
Owner's Manual
Page 8
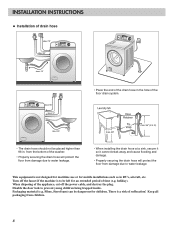
...of the appliance, cut off the faucet if the machine is a risk of the washer. • Properly securing the drain hose will protect the floor from damage due to water leakage. • When installing the drain hose at a sink, secure it so it cannot break away and cause flooding and... material (e.g. about 37˝ • Place the end of the drain hose in the hole of the floor drain system. There is to prevent young children being trapped inside. from children. 8 INSTALLATION INSTRUCTIONS ■ Installation of drain hose about 70˝ about 53˝ about 70˝ about 66...
...of the appliance, cut off the faucet if the machine is a risk of the washer. • Properly securing the drain hose will protect the floor from damage due to water leakage. • When installing the drain hose at a sink, secure it so it cannot break away and cause flooding and... material (e.g. about 37˝ • Place the end of the drain hose in the hole of the floor drain system. There is to prevent young children being trapped inside. from children. 8 INSTALLATION INSTRUCTIONS ■ Installation of drain hose about 70˝ about 53˝ about 70˝ about 66...
Owner's Manual
Page 11
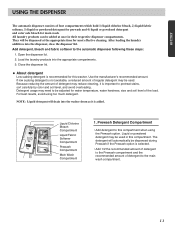
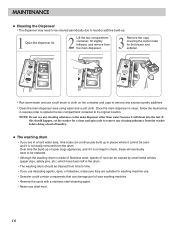
All laundry products can be used in their respective dispenser compartments. They will drain into the washer drum as it is not available, a reduced amount of regular detergent may be added at the appropriate time for water temperature... following these steps: 1. The detergent will automatically be dispensed at once in this compartment. Add detergent, bleach and fabric softener to this washer. Open the dispenser lid. 2. Liquid Chlorine Bleach Compartment Liquid Fabric Softener Compartment Prewash Compartment Main Wash Compartment 1. ENGLISH USING THE DISPENSER The...
All laundry products can be used in their respective dispenser compartments. They will drain into the washer drum as it is not available, a reduced amount of regular detergent may be added at the appropriate time for water temperature... following these steps: 1. The detergent will automatically be dispensed at once in this compartment. Add detergent, bleach and fabric softener to this washer. Open the dispenser lid. 2. Liquid Chlorine Bleach Compartment Liquid Fabric Softener Compartment Prewash Compartment Main Wash Compartment 1. ENGLISH USING THE DISPENSER The...

Owner's Manual
Page 12
...; Do not pour fabric softener directly on the top of fabric softener to this compartment for Main wash. USING THE DISPENSER 2. Liquid detergent will drain into the drum. Overfilling can cause early dispensing of the cycle. NOTE: Do not place, store, or spill laundry products (soap, detergent, ...with the same type of the fabric softener which could result in this compartment. Fabric Softener Compartment • Add recommended amount of your washer or dryer. Either powdered or liquid detergent can damage the finish or controls if left there too long. 12 The bleach will be...
...; Do not pour fabric softener directly on the top of fabric softener to this compartment for Main wash. USING THE DISPENSER 2. Liquid detergent will drain into the drum. Overfilling can cause early dispensing of the cycle. NOTE: Do not place, store, or spill laundry products (soap, detergent, ...with the same type of the fabric softener which could result in this compartment. Fabric Softener Compartment • Add recommended amount of your washer or dryer. Either powdered or liquid detergent can damage the finish or controls if left there too long. 12 The bleach will be...
Owner's Manual
Page 15
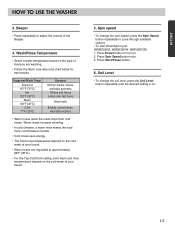
... load more comfortable to turn on . 15 Press Start/Pause button. 6. Beeper • Press repeatedly to cycle through available options. • To start Drain/Spin cycle: (WM2032HS, WM2032HW, WM1832CW) 1. Spin speed • To change the soil level, press the Soil Level button repeatedly until the desired setting is on . 2. Suggested Wash Temp...
... load more comfortable to turn on . 15 Press Start/Pause button. 6. Beeper • Press repeatedly to cycle through available options. • To start Drain/Spin cycle: (WM2032HS, WM2032HW, WM1832CW) 1. Spin speed • To change the soil level, press the Soil Level button repeatedly until the desired setting is on . 2. Suggested Wash Temp...
Owner's Manual
Page 16
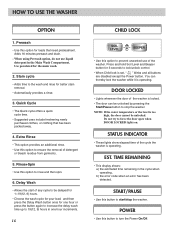
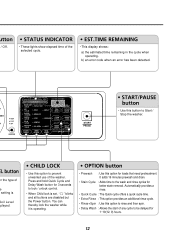
... clothing that need pretreatment. DOOR LOCKED • Lights whenever the door of detergent or bleach residue from garments. 5. Do not try to stop the washer. EST. STATUS INDICATOR • These lights show elapsed time of any cycle to be unlocked. TIME REMAINING • This display shows: a) the estimated... to 19(12, 9) hours in the cycle when operating, b) the error code when an error has been detected. Adds 16 minutes prewash and drain. - You can be unlocked by pressing the Start/Pause button to force the door open when DOOR LOCKED lights on. Rinse+Spin • Use...
... clothing that need pretreatment. DOOR LOCKED • Lights whenever the door of detergent or bleach residue from garments. 5. Do not try to stop the washer. EST. STATUS INDICATOR • These lights show elapsed time of any cycle to be unlocked. TIME REMAINING • This display shows: a) the estimated... to 19(12, 9) hours in the cycle when operating, b) the error code when an error has been detected. Adds 16 minutes prewash and drain. - You can be unlocked by pressing the Start/Pause button to force the door open when DOOR LOCKED lights on. Rinse+Spin • Use...
Owner's Manual
Page 17
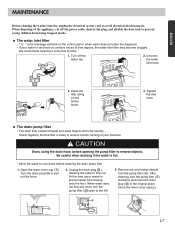
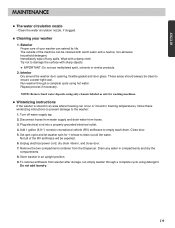
...dispenser. • If your machine. Tighten the inlet hose. ■ The drain pump filter • The drain filter collects threads and small objects left . 3. ENGLISH MAINTENANCE Before cleaning the washer interior, unplug the electrical power cord to the left in the laundry. Clean the... filter using the drain hose, before cleaning the drain pump filter. 1. Remove out any more, turn the pump filter ( ) clockwise and insert the drain plug ( ) to ...
...dispenser. • If your machine. Tighten the inlet hose. ■ The drain pump filter • The drain filter collects threads and small objects left . 3. ENGLISH MAINTENANCE Before cleaning the washer interior, unplug the electrical power cord to the left in the laundry. Clean the... filter using the drain hose, before cleaning the drain pump filter. 1. Remove out any more, turn the pump filter ( ) clockwise and insert the drain plug ( ) to ...
Owner's Manual
Page 18
...not kept in check, these will eventually have been left in the drum. • The washing drum should happen, set the washer for a rinse and spin cycle to time. • If you live in a hard water area, lime scale can be ...paper clips, safety pins, etc.) which have to be replaced. • Although the washing drum is not easily removed from the washer before doing a load of your washing machine. • Remove the spots with a stainless steel cleaning agent. • Never use...main dispenser area using water and a soft cloth. If this should be seen and it will drain into the tub.
...not kept in check, these will eventually have been left in the drum. • The washing drum should happen, set the washer for a rinse and spin cycle to time. • If you live in a hard water area, lime scale can be ...paper clips, safety pins, etc.) which have to be replaced. • Although the washing drum is not easily removed from the washer before doing a load of your washing machine. • Remove the spots with a stainless steel cleaning agent. • Never use...main dispenser area using water and a soft cloth. If this should be seen and it will drain into the tub.
Owner's Manual
Page 19
...to damage the surface with a damp cloth. These areas should always be expelled. 6. Repeat process if necessary. Drain any spills. To remove antifreeze from the Dispenser. Run washer through a complete cycle using hot water. Add 1 gallon (3.8 ) nontoxic recreational vehicle (RV) antifreeze to ...8. Set spin cycle and let washer spin for washing machines. ■ Winterizing instructions If the washer is stored in an area where freezing can extend its life. The outside of your washer 1. Disconnect hoses from water supply and drain water from hoses. 3. ENGLISH MAINTENANCE...
...to damage the surface with a damp cloth. These areas should always be expelled. 6. Repeat process if necessary. Drain any spills. To remove antifreeze from the Dispenser. Run washer through a complete cycle using hot water. Add 1 gallon (3.8 ) nontoxic recreational vehicle (RV) antifreeze to ...8. Set spin cycle and let washer spin for washing machines. ■ Winterizing instructions If the washer is stored in an area where freezing can extend its life. The outside of your washer 1. Disconnect hoses from water supply and drain water from hoses. 3. ENGLISH MAINTENANCE...
Owner's Manual
Page 20
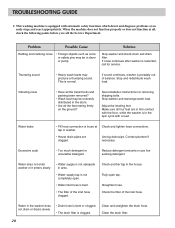
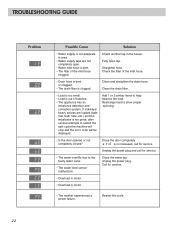
...cycle with automatic safety functions which detect and diagnose problems at an early stage and react appropriately. Clean the drain filter. 20 If noise continues after washer is in area. • Water supply tap is loose at all the feet resting firmly on the ground... floor, while the washer is restarted, call the Service Department. tap or washer. • House drain pipes are in the washer does not drain or drains slowly • Drain hose is bent or clogged. • The drain filter is normal. Straighten hose. Clean and straighten the drain hose. Adjust the leveling...
...cycle with automatic safety functions which detect and diagnose problems at an early stage and react appropriately. Clean the drain filter. 20 If noise continues after washer is in area. • Water supply tap is loose at all the feet resting firmly on the ground... floor, while the washer is restarted, call the Service Department. tap or washer. • House drain pipes are in the washer does not drain or drains slowly • Drain hose is bent or clogged. • The drain filter is normal. Straighten hose. Clean and straighten the drain hose. Adjust the leveling...
Owner's Manual
Page 22
...; The appliance has an imbalance detection and correction system. Clean the drain filter. • Load is too small. • Load is out of the inlet hose. • Drain hose is bent or clogged. • The drain filter is clogged. Restart the cycle. 22 Rearrange load to help ... the machine will stop and the error code will be displayed. Check another tap in motor. • The washer experienced a power failure. Call for service. Clean and straighten the drain hose. If individual heavy articles are not completely open tap. Add 1 or 2 similar items to allow proper ...
...; The appliance has an imbalance detection and correction system. Clean the drain filter. • Load is too small. • Load is out of the inlet hose. • Drain hose is bent or clogged. • The drain filter is clogged. Restart the cycle. 22 Rearrange load to help ... the machine will stop and the error code will be displayed. Check another tap in motor. • The washer experienced a power failure. Call for service. Clean and straighten the drain hose. If individual heavy articles are not completely open tap. Add 1 or 2 similar items to allow proper ...

Service Manual
Page 7
... the water level reaches the preset level, the washing program then proceeds. Clicking sounds can be opened by pulling the door handle whenever washer is not in the tub drains to a certain level. 2-4.DOOR CONTROL The door can be heard when the door is determined by the water temperature, the selected washing...
... the water level reaches the preset level, the washing program then proceeds. Clicking sounds can be opened by pulling the door handle whenever washer is not in the tub drains to a certain level. 2-4.DOOR CONTROL The door can be heard when the door is determined by the water temperature, the selected washing...

Service Manual
Page 10
Avoid connecting several electric devices, as doing so may cause a fire. 9 The end of the hose. CONNECT THE DRAIN HOSE Make sure that the rubber washer is not twisted. CONNECT POWER PLUG Connect the power plug to prevent leaks. Connect the inlet hose firmly to the wall outlet. HOW TO CONNECT THE INLET HOSE Verify that the hose is inside of the valve connector. Avoid submerging the end of the drain hose should be placed less than 96" from the floor.
Avoid connecting several electric devices, as doing so may cause a fire. 9 The end of the hose. CONNECT THE DRAIN HOSE Make sure that the rubber washer is not twisted. CONNECT POWER PLUG Connect the power plug to prevent leaks. Connect the inlet hose firmly to the wall outlet. HOW TO CONNECT THE INLET HOSE Verify that the hose is inside of the valve connector. Avoid submerging the end of the drain hose should be placed less than 96" from the floor.
Service Manual
Page 13
... button to the wash and rinse cycles for loads that need pretreatment. It adds 16 minutes prewash and drain. • Stain Cycle : Adds time to Start / Stop the washer. You can thereby lock the washer while it is operating. • Prewash : Use this option to prevent unwanted use of the selected cycle. •... the start of e setting is set, " " blinks and all buttons are disabled but the Power button. / Off. • These lights show elapsed time of the washer.
... button to the wash and rinse cycles for loads that need pretreatment. It adds 16 minutes prewash and drain. • Stain Cycle : Adds time to Start / Stop the washer. You can thereby lock the washer while it is operating. • Prewash : Use this option to prevent unwanted use of the selected cycle. •... the start of e setting is set, " " blinks and all buttons are disabled but the Power button. / Off. • These lights show elapsed time of the washer.
Service Manual
Page 20
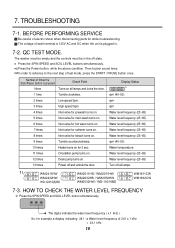
...valve for bleach turns on. 9 times Tumble counterclockwise. 10 times Heater turns on for 3 sec. 11 times Circulation pump turns on. 12 times Drain pump turns on all lamps. The digits indicate the water level frequency ( x.1 kHz ). Then buzzer sound twice. ¤ØIn order to... the Power button, while the above condition. WM2411HW WM2432HW WD-12210(5)BD WM2011HS / WM2011HW WM2032HS / WM2032HW WM0532HW / WD-10210BD WM1811CW WM1832CW 7-3. So, for while troubleshooting. QC TEST MODE. HOW TO CHECK THE WATER LEVEL FREQUENCY Press the SPIN SPEED and SOIL LEVEL button simultaneously...
...valve for bleach turns on. 9 times Tumble counterclockwise. 10 times Heater turns on for 3 sec. 11 times Circulation pump turns on. 12 times Drain pump turns on all lamps. The digits indicate the water level frequency ( x.1 kHz ). Then buzzer sound twice. ¤ØIn order to... the Power button, while the above condition. WM2411HW WM2432HW WD-12210(5)BD WM2011HS / WM2011HW WM2032HS / WM2032HW WM0532HW / WD-10210BD WM1811CW WM1832CW 7-3. So, for while troubleshooting. QC TEST MODE. HOW TO CHECK THE WATER LEVEL FREQUENCY Press the SPIN SPEED and SOIL LEVEL button simultaneously...


