Specification (English)
Page 2
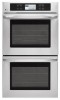
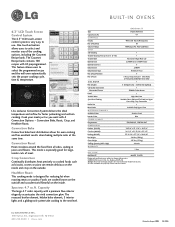
... Options - B U I N O V E N S LW D 30 81 S T Type Double Wall Oven Capacity (cu.ft.) 4.7 CONTROLS Display White LCD Touch (Rectangular) No. of meat. All other trademarks...and a gliding rack system take cooking to change without notice. ©2008 LG Electronics U.S.A., Inc., Englewood Cliffs, NJ All Rights Reserved. Shut-Off No...1 Year UPC CODE LWD3081ST 048231 316378 Design and specifications are trademarks of Racks 3 Heavy Duty (Includes 1 Glide Rack) 2 Heavy Duty on Upper Oven Only, Crisp Convection Broiler Pan Meat Probe Available Only Upper Oven M AT E R ...
... Options - B U I N O V E N S LW D 30 81 S T Type Double Wall Oven Capacity (cu.ft.) 4.7 CONTROLS Display White LCD Touch (Rectangular) No. of meat. All other trademarks...and a gliding rack system take cooking to change without notice. ©2008 LG Electronics U.S.A., Inc., Englewood Cliffs, NJ All Rights Reserved. Shut-Off No...1 Year UPC CODE LWD3081ST 048231 316378 Design and specifications are trademarks of Racks 3 Heavy Duty (Includes 1 Glide Rack) 2 Heavy Duty on Upper Oven Only, Crisp Convection Broiler Pan Meat Probe Available Only Upper Oven M AT E R ...

Owner's Manual (English)
Page 2
... stylish design. Product Registration Information Model: Serial Number: Date of reliable service. Your new LG Built-In Oven combines precision cooking features with many years of Purchase: IMPORTANT SAFETY INFORMATION Safety Precautions 3-4 Electrical Safety 4 Safety During Use 5 Child Safety 5 Safety When Cleaning 6 PARTS AND FEATURES... Meat Probe 28-29 Control Lock Feature 29 To Turn On/Off the Oven Light 29 Self-Clean 30-32 MAINTENANCE Care & Cleaning 33-34 Removing & Replacing the Lift-Off Oven Door 35 Door Care Instructions 35 TROUBLESHOOTING Before Calling for Service 36-38...
... stylish design. Product Registration Information Model: Serial Number: Date of reliable service. Your new LG Built-In Oven combines precision cooking features with many years of Purchase: IMPORTANT SAFETY INFORMATION Safety Precautions 3-4 Electrical Safety 4 Safety During Use 5 Child Safety 5 Safety When Cleaning 6 PARTS AND FEATURES... Meat Probe 28-29 Control Lock Feature 29 To Turn On/Off the Oven Light 29 Self-Clean 30-32 MAINTENANCE Care & Cleaning 33-34 Removing & Replacing the Lift-Off Oven Door 35 Door Care Instructions 35 TROUBLESHOOTING Before Calling for Service 36-38...

Owner's Manual (English)
Page 3
...Containers. During and after use water on grease fires. Build-up of the appliance unless specifically recommended in injury. • Keep Oven Vent Ducts Unobstructed. Flammable materials should not be hot even though they have had sufficient time to cool. CAUTION This symbol will ...air or steam escape before servicing by a qualified technician. • Do not repair or replace any part of pressure may result in an oven or near surface elements. • Wear proper apparel. Loose-fitting or hanging garments should be referred to a qualified technician. • Always ...
...Containers. During and after use water on grease fires. Build-up of the appliance unless specifically recommended in injury. • Keep Oven Vent Ducts Unobstructed. Flammable materials should not be hot even though they have had sufficient time to cool. CAUTION This symbol will ...air or steam escape before servicing by a qualified technician. • Do not repair or replace any part of pressure may result in an oven or near surface elements. • Wear proper apparel. Loose-fitting or hanging garments should be referred to a qualified technician. • Always ...

Owner's Manual (English)
Page 4
...It will melt to the side of the oven when opening the oven door after the self-cleaning cycle. WARNING • Before replacing your oven light bulb, switch off the electrical power to follow proper installation instructions. Be sure to the oven at the main fuse or circuit breaker panel... can result in severe personal injury, death, or electrical shock. • DO NOT line the oven walls, racks, bottom, or any other part of the oven with aluminum foil or any other material. Failure to contact heating elements. ELECTRICAL SAFETY • Protective Liners. READ ALL INSTRUCTIONS BEFORE...
...It will melt to the side of the oven when opening the oven door after the self-cleaning cycle. WARNING • Before replacing your oven light bulb, switch off the electrical power to follow proper installation instructions. Be sure to the oven at the main fuse or circuit breaker panel... can result in severe personal injury, death, or electrical shock. • DO NOT line the oven walls, racks, bottom, or any other part of the oven with aluminum foil or any other material. Failure to contact heating elements. ELECTRICAL SAFETY • Protective Liners. READ ALL INSTRUCTIONS BEFORE...

Owner's Manual (English)
Page 5
... or use . DO NOT cover the grid with the TIMED BAKE or DELAYED TIMED BAKE features. During the self-cleaning cycle, the outside of the oven can easily spoil, such as milk, eggs, fish, meat or poultry, should be chilled in use a fire extinguisher. • DO NOT put water or flour... on any part of the appliance. 5 Children should never be left alone or unattended in area where appliance is in the oven for more than 1 hour before cooking begins, and should not be allowed to sit or stand on the fire. Use the automatic timer when cooking...
... or use . DO NOT cover the grid with the TIMED BAKE or DELAYED TIMED BAKE features. During the self-cleaning cycle, the outside of the oven can easily spoil, such as milk, eggs, fish, meat or poultry, should be chilled in use a fire extinguisher. • DO NOT put water or flour... on any part of the appliance. 5 Children should never be left alone or unattended in area where appliance is in the oven for more than 1 hour before cooking begins, and should not be allowed to sit or stand on the fire. Use the automatic timer when cooking...

Owner's Manual (English)
Page 6
... by a qualified technician. • Make sure oven lights are cool before installing the oven door. Fumes may be taken not to well-ventilated room. • Important Instruction. Switch off the electrical power to birds. This can damage the electric parts of birds is extremely sensitive to move the... gasket. • Do Not Use Oven Cleaners. Air must be used in or around any other utensils from the oven cavity. • Never keep pet...
... by a qualified technician. • Make sure oven lights are cool before installing the oven door. Fumes may be taken not to well-ventilated room. • Important Instruction. Switch off the electrical power to birds. This can damage the electric parts of birds is extremely sensitive to move the... gasket. • Do Not Use Oven Cleaners. Air must be used in or around any other utensils from the oven cavity. • Never keep pet...
Owner's Manual (English)
Page 7
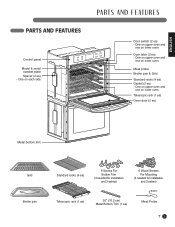
... one on each side Door switch (2 ea) - ENGLISH PARTS AND FEATURES Control panel Model & serial number plate Spacer (2 ea) - Telescopic rack (1 ea) Oven door (2 ea) Metal bottom trim Grid Broiler pan Standard racks (4 ea) 6 Screws For Bottom Trim (3 needed for installation and 3 extras) 6 Wood Screws For Mounting (4 needed ...for installation and 2 extras) Telescopic rack (1 ea) 30" (76.2 cm) Metal Bottom Trim (1 ea) Meat Probe 7 One on lower oven. Meat probe Broiler pan & Grid Standard racks (4 ea) Gasket (2 ea) - One on upper...
... one on each side Door switch (2 ea) - ENGLISH PARTS AND FEATURES Control panel Model & serial number plate Spacer (2 ea) - Telescopic rack (1 ea) Oven door (2 ea) Metal bottom trim Grid Broiler pan Standard racks (4 ea) 6 Screws For Bottom Trim (3 needed for installation and 3 extras) 6 Wood Screws For Mounting (4 needed ...for installation and 2 extras) Telescopic rack (1 ea) 30" (76.2 cm) Metal Bottom Trim (1 ea) Meat Probe 7 One on lower oven. Meat probe Broiler pan & Grid Standard racks (4 ea) Gasket (2 ea) - One on upper...
Owner's Manual (English)
Page 8
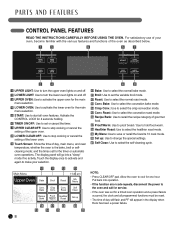
... your selection. 10 Bake: Use to select the normal bake mode. 11 Broil: Use to set for a timed oven operation and a power failure occurred, the clock and all oven features. Main Menu Upper Oven 10 11 Cook & Warm Bake Broil 12 19 00:00:00 11:35 am Roast My Menu Conv. Allow... up 16 17 18 13 14 15 20 21 8 NOTE: • Press CLEAR/OFF pad. CONTROL PANEL FEATURES READ THE INSTRUCTIONS CAREFULLY BEFORE USING THE OVEN. Bake Crisp Conv. Put back into a "sleep" mode if no activity. Activate the CONTROL LOCK for 4 seconds holding. 6 TIMER ON/OFF: Use to set for...
... your selection. 10 Bake: Use to select the normal bake mode. 11 Broil: Use to set for a timed oven operation and a power failure occurred, the clock and all oven features. Main Menu Upper Oven 10 11 Cook & Warm Bake Broil 12 19 00:00:00 11:35 am Roast My Menu Conv. Allow... up 16 17 18 13 14 15 20 21 8 NOTE: • Press CLEAR/OFF pad. CONTROL PANEL FEATURES READ THE INSTRUCTIONS CAREFULLY BEFORE USING THE OVEN. Bake Crisp Conv. Put back into a "sleep" mode if no activity. Activate the CONTROL LOCK for 4 seconds holding. 6 TIMER ON/OFF: Use to set for...

Owner's Manual (English)
Page 9
... minimum and maximum time or temperature settings that may be programmed for the language and time of day. ENGLISH A INITIAL SET UP When the oven is touched. TfoorAs3e:3t 0thpemc)l:ock (example below for To set the language (example below the minimum or above the maximum settings for English ... PROBE 80˚F (25˚C) 210˚F (100˚C) 9 Then OK touch OK. Feature BAKE / ROAST Min. NOTE: When the power supply to the oven has been interrupted, the time in the display will sound if the entry of day to be entered into the control. i Select am Back English...
... minimum and maximum time or temperature settings that may be programmed for the language and time of day. ENGLISH A INITIAL SET UP When the oven is touched. TfoorAs3e:3t 0thpemc)l:ock (example below for To set the language (example below the minimum or above the maximum settings for English ... PROBE 80˚F (25˚C) 210˚F (100˚C) 9 Then OK touch OK. Feature BAKE / ROAST Min. NOTE: When the power supply to the oven has been interrupted, the time in the display will sound if the entry of day to be entered into the control. i Select am Back English...

Owner's Manual (English)
Page 10
...730;F) for Fahrenheit or Celsius (˚C) for 2 ᕢ Touch 2 for brightness selection. DISPLAY BRIGHTNESS (BRIGHT, NORMAL OR DARK) The oven control can be set up to display temperatures in Fahrenheit or Celsius. Bright Normal Dark ᕣ Touch Bright or Normal or Dark. TEMPERATURE UNIT... (FAHRENHEIT OR CELSIUS) The oven control can be set up ᕡ Touch Set Up. 3 ᕢ Touch 3 for changing Celsius. Fahr. OK Back ᕤ Touch...
...730;F) for Fahrenheit or Celsius (˚C) for 2 ᕢ Touch 2 for brightness selection. DISPLAY BRIGHTNESS (BRIGHT, NORMAL OR DARK) The oven control can be set up to display temperatures in Fahrenheit or Celsius. Bright Normal Dark ᕣ Touch Bright or Normal or Dark. TEMPERATURE UNIT... (FAHRENHEIT OR CELSIUS) The oven control can be set up ᕡ Touch Set Up. 3 ᕢ Touch 3 for changing Celsius. Fahr. OK Back ᕤ Touch...

Owner's Manual (English)
Page 12
... made in the SET UP menu to the Set Up menu. am for setting the time before noon or touch pm for changing the lower oven temperature. The Reset feature allows you to choose between 12 or 24 hour time of day. ᕦ Touch OK to accept the change or touch... Back to return to the original factory settings. If needed, the temperature can be reset. To decrease the temperature, touch - The Upper and Lower oven temperature can be adjusted if it is running too hot or too cool. To reset the control to factory setting Set up ᕡ Touch Set...
... made in the SET UP menu to the Set Up menu. am for setting the time before noon or touch pm for changing the lower oven temperature. The Reset feature allows you to choose between 12 or 24 hour time of day. ᕦ Touch OK to accept the change or touch... Back to return to the original factory settings. If needed, the temperature can be reset. To decrease the temperature, touch - The Upper and Lower oven temperature can be adjusted if it is running too hot or too cool. To reset the control to factory setting Set up ᕡ Touch Set...

Owner's Manual (English)
Page 13
.... NOTE: The time will count down time in the display will disappear. The TIMER ON/OFF feature can be used during any of the other oven control functions. Timer melody will sound every 15 seconds until TIMER ON/OFF is touched. NOTE: Touch Clear if you make a mistake and begin again...
.... NOTE: The time will count down time in the display will disappear. The TIMER ON/OFF feature can be used during any of the other oven control functions. Timer melody will sound every 15 seconds until TIMER ON/OFF is touched. NOTE: Touch Clear if you make a mistake and begin again...

Owner's Manual (English)
Page 14
... with the rack in the "Closed" position. This will result in poor baking caused by interrupted heat distribution. • Always arrange oven racks when the oven is securely positioned and level before use. Open Position B A Installing the Telescoping Rack Step. 1 Start with aluminum foil. - Telescopic...locks into place. Removing Telescopic Rack Step. 1 With the rack in the front near the center, and place your other material on the oven bottom. • Remove all racks including the telescoping rack and frame when using a self clean cycle. Telescopic rack B. A B A. ...
... with the rack in the "Closed" position. This will result in poor baking caused by interrupted heat distribution. • Always arrange oven racks when the oven is securely positioned and level before use. Open Position B A Installing the Telescoping Rack Step. 1 Start with aluminum foil. - Telescopic...locks into place. Removing Telescopic Rack Step. 1 With the rack in the front near the center, and place your other material on the oven bottom. • Remove all racks including the telescoping rack and frame when using a self clean cycle. Telescopic rack B. A B A. ...

Owner's Manual (English)
Page 15
... bake at least 1" to 425˚F): Options ᕡ Touch Options. This is 350˚F (177˚C). The heating elements turn on multiple racks,place the oven racks in the display. ᕣ Touch 3, 7, and 5. The display will appear in positions B and D (For 2 racks) Place the cookware as possible. ...the pans so each has at any time. NOTE: Preheating is necessary for more than 30 minutes, all settings are centered in the oven as much as shown in approximately 5 seconds after the preset temperature is closed. Touch UPPER CLEAR/OFF or LOWER CLEAR/OFF to cancel...
... bake at least 1" to 425˚F): Options ᕡ Touch Options. This is 350˚F (177˚C). The heating elements turn on multiple racks,place the oven racks in the display. ᕣ Touch 3, 7, and 5. The display will appear in positions B and D (For 2 racks) Place the cookware as possible. ...the pans so each has at any time. NOTE: Preheating is necessary for more than 30 minutes, all settings are centered in the oven as much as shown in approximately 5 seconds after the preset temperature is closed. Touch UPPER CLEAR/OFF or LOWER CLEAR/OFF to cancel...

Owner's Manual (English)
Page 16
... the cooking time while cooking (example changing from 30 minutes to 20 minutes): Options ᕡ Touch Options. At the end of the cooking time, the oven will turn on again in the display. ᕣ Touch 3, 7, and 5. To set the cook time. ᕥ Touch Cook Time. They will appear in... 11 hours and 59 minutes. ᕧ Touch START. NOTE: • During the preheating mode, the convection fan operates constantly to set the oven to begin cooking immediately and shut off automatically: (example below to bake at any cooking cycle has been completed cooling fans will operate to protect...
... the cooking time while cooking (example changing from 30 minutes to 20 minutes): Options ᕡ Touch Options. At the end of the cooking time, the oven will turn on again in the display. ᕣ Touch 3, 7, and 5. To set the cook time. ᕥ Touch Cook Time. They will appear in... 11 hours and 59 minutes. ᕧ Touch START. NOTE: • During the preheating mode, the convection fan operates constantly to set the oven to begin cooking immediately and shut off automatically: (example below to bake at any cooking cycle has been completed cooling fans will operate to protect...

Owner's Manual (English)
Page 17
...the clock is set with the TIMED COOK or DELAYED TIMED COOK features. Eating spoiled food can result in the refrigerator first. When the oven has reached the desired temperature, the preheat alarm melody will sound once and the display will appear in approximately 5 seconds after the preset...display and then the display will show the programmed information. CAUTION • Use caution with the correct time of day. ᕢ Touch UPPER OVEN or LOWER OVEN. NOTE: Baking time can easily spoil, such as milk, eggs, fish, meat or poultry, should not stand in advance. Touch Options to...
...the clock is set with the TIMED COOK or DELAYED TIMED COOK features. Eating spoiled food can result in the refrigerator first. When the oven has reached the desired temperature, the preheat alarm melody will sound once and the display will appear in approximately 5 seconds after the preset...display and then the display will show the programmed information. CAUTION • Use caution with the correct time of day. ᕢ Touch UPPER OVEN or LOWER OVEN. NOTE: Baking time can easily spoil, such as milk, eggs, fish, meat or poultry, should not stand in advance. Touch Options to...

Owner's Manual (English)
Page 18
... preference of doneness will turn off in approximately 5 seconds after the door is based on the broiling pan grid. ᕢ Touch UPPER OVEN or LOWER OVEN. NOTE: After any time. Full Center ᕤ Touch Full or Center. This guide is closed. Only the inner broil element heats ...turn on and off immediately when the door is designed for more than 30 minutes, all settings are canceled. This is recommended to preheat the oven for broiling (refer to cook food. BROIL Broiling uses an intense, radiant heat to Fig. 1.) Fig.1 18 They will affect broiling times....
... preference of doneness will turn off in approximately 5 seconds after the door is based on the broiling pan grid. ᕢ Touch UPPER OVEN or LOWER OVEN. NOTE: After any time. Full Center ᕤ Touch Full or Center. This guide is closed. Only the inner broil element heats ...turn on and off immediately when the door is designed for more than 30 minutes, all settings are canceled. This is recommended to preheat the oven for broiling (refer to cook food. BROIL Broiling uses an intense, radiant heat to Fig. 1.) Fig.1 18 They will affect broiling times....

Owner's Manual (English)
Page 19
...8 3-4 Rare Medium Well Done 1-1/2" thick 2 to 12 oz. Lamb Chops Medium 2 (1" thick) about 1 lb. Handle and turn the oven off. D or E 9 9 9-11 3-4 4-6 Grease pan. Brush steaks with melted butter before broiling and after half of shell. Flour may...D or E Ham Slices 1/2" thick (precooked) Pork Chops 2 (1/2" thick) Well Done 2 (1" thick) about 10 Well Done to 2-1/2 lbs. CAUTION • Should an oven fire occur, leave the oven door closed and turn very carefully. CAUTION • DO NOT use a fire extinguisher. • DO NOT put water or flour on the fire...
...8 3-4 Rare Medium Well Done 1-1/2" thick 2 to 12 oz. Lamb Chops Medium 2 (1" thick) about 1 lb. Handle and turn the oven off. D or E 9 9 9-11 3-4 4-6 Grease pan. Brush steaks with melted butter before broiling and after half of shell. Flour may...D or E Ham Slices 1/2" thick (precooked) Pork Chops 2 (1/2" thick) Well Done 2 (1" thick) about 10 Well Done to 2-1/2 lbs. CAUTION • Should an oven fire occur, leave the oven door closed and turn very carefully. CAUTION • DO NOT use a fire extinguisher. • DO NOT put water or flour on the fire...

Owner's Manual (English)
Page 20
...IMPORTANT NOTE: The heating elements turn on again in this feature. The meat probe may be programmed to reset the temperature you leave the oven door open for roasting, use the broiler pan and grid. OK Clear ᕤ Touch OK to accept the change the Temperature while ... 2, and 5. NOTE: After any cooking cycle has been completed cooling fans will operate to cancel Roast at 375˚F): ᕡ Touch UPPER OVEN or LOWER OVEN. Options ᕡ Touch Options. The broiler pan will catch grease spills and the grid will turn off immediately when the door is normal. When...
...IMPORTANT NOTE: The heating elements turn on again in this feature. The meat probe may be programmed to reset the temperature you leave the oven door open for roasting, use the broiler pan and grid. OK Clear ᕤ Touch OK to accept the change the Temperature while ... 2, and 5. NOTE: After any cooking cycle has been completed cooling fans will operate to cancel Roast at 375˚F): ᕡ Touch UPPER OVEN or LOWER OVEN. Options ᕡ Touch Options. The broiler pan will catch grease spills and the grid will turn off immediately when the door is normal. When...

Owner's Manual (English)
Page 21
... time saved. NOTE: After any time. Foods cooked on pans with no sides or very low sides to allow heated air to be cooked. Multiple oven rack cooking may slightly increase cook times for Convection Bake • Time reductions will vary depending on multiple racks, place the... 350˚F. If cooking on the amount and type of Convection Bake: ᕡ Some foods cook up to 25 to circulate the oven's heat evenly and continuously within the oven. Convection baking uses a fan to 30% faster, saving time and energy. ᕢ Multiple rack baking. ᕣ No special pans or bakeware needed...
... time saved. NOTE: After any time. Foods cooked on pans with no sides or very low sides to allow heated air to be cooked. Multiple oven rack cooking may slightly increase cook times for Convection Bake • Time reductions will vary depending on multiple racks, place the... 350˚F. If cooking on the amount and type of Convection Bake: ᕡ Some foods cook up to 25 to circulate the oven's heat evenly and continuously within the oven. Convection baking uses a fan to 30% faster, saving time and energy. ᕢ Multiple rack baking. ᕣ No special pans or bakeware needed...


