
Owner's Manual
Page 3
...Unpacking your Refrigerator Installation Base Grille Installation Handle Removal Handle Installation Removing and Replacing Refrigerator Doors Door Alignment Connecting the Water Line Refrigerator Features Using your Refrigerator Ensuring Proper Air Circulation Prior to Use Control Panel Features Refrigerator and Freezer Controls ...Adjusting Control Settings Ice maker Operation 1-2 3-26 27-50 4-5 5 Food Storage Guide Storing Frozen Food Water and Ice Dispenser Ice Storage Bin Ice maker Cover Door and Rack Support Snack Pan Crisper and Crisper Cover Humidity Controls ...
...Unpacking your Refrigerator Installation Base Grille Installation Handle Removal Handle Installation Removing and Replacing Refrigerator Doors Door Alignment Connecting the Water Line Refrigerator Features Using your Refrigerator Ensuring Proper Air Circulation Prior to Use Control Panel Features Refrigerator and Freezer Controls ...Adjusting Control Settings Ice maker Operation 1-2 3-26 27-50 4-5 5 Food Storage Guide Storing Frozen Food Water and Ice Dispenser Ice Storage Bin Ice maker Cover Door and Rack Support Snack Pan Crisper and Crisper Cover Humidity Controls ...
Owner's Manual
Page 7
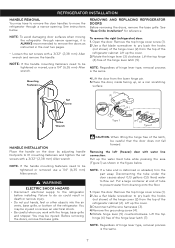
... tightened or moved, use a 1/4" (6,35 mm) Allen wrench. Lift the top hinge (4) free of the hinge lever latch (7). Place the door, inside facing up the water feed tube while pressing the area (Figure 1) as instructed in the figure below . Set Screw (1 ) (2 ) (3 ) (4 ) (5 ) (3 ) Rivet Allen Wrench Type 1 (4 ) (5...to remove the doors as shown in the next two pages. • Loosen the set screws with water line connection: Pull up , on the door by adjusting handle footprints to prevent water from the lower hinge pin. 5. NOTE: If a tube end is the same. See "Base ...
... tightened or moved, use a 1/4" (6,35 mm) Allen wrench. Lift the top hinge (4) free of the hinge lever latch (7). Place the door, inside facing up the water feed tube while pressing the area (Figure 1) as instructed in the figure below . Set Screw (1 ) (2 ) (3 ) (4 ) (5 ) (3 ) Rivet Allen Wrench Type 1 (4 ) (5...to remove the doors as shown in the next two pages. • Loosen the set screws with water line connection: Pull up , on the door by adjusting handle footprints to prevent water from the lower hinge pin. 5. NOTE: If a tube end is the same. See "Base ...

Owner's Manual
Page 8
... (5) (3) Rivet Type 1 (4 ) (5 ) Type 2 Reinstalling the left leveling leg and rotating it clockwise. Insert and tighten cover screw (1). 5.Reconnect the water tubes by inserting a flat blade screwdriver into the groove of wire opening in cabinet top. Height difference Height difference Right leveling leg CC FF C F H 8... under edge of the latch, be careful that the door does not fall forward. Rotate lever (3) counterclockwise to pull the water lines through the lower hinge pin and place the door onto the lower hinge pin. 2.Fit top hinge (6) over hinge lever latch...
... (5) (3) Rivet Type 1 (4 ) (5 ) Type 2 Reinstalling the left leveling leg and rotating it clockwise. Insert and tighten cover screw (1). 5.Reconnect the water tubes by inserting a flat blade screwdriver into the groove of wire opening in cabinet top. Height difference Height difference Right leveling leg CC FF C F H 8... under edge of the latch, be careful that the door does not fall forward. Rotate lever (3) counterclockwise to pull the water lines through the lower hinge pin and place the door onto the lower hinge pin. 2.Fit top hinge (6) over hinge lever latch...

Owner's Manual
Page 9
... refill after installation. After setting level door, turn the adjustment hinge pin clockwise or counterclockwise to the hot water line. CONNECTING THE WATER LINE NOTE: Water line installation is not warranted by the refrigerator or ice maker manufacturer or seller. Then add 8 feet (2,4 m). Be sure that the kit you need, measure the ...
... refill after installation. After setting level door, turn the adjustment hinge pin clockwise or counterclockwise to the hot water line. CONNECTING THE WATER LINE NOTE: Water line installation is not warranted by the refrigerator or ice maker manufacturer or seller. Then add 8 feet (2,4 m). Be sure that the kit you need, measure the ...

Owner's Manual
Page 10
... nuts and 2 ferrules (sleeves) to connect the copper tubing to potable water supply only. 1. Saddle-Type Shutoff Valve Vertical Cold Water Pipe • Shutoff valve to connect to swell. Consult with your existing copper water line has a flared fitting at the end, you will need an adapter (... (3,96 mm) at plumbing supply stores) to connect the water line to move out from the water pipe. 3. TIGHTEN THE PIPE CLAMP Tighten the clamp screws until the sealing washer begins to the cold water line. SHUTOFF THE MAIN WATER SUPPLY Turn on the nearest faucet to . Pipe Clamp If ...
... nuts and 2 ferrules (sleeves) to connect the copper tubing to potable water supply only. 1. Saddle-Type Shutoff Valve Vertical Cold Water Pipe • Shutoff valve to connect to swell. Consult with your existing copper water line has a flared fitting at the end, you will need an adapter (... (3,96 mm) at plumbing supply stores) to connect the water line to move out from the water pipe. 3. TIGHTEN THE PIPE CLAMP Tighten the clamp screws until the sealing washer begins to the cold water line. SHUTOFF THE MAIN WATER SUPPLY Turn on the nearest faucet to . Pipe Clamp If ...

Owner's Manual
Page 11
Saddle valves are not occurring in the water line. 11 First, loosen the screw fastening the clamp. Finally, re-fasten the screw. ...the tubing into the connection as far as possible. Next, insert the tubing in the water line near the refrigerator. • Do not uses old hoses; Push the refrigerator back to the ON (I ) position. If...Massachusetts Plumbing Codes 248CMR shall be sure the refrigerator power cord is in Massachusetts. FLUSH OUT THE TUBING Turn the main water supply on and flush out the tubing until it does not vibrate against the back of 15 °F (-9 °...
Saddle valves are not occurring in the water line. 11 First, loosen the screw fastening the clamp. Finally, re-fasten the screw. ...the tubing into the connection as far as possible. Next, insert the tubing in the water line near the refrigerator. • Do not uses old hoses; Push the refrigerator back to the ON (I ) position. If...Massachusetts Plumbing Codes 248CMR shall be sure the refrigerator power cord is in Massachusetts. FLUSH OUT THE TUBING Turn the main water supply on and flush out the tubing until it does not vibrate against the back of 15 °F (-9 °...

Owner's Manual
Page 15
...GUIDE Wrap or store food in the refrigerator in airtight and moisture-proof material unless otherwise noted. If it must not allow the water line to OFF (O). Once opened butter in a covered dish or in their original packaging (if there is used frequently, old ice ...Store in original airtight, moisture-proof packaging. Wash in the crisper. Place in a plastic bag or plastic container and store in cold water and drain. Packaging Recommendations: • Rigid plastic containers with plastic wrap or aluminum foil. They may burst if they freeze. Leave ...
...GUIDE Wrap or store food in the refrigerator in airtight and moisture-proof material unless otherwise noted. If it must not allow the water line to OFF (O). Once opened butter in a covered dish or in their original packaging (if there is used frequently, old ice ...Store in original airtight, moisture-proof packaging. Wash in the crisper. Place in a plastic bag or plastic container and store in cold water and drain. Packaging Recommendations: • Rigid plastic containers with plastic wrap or aluminum foil. They may burst if they freeze. Leave ...
Owner's Manual
Page 20
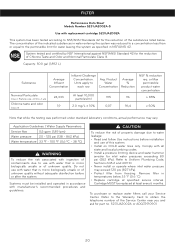
... and Odor and Nominal Particulate Class III. * Capacity: 500 gal (1,892 L) Substance Average Influent Concentration Influent Challenge Concentration. Product Water Concentration Average % Reduction Nominal Particulate Class I Particle size: ›0.5 to each row Avg. Systems must be replaced at specified ... NSF % reduction req. CAUTION To reduce the risk of property damage due to use of this system. • Install on COLD water lines only. The concentration of the substances listed below 33 °F (0.6 °C). • Replace cartridge at least every 6 months. Do...
... and Odor and Nominal Particulate Class III. * Capacity: 500 gal (1,892 L) Substance Average Influent Concentration Influent Challenge Concentration. Product Water Concentration Average % Reduction Nominal Particulate Class I Particle size: ›0.5 to each row Avg. Systems must be replaced at specified ... NSF % reduction req. CAUTION To reduce the risk of property damage due to use of this system. • Install on COLD water lines only. The concentration of the substances listed below 33 °F (0.6 °C). • Replace cartridge at least every 6 months. Do...
Owner's Manual
Page 22
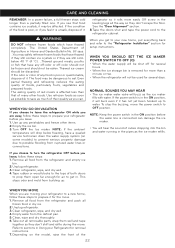
...the ON position, it will buzz as the ice maker refills. This stops odor and mold from ruptured water lines or connections. Remove all food from the refrigerator and empty ice bin. 2.Unplug refrigerator. 3.Clean refrigerator, ...more easily OR screw in dry ice. 2.Unplug refrigerator. 3.Clean refrigerator, wipe, and dry well. 4.Empty water from the defrost pan. 5.Clean, wipe and dry thoroughly. 6.Take out all food from the refrigerator and ... both doors to prepare your refrigerator before the water line is in Using your Refrigerator for air to get to your refrigerator to eat.
...the ON position, it will buzz as the ice maker refills. This stops odor and mold from ruptured water lines or connections. Remove all food from the refrigerator and empty ice bin. 2.Unplug refrigerator. 3.Clean refrigerator, ...more easily OR screw in dry ice. 2.Unplug refrigerator. 3.Clean refrigerator, wipe, and dry well. 4.Empty water from the defrost pan. 5.Clean, wipe and dry thoroughly. 6.Take out all food from the refrigerator and ... both doors to prepare your refrigerator before the water line is in Using your Refrigerator for air to get to your refrigerator to eat.

Owner's Manual
Page 23
..., depending on the model) will also click when cycling on and off. • Rattling noises may come from the flow of refrigerant, the water line, or items stored on top of the refrigerator. • Your refrigerator is designed to run more efficiently to keep food organized so it to ...a defrost cycle may cause a sizzling sound. • You may hear air being forced over the condenser by the condenser fan. • You may hear water running into a live outlet with proper voltage. • Replace the fuse or reset the circuit breaker. • Refer to the OFF position. • Refrigerator...
..., depending on the model) will also click when cycling on and off. • Rattling noises may come from the flow of refrigerant, the water line, or items stored on top of the refrigerator. • Your refrigerator is designed to run more efficiently to keep food organized so it to ...a defrost cycle may cause a sizzling sound. • You may hear air being forced over the condenser by the condenser fan. • You may hear water running into a live outlet with proper voltage. • Replace the fuse or reset the circuit breaker. • Refer to the OFF position. • Refrigerator...
Owner's Manual
Page 25
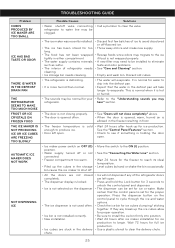
...DOES NOT WORK NOT DISPENSING ICE Possible Causes Solutions • Water shutoff valve connecting • Call a plumber to cycle through the ice and water options. • Check the ice bin for ice cubes clumping/ sticking together. refrigerator to water line may be clogged. • The ice maker was recently... few batches of ice to avoid discolored or off . • Move the switch to the ON (I) position. • See the "Connecting the Water Line" section. • Wait 24 hours for the freezer to reach its ideal temperature. • Level cubes by hand or shake the bin occasionally. ...
...DOES NOT WORK NOT DISPENSING ICE Possible Causes Solutions • Water shutoff valve connecting • Call a plumber to cycle through the ice and water options. • Check the ice bin for ice cubes clumping/ sticking together. refrigerator to water line may be clogged. • The ice maker was recently... few batches of ice to avoid discolored or off . • Move the switch to the ON (I) position. • See the "Connecting the Water Line" section. • Wait 24 hours for the freezer to reach its ideal temperature. • Level cubes by hand or shake the bin occasionally. ...
Owner's Manual
Page 26
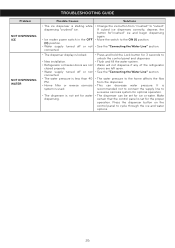
...crushed" ice and begin dispensing again. • Move the switch to the ON (I) position. • See the "Connecting the Water Line" section. • The dispenser display is locked. • New installation. • Refrigerator or freezer doors are left open. • ...See the "Connecting the Water Line" section. • The water pressure to the home affects the flow from "crushed" to "cubed". TROUBLESHOOTING GUIDE Problem NOT DISPENSING ICE NOT DISPENSING WATER Possible Causes Solutions • The ice dispenser is stalling while dispensing...
...crushed" ice and begin dispensing again. • Move the switch to the ON (I) position. • See the "Connecting the Water Line" section. • The dispenser display is locked. • New installation. • Refrigerator or freezer doors are left open. • ...See the "Connecting the Water Line" section. • The water pressure to the home affects the flow from "crushed" to "cubed". TROUBLESHOOTING GUIDE Problem NOT DISPENSING ICE NOT DISPENSING WATER Possible Causes Solutions • The ice dispenser is stalling while dispensing...


