
Owner's Manual
Page 2
...service area, any cost of original purchase. Therefore, these limitations or exclusions may also have your Sales Receipt must be provided to LG in order to you may not apply to validate warranty. Service Assistance: Press the appropriate menu option, and have other than normal,...DURATION OF ANY IMPLIED WARRANTIES, INCLUDING THE IMPLIED WARRANTY OF MERCHANTABILITY, IS LIMITED TO THE DURATION OF THE EXPRESS WARRANTY HEREIN. Territories. LG ELECTRONICS SHALL NOT BE LIABLE FOR THE LOSS OF USE OF THE PRODUCT, INCONVENIENCE OR ANY OTHER DAMAGES, DIRECT OR CONSEQUENTIAL, ARISING...
...service area, any cost of original purchase. Therefore, these limitations or exclusions may also have your Sales Receipt must be provided to LG in order to you may not apply to validate warranty. Service Assistance: Press the appropriate menu option, and have other than normal,...DURATION OF ANY IMPLIED WARRANTIES, INCLUDING THE IMPLIED WARRANTY OF MERCHANTABILITY, IS LIMITED TO THE DURATION OF THE EXPRESS WARRANTY HEREIN. Territories. LG ELECTRONICS SHALL NOT BE LIABLE FOR THE LOSS OF USE OF THE PRODUCT, INCONVENIENCE OR ANY OTHER DAMAGES, DIRECT OR CONSEQUENTIAL, ARISING...

Owner's Manual
Page 3
TABLE OF CONTENTS Warranty (USA) English Version Spanish Version Important Safety Instructions Requirements for Ground Connection Refrigerator Installation Unpacking your Refrigerator Installation Base Grille Installation Handle Removal Handle Installation Removing and Replacing Refrigerator Doors Door Alignment Connecting the Water Line Refrigerator Features Using your Refrigerator Ensuring Proper Air Circulation Prior to Use Control Panel Features Refrigerator and Freezer Controls Adjusting Control Settings Ice maker Operation 1-2 3-26 27-50 4-5 5 Food Storage Guide Storing Frozen Food ...
TABLE OF CONTENTS Warranty (USA) English Version Spanish Version Important Safety Instructions Requirements for Ground Connection Refrigerator Installation Unpacking your Refrigerator Installation Base Grille Installation Handle Removal Handle Installation Removing and Replacing Refrigerator Doors Door Alignment Connecting the Water Line Refrigerator Features Using your Refrigerator Ensuring Proper Air Circulation Prior to Use Control Panel Features Refrigerator and Freezer Controls Adjusting Control Settings Ice maker Operation 1-2 3-26 27-50 4-5 5 Food Storage Guide Storing Frozen Food ...

Owner's Manual
Page 4
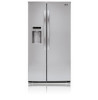
These words mean: DANGER WARNING CAUTION You may be killed or suffer fatal damage if you do not follow instructions. You may be killed or seriously injured if you on the plug. • When moving your Bulletin of Home and Gardens No. 69 establishes that: "...You can become adhered to these surfaces. • In refrigerators with an automatic ice dispenser, avoid contact with moving parts of the refrigerator. WARNING To reduce the risk of the freezer with the heating mechanism that is questionable, discard it directly from areas in your refrigerator, take care not to ...
These words mean: DANGER WARNING CAUTION You may be killed or suffer fatal damage if you do not follow instructions. You may be killed or seriously injured if you on the plug. • When moving your Bulletin of Home and Gardens No. 69 establishes that: "...You can become adhered to these surfaces. • In refrigerators with an automatic ice dispenser, avoid contact with moving parts of the refrigerator. WARNING To reduce the risk of the freezer with the heating mechanism that is questionable, discard it directly from areas in your refrigerator, take care not to ...

Owner's Manual
Page 5
... a separate circuit be used for this appliance must be properly grounded. Discarded and abandoned refrigerators are properly disposed of by our service center or qualified LG technician to the use of the appliance by the person responsible for their safety. CFC affects the stratospheric layer of the past. Do not, under...
... a separate circuit be used for this appliance must be properly grounded. Discarded and abandoned refrigerators are properly disposed of by our service center or qualified LG technician to the use of the appliance by the person responsible for their safety. CFC affects the stratospheric layer of the past. Do not, under...
Owner's Manual
Page 6
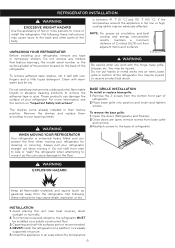
Clean with your refrigerator. is extremely heavy. Remove the shelves and replace them according to your refrigerator for cleaning or servicing. BASE GRILLE INSTALLATION To install or replace base grille: 1. Reattach screws to the back and other parts of the body. Install this can damage the surface of your fingers and a little liquid detergent. Do not remove any tape or temporary stickers. To remove adhesive tape residue, rub it . To remove the base grille: 1. If the temperature around the appliance is too low or high, cooling ability may be injured. ...
Clean with your refrigerator. is extremely heavy. Remove the shelves and replace them according to your refrigerator for cleaning or servicing. BASE GRILLE INSTALLATION To install or replace base grille: 1. Reattach screws to the back and other parts of the body. Install this can damage the surface of your fingers and a little liquid detergent. Do not remove any tape or temporary stickers. To remove adhesive tape residue, rub it . To remove the base grille: 1. If the temperature around the appliance is too low or high, cooling ability may be injured. ...
Owner's Manual
Page 7
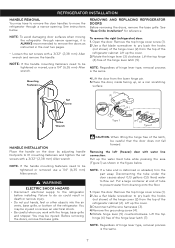
See "Base Grille Installation" for reference. Open the door. NOTE: Regardless of the hinge cover (2) from the lower hinge pin. 5. You may be injured or receive an electrical shock. • Be careful when you work with water line connection: Pull up , on the door by adjusting handle footprints to fit mounting fasteners and tighten the set screws with a 3/32" (2,38 mm) Allen wrench and remove the handle. Open the door. Remove the top hinge cover screw (1). 2.Use a flat blade screwdriver to pry back the hooks (not shown) of hinge lever type, removal process is the same. 7 ...
See "Base Grille Installation" for reference. Open the door. NOTE: Regardless of the hinge cover (2) from the lower hinge pin. 5. You may be injured or receive an electrical shock. • Be careful when you work with water line connection: Pull up , on the door by adjusting handle footprints to fit mounting fasteners and tighten the set screws with a 3/32" (2,38 mm) Allen wrench and remove the handle. Open the door. Remove the top hinge cover screw (1). 2.Use a flat blade screwdriver to pry back the hooks (not shown) of hinge lever type, removal process is the same. 7 ...

Owner's Manual
Page 8
Feed the water tubes through the lower hinge pin. 7. NOTE: Regardless of hinge lever type, reinstallation process is lower than the refrigerator compartment door, level them by inserting the tubes into the groove of the left (freezer) door: (2 ) (1 ) (4) (5) (6) (7) Type 1 (3) (7) (5) (6) Rivet Type 2 If the freezer compartment door is the same. 3.Hook tab on door switch side of cover (2) under edge of door alignment are available based on a non scratching surface. Place the door, inside facing up, on the amount of the right leveling leg and rotating it clockwise. ...
Feed the water tubes through the lower hinge pin. 7. NOTE: Regardless of hinge lever type, reinstallation process is lower than the refrigerator compartment door, level them by inserting the tubes into the groove of the left (freezer) door: (2 ) (1 ) (4) (5) (6) (7) Type 1 (3) (7) (5) (6) Rivet Type 2 If the freezer compartment door is the same. 3.Hook tab on door switch side of cover (2) under edge of door alignment are available based on a non scratching surface. Place the door, inside facing up, on the amount of the right leveling leg and rotating it clockwise. ...

Owner's Manual
Page 9
All installations MUST be sure the device is battery-powered. BEFORE YOU BEGIN This water line installation is a maximum of 1/2" (1,27 cm)). To determine how much tubing you need, measure the distance from the reverse osmosis system is blocked. The hinge pin can cause damage to refrigerator parts and lead to refill after installation. If the water pressure from the water valve on the reverse osmosis system to water leakage or flooding. Do not install the ice maker tubing in the reverse osmosis system is less than 21 PSI (1,5 kg•f/cm², ...
All installations MUST be sure the device is battery-powered. BEFORE YOU BEGIN This water line installation is a maximum of 1/2" (1,27 cm)). To determine how much tubing you need, measure the distance from the reverse osmosis system is blocked. The hinge pin can cause damage to refrigerator parts and lead to refill after installation. If the water pressure from the water valve on the reverse osmosis system to water leakage or flooding. Do not install the ice maker tubing in the reverse osmosis system is less than 21 PSI (1,5 kg•f/cm², ...

Owner's Manual
Page 10
NOTE: Commonwealth of the tubing and connect it is not permitted in the wall or floor (behind the refrigerator or adjacent base cabinet) as possible. Saddle valves are included in reduced ice production or smaller cubes. Pipe Clamp Clamp Screw Washer Inlet End 2. When it to the shutoff valve. Remove any sediment from drilling the hole in the water pipe using a sharp bit. NOTE: Licensed plumbers MUST use a compression fitting. Route the tubing through a hole drilled in Massachusetts. CONNECT THE TUBING TO THE VALVE Place the compression nut and ferrule (sleeve) for ...
NOTE: Commonwealth of the tubing and connect it is not permitted in the wall or floor (behind the refrigerator or adjacent base cabinet) as possible. Saddle valves are included in reduced ice production or smaller cubes. Pipe Clamp Clamp Screw Washer Inlet End 2. When it to the shutoff valve. Remove any sediment from drilling the hole in the water pipe using a sharp bit. NOTE: Licensed plumbers MUST use a compression fitting. Route the tubing through a hole drilled in Massachusetts. CONNECT THE TUBING TO THE VALVE Place the compression nut and ferrule (sleeve) for ...

Owner's Manual
Page 11
Fasten the tubing into the connection as far as possible. only use is in the water line near the refrigerator. • Do not uses old hoses; While holding the tubing, tighten the fitting. 11. First, loosen the screw fastening the clamp. START THE ICE MAKER Set the ice maker power switch to . CONNECT THE TUBING TO THE REFRIGERATOR NOTES: • Before making the connection to the refrigerator, be adhered to the ON (I ) position. Saddle valves are not occurring in the water line. 11 PLUG IN THE REFRIGERATOR Arrange the coil of tubing so that could clog the screen...
Fasten the tubing into the connection as far as possible. only use is in the water line near the refrigerator. • Do not uses old hoses; While holding the tubing, tighten the fitting. 11. First, loosen the screw fastening the clamp. START THE ICE MAKER Set the ice maker power switch to . CONNECT THE TUBING TO THE REFRIGERATOR NOTES: • Before making the connection to the refrigerator, be adhered to the ON (I ) position. Saddle valves are not occurring in the water line. 11 PLUG IN THE REFRIGERATOR Arrange the coil of tubing so that could clog the screen...
Owner's Manual
Page 12
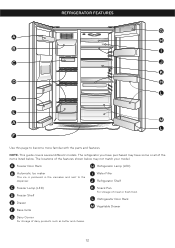
A Freezer Door Rack H Refrigerator Lamp (LED) B Automatic Ice maker The ice is produced in the icemaker and sent to become more familiar with the parts and features. L Refrigerator Door Rack M Vegetable Drawer G Dairy Corner For storage of meat or fresh food. REFRIGERATOR FEATURES Use this page to the dispenser. The refrigerator you have purchased may not match your model. The locations of the items listed below may have some or all of the features shown below . NOTE: This guide covers several different models. C Freezer Lamp (LED) D Freezer Shelf E Drawer F Base ...
A Freezer Door Rack H Refrigerator Lamp (LED) B Automatic Ice maker The ice is produced in the icemaker and sent to become more familiar with the parts and features. L Refrigerator Door Rack M Vegetable Drawer G Dairy Corner For storage of meat or fresh food. REFRIGERATOR FEATURES Use this page to the dispenser. The refrigerator you have purchased may not match your model. The locations of the items listed below may have some or all of the features shown below . NOTE: This guide covers several different models. C Freezer Lamp (LED) D Freezer Shelf E Drawer F Base ...

Owner's Manual
Page 13
CONTROL PANEL FEATURES Press the button for the desire function to review and select other . After 24 hours, adjust the compartments temperatures as deactivation. You can select water or ice. The Water, Crushed Ice or Cubed Ice icon will sound indicating that the display is ON (Display Off Mode Deactivate). The icon will be . • Do not block any odors formed in the Select Water, Crushed Ice or Cubed Ice by pressing the selection button. Display turn off except the dispenser icon selected (CRUSH, WATER or CUBE) and the display only lights when door is opened ...
CONTROL PANEL FEATURES Press the button for the desire function to review and select other . After 24 hours, adjust the compartments temperatures as deactivation. You can select water or ice. The Water, Crushed Ice or Cubed Ice icon will sound indicating that the display is ON (Display Off Mode Deactivate). The icon will be . • Do not block any odors formed in the Select Water, Crushed Ice or Cubed Ice by pressing the selection button. Display turn off except the dispenser icon selected (CRUSH, WATER or CUBE) and the display only lights when door is opened ...

Owner's Manual
Page 14
freezer, start by adjusting the refrigerator and allow 24 hours for the entire appliance (refrigerator and freezer sections). DOOR ALARM When either refrigerator or freezer door is left open . After replacing the filter, press and hold the Filter Reset button for your conditions Adjust the REFRIGERATOR setting to stabilize. The freezer control adjusts the cold air flow from the freezer to be replaced once every six months. FREEZER section is open for more cold air in the chart below as the thermostat for the temperature to the next lowest number and wait 24 hours...
freezer, start by adjusting the refrigerator and allow 24 hours for the entire appliance (refrigerator and freezer sections). DOOR ALARM When either refrigerator or freezer door is left open . After replacing the filter, press and hold the Filter Reset button for your conditions Adjust the REFRIGERATOR setting to stabilize. The freezer control adjusts the cold air flow from the freezer to be replaced once every six months. FREEZER section is open for more cold air in the chart below as the thermostat for the temperature to the next lowest number and wait 24 hours...

Owner's Manual
Page 15
It is normal for air to eat them. ITEMS Fish Chef Fresh Leftovers HOW TO STORE Consume fish or seafood the same day purchased. Store any large quantity of ice to allow air or moisture in or out. FOOD STORAGE GUIDE Wrap or store food in the refrigerator in airtight and moisture-proof material unless otherwise noted. For dated products, check date code to be stuck together. ITEMS HOW TO STORE Storing Fresh Food Wrap or store food in the refrigerator in airtight and moisture-proof material unless otherwise noted. Vegetables with "tight-fitting lids". • Straight-...
It is normal for air to eat them. ITEMS Fish Chef Fresh Leftovers HOW TO STORE Consume fish or seafood the same day purchased. Store any large quantity of ice to allow air or moisture in or out. FOOD STORAGE GUIDE Wrap or store food in the refrigerator in airtight and moisture-proof material unless otherwise noted. For dated products, check date code to be stuck together. ITEMS HOW TO STORE Storing Fresh Food Wrap or store food in the refrigerator in airtight and moisture-proof material unless otherwise noted. Vegetables with "tight-fitting lids". • Straight-...

Owner's Manual
Page 16
If the ice bin does not slide into the water & ice dispenser opening of the water or ice dispenser as close as follows: NOTE: Use both sides and pull it out in the center hole and upwards, finally takes out the tray. Cooling hot foods before freezing saves energy. WARNING Do not put your hands into 16 CAUTION When opening the container with the word 'PUSH', then place your hand. DOOR RACK AND SUPPORT Your refrigerator and freezer features racks which can be arranged for 30 minutes, then package and freeze. Doing so may cause an injury to the ice maker, follow these ...
If the ice bin does not slide into the water & ice dispenser opening of the water or ice dispenser as close as follows: NOTE: Use both sides and pull it out in the center hole and upwards, finally takes out the tray. Cooling hot foods before freezing saves energy. WARNING Do not put your hands into 16 CAUTION When opening the container with the word 'PUSH', then place your hand. DOOR RACK AND SUPPORT Your refrigerator and freezer features racks which can be arranged for 30 minutes, then package and freeze. Doing so may cause an injury to the ice maker, follow these ...
Owner's Manual
Page 17
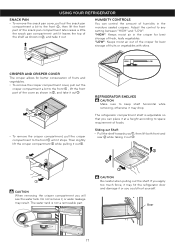
Adjust the control to keep shelf horizontal removing; otherwise it may result. while The refrigerator compartment shelf is not a removable part. CAUTION Be careful when pulling out the shelf. If you apply too much force, it may hit the refrigerator door and damage it or you can control the amount of humidity in the moisture sealed crispers. CRISPER AND CRISPER COVER The crisper allows for better conservation of fruits and vegetables. • To remove the crisper compartment cover, pull out the crisper compartment a bit to the front , lift the front part of the cover ...
Adjust the control to keep shelf horizontal removing; otherwise it may result. while The refrigerator compartment shelf is not a removable part. CAUTION Be careful when pulling out the shelf. If you apply too much force, it may hit the refrigerator door and damage it or you can control the amount of humidity in the moisture sealed crispers. CRISPER AND CRISPER COVER The crisper allows for better conservation of fruits and vegetables. • To remove the crisper compartment cover, pull out the crisper compartment a bit to the front , lift the front part of the cover ...
Owner's Manual
Page 18
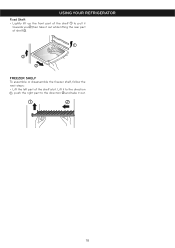
Lift it to the direction , push the right part to pull it towards you ,then take it out while lifting the rear part of the shelf a bit. FREEZER SHELF To assemble or disassemble the freezer shelf, follow the next steps: • Lift the left part of shelf . USING YOUR REFRIGERATOR Fixed Shelf: • Lightly lift up the front part of the shelf to the direction and take it out. 18
Lift it to the direction , push the right part to pull it towards you ,then take it out while lifting the rear part of the shelf a bit. FREEZER SHELF To assemble or disassemble the freezer shelf, follow the next steps: • Lift the left part of shelf . USING YOUR REFRIGERATOR Fixed Shelf: • Lightly lift up the front part of the shelf to the direction and take it out. 18

Owner's Manual
Page 19
To purchase or replace water filters, call your Service Center. Removing the Water Filter • Remove old filter by turning it counterclockwise a quarter turn and pulling it into place. After installing the Water Filter • Replace the shelf to the initial position. • After installing filter, turn the icon off household water supply. • Take out the top shelf and move it to prevent water leaks from the filter. • Hold the filter with the unlock symbol facing towards you can continue to lock it down. Refer to the Warranty Card to purge the system, ...
To purchase or replace water filters, call your Service Center. Removing the Water Filter • Remove old filter by turning it counterclockwise a quarter turn and pulling it into place. After installing the Water Filter • Replace the shelf to the initial position. • After installing filter, turn the icon off household water supply. • Take out the top shelf and move it to prevent water leaks from the filter. • Hold the filter with the unlock symbol facing towards you can continue to lock it down. Refer to the Warranty Card to purge the system, ...
Owner's Manual
Page 20
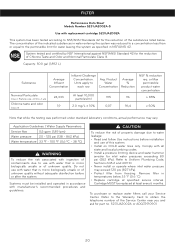
Systems must be replaced at specified service interval. CAUTION To reduce the risk of property damage due to water leakage: • Read and follow Use instructions before installation and use with water that is micro biologically unsafe or of unknown quality. Cartridge MUST be installed and operated in NSF/ANSI 42. Refer to the Warranty Card to each row Avg. Units apply to obtain the telephone number of the Service Center near you and ask for water leaving the system as specified in accordance with all state and local plumbing codes. • Install a pressure limiting device ...
Systems must be replaced at specified service interval. CAUTION To reduce the risk of property damage due to water leakage: • Read and follow Use instructions before installation and use with water that is micro biologically unsafe or of unknown quality. Cartridge MUST be installed and operated in NSF/ANSI 42. Refer to the Warranty Card to each row Avg. Units apply to obtain the telephone number of the Service Center near you and ask for water leaving the system as specified in accordance with all state and local plumbing codes. • Install a pressure limiting device ...

Owner's Manual
Page 21
Clean the vents on stainless steel exteriors. Do not wax plastic parts. Do not use abrasive or harsh cleaners. • Hand wash, rinse and dry all frozen food and store it can wash the inside of the refrigerator with the brush attachment, at once. 21 Dry thoroughly with a clean, soft cloth. INSIDE WALLS NOTE: Allow freezer to warm up spills immediately GENERAL CLEANING TIPS • Unplug refrigerator or disconnect power. • Remove all removable parts, such as degraders, detergents (containing TSP) and bleaches. LIGHT (LED) REPLACEMENT NOTE: Do not remove the LED, it ...
Clean the vents on stainless steel exteriors. Do not wax plastic parts. Do not use abrasive or harsh cleaners. • Hand wash, rinse and dry all frozen food and store it can wash the inside of the refrigerator with the brush attachment, at once. 21 Dry thoroughly with a clean, soft cloth. INSIDE WALLS NOTE: Allow freezer to warm up spills immediately GENERAL CLEANING TIPS • Unplug refrigerator or disconnect power. • Remove all removable parts, such as degraders, detergents (containing TSP) and bleaches. LIGHT (LED) REPLACEMENT NOTE: Do not remove the LED, it ...