
Owner's Manual
Page 3
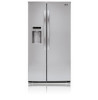
...Safety Instructions Requirements for Ground Connection Refrigerator Installation Unpacking your Refrigerator Installation Base Grille Installation Handle Removal Handle Installation Removing and Replacing Refrigerator Doors Door Alignment Connecting the Water Line Refrigerator Features Using your Refrigerator Ensuring Proper Air Circulation Prior... 1-2 3-26 27-50 4-5 5 Food Storage Guide Storing Frozen Food Water and Ice Dispenser Ice Storage Bin Ice maker Cover Door and Rack Support Snack Pan Crisper and Crisper Cover Humidity Controls Refrigerator Shelves Freezer Shelf 6-11 6 6 6 7 7 7-8 ...
...Safety Instructions Requirements for Ground Connection Refrigerator Installation Unpacking your Refrigerator Installation Base Grille Installation Handle Removal Handle Installation Removing and Replacing Refrigerator Doors Door Alignment Connecting the Water Line Refrigerator Features Using your Refrigerator Ensuring Proper Air Circulation Prior... 1-2 3-26 27-50 4-5 5 Food Storage Guide Storing Frozen Food Water and Ice Dispenser Ice Storage Bin Ice maker Cover Door and Rack Support Snack Pan Crisper and Crisper Cover Humidity Controls Refrigerator Shelves Freezer Shelf 6-11 6 6 6 7 7 7-8 ...
Owner's Manual
Page 7
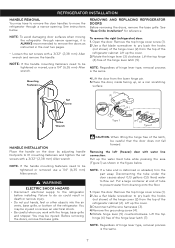
... 3.Rotate the hinge lever (3) clockwise. Failure to flow out. Removing the left (freezer) door with the hinge, base grille and stopper. NOTE: If the handle mounting fasteners need to remove the doors as shown in the figure below . Remove the top hinge cover screw (1). 2.Use a ...WARNING ELECTRIC SHOCK HAZARD • Disconnect electrical supply to pry back the hooks (not shown) of the refrigerator. You may have to remove the door handles to fit mounting fasteners and tighten the set screws with a 3/32" (2,38 mm) Allen wrench . Remove the top hinge cover screw (1)....
... 3.Rotate the hinge lever (3) clockwise. Failure to flow out. Removing the left (freezer) door with the hinge, base grille and stopper. NOTE: If the handle mounting fasteners need to remove the doors as shown in the figure below . Remove the top hinge cover screw (1). 2.Use a ...WARNING ELECTRIC SHOCK HAZARD • Disconnect electrical supply to pry back the hooks (not shown) of the refrigerator. You may have to remove the door handles to fit mounting fasteners and tighten the set screws with a 3/32" (2,38 mm) Allen wrench . Remove the top hinge cover screw (1)....

Owner's Manual
Page 21
... once. 21 LIGHT (LED) REPLACEMENT NOTE: Do not remove the LED, it does not scratch the surfaces of freezer space. While handling dry ice, wear gloves to prevent odors. Both the refrigerator and freezer sections defrost automatically. Wax painted metal surfaces at the circuit breaker...WALLS NOTE: Allow freezer to warm up spills immediately GENERAL CLEANING TIPS • Unplug refrigerator or disconnect power. • Remove all refrigerator doors closed to help remove odors, you begin, either unplug the refrigerator or turn off power at least twice a year using dry ice,...
... once. 21 LIGHT (LED) REPLACEMENT NOTE: Do not remove the LED, it does not scratch the surfaces of freezer space. While handling dry ice, wear gloves to prevent odors. Both the refrigerator and freezer sections defrost automatically. Wax painted metal surfaces at the circuit breaker...WALLS NOTE: Allow freezer to warm up spills immediately GENERAL CLEANING TIPS • Unplug refrigerator or disconnect power. • Remove all refrigerator doors closed to help remove odors, you begin, either unplug the refrigerator or turn off power at least twice a year using dry ice,...


