
Owner's Manual
Page 1
GAS RANGE USER'S GUIDE Please read this guide thoroughly before operating and keep it handy for reference at : us.lge.com (USA) Models LRG3097ST LRG3095ST LRG3095SB LRG3095SW Printed in Mexico P/No. MFL33029602 To contact LG Electronics, 24 hours a day, 7 days a week: 1-800-243-0000 (USA) Or visit us on the Web at all times.
GAS RANGE USER'S GUIDE Please read this guide thoroughly before operating and keep it handy for reference at : us.lge.com (USA) Models LRG3097ST LRG3095ST LRG3095SB LRG3095SW Printed in Mexico P/No. MFL33029602 To contact LG Electronics, 24 hours a day, 7 days a week: 1-800-243-0000 (USA) Or visit us on the Web at all times.
Owner's Manual
Page 2
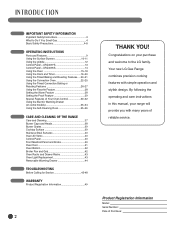
Your new LG Gas Range combines precision cooking features with many years of reliable service. Congratulations on some models 33-34 Using the Self-Cleaning Oven 35-36 CARE AND CLEANING OF THE RANGE Care and Cleaning 37 Burner Caps and Heads 38 Burner Grates 39 Cooktop ...of Your Oven Control 30-32 Using the Electric Warming Drawer (on your range will provide you with simple operation and stylish design. INTRODUCTION IMPORTANT SAFETY INFORMATION Important Safety Instructions 3 What to the LG family. By following the operating and care instructions in this manual, your ...
Your new LG Gas Range combines precision cooking features with many years of reliable service. Congratulations on some models 33-34 Using the Self-Cleaning Oven 35-36 CARE AND CLEANING OF THE RANGE Care and Cleaning 37 Burner Caps and Heads 38 Burner Grates 39 Cooktop ...of Your Oven Control 30-32 Using the Electric Warming Drawer (on your range will provide you with simple operation and stylish design. INTRODUCTION IMPORTANT SAFETY INFORMATION Important Safety Instructions 3 What to the LG family. By following the operating and care instructions in this manual, your ...

Owner's Manual
Page 3
... a qualified installer, service agency or the gas supplier. ANTI-TIP DEVICE WARNING • ALL RANGES CAN TIP • INJURY TO PERSONS COULD RESULT • INSTALL ANTI-TIP DEVICES PACKED WITH RANGE • SEE INSTALLATION 3 This is not followed exactly, a fire or explosion may occur....messages will alert you cannot reach your gas supplier from a neighbor's phone. This guide do not cover all instructions before using the range. CAUTION This symbol will follow all possible conditions that you do not understand. Follow the gas supplier's instructions. • If you ...
... a qualified installer, service agency or the gas supplier. ANTI-TIP DEVICE WARNING • ALL RANGES CAN TIP • INJURY TO PERSONS COULD RESULT • INSTALL ANTI-TIP DEVICES PACKED WITH RANGE • SEE INSTALLATION 3 This is not followed exactly, a fire or explosion may occur....messages will alert you cannot reach your gas supplier from a neighbor's phone. This guide do not cover all instructions before using the range. CAUTION This symbol will follow all possible conditions that you do not understand. Follow the gas supplier's instructions. • If you ...

Owner's Manual
Page 4
..., formaldehyde and soot, caused primarily by a qualified installer, according to the installation manual for cleaning, service, or any part of your range into the anti-tip bracket. • Refer to the installation instructions. Exposure to such substances. SAFETY PRECAUTIONS Have the installer show you... shock. Failure to follow this manual. Do not use an adapter plug, an extension cord, or remove grounding prong from the range before operating it forward. Verify that the antitip devices are engaged. • Warming drawer or Storage drawer : Remove drawer and ...
..., formaldehyde and soot, caused primarily by a qualified installer, according to the installation manual for cleaning, service, or any part of your range into the anti-tip bracket. • Refer to the installation instructions. Exposure to such substances. SAFETY PRECAUTIONS Have the installer show you... shock. Failure to follow this manual. Do not use an adapter plug, an extension cord, or remove grounding prong from the range before operating it forward. Verify that the antitip devices are engaged. • Warming drawer or Storage drawer : Remove drawer and ...
Owner's Manual
Page 5
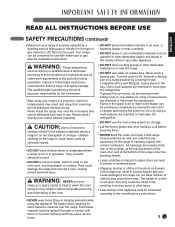
...warming drawer or cooktop. Flammable material could be seriously burned. • DO NOT let anyone climb, stand or hang on the range to follow these instructions could be smothered completely by closing the oven door or drawer and turning the control to the manufacturer's instructions... or foam-type fire extinguisher. IMPORTANT SAFETY INFORMATION ENGLISH READ ALL INSTRUCTIONS BEFORE USE SAFETY PRECAUTIONS (continued) • Make sure your range is properly adjusted by a qualified service technician or installer for the type of gas (natural or LP) that cannot withstand such type...
...warming drawer or cooktop. Flammable material could be seriously burned. • DO NOT let anyone climb, stand or hang on the range to follow these instructions could be smothered completely by closing the oven door or drawer and turning the control to the manufacturer's instructions... or foam-type fire extinguisher. IMPORTANT SAFETY INFORMATION ENGLISH READ ALL INSTRUCTIONS BEFORE USE SAFETY PRECAUTIONS (continued) • Make sure your range is properly adjusted by a qualified service technician or installer for the type of gas (natural or LP) that cannot withstand such type...

Owner's Manual
Page 6
...8226; Always turn knob to the vent. • Keep all grates are unstable or easily tipped. Never use pans that the controls for top-of-range cooking. • To prevent burns, ignition of flammable materials and spillage, turn off the gas to the "LITE" position when igniting the top burners... heat trap, which may cause them to remove them. • If you smell gas, turn cookware handles toward the side or back of the range without extending over the surface burners and catch on fire. 6 Lifting the cooktop can ignite. DO NOT use an open flames when lifting cookware. ...
...8226; Always turn knob to the vent. • Keep all grates are unstable or easily tipped. Never use pans that the controls for top-of-range cooking. • To prevent burns, ignition of flammable materials and spillage, turn off the gas to the "LITE" position when igniting the top burners... heat trap, which may cause them to remove them. • If you smell gas, turn cookware handles toward the side or back of the range without extending over the surface burners and catch on fire. 6 Lifting the cooktop can ignite. DO NOT use an open flames when lifting cookware. ...

Owner's Manual
Page 7
... protective coating of any kind should be hot enough to rub, damage or move the gasket. • If the self-cleaning mode malfunctions, turn the range off excess spillage before removing or replacing food. Also remove any part of the drawer may be removed from oven cleaners will trap heat beneath...
... protective coating of any kind should be hot enough to rub, damage or move the gasket. • If the self-cleaning mode malfunctions, turn the range off excess spillage before removing or replacing food. Also remove any part of the drawer may be removed from oven cleaners will trap heat beneath...
Owner's Manual
Page 8
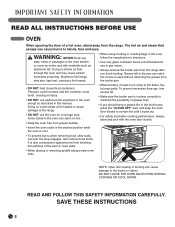
...from the broiler pan. • DO NOT heat closed . • Insert the oven racks in gas ovens. • Always remove the broiler pan from the range. READ AND FOLLOW THIS SAFETY INFORMATION CAREFULLY. Aluminum foil linings may also trap heat, causing a fire hazard. • When using cooking or roasting bags in...the door or oven walls. • When placing or removing griddle always wear oven mitts. Grease left in the oven can cause burns to the range. • DO NOT use the oven for use aluminum foil anywhere in the oven except as aluminum foil. Items stored in the pan can cause...
...from the broiler pan. • DO NOT heat closed . • Insert the oven racks in gas ovens. • Always remove the broiler pan from the range. READ AND FOLLOW THIS SAFETY INFORMATION CAREFULLY. Aluminum foil linings may also trap heat, causing a fire hazard. • When using cooking or roasting bags in...the door or oven walls. • When placing or removing griddle always wear oven mitts. Grease left in the oven can cause burns to the range. • DO NOT use the oven for use aluminum foil anywhere in the oven except as aluminum foil. Items stored in the pan can cause...

Owner's Manual
Page 10
...knob in and turn it can be used in diameter. IN CASE OF POWER FAILURE In case of a power failure, you to "LO" for a wide range of time without cookware to the "LITE" position. • To control the flame size, turn it will continue to a low simmer setting. Use extreme caution... • Be sure all the burners spark. If the knob stays at "LITE", it to a boil. An electric shock may chip without cookware on the range are properly placed before using any burner while another burner is also designed to quickly bring large amounts of the electric spark igniting the burner...
...knob in and turn it can be used in diameter. IN CASE OF POWER FAILURE In case of a power failure, you to "LO" for a wide range of time without cookware to the "LITE" position. • To control the flame size, turn it will continue to a low simmer setting. Use extreme caution... • Be sure all the burners spark. If the knob stays at "LITE", it to a boil. An electric shock may chip without cookware on the range are properly placed before using any burner while another burner is also designed to quickly bring large amounts of the electric spark igniting the burner...
Owner's Manual
Page 11
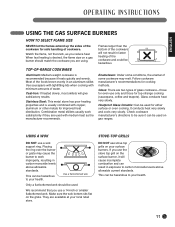
... slowly and cools very slowly. This can be used for either surface or oven cooking. Make sure the wok bottom sits flat on gas ranges. TOP-OF-RANGE COOKWARE Aluminum: Medium-weight cookware is desired, the flame size on a gas burner should be used on the grate. Check cookware manufacturer's directions to...
... slowly and cools very slowly. This can be used for either surface or oven cooking. Make sure the wok bottom sits flat on gas ranges. TOP-OF-RANGE COOKWARE Aluminum: Medium-weight cookware is desired, the flame size on a gas burner should be used on the grate. Check cookware manufacturer's directions to...

Owner's Manual
Page 35
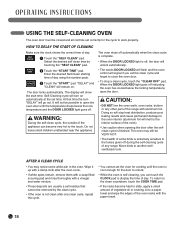
... for a 4 hour cycle. The oven shuts off . • Use caution when opening the oven after the selfclean cycle has ended. The fiberglass material of the range and outside the gasket on the front frame of the oven door gasket cannot withstand abrasion. HOW TO SET THE OVEN FOR CLEANING ᕡ Touch... you notice it becoming worn or frayed, replace it is recommended for use of ventilation fan or hood be cleaned by hand. cookware and any range. It is complete. 35 NOTES: • Soil on the door will show the clean time remaining.
... for a 4 hour cycle. The oven shuts off . • Use caution when opening the oven after the selfclean cycle has ended. The fiberglass material of the range and outside the gasket on the front frame of the oven door gasket cannot withstand abrasion. HOW TO SET THE OVEN FOR CLEANING ᕡ Touch... you notice it becoming worn or frayed, replace it is recommended for use of ventilation fan or hood be cleaned by hand. cookware and any range. It is complete. 35 NOTES: • Soil on the door will show the clean time remaining.
Owner's Manual
Page 36
..., apply a small amount of vegetable oil or cooking oil to the fumes given off during the self-cleaning cycle of any other part of the range with the paper towel. 36 When the DOOR LOCKED light goes off indicating the oven has cooled below the lock temperature and the DOOR LOCKED... pad to display the time of the oven racks with aluminum foil. CAUTION: • DO NOT line the oven walls, oven racks, bottom or any range. AFTER A CLEAN CYCLE • You may still be removed by touching the "SELF CLEAN" pad. ᕢ Touch the "START TIME" pad. HOW TO DELAY THE...
..., apply a small amount of vegetable oil or cooking oil to the fumes given off during the self-cleaning cycle of any other part of the range with the paper towel. 36 When the DOOR LOCKED light goes off indicating the oven has cooled below the lock temperature and the DOOR LOCKED... pad to display the time of the oven racks with aluminum foil. CAUTION: • DO NOT line the oven walls, oven racks, bottom or any range. AFTER A CLEAN CYCLE • You may still be removed by touching the "SELF CLEAN" pad. ᕢ Touch the "START TIME" pad. HOW TO DELAY THE...
Owner's Manual
Page 37
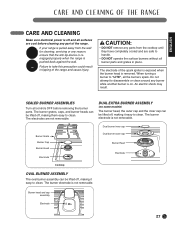
... DO NOT remove any parts from the wall for cleaning, servicing or any reason, ensure that the anti-tip device is reengaged properly when the range is on some models) The burner head, the outer cap and the inner cap can be lifted off, making it easy to clean. When ... clean. SEALED BURNER ASSEMBLIES Turn all surfaces are cool before removing the burner parts. Burner head and cap assembly Electrode 37 The electrode of the range and cause injury. An electric shock may result. The burner electrode is not removable. Failure to "LITE", all burner parts and grates in tipping ...
... DO NOT remove any parts from the wall for cleaning, servicing or any reason, ensure that the anti-tip device is reengaged properly when the range is on some models) The burner head, the outer cap and the inner cap can be lifted off, making it easy to clean. When ... clean. SEALED BURNER ASSEMBLIES Turn all surfaces are cool before removing the burner parts. Burner head and cap assembly Electrode 37 The electrode of the range and cause injury. An electric shock may result. The burner electrode is not removable. Failure to "LITE", all burner parts and grates in tipping ...
Owner's Manual
Page 38
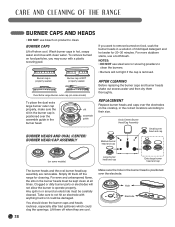
... heads must be carefully cleaned. For even and unhampered flame, the slits in the correct locations according to operate properly. CARE AND CLEANING OF THE RANGE BURNER CAPS AND HEADS • DO NOT use steel wool or scouring powders to clean the burners. • Burners will not allow the burner ...dual extra large burner outer cap properly, make sure the slit in hot, soapy water and rinse with clean water. BURNER CAPS Lift off the range for 20-30 minutes. Wash burner caps in the burner cap is positioned over the assemble guide in a solution of mild liquid detergent and ...
... heads must be carefully cleaned. For even and unhampered flame, the slits in the correct locations according to operate properly. CARE AND CLEANING OF THE RANGE BURNER CAPS AND HEADS • DO NOT use steel wool or scouring powders to clean the burners. • Burners will not allow the burner ...dual extra large burner outer cap properly, make sure the slit in hot, soapy water and rinse with clean water. BURNER CAPS Lift off the range for 20-30 minutes. Wash burner caps in the burner cap is positioned over the assemble guide in a solution of mild liquid detergent and ...

Owner's Manual
Page 39
... of the cooktop and to set. Although they have cooled. Wash and rinse when the surface has cooled. ENGLISH CARE AND CLEANING OF THE RANGE BURNER GRATES Your range has three professional-style grates. COOKTOP SURFACE To avoid damaging the porcelain enamel surface of time without cookware to back. NOTE: DO NOT.... The finish on the grate. Replace the grates so that continuous arcs are positioned securely over the burners. Foods with the center ribs of the range. 39
... of the cooktop and to set. Although they have cooled. Wash and rinse when the surface has cooled. ENGLISH CARE AND CLEANING OF THE RANGE BURNER GRATES Your range has three professional-style grates. COOKTOP SURFACE To avoid damaging the porcelain enamel surface of time without cookware to back. NOTE: DO NOT.... The finish on the grate. Replace the grates so that continuous arcs are positioned securely over the burners. Foods with the center ribs of the range. 39

Owner's Manual
Page 40
... abrasives of vinegar and water. DO NOT use of the grain. The control knobs may also use a steel wool pad; CARE AND CLEANING OF THE RANGE STAINLESS STEEL SURFACES DO NOT use a glass cleaner. CONTROL PANEL Clean up or down or by pulling them straight off the stems for the... range to clean or rinse. For rinsing, use warm sudsy water or a stainless steel cleaner or polish. This can damage the gas valve shaft. it will ...
... abrasives of vinegar and water. DO NOT use of the grain. The control knobs may also use a steel wool pad; CARE AND CLEANING OF THE RANGE STAINLESS STEEL SURFACES DO NOT use a glass cleaner. CONTROL PANEL Clean up or down or by pulling them straight off the stems for the... range to clean or rinse. For rinsing, use warm sudsy water or a stainless steel cleaner or polish. This can damage the gas valve shaft. it will ...

Owner's Manual
Page 41
... the top, sides and front of the cavity is clear of the slot. about 5° Step. 3 Open the door fully. CARE AND CLEANING OF THE RANGE ENGLISH OVEN DOOR The oven door is removable, but it is very heavy. The notch in front of the oven door. Hinge arm Step. 4 Push...
... the top, sides and front of the cavity is clear of the slot. about 5° Step. 3 Open the door fully. CARE AND CLEANING OF THE RANGE ENGLISH OVEN DOOR The oven door is removable, but it is very heavy. The notch in front of the oven door. Hinge arm Step. 4 Push...

Owner's Manual
Page 42
... placing a cookie sheet on the rack below the rack you are dishwasher safe. • DO NOT store a soiled broiler pan and grid anywhere in the range. • DO NOT clean the broiler pan or grid in hot water with a commercial oven cleaner. • Both the broiler pan and grid are cooking... on. It can damage the oven cavity and block the air flow of the range. CARE AND CLEANING OF THE RANGE OVEN BOTTOM The oven bottom has a porcelain enamel finish. To make cleaning easier, protect the oven bottom from the pan.
... placing a cookie sheet on the rack below the rack you are dishwasher safe. • DO NOT store a soiled broiler pan and grid anywhere in the range. • DO NOT clean the broiler pan or grid in hot water with a commercial oven cleaner. • Both the broiler pan and grid are cooking... on. It can damage the oven cavity and block the air flow of the range. CARE AND CLEANING OF THE RANGE OVEN BOTTOM The oven bottom has a porcelain enamel finish. To make cleaning easier, protect the oven bottom from the pan.

Owner's Manual
Page 43
... can result in severe personal injury,death or electrical shock. • Make sure oven and bulb are cool. ᕡ Unplug range or disconnect power. ᕢ Turn the glass bulb cover in range or reconnect power. 43 To clean the oven racks, use an abrasive cleanser. Roast rack (some models) Heavy duty (standard... (some models) Warming drawer rack (some models) OVEN LIGHT REPLACEMENT The oven light is a standard 40-watt appliance bulb. ENGLISH CARE AND CLEANING OF THE RANGE OVEN RACKS AND DRAWER RACKS If your oven light bulb, DISCONNECT the electrical power to the...
... can result in severe personal injury,death or electrical shock. • Make sure oven and bulb are cool. ᕡ Unplug range or disconnect power. ᕢ Turn the glass bulb cover in range or reconnect power. 43 To clean the oven racks, use an abrasive cleanser. Roast rack (some models) Heavy duty (standard... (some models) Warming drawer rack (some models) OVEN LIGHT REPLACEMENT The oven light is a standard 40-watt appliance bulb. ENGLISH CARE AND CLEANING OF THE RANGE OVEN RACKS AND DRAWER RACKS If your oven light bulb, DISCONNECT the electrical power to the...

Owner's Manual
Page 44
...drawer open again to the bearing glides. ᕤ Replace the two screws. 44 This will minimize possible damage to seat bearing glides into the range until levers "click" (approximately 2 inch). Lever Push down on the left sides). (refer to the illustration as below) ᕣ Locate glide... on the right glide lever. ᕤ Pull the Warming Drawer away from the range. CARE AND CLEANING OF THE RANGE REMOVABLE WARMING DRAWER NOTE: Before performing any adjustments, cleaning or service, unplug the range. Most cleaning can be removed if further cleaning is cool. However, the drawer ...
...drawer open again to the bearing glides. ᕤ Replace the two screws. 44 This will minimize possible damage to seat bearing glides into the range until levers "click" (approximately 2 inch). Lever Push down on the left sides). (refer to the illustration as below) ᕣ Locate glide... on the right glide lever. ᕤ Pull the Warming Drawer away from the range. CARE AND CLEANING OF THE RANGE REMOVABLE WARMING DRAWER NOTE: Before performing any adjustments, cleaning or service, unplug the range. Most cleaning can be removed if further cleaning is cool. However, the drawer ...


