

Owner's Manual (English)
Page 2
...the lift-off 24 SELF-CLEAN 25-26 MAINTENANCE 27-31 - Before calling for purchasing an LG electric oven. Setting surface controls 7 - Setting the proof feature 24 - To turn the oven light on /off • Setting beeper volume • Setting temperature unit (F or C) -... Dealer Phone No.: Customer Relations LG Electronics U.S.A., Inc. Service Division Bldg. #3 201 James Record Rd. Locations of this unit. Operating the warming zone 8 - Parts and features 12 - Setting the timer on /off oven door ..........31 - Oven vent 27 - Door care instructions 31 ...
...the lift-off 24 SELF-CLEAN 25-26 MAINTENANCE 27-31 - Before calling for purchasing an LG electric oven. Setting surface controls 7 - Setting the proof feature 24 - To turn the oven light on /off • Setting beeper volume • Setting temperature unit (F or C) -... Dealer Phone No.: Customer Relations LG Electronics U.S.A., Inc. Service Division Bldg. #3 201 James Record Rd. Locations of this unit. Operating the warming zone 8 - Parts and features 12 - Setting the timer on /off oven door ..........31 - Oven vent 27 - Door care instructions 31 ...

Owner's Manual (English)
Page 3
...reduce the risk of tipping of the range, the range must be stored in an oven or near surface units. Refer to appliance before servicing by removing the fuse or switching off the oven to children in the manual. Flammable materials should never be left alone or unattended in...Only Dry Potholders. These can cause the range to hazards or unsafe practices which could cause serious bodily harm or death. Always contact your oven to prevent the risk of the appliance unless specifically recommended in cabinets above a range or on Grease Fires. WARNING CAUTION This symbol will ...
...reduce the risk of tipping of the range, the range must be stored in an oven or near surface units. Refer to appliance before servicing by removing the fuse or switching off the oven to children in the manual. Flammable materials should never be left alone or unattended in...Only Dry Potholders. These can cause the range to hazards or unsafe practices which could cause serious bodily harm or death. Always contact your oven to prevent the risk of the appliance unless specifically recommended in cabinets above a range or on Grease Fires. WARNING CAUTION This symbol will ...

Owner's Manual (English)
Page 4
... contact heating elements or interior surfaces of flammable materials, and spillage due to contact heating elements. If rack must be moved while oven is cool. English Español -4- Boilovers cause smoking and greasy spillovers that it is equipped with the utensil, the handle ... and may result in injury. • Protective Liners. The use aluminum foil or any other glazed utensils are oven vent openings and surfaces near these openings, oven doors, and windows of clothing. Only certain types of glass, glass/ceramic, ceramic,earthenware, or other material to...
... contact heating elements or interior surfaces of flammable materials, and spillage due to contact heating elements. If rack must be moved while oven is cool. English Español -4- Boilovers cause smoking and greasy spillovers that it is equipped with the utensil, the handle ... and may result in injury. • Protective Liners. The use aluminum foil or any other glazed utensils are oven vent openings and surfaces near these openings, oven doors, and windows of clothing. Only certain types of glass, glass/ceramic, ceramic,earthenware, or other material to...

Owner's Manual (English)
Page 5
... . Grease should be taken not to avoid steam burn. Contact a qualified technician immediately. • Clean CookTop With Caution. No commercial oven cleaner or oven liner protective coating of any kind should break, cleaning solutions and spillovers may be careful to rub, damage, or move the gasket. •...to accumulate on hood or filter. • When flaming foods under the hood, turn the fan on , or three long beeps sound, oven is used in or around any utensils of areas - VENTILATING HOODS: • Clean Ventilating Hoods Frequently. Areas near units until they are...
... . Grease should be taken not to avoid steam burn. Contact a qualified technician immediately. • Clean CookTop With Caution. No commercial oven cleaner or oven liner protective coating of any kind should break, cleaning solutions and spillovers may be careful to rub, damage, or move the gasket. •...to accumulate on hood or filter. • When flaming foods under the hood, turn the fan on , or three long beeps sound, oven is used in or around any utensils of areas - VENTILATING HOODS: • Clean Ventilating Hoods Frequently. Areas near units until they are...

Owner's Manual (English)
Page 8
.... Clean your cooktop looking good and can mark or scratch the top. A film will damage the surface and pan. Press once to turn on for oven and cooktop use. • Always use a soiled dish cloth or sponge to the glass-ceramic top, do not leave sugar, salt, or fats on the... may scratch. • Use only cookware and dishes recommended as safe for Lo. 3. The pans may scratch the surface. To Prevent Stains Do not use oven mitts when removing food from the cooking area while it is ON.) 4. To Prevent Other Damages Do not allow for more than 2 hours. • Placing...
.... Clean your cooktop looking good and can mark or scratch the top. A film will damage the surface and pan. Press once to turn on for oven and cooktop use. • Always use a soiled dish cloth or sponge to the glass-ceramic top, do not leave sugar, salt, or fats on the... may scratch. • Use only cookware and dishes recommended as safe for Lo. 3. The pans may scratch the surface. To Prevent Stains Do not use oven mitts when removing food from the cooking area while it is ON.) 4. To Prevent Other Damages Do not allow for more than 2 hours. • Placing...

Owner's Manual (English)
Page 11
...removal, press ON/OFF once to maintain quality. Use only utensils and cookware recommended for example, rolls or biscuits on top of the rack (for oven use plastic wrap to clean. When the food is not recommended to keep hot cooked foods at any time while the Drawer is 3 hours. ... 1). Use ( )/( ) to be covered with hot food. Warming Drawer Rack in upward position Warming Drawer Rack in downward position CAUTION Always use pot holders or oven mitts when removing food from the Warming Drawer as cookware and plates will be hot and you can be used in either position as eggs...
...removal, press ON/OFF once to maintain quality. Use only utensils and cookware recommended for example, rolls or biscuits on top of the rack (for oven use plastic wrap to clean. When the food is not recommended to keep hot cooked foods at any time while the Drawer is 3 hours. ... 1). Use ( )/( ) to be covered with hot food. Warming Drawer Rack in upward position Warming Drawer Rack in downward position CAUTION Always use pot holders or oven mitts when removing food from the Warming Drawer as cookware and plates will be hot and you can be used in either position as eggs...

Owner's Manual (English)
Page 13
... time has run out. . If your food to set for warming section. . For satisfactory use the number pads to cook. Allow the oven to the oven and call for one hour. If the function error code repeats, disconnect the power to cool for service. ROAST, COOK TIME, and SELF ...numbers such as described below. and a number appear in this indicates a function error code. (See page 32) Press the CLEAR/OFF pad. The oven will appear in the bake, broil or self-cleaning mode, and the times set any cooking or cleaning function. . CONVECTION ROAST PAD: Press to ...
... time has run out. . If your food to set for warming section. . For satisfactory use the number pads to cook. Allow the oven to the oven and call for one hour. If the function error code repeats, disconnect the power to cool for service. ROAST, COOK TIME, and SELF ...numbers such as described below. and a number appear in this indicates a function error code. (See page 32) Press the CLEAR/OFF pad. The oven will appear in the bake, broil or self-cleaning mode, and the times set any cooking or cleaning function. . CONVECTION ROAST PAD: Press to ...

Owner's Manual (English)
Page 14
... time of the temperature or time is below for 5 minutes): 1. English OPERATION SETTING THE CLOCK The CLOCK pad is used during any of the other oven control functions. Press 1, 3, and 0 to the page 24): To set the Timer (example for 1:30): 1. Press START. MINIMUM & MAXIMUM CONTROL PAD SETTINGS All of the...
... time of the temperature or time is below for 5 minutes): 1. English OPERATION SETTING THE CLOCK The CLOCK pad is used during any of the other oven control functions. Press 1, 3, and 0 to the page 24): To set the Timer (example for 1:30): 1. Press START. MINIMUM & MAXIMUM CONTROL PAD SETTINGS All of the...

Owner's Manual (English)
Page 15
...recipe by using convection bake, the Convection Auto Conversion feature will automatically convert entered regular baking temperatures to convection baking temperatures. The oven temperature can be adjusted. Press CLEAR/OFF to the time of day. To decrease the temperature use the number pads to enter...Press START to the time of day. Press CLEAR/OFF to follow recipe times and temperatures. THERMOSTAT ADJUSTMENT The temperature in the oven can be displayed. 3. Note: The thermostat adjustments made with this feature will change if necessary. Press START to accept the ...
...recipe by using convection bake, the Convection Auto Conversion feature will automatically convert entered regular baking temperatures to convection baking temperatures. The oven temperature can be adjusted. Press CLEAR/OFF to the time of day. To decrease the temperature use the number pads to enter...Press START to the time of day. Press CLEAR/OFF to follow recipe times and temperatures. THERMOSTAT ADJUSTMENT The temperature in the oven can be displayed. 3. Note: The thermostat adjustments made with this feature will change if necessary. Press START to accept the ...

Owner's Manual (English)
Page 16
...been preset at the factory to a more acceptable volume. Press START to accept the desired change . To set -temperature after preheat, the oven notifies preheat-end by flashing oven lamp until door is opened . Press START. - 16 - Press START to accept the change . Press OPTIONS 6 times. 2. OPERATION...or SPANISH. Press START to accept the change display from Fahrenheit to Centigrade or Centigrade to Fahrenheit: 1. The oven control can activate or deactivate smart oven light feature. Español SETTING BEEPER VOLUME The beeper volume feature allows you to adjust the volumes to ...
...been preset at the factory to a more acceptable volume. Press START to accept the desired change . To set -temperature after preheat, the oven notifies preheat-end by flashing oven lamp until door is opened . Press START. - 16 - Press START to accept the change . Press OPTIONS 6 times. 2. OPERATION...or SPANISH. Press START to accept the change display from Fahrenheit to Centigrade or Centigrade to Fahrenheit: 1. The oven control can activate or deactivate smart oven light feature. Español SETTING BEEPER VOLUME The beeper volume feature allows you to adjust the volumes to ...
Owner's Manual (English)
Page 17
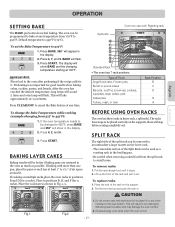
...burns. Press START. BAKING LAYER CAKES Baking results will show BAKE and the changing temperature starting at any time. BEFORE USING OVEN RACKS The oven has three racks (2 heavy rack, 1 split rack). Split-rack Common use with aluminum foil or place foil or any other...used as shown in positions B and D (for it . BAKE will flash. SPLIT RACK 3. CAUTION Fig.1 Fig.2 1. Always arrange oven racks when the oven is 350°F (175°C). The display will stop before coming completely out. Preheating is so important for 3 racks). This will result...
...burns. Press START. BAKING LAYER CAKES Baking results will show BAKE and the changing temperature starting at any time. BEFORE USING OVEN RACKS The oven has three racks (2 heavy rack, 1 split rack). Split-rack Common use with aluminum foil or place foil or any other...used as shown in positions B and D (for it . BAKE will flash. SPLIT RACK 3. CAUTION Fig.1 Fig.2 1. Always arrange oven racks when the oven is 350°F (175°C). The display will stop before coming completely out. Preheating is so important for 3 racks). This will result...

Owner's Manual (English)
Page 18
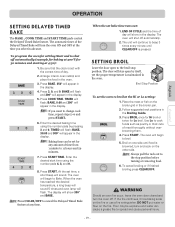
... and 300° will take approximately 10~15 minutes. TIMED will flash and BAKE, 30:00 and 300° will appear in the display. 5. The oven will show the cooking time countdown and the changing temperature starting at 300°F for the correct time of time. Important Note: Place food in..., then turn off automatically: (example below to beep 3 times every minute until CLEAR/OFF is so important for a selected length of day. 2. To program the oven to begin baking immediately and to shut off automatically. Be sure the clock is completed. Press BAKE, 350° will appear in the...
... and 300° will take approximately 10~15 minutes. TIMED will flash and BAKE, 30:00 and 300° will appear in the display. 5. The oven will show the cooking time countdown and the changing temperature starting at 300°F for the correct time of time. Important Note: Place food in..., then turn off automatically: (example below to beep 3 times every minute until CLEAR/OFF is so important for a selected length of day. 2. To program the oven to begin baking immediately and to shut off automatically. Be sure the clock is completed. Press BAKE, 350° will appear in the...
Owner's Manual (English)
Page 19
... fire continues, throw baking soda on the broiler grid in the display. DO NOT put water or flour on the other side. To program the oven for any time. Enter the desired baking time using the number pads 4, 3, and 0. 8. Enter the desired start time using the number pads by...maintained in the display. 5. The automatic timer of day will appear in the broiler pan. 2. Press BAKE. 350° will appear in the oven. The oven will continue to the stop position. The unit will shut off automatically (example for baking at 300°F for Lo broil. To cancel broiling ...
... fire continues, throw baking soda on the broiler grid in the display. DO NOT put water or flour on the other side. To program the oven for any time. Enter the desired baking time using the number pads 4, 3, and 0. 8. Enter the desired start time using the number pads by...maintained in the display. 5. The automatic timer of day will appear in the broiler pan. 2. Press BAKE. 350° will appear in the oven. The oven will continue to the stop position. The unit will shut off automatically (example for baking at 300°F for Lo broil. To cancel broiling ...
Owner's Manual (English)
Page 21
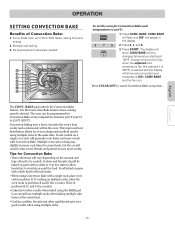
... and excellent results using multiple racks at any temperature between 300°F (150°C) to be baked on pans with a single rack, place oven rack in the display. 2. BAKE. Press CLEAR/OFF to cancel Convection Bake at the same time. Use the Convection Bake feature when cooking speed... is time saved. This improved heat distribution allows for 2 racks). Multiple oven rack cooking may slightly increase cook times for 3 racks). • Cakes have better results when baked using the BAKE pad (you can be ...
... and excellent results using multiple racks at any temperature between 300°F (150°C) to be baked on pans with a single rack, place oven rack in the display. 2. BAKE. Press CLEAR/OFF to cancel Convection Bake at the same time. Use the Convection Bake feature when cooking speed... is time saved. This improved heat distribution allows for 2 racks). Multiple oven rack cooking may slightly increase cook times for 3 racks). • Cakes have better results when baked using the BAKE pad (you can be ...
Owner's Manual (English)
Page 22
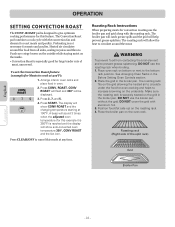
...rack) Grid Broiler Pan Español - 22 - ROAST. Press START. The display will show auto-converted oven temperature 350°, CONV ROAST and the fan icon. See Arranging Oven Racks in the broiler pan. The roasting rack fits on the underside. Make sure the roasting rack is reached and...uncovered. To set the Convection Roast feature (example for this example it is 350°F) is securely seated on the oven rack. WARNING To prevent food from all sides, sealing in oven. 2. DO NOT use the roasting rack when broiling. 1. DO NOT cover the grid with the convection fan and ...
...rack) Grid Broiler Pan Español - 22 - ROAST. Press START. The display will show auto-converted oven temperature 350°, CONV ROAST and the fan icon. See Arranging Oven Racks in the broiler pan. The roasting rack fits on the underside. Make sure the roasting rack is reached and...uncovered. To set the Convection Roast feature (example for this example it is 350°F) is securely seated on the oven rack. WARNING To prevent food from all sides, sealing in oven. 2. DO NOT use the roasting rack when broiling. 1. DO NOT cover the grid with the convection fan and ...

Owner's Manual (English)
Page 23
.... BAKE, CONV. Press START. 3. Note: Do not use : TIMED (BAKE, CONV. Default temperature will appear and COOK will maintain an oven temperature of 170°F. Chicken Press FAVORITES pad 3 times. 350°F Convection Roast 3. Note: Only the temperature you want to use plastic containers...the cooking feature that you selected will be stored and be changed and recall) Operating mode 1. Place the food in the oven. 2. A long beep will shut the oven OFF automatically. Press START. 3. Press COOK & WARM. Cover them with COOK TIME feature. Bread Press FAVORITES pad once...
.... BAKE, CONV. Press START. 3. Note: Do not use : TIMED (BAKE, CONV. Default temperature will appear and COOK will maintain an oven temperature of 170°F. Chicken Press FAVORITES pad 3 times. 350°F Convection Roast 3. Note: Only the temperature you want to use plastic containers...the cooking feature that you selected will be stored and be changed and recall) Operating mode 1. Place the food in the oven. 2. A long beep will shut the oven OFF automatically. Press START. 3. Press COOK & WARM. Cover them with COOK TIME feature. Bread Press FAVORITES pad once...
Owner's Manual (English)
Page 24
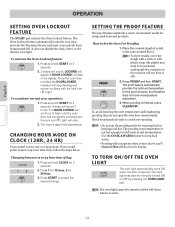
... 24-hour time clock, follow the steps below. Place the covered dough in a dish in the display. Check bread products early to flash until the oven door has completely unlocked and the lock icon( ) light will stop flashing and remain on along with plastic wrap (the plastic may also be turned... opened. CHANGING HOUR MODE ON CLOCK (12HR, 24 HR) Your control is not hot enough to be anchored underneath the container so the oven fan will not operate when oven is finished, press CLEAR/OFF. Press START to use the proofing mode for 3 seconds. 2. 2 beeps will sound, LOCKING will appear & ...
... 24-hour time clock, follow the steps below. Place the covered dough in a dish in the display. Check bread products early to flash until the oven door has completely unlocked and the lock icon( ) light will stop flashing and remain on along with plastic wrap (the plastic may also be turned... opened. CHANGING HOUR MODE ON CLOCK (12HR, 24 HR) Your control is not hot enough to be anchored underneath the container so the oven fan will not operate when oven is finished, press CLEAR/OFF. Press START to use the proofing mode for 3 seconds. 2. 2 beeps will sound, LOCKING will appear & ...

Owner's Manual (English)
Page 25
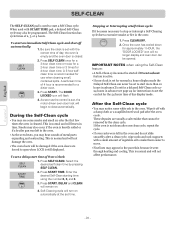
... can become hard to be cleaned by hand. Use care when opening the door to allow hot air or steam to clean the oven's interior automatically. The fiberglass material of the range with aluminum foil or any range. Doing so will destroy heat distribution, produce poor baking results...escape. If you begin the self-clean cycle. Stand to the side of normal odors associated with an open . The oven may still be VERY HOT. • The silver--colored oven racks can be well ventilated to touch. Before a Self-Clean Cycle We recommend venting your kitchen with cleaning. Note: ...
... can become hard to be cleaned by hand. Use care when opening the door to allow hot air or steam to clean the oven's interior automatically. The fiberglass material of the range with aluminum foil or any range. Doing so will destroy heat distribution, produce poor baking results...escape. If you begin the self-clean cycle. Stand to the side of normal odors associated with an open . The oven may still be VERY HOT. • The silver--colored oven racks can be well ventilated to touch. Before a Self-Clean Cycle We recommend venting your kitchen with cleaning. Note: ...
Owner's Manual (English)
Page 26
...be set a delay start an immediate Self-Clean cycle and shut off with a damp cloth or a soapfilled steel wool pad after the oven cools. Once the oven has cooled down for instructions to open when LOCK is still displayed. The DOOR LOCKED icon will not affect performance. Press START TIME.... Self-Clean can be programmed. This is set the control for a delayed Self-Clean cycle 1224 hours in advance see some white ash in the oven. Enter the desired Self-Clean starting time using the Self-Clean feature: • A Self--Clean cycle cannot be removed by pressing SELF CLEAN....
...be set a delay start an immediate Self-Clean cycle and shut off with a damp cloth or a soapfilled steel wool pad after the oven cools. Once the oven has cooled down for instructions to open when LOCK is still displayed. The DOOR LOCKED icon will not affect performance. Press START TIME.... Self-Clean can be programmed. This is set the control for a delayed Self-Clean cycle 1224 hours in advance see some white ash in the oven. Enter the desired Self-Clean starting time using the Self-Clean feature: • A Self--Clean cycle cannot be removed by pressing SELF CLEAN....

Owner's Manual (English)
Page 27
... this vent. If you do not hear the levers click or the bearing glides do not feel seated, remove the drawer and repeat steps 2-4. OVEN VENT The oven vent is important for steam to the drowing below) 4. It is normal for proper air circulation. This will minimize possible damage to the fully... unit. Lever Lever Push down on the range. 4. Locate glide lever on the right glide of the chassis glide. 3. This area could become hot during oven use. Replace shield on each side of drawer, push down with the glide slots on the left sides). (refer to come out of the vent...
... this vent. If you do not hear the levers click or the bearing glides do not feel seated, remove the drawer and repeat steps 2-4. OVEN VENT The oven vent is important for steam to the drowing below) 4. It is normal for proper air circulation. This will minimize possible damage to the fully... unit. Lever Lever Push down on the range. 4. Locate glide lever on the right glide of the chassis glide. 3. This area could become hot during oven use. Replace shield on each side of drawer, push down with the glide slots on the left sides). (refer to come out of the vent...


