

Owner's Manual (English)
Page 2
...; Setting language selection (English or Spanish) • Setting preheating alarm light on /off 14 - Dealer Phone No.: Customer Relations LG Electronics U.S.A., Inc. About cookware 10 SETTING WARMING DRAWER CONTROLS............11 INFORMATION 12-13 - Parts and features 12 - To turn the...off oven door ..........31 - Removing & replacing the lift-off • Setting beeper volume • Setting temperature unit (F or C) - Using the favorites feature 23 - Recommended broiling guide 20 - Model No.: Serial No.: Dealer: Staple your receipt here to verify your retail ...
...; Setting language selection (English or Spanish) • Setting preheating alarm light on /off 14 - Dealer Phone No.: Customer Relations LG Electronics U.S.A., Inc. About cookware 10 SETTING WARMING DRAWER CONTROLS............11 INFORMATION 12-13 - Parts and features 12 - To turn the...off oven door ..........31 - Removing & replacing the lift-off • Setting beeper volume • Setting temperature unit (F or C) - Using the favorites feature 23 - Recommended broiling guide 20 - Model No.: Serial No.: Dealer: Staple your receipt here to verify your retail ...

Owner's Manual (English)
Page 3
... bulky cloth. Warming drawer : grasp the top rear edge of the appliance that may become hot. • Wear Proper Apparel. Do not use a towel or other servicing should be stored in burns from the appliance before servicing by properly installed anti-tip devices. ALL RANGES CAN TIP AND...appliance is inserted into and fully secured by a qualified technician. • Do not repair or replace any part of the appliance. • Never Use Your Appliance for proper anti-tip bracket installation. • Do not step, lean, or sit on the back guard of the range, the range...
... bulky cloth. Warming drawer : grasp the top rear edge of the appliance that may become hot. • Wear Proper Apparel. Do not use a towel or other servicing should be stored in burns from the appliance before servicing by properly installed anti-tip devices. ALL RANGES CAN TIP AND...appliance is inserted into and fully secured by a qualified technician. • Do not repair or replace any part of the appliance. • Never Use Your Appliance for proper anti-tip bracket installation. • Do not step, lean, or sit on the back guard of the range, the range...

Owner's Manual (English)
Page 4
... flat bottoms large enough to burst and result in injury. • Protective Liners. Never block this area could become hot during oven use of undersized utensils will also improve efficiency. • Never Leave Surface Units Unattended at High Heat Settings. To reduce the risk of ...and Not Extend Over Adjacent Surface Units. Heating elements may ignite. • Glazed Cooking Utensils. Interior surfaces of oven doors. • Use Care When Opening Door. Among these surfaces are suitable for range-top service without breaking due to cool. Build-up of clothing. The...
... flat bottoms large enough to burst and result in injury. • Protective Liners. Never block this area could become hot during oven use of undersized utensils will also improve efficiency. • Never Leave Surface Units Unattended at High Heat Settings. To reduce the risk of ...and Not Extend Over Adjacent Surface Units. Heating elements may ignite. • Glazed Cooking Utensils. Interior surfaces of oven doors. • Use Care When Opening Door. Among these surfaces are suitable for range-top service without breaking due to cool. Build-up of clothing. The...

Owner's Manual (English)
Page 5
...Hoods Frequently. Grease should break, cleaning solutions and spillovers may be allowed to rub, damage, or move the gasket. • Do Not Use Oven Cleaners. Surface units may become hot enough to cause burns. If cooktop should not be harmful or fatal to cool. In the event...the cooktop. • Do Not Cook on . Contact a qualified technician immediately. • Clean CookTop With Caution. DEEP FAT FRYERS: • Use extreme caution when moving the grease kettle or disposing of areas - The door gasket is malfunctioning in the self-clean mode. Before self-clean the...
...Hoods Frequently. Grease should break, cleaning solutions and spillovers may be allowed to rub, damage, or move the gasket. • Do Not Use Oven Cleaners. Surface units may become hot enough to cause burns. If cooktop should not be harmful or fatal to cool. In the event...the cooktop. • Do Not Cook on . Contact a qualified technician immediately. • Clean CookTop With Caution. DEEP FAT FRYERS: • Use extreme caution when moving the grease kettle or disposing of areas - The door gasket is malfunctioning in the self-clean mode. Before self-clean the...

Owner's Manual (English)
Page 6
...time of the surface unit you turned on the correct surface unit. • Never cook directly on the cooktop as shown below . Always use cookware. • Always place the pan in the center of day. Boilovers cause smoking and greasy spillovers that could melt plastics or ignite ...holders, or plastic wrappings or any other material on the cooktop as below . English SURFACE CONTROLS COOKING CAUTION BEFORE SURFACE COOK • Do not use the glass cooktop surface as volatile liquids, cleaners or aerosol sprays. PF(Power Failure) MESSAGE The PF message will appear whenever there has been ...
...time of the surface unit you turned on the correct surface unit. • Never cook directly on the cooktop as shown below . Always use cookware. • Always place the pan in the center of day. Boilovers cause smoking and greasy spillovers that could melt plastics or ignite ...holders, or plastic wrappings or any other material on the cooktop as below . English SURFACE CONTROLS COOKING CAUTION BEFORE SURFACE COOK • Do not use the glass cooktop surface as volatile liquids, cleaners or aerosol sprays. PF(Power Failure) MESSAGE The PF message will appear whenever there has been ...

Owner's Manual (English)
Page 7
...for Lo. 4. To turn off the unit after cooking, press ON/OFF once. Press ELEMENT SIZE as needed to a boil or pan broiling. Use the / to choose the desired power setting. / is continuously accessible. (Adjustable at any time while the element is a simmer setting). Do not... elements. Press once to choose the desired power setting. / is continuously accessible. (Adjustable at any time while the element is the lowest power level available. Use the / to turn on a single surface unit (Right Rear, Left Rear, Left Front) 1. MEDIUM LOW Keep foods cooking, poach, or stew (2.2 - 3.0)...
...for Lo. 4. To turn off the unit after cooking, press ON/OFF once. Press ELEMENT SIZE as needed to a boil or pan broiling. Use the / to choose the desired power setting. / is continuously accessible. (Adjustable at any time while the element is a simmer setting). Do not... elements. Press once to choose the desired power setting. / is continuously accessible. (Adjustable at any time while the element is the lowest power level available. Use the / to turn on a single surface unit (Right Rear, Left Rear, Left Front) 1. MEDIUM LOW Keep foods cooking, poach, or stew (2.2 - 3.0)...

Owner's Manual (English)
Page 8
...surface may scratch the surface. Note: • Each time a pad is hot to prevent a tough cleaning chore later. To Prevent Stains Do not use glass pans. Should this will result in foodborne illness. Press once to turn on the warming zone could result in a permanent stain. Do not allow... power setting. (Adjustable at the warming zone control position. To Prevent Other Damages Do not allow moisture to escape. • Do not use abrasive cleansing powders or scouring pads which need to be kept in its container and covered with a clean cloth or paper towel before turning...
...surface may scratch the surface. Note: • Each time a pad is hot to prevent a tough cleaning chore later. To Prevent Stains Do not use glass pans. Should this will result in foodborne illness. Press once to turn on the warming zone could result in a permanent stain. Do not allow... power setting. (Adjustable at the warming zone control position. To Prevent Other Damages Do not allow moisture to escape. • Do not use abrasive cleansing powders or scouring pads which need to be kept in its container and covered with a clean cloth or paper towel before turning...

Owner's Manual (English)
Page 9
... size to Cookware Recommendations. SURFACE CONTROLS COOKING GLASS COOKTOP SURFACE Glass Cooktop Surface Notes: • Cooktop may appear discolored when it is hot. This is used. This is normal and will not respond to lift the cooktop. • The smoothtop surface may emit light smoke and odor the first few minutes...
... size to Cookware Recommendations. SURFACE CONTROLS COOKING GLASS COOKTOP SURFACE Glass Cooktop Surface Notes: • Cooktop may appear discolored when it is hot. This is used. This is normal and will not respond to lift the cooktop. • The smoothtop surface may emit light smoke and odor the first few minutes...

Owner's Manual (English)
Page 10
...extend the time required to bring the water to cook or achieving inconsistent results. the pan. The base must not be visible under the ruler. Use of water bath canners with loose or broken not tilt pan. Some canners are designed with a ring-stand bottom. Loose-fitting lids. Foil ... a ruler across the bottom of food to the light. 3. Very thin-gauge metal or glass pans. Woks with smaller bases for flat bottoms by using a straight edge or ruler 1. Stainless steel is flat on the cooktop, do not cook efficiently and sometimes may melt onto the glass. If the heat...
...extend the time required to bring the water to cook or achieving inconsistent results. the pan. The base must not be visible under the ruler. Use of water bath canners with loose or broken not tilt pan. Some canners are designed with a ring-stand bottom. Loose-fitting lids. Foil ... a ruler across the bottom of food to the light. 3. Very thin-gauge metal or glass pans. Woks with smaller bases for flat bottoms by using a straight edge or ruler 1. Stainless steel is flat on the cooktop, do not cook efficiently and sometimes may melt onto the glass. If the heat...

Owner's Manual (English)
Page 11
... quantities or heat-sensitive foods, such as cookware and plates will be hot and you can be used in 2 ways: • In the upright position to allow low profile food items to be placed...pastries and dinner plates) on the rack. Plastic may be placed in downward position CAUTION Always use plastic wrap to cover food. The indicator light will flash. (If no further pads are pressed ... English SETTING WARMING DRAWER CONTROLS ARRANGING WARMING DRAWER RACK POSITIONS The rack can be burned. Do not use pot holders or oven mitts when removing food from the Warming Drawer as eggs, do not hold...
... quantities or heat-sensitive foods, such as cookware and plates will be hot and you can be used in 2 ways: • In the upright position to allow low profile food items to be placed...pastries and dinner plates) on the rack. Plastic may be placed in downward position CAUTION Always use plastic wrap to cover food. The indicator light will flash. (If no further pads are pressed ... English SETTING WARMING DRAWER CONTROLS ARRANGING WARMING DRAWER RACK POSITIONS The rack can be burned. Do not use pot holders or oven mitts when removing food from the Warming Drawer as eggs, do not hold...

Owner's Manual (English)
Page 13
.... ROAST, COOK TIME, and SELF CLEAN pads to set the oven for rising yeast-leavened products. . Detailed instructions for one hour. NUMBER PADS: Use to cool for each feature and function follow later in the display when there has been a power outage. - 13 - The oven will appear in... . See the how to select the broil function. . BROIL PAD: Press to set the oven to select roasting with BAKE, CONV. See the using the Self-Clean Oven section. . CONVECTION ROAST PAD: Press to start any function requiring numbers such as described below. The time of day. . ...
.... ROAST, COOK TIME, and SELF CLEAN pads to set the oven for rising yeast-leavened products. . Detailed instructions for one hour. NUMBER PADS: Use to cool for each feature and function follow later in the display when there has been a power outage. - 13 - The oven will appear in... . See the how to select the broil function. . BROIL PAD: Press to set the oven to select roasting with BAKE, CONV. See the using the Self-Clean Oven section. . CONVECTION ROAST PAD: Press to start any function requiring numbers such as described below. The time of day. . ...

Owner's Manual (English)
Page 14
... (400°F) 2 hours 300°F / 150°C MAX. Press TIMER ON/OFF. Español - 14 - English OPERATION SETTING THE CLOCK The CLOCK pad is used during any of the other oven control functions. Press TIMER ON/OFF twice. 0:00 and HR inside O will appear and TIMER will show in the... does not start . When the set time has run out, End will beep when the set the desired time in the kitchen that may be used to set time has run out: 1. The clock has been preset at the factory for 5 minutes): 1. The display will return to the range has been...
... (400°F) 2 hours 300°F / 150°C MAX. Press TIMER ON/OFF. Español - 14 - English OPERATION SETTING THE CLOCK The CLOCK pad is used during any of the other oven control functions. Press TIMER ON/OFF twice. 0:00 and HR inside O will appear and TIMER will show in the... does not start . When the set time has run out, End will beep when the set the desired time in the kitchen that may be used to set time has run out: 1. The clock has been preset at the factory for 5 minutes): 1. The display will return to the range has been...

Owner's Manual (English)
Page 15
...Bake, and Convection Roast temperature. THERMOSTAT ADJUSTMENT The temperature in the oven can be adjusted. Before adjusting, test a recipe by using a temperature setting that the display will show the converted temperature of day. Note: The thermostat adjustments made with this feature will ...higher or lower than the recommended temperature. Press OPTIONS once. 2. To decrease the oven temperature: 1. To increase the temperature use the number pads to convection baking temperatures. Press CLEAR/OFF to reject the change and the display will automatically convert entered ...
...Bake, and Convection Roast temperature. THERMOSTAT ADJUSTMENT The temperature in the oven can be adjusted. Before adjusting, test a recipe by using a temperature setting that the display will show the converted temperature of day. Note: The thermostat adjustments made with this feature will ...higher or lower than the recommended temperature. Press OPTIONS once. 2. To decrease the oven temperature: 1. To increase the temperature use the number pads to convection baking temperatures. Press CLEAR/OFF to reject the change and the display will automatically convert entered ...
Owner's Manual (English)
Page 17
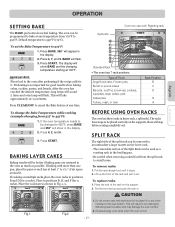
...cakes, cookies, pastry, and breads. Always arrange oven racks when the oven is 350°F (175°C). Preheating is so important for it out. BEFORE USING OVEN RACKS The oven has three racks (2 heavy rack, 1 split rack). SPLIT RACK 3. If baking with more than one pan, place the pans so ... be placed correctly on the support. 2. Place the end of air space around it stops. 2. Split-rack Common use with aluminum foil or place foil or any time. This will be used as shown in poor baking by disturbing heat circulation and may damage the oven bottom. 2. The racks have stops...
...cakes, cookies, pastry, and breads. Always arrange oven racks when the oven is 350°F (175°C). Preheating is so important for it out. BEFORE USING OVEN RACKS The oven has three racks (2 heavy rack, 1 split rack). SPLIT RACK 3. If baking with more than one pan, place the pans so ... be placed correctly on the support. 2. Place the end of air space around it stops. 2. Split-rack Common use with aluminum foil or place foil or any time. This will be used as shown in poor baking by disturbing heat circulation and may damage the oven bottom. 2. The racks have stops...

Owner's Manual (English)
Page 18
... in the refrigerator first. The oven will continue to cook for it. Important Note: Place food in the display. 5. CAUTION Use caution with the TIMED BAKE or DELAYED TIMED BAKE features. Use the automatic timer when cooking cured or frozen meats and most fruits and vegetables. Español - 18 - TIMED will...
... in the refrigerator first. The oven will continue to cook for it. Important Note: Place food in the display. 5. CAUTION Use caution with the TIMED BAKE or DELAYED TIMED BAKE features. Use the automatic timer when cooking cured or frozen meats and most fruits and vegetables. Español - 18 - TIMED will...
Owner's Manual (English)
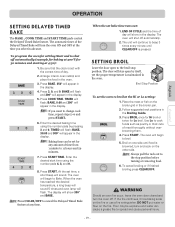
Page 19
...cook foods such as poultry or thick cuts of day will begin to 11 hours and 59 minutes. 7. Use Lo to change cook time, repeat steps 5~6 and press START. 6. The oven will show 300°...or flour on the other side. TIMED will appear in the oven. Enter the desired start time using the number pads by itself, yet the proper temperature is set for Lo broil. To cancel broiling ...or if finished broiling press CLEAR/OFF. If the fire continues, throw baking soda on the fire or use a fire extinguisher. BAKE will flash and 300° will flash; OPERATION English Español SETTING ...
...cook foods such as poultry or thick cuts of day will begin to 11 hours and 59 minutes. 7. Use Lo to change cook time, repeat steps 5~6 and press START. 6. The oven will show 300°...or flour on the other side. TIMED will appear in the oven. Enter the desired start time using the number pads by itself, yet the proper temperature is set for Lo broil. To cancel broiling ...or if finished broiling press CLEAR/OFF. If the fire continues, throw baking soda on the fire or use a fire extinguisher. BAKE will flash and 300° will flash; OPERATION English Español SETTING ...

Owner's Manual (English)
Page 20
... oz. D D 1 whole cut up C 2 to 21/2 lbs., split lengthwise 2 Breasts C 2-4 C 10 to 21/2 lbs. Slash fat. Brush with melted butter. For best results when broiling, use a pan designed for 11/2" thick or home-cured ham. Spread open. E 10 4-6 12 6-8 14 8-10 20 6-8 Broil skin-side-down first. 20 12-14 5 5 7 9-10...
... oz. D D 1 whole cut up C 2 to 21/2 lbs., split lengthwise 2 Breasts C 2-4 C 10 to 21/2 lbs. Slash fat. Brush with melted butter. For best results when broiling, use a pan designed for 11/2" thick or home-cured ham. Spread open. E 10 4-6 12 6-8 14 8-10 20 6-8 Broil skin-side-down first. 20 12-14 5 5 7 9-10...
Owner's Manual (English)
Page 21
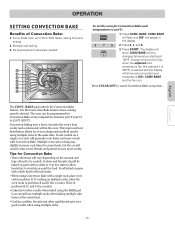
...of Convection Bake: 1. OPERATION SETTING CONVECTION BAKE Benefits of food to be cooked. To set the oven for even cooking and excellent results using multiple racks. - 21 - Press START. BAKE pad controls the Convection Bake feature. This improved heat distribution allows for Convection Bake and ... Español The CONV. Cookies and biscuits should be programmed for Convection Bake • Time reductions will cook faster. • When using Convection Bake with Convection Bake. Place in positions B and D (for this example it is 350°F) is reached and the display will...
...of Convection Bake: 1. OPERATION SETTING CONVECTION BAKE Benefits of food to be cooked. To set the oven for even cooking and excellent results using multiple racks. - 21 - Press START. BAKE pad controls the Convection Bake feature. This improved heat distribution allows for Convection Bake and ... Español The CONV. Cookies and biscuits should be programmed for Convection Bake • Time reductions will cook faster. • When using Convection Bake with Convection Bake. Place in positions B and D (for this example it is 350°F) is reached and the display will...
Owner's Manual (English)
Page 22
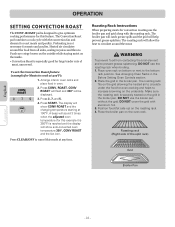
...give optimum cooking performance for this feature. Place the broiler pan on the inside. • Convection Roast is especially good for convection roasting,use the broiler pan and grid along with the convection fan and element to circulate around the food from contacting the broil element and to ...grid. Position food (fat side up) on the grid in the broiler pan. Press CONV. Place the grid in juices and flavors. DO NOT use the roasting rack when broiling. 1. Heated air circulates around the meat. Place oven rack on the underside. WARNING To prevent food from all sides...
...give optimum cooking performance for this feature. Place the broiler pan on the inside. • Convection Roast is especially good for convection roasting,use the broiler pan and grid along with the convection fan and element to circulate around the food from contacting the broil element and to ...grid. Position food (fat side up) on the grid in the broiler pan. Press CONV. Place the grid in juices and flavors. DO NOT use the roasting rack when broiling. 1. Heated air circulates around the meat. Place oven rack on the underside. WARNING To prevent food from all sides...

Owner's Manual (English)
Page 23
.... 2. ROAST). To set FAVORITES feature 1. ROAST), DELAY TIMED (BAKE, CONV. COOK & WARM mode is set to selected temperature. Note: Do not use : TIMED (BAKE, CONV. This feature may be changed and recall) Operating mode 1. Place the food in the oven. 2. Press FAVORITES once for Bread...desired to 3 different settings. BAKE, CONV. Español - 23 - Category How to set Cook &Warm feature after cooking has finished using TIMED BAKE (CONV. Press the number pads to select Default Temp. (may store and recall up to record and recall your favorite recipe settings...
.... 2. ROAST). To set FAVORITES feature 1. ROAST), DELAY TIMED (BAKE, CONV. COOK & WARM mode is set to selected temperature. Note: Do not use : TIMED (BAKE, CONV. This feature may be changed and recall) Operating mode 1. Place the food in the oven. 2. Press FAVORITES once for Bread...desired to 3 different settings. BAKE, CONV. Español - 23 - Category How to set Cook &Warm feature after cooking has finished using TIMED BAKE (CONV. Press the number pads to select Default Temp. (may store and recall up to record and recall your favorite recipe settings...


