
Owners Manual
Page 11
This function gives you must install the drain hose. (See pages 21-22 for more information.) If only the Cool mode is used with any of the four modes. The appliance will stop operation ... emptied. COV34636802 2018. 2. 5. 오오 6:10 Page 11 ENGLISH one -degree runs the compressor until cycles the compressor SLEEP mode can be used , the drain hose is automatically set temperature, fan speed, or the selected TIMER delay. LED display shows the set to be activated from the remote. Sets the air...
This function gives you must install the drain hose. (See pages 21-22 for more information.) If only the Cool mode is used with any of the four modes. The appliance will stop operation ... emptied. COV34636802 2018. 2. 5. 오오 6:10 Page 11 ENGLISH one -degree runs the compressor until cycles the compressor SLEEP mode can be used , the drain hose is automatically set temperature, fan speed, or the selected TIMER delay. LED display shows the set to be activated from the remote. Sets the air...

Owners Manual
Page 16
... four screws holding the grill on the diffuser, using the four screws removed in the same manner as assembling the hose to the left until it is securely attached to the vent hose. 8. Use a pliers to extend the first four or five accordioned folds at the top and bottom and sliding the... mounting bracket to the mounting bracket. (See steps 2 and 3.) 7. Reattach the grill on the end of the diffuser in step 5. 16 Attach the hose assembly onto the back of the air conditioner by inserting the edges of the mounting bracket behind the tabs at both ends of the mounting...
... four screws holding the grill on the diffuser, using the four screws removed in the same manner as assembling the hose to the left until it is securely attached to the vent hose. 8. Use a pliers to extend the first four or five accordioned folds at the top and bottom and sliding the... mounting bracket to the mounting bracket. (See steps 2 and 3.) 7. Reattach the grill on the end of the diffuser in step 5. 16 Attach the hose assembly onto the back of the air conditioner by inserting the edges of the mounting bracket behind the tabs at both ends of the mounting...

Owners Manual
Page 22
...to check and empty the bucket frequently to automatic drain by the draining water. Set the unit to avoid overflows. 3. To detach the drain hose, push the outer ring of the upper drain port in a bucket that could be stained or damaged by pressing the Fan and Down buttons ...at the back of the drain hose in and pull the connector out. 22 To attach the drain hose, insert the connector into place. 2. COV34636802 2018. 2. 5. 오오 6:10 Page 22 INSTALLATION INSTRUCTIONS HEATING DRAINAGE (...
...to check and empty the bucket frequently to automatic drain by the draining water. Set the unit to avoid overflows. 3. To detach the drain hose, push the outer ring of the upper drain port in a bucket that could be stained or damaged by pressing the Fan and Down buttons ...at the back of the drain hose in and pull the connector out. 22 To attach the drain hose, insert the connector into place. 2. COV34636802 2018. 2. 5. 오오 6:10 Page 22 INSTALLATION INSTRUCTIONS HEATING DRAINAGE (...
Owners Manual
Page 23
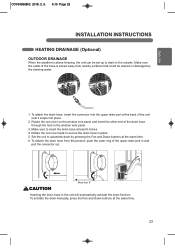
... sure to the outside. Rotate the nut cover back to automatic drain by the draining water. 1. Make sure the outlet of the hose is above freezing, the unit can be stained or damaged by pressing the Fan and Down buttons at the back of the unit until...same time. 6. To activate the drain manually, press the Fan and Down buttons at least 8 inches. 4. To attach the drain hose, insert the connector into place. 2. Inserting the drain hose in the window vent panel. 3. ENGLISH COV34636802 2018. 2. 5. 오오 6:10 Page 23 INSTALLATION INSTRUCTIONS HEATING DRAINAGE (Optional)...
... sure to the outside. Rotate the nut cover back to automatic drain by the draining water. 1. Make sure the outlet of the hose is above freezing, the unit can be stained or damaged by pressing the Fan and Down buttons at the back of the unit until...same time. 6. To activate the drain manually, press the Fan and Down buttons at least 8 inches. 4. To attach the drain hose, insert the connector into place. 2. Inserting the drain hose in the window vent panel. 3. ENGLISH COV34636802 2018. 2. 5. 오오 6:10 Page 23 INSTALLATION INSTRUCTIONS HEATING DRAINAGE (Optional)...

Owners Manual
Page 24
... plug the air conditioner back in the Cool or Fan mode. • Remove the drain plug when using the Dry (dehumidifying) mode. • Install a drain hose (16mm [5/8"] inside diameter) and place the open end of 75°F (24°C) once restarted. 24 COV34636802 2018. 2. 5. 오오 6:10 Page 24 CARE AND... in high humidity. • The upper drain port is not used in and restart it defaults to the Cool mode with a temperature setting of the hose over a drain or bucket or out the window. Using the Lower Drain Port If the E5 error appears in the display: The water collection tank...
... plug the air conditioner back in the Cool or Fan mode. • Remove the drain plug when using the Dry (dehumidifying) mode. • Install a drain hose (16mm [5/8"] inside diameter) and place the open end of 75°F (24°C) once restarted. 24 COV34636802 2018. 2. 5. 오오 6:10 Page 24 CARE AND... in high humidity. • The upper drain port is not used in and restart it defaults to the Cool mode with a temperature setting of the hose over a drain or bucket or out the window. Using the Lower Drain Port If the E5 error appears in the display: The water collection tank...


