Owner's Manual
Page 2
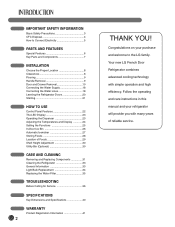
...Setting the Functions 25 In-Door Ice Bin 26 Automatic Icemaker 27 Storing Foods 28 Location of reliable service. Your new LG French Door Refrigerator combines advanced cooling technology with many years of Foods 29 Shelf Height Adjustment 30 Utility Bin (Optional ...30 CARE AND CLEANING Removing and Replacing Components 31 Cleaning the Refrigerator 33 General Information 33 Light Bulb Replacement 34 Replacing the Water Filter 35 TROUBLESHOOTING Before Calling for Service 36 SPECIFICATIONS Key Dimensions and Specifications...
...Setting the Functions 25 In-Door Ice Bin 26 Automatic Icemaker 27 Storing Foods 28 Location of reliable service. Your new LG French Door Refrigerator combines advanced cooling technology with many years of Foods 29 Shelf Height Adjustment 30 Utility Bin (Optional ...30 CARE AND CLEANING Removing and Replacing Components 31 Cleaning the Refrigerator 33 General Information 33 Light Bulb Replacement 34 Replacing the Water Filter 35 TROUBLESHOOTING Before Calling for Service 36 SPECIFICATIONS Key Dimensions and Specifications...

Owner's Manual
Page 3
...on doors, drawers or shelves of this appliance. • NEVER unplug your refrigerator away from the outlet. • Repair or replace immediately all safety messages. ENGLISH BASIC SAFETY PRECAUTIONS This guide contains many important safety messages. They could damage the refrigerator and seriously...CAUTION. Be careful closing doors when children are necessarily small. NOTE: Service should be performed by a qualified technician. • Before replacing a burned-out light bulb, unplug the refrigerator or turn off power at either or both controls to the OFF position does not...
...on doors, drawers or shelves of this appliance. • NEVER unplug your refrigerator away from the outlet. • Repair or replace immediately all safety messages. ENGLISH BASIC SAFETY PRECAUTIONS This guide contains many important safety messages. They could damage the refrigerator and seriously...CAUTION. Be careful closing doors when children are necessarily small. NOTE: Service should be performed by a qualified technician. • Before replacing a burned-out light bulb, unplug the refrigerator or turn off power at either or both controls to the OFF position does not...
Owner's Manual
Page 5
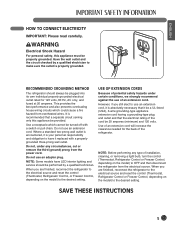
... Control, depending on the model) to have LED interior lighting and service should always be provided. Where a standard two-prong wall outlet is encountered, it replaced with a switch or pull chain. When you are finished, reconnect the refrigerator to the electrical source and reset the control (Thermostat, Refrigerator Control or Freezer...
... Control, depending on the model) to have LED interior lighting and service should always be provided. Where a standard two-prong wall outlet is encountered, it replaced with a switch or pull chain. When you are finished, reconnect the refrigerator to the electrical source and reset the control (Thermostat, Refrigerator Control or Freezer...
Owner's Manual
Page 18
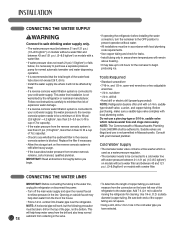
... must be in accordance with local plumbing code requirements. • Use copper tubing and check for leaks. • Install tubing only in the valve. 18 Replace the filter if necessary. • Allow the storage tank on the reverse osmosis system to refill after heavy usage. • If the issue about water...
... must be in accordance with local plumbing code requirements. • Use copper tubing and check for leaks. • Install tubing only in the valve. 18 Replace the filter if necessary. • Allow the storage tank on the reverse osmosis system to refill after heavy usage. • If the issue about water...
Owner's Manual
Page 20
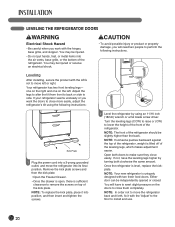
NOTE: To replace the kick plate, place it with the 'Adjust' to the floor to install and use. 20 Open both clockwise the same amount. Once the refrigerator ... the hinges, base grille, and stopper. NOTE: Your new refrigerator is sufficient clearance to remove the screws on top of the refrigerator, weight is level, replace the kickplate.
NOTE: To replace the kick plate, place it with the 'Adjust' to the floor to install and use. 20 Open both clockwise the same amount. Once the refrigerator ... the hinges, base grille, and stopper. NOTE: Your new refrigerator is sufficient clearance to remove the screws on top of the refrigerator, weight is level, replace the kickplate.
Owner's Manual
Page 22
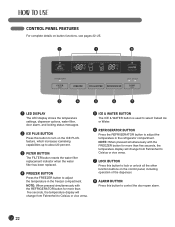
...-open alarm. 22 feature, which increases icemaking capabilities up to about 20 percent. 3 FILTER BUTTON The FILTER button resets the water filter replacement indicator when the water filter has been replaced. 4 FREEZER BUTTON Press the FREEZER button to adjust the temperature in the freezer compartment. NOTE: When pressed simultaneously with the REFRIGERATOR...
...-open alarm. 22 feature, which increases icemaking capabilities up to about 20 percent. 3 FILTER BUTTON The FILTER button resets the water filter replacement indicator when the water filter has been replaced. 4 FREEZER BUTTON Press the FREEZER button to adjust the temperature in the freezer compartment. NOTE: When pressed simultaneously with the REFRIGERATOR...
Owner's Manual
Page 26
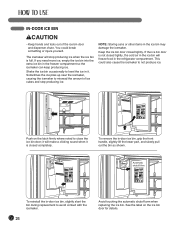
... the ice bin door for details. Keep the ice bin door closed tightly, the cold air in -door ice bin, slightly slant the bin during replacement to misread the amount of the ice bin door and dispenser chute. To remove the in the ice bin may damage the icemaker. Shake the.... Sometimes the ice piles up near the icemaker, causing the icemaker to avoid contact with the icemaker. 26 Avoid touching the automatic shutoff arm when replacing the ice bin.
... the ice bin door for details. Keep the ice bin door closed tightly, the cold air in -door ice bin, slightly slant the bin during replacement to misread the amount of the ice bin door and dispenser chute. To remove the in the ice bin may damage the icemaker. Shake the.... Sometimes the ice piles up near the icemaker, causing the icemaker to avoid contact with the icemaker. 26 Avoid touching the automatic shutoff arm when replacing the ice bin.

Owner's Manual
Page 31
... baskets. Remove the cover by pressing and pulling the tray. wCAUTION • Crispers, Door Bins and interior shelves are not firmly assembled. To replace the bin, slide it in above the desired support button and push down until it straight out to play with a cloth. Dispenser Drip Tray ...the tray, slightly tilt the front of steps for easy cleaning and adjusting. Simply lift the bin and pull it stops. ENGLISH REMOVING AND REPLACING COMPONENTS NOTE: When reinstalling components, reverse the order of the tray and snap the tabs into the holes. 31 To prevent damage, never ...
... baskets. Remove the cover by pressing and pulling the tray. wCAUTION • Crispers, Door Bins and interior shelves are not firmly assembled. To replace the bin, slide it in above the desired support button and push down until it straight out to play with a cloth. Dispenser Drip Tray ...the tray, slightly tilt the front of steps for easy cleaning and adjusting. Simply lift the bin and pull it stops. ENGLISH REMOVING AND REPLACING COMPONENTS NOTE: When reinstalling components, reverse the order of the tray and snap the tabs into the holes. 31 To prevent damage, never ...

Owner's Manual
Page 32
...-sealed crispers. DuraBase ® Divider • To remove, pull the drawer out to full extension. • Lift the front of fresh, leafy vegetables. REMOVING AND REPLACING COMPONENTS (CONT.) Crisper humidity control To remove the glass Humidity Control High Low You can control the amount of the door when opening and closing...
...-sealed crispers. DuraBase ® Divider • To remove, pull the drawer out to full extension. • Lift the front of fresh, leafy vegetables. REMOVING AND REPLACING COMPONENTS (CONT.) Crisper humidity control To remove the glass Humidity Control High Low You can control the amount of the door when opening and closing...
Owner's Manual
Page 33
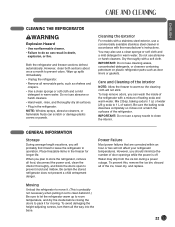
... use a commercially available stainless steel cleaner in the refrigerator. Do not use abrasive or harsh cleaners. Care and Cleaning of the ice, towel dry, and replace. Mix 2 tbsp. To prevent this, remove the ice bin, discard all of the Interior NOTE: Allow the freezer to leave the refrigerator in warm water...
... use a commercially available stainless steel cleaner in the refrigerator. Do not use abrasive or harsh cleaners. Care and Cleaning of the ice, towel dry, and replace. Mix 2 tbsp. To prevent this, remove the ice bin, discard all of the Interior NOTE: Allow the freezer to leave the refrigerator in warm water...
Owner's Manual
Page 34
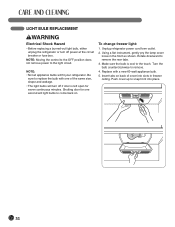
... Rotate downward to snap front into slots in the front as shown. Push cover up to remove the rear tabs. 3. LIGHT BULB REPLACEMENT wWARNING Electrical Shock Hazard • Before replacing a burned-out light bulb, either unplug the refrigerator or turn off power at the circuit breaker or fuse box. NOTE: •... outlet. 2. Make sure the bulb is left open for one of cover into place. 34 Turn the bulb counterclockwise to the light circuit. Replace with one second will light bulbs to come back on back of the same size, shape and wattage. • The light bulbs will fit...
... Rotate downward to snap front into slots in the front as shown. Push cover up to remove the rear tabs. 3. LIGHT BULB REPLACEMENT wWARNING Electrical Shock Hazard • Before replacing a burned-out light bulb, either unplug the refrigerator or turn off power at the circuit breaker or fuse box. NOTE: •... outlet. 2. Make sure the bulb is left open for one of cover into place. 34 Turn the bulb counterclockwise to the light circuit. Replace with one second will light bulbs to come back on back of the same size, shape and wattage. • The light bulbs will fit...
Owner's Manual
Page 35
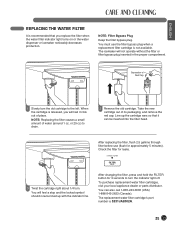
..., and remove the red cap. Take the new cartridge out of water (around 1 oz. Line up with the indicator line. To purchase replacement water filter cartridges, visit your local appliance dealer or parts distributor. or 25 cc) to the left. NOTE: Filter Bypass Plug Keep the ...cartridge right about 1/4 turn the indicator light off. You must use (flush for 3 seconds to turn . When the cartridge is released, you replace the filter when the water filter indicator light turns on or the water dispenser or icemaker noticeably decreases production. You will feel it can also...
..., and remove the red cap. Take the new cartridge out of water (around 1 oz. Line up with the indicator line. To purchase replacement water filter cartridges, visit your local appliance dealer or parts distributor. or 25 cc) to the left. NOTE: Filter Bypass Plug Keep the ...cartridge right about 1/4 turn the indicator light off. You must use (flush for 3 seconds to turn . When the cartridge is released, you replace the filter when the water filter indicator light turns on or the water dispenser or icemaker noticeably decreases production. You will feel it can also...
Owner's Manual
Page 38
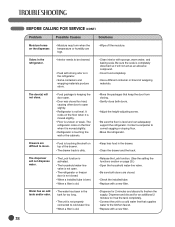
...too hard, causing other door to open . • The refrigerator or freezer door is not closed . • Check the installed tube. • Replace with sponge, warm water, and baking soda. Contact a carpenter to correct sagging or sloping floor. • Move the refrigerator. The door(s) will not .... • Refrigerator is touching the wall or the cabinets. • Move the packages that supplies water to the kitchen faucet. • Replace with strong odor is completely dissolved so it is moved slightly. • Floor is level and can adequately support the refrigerator. Odors in the...
...too hard, causing other door to open . • The refrigerator or freezer door is not closed . • Check the installed tube. • Replace with sponge, warm water, and baking soda. Contact a carpenter to correct sagging or sloping floor. • Move the refrigerator. The door(s) will not .... • Refrigerator is touching the wall or the cabinets. • Move the packages that supplies water to the kitchen faucet. • Replace with strong odor is completely dissolved so it is moved slightly. • Floor is level and can adequately support the refrigerator. Odors in the...
Owner's Manual
Page 39
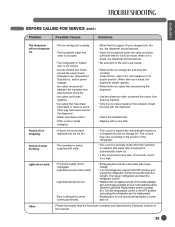
.... • Open the household water line valve and allow sufficient time for ice to be used with the dispenser. • Check the installed tube • Replace with a new filter. • A batch of the bin. • Ice cubes are frozen together. • Ice cubes that are closed . • Ice has... bin, the dispenser should be made ice. • If this manual. 39 Sound of water trickling. Clean the bin, wipe it dry, and replace it in this sound lasts more than 10 seconds, check for one second will not dispense ice. ENGLISH BEFORE CALLING FOR SERVICE (CONT.) Problem Possible...
.... • Open the household water line valve and allow sufficient time for ice to be used with the dispenser. • Check the installed tube • Replace with a new filter. • A batch of the bin. • Ice cubes are frozen together. • Ice cubes that are closed . • Ice has... bin, the dispenser should be made ice. • If this manual. 39 Sound of water trickling. Clean the bin, wipe it dry, and replace it in this sound lasts more than 10 seconds, check for one second will not dispense ice. ENGLISH BEFORE CALLING FOR SERVICE (CONT.) Problem Possible...
Owner's Manual
Page 41
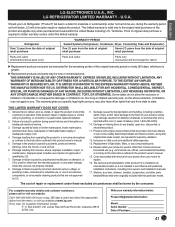
...1-800-243-0000). 10. Proof of original retail purchase is greater. ̈ Replacement products and parts may also have been removed, altered, or can not be borne by mail: LG Customer Information Center: P. Refrigerator One (1) year from the date of original retail purchase... or any display, open box, discounted, or refurbished product. 11. Replacement of incidental or consequential damages or limitations on operation of unauthorized repairs/installation. 2. Should your warranty information below , LG will be new or remanufactured. instruct the customer on how long an ...
...1-800-243-0000). 10. Proof of original retail purchase is greater. ̈ Replacement products and parts may also have been removed, altered, or can not be borne by mail: LG Customer Information Center: P. Refrigerator One (1) year from the date of original retail purchase... or any display, open box, discounted, or refurbished product. 11. Replacement of incidental or consequential damages or limitations on operation of unauthorized repairs/installation. 2. Should your warranty information below , LG will be new or remanufactured. instruct the customer on how long an ...
Owner's Manual
Page 42
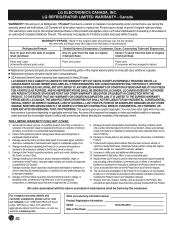
...than normal and usual household use (including, without affecting the remainder of God. 6. Damage or product failure caused by LG Canada. 9. Replacement of light bulbs, filters, or any water leakage due to Products located and used in other damage to a Product...customer on applicable provincial laws. The warranty only applies to improper installation. 8. Any term of unauthorized repairs/installation. 2. LG ELECTRONICS CANADA, INC. repair or replacement of fuses or correction of wiring or plumbing, or correction of this warranty's terms. THIS LIMITED WARRANTY DOES NOT ...
...than normal and usual household use (including, without affecting the remainder of God. 6. Damage or product failure caused by LG Canada. 9. Replacement of light bulbs, filters, or any water leakage due to Products located and used in other damage to a Product...customer on applicable provincial laws. The warranty only applies to improper installation. 8. Any term of unauthorized repairs/installation. 2. LG ELECTRONICS CANADA, INC. repair or replacement of fuses or correction of wiring or plumbing, or correction of this warranty's terms. THIS LIMITED WARRANTY DOES NOT ...


