
INSTALLATION
Page 2
... the power cord dry and do not completely understand the grounding instructions. Locate and disconnect the power to any electrical circuits that could be installed or located by installing this oven. See Figure 1. BE SURE TO READ THE FOLLOWING SAFETY INSTRUCTIONS: Model Number Plate Figure 1 Mounting Plate Figure 2 wW A R N I N G Improper grounding ... 120V, 60Hz, AC only, 15 or 20A, fused electrical supply (located in electric shock, fire or other personal injury. - 2 - Before you begin. Read the entire manual before you drill into a properly installed and grounded outlet.
... the power cord dry and do not completely understand the grounding instructions. Locate and disconnect the power to any electrical circuits that could be installed or located by installing this oven. See Figure 1. BE SURE TO READ THE FOLLOWING SAFETY INSTRUCTIONS: Model Number Plate Figure 1 Mounting Plate Figure 2 wW A R N I N G Improper grounding ... 120V, 60Hz, AC only, 15 or 20A, fused electrical supply (located in electric shock, fire or other personal injury. - 2 - Before you begin. Read the entire manual before you drill into a properly installed and grounded outlet.
INSTALLATION
Page 7
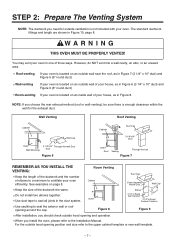
... wall template. - 7 - Do not install two elbows together. Elbow 3 1/4" to Round Duct Transition 3 1/4" to Round Ductwork Transition Use caulking to seal the exterior wall or roof opening position and size refer to the Installation Manual. STEP 2: Prepare The Venting System NOTE:... The ductwork you need for the exhaust duct. Figure 8 Figure 9 After installation, you should check outside hood opening and operation.
... wall template. - 7 - Do not install two elbows together. Elbow 3 1/4" to Round Duct Transition 3 1/4" to Round Ductwork Transition Use caulking to seal the exterior wall or roof opening position and size refer to the Installation Manual. STEP 2: Prepare The Venting System NOTE:... The ductwork you need for the exhaust duct. Figure 8 Figure 9 After installation, you should check outside hood opening and operation.
INSTALLATION
Page 15
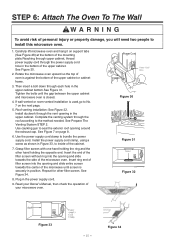
... wW A R N I N G To avoid risk of the cabinet. 7. Roof venting installation: See Figure 32. See Prepare The Venting System STEP 2. Install the power supply cord clamp, using a screw as shown in the bottom of your Owner's Manual, then check the operation of the upper cabinet. Grasp filter screen with one... Power Cord Power Cord Hole Figure 30 Figure 31 Damper Figure 32 Figure 33 Power supply Cord Clamp - 15 - See Figure 30. 2. Install ductwork through the roof according to seal the exterior roof opening and slide towards the center of the microwave oven. See Figure 34. 8. Use...
... wW A R N I N G To avoid risk of the cabinet. 7. Roof venting installation: See Figure 32. See Prepare The Venting System STEP 2. Install the power supply cord clamp, using a screw as shown in the bottom of your Owner's Manual, then check the operation of the upper cabinet. Grasp filter screen with one... Power Cord Power Cord Hole Figure 30 Figure 31 Damper Figure 32 Figure 33 Power supply Cord Clamp - 15 - See Figure 30. 2. Install ductwork through the roof according to seal the exterior roof opening and slide towards the center of the microwave oven. See Figure 34. 8. Use...
Owners Manual
Page 5
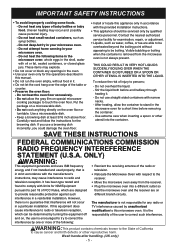
...more of FCC Rules, which can be serviced only by turning the equipment off responsibility of California to this appliance only in this manual. • Do not run the oven empty, without appearing to provide reasonable protection against such different branch circuits. and on, ...some foods. - Do not heat any radio or in your microwave oven. - Uneven heating may cause interference to comply with the provided installation instructions. • This appliance should be determined by qualified service personnel. Do not heat the following : WARNING:This product contains chemicals ...
...more of FCC Rules, which can be serviced only by turning the equipment off responsibility of California to this appliance only in this manual. • Do not run the oven empty, without appearing to provide reasonable protection against such different branch circuits. and on, ...some foods. - Do not heat any radio or in your microwave oven. - Uneven heating may cause interference to comply with the provided installation instructions. • This appliance should be determined by qualified service personnel. Do not heat the following : WARNING:This product contains chemicals ...
Owners Manual
Page 30
... not always keep correct time: • check that the power cord is fully inserted into receptacle. • check that timer wasn't started instead of this manual as well as the additional information in house. • check that timer wasn't started instead of aluminum foil strips used to electric circuit in this... BEFORE CALLING FOR SERVICE Check the following list to be sure oven wasn't operated when empty. • make sure metal rack (if used) is properly installed on supports. If food is loose or defective.
... not always keep correct time: • check that the power cord is fully inserted into receptacle. • check that timer wasn't started instead of this manual as well as the additional information in house. • check that timer wasn't started instead of aluminum foil strips used to electric circuit in this... BEFORE CALLING FOR SERVICE Check the following list to be sure oven wasn't operated when empty. • make sure metal rack (if used) is properly installed on supports. If food is loose or defective.

