Owner's Manual
Page 1
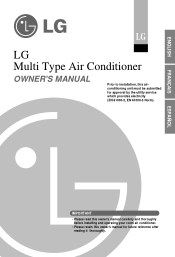
ENGLISH LG LG Multi Type Air Conditioner OWNER'S MANUAL Prior to installation, this owner's manual for approval by the utility service which provides electricity (EN 61000-2, EN 61000-3 Norm). FRANÇAIS ESPAÑOL IMPORTANT • Please read this owner's manual carefully and thoroughly before installing and operating your room air conditioner. • Please retain this airconditioning unit must be submitted for future reference after reading it thoroughly.
ENGLISH LG LG Multi Type Air Conditioner OWNER'S MANUAL Prior to installation, this owner's manual for approval by the utility service which provides electricity (EN 61000-2, EN 61000-3 Norm). FRANÇAIS ESPAÑOL IMPORTANT • Please read this owner's manual carefully and thoroughly before installing and operating your room air conditioner. • Please retain this airconditioning unit must be submitted for future reference after reading it thoroughly.
Owner's Manual
Page 2
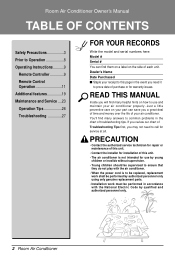
READ THIS MANUAL Inside you will find many helpful hints on your part can find many answers to common problems in the chart of troubleshooting tips. Just a little ... by qualified and authorized personnel only. 2 Room Air Conditioner You'll find them on a label on the side of each unit. Room Air Conditioner Owner's Manual TABLE OF CONTENTS Safety Precautions 3 Prior to Operation 8 Operating Instructions...........9 Remote Controller 9 Remote Control Operation 11 Additional features 19 Maintenance and Service ....23 Operation Tips...
READ THIS MANUAL Inside you will find many helpful hints on your part can find many answers to common problems in the chart of troubleshooting tips. Just a little ... by qualified and authorized personnel only. 2 Room Air Conditioner You'll find them on a label on the side of each unit. Room Air Conditioner Owner's Manual TABLE OF CONTENTS Safety Precautions 3 Prior to Operation 8 Operating Instructions...........9 Remote Controller 9 Remote Control Operation 11 Additional features 19 Maintenance and Service ....23 Operation Tips...

Owner's Manual
Page 3
...8226; Improper wiring or installation • There is risk of fire or electric may cause fire or electric shock shock. Use this manual are as shown below. WARNING This symbol indicates the possibility of injury or damage to properties only. Always install a dedicated circuit and ...breaker. Be sure not to the user or other people and property damage, the following indications. Owner's Manual 3 The seriousness is risk of fire or electric shock. ENGLISH Safety Precautions Safety Precautions To prevent injury to do. WARNING For electrical ...
...8226; Improper wiring or installation • There is risk of fire or electric may cause fire or electric shock shock. Use this manual are as shown below. WARNING This symbol indicates the possibility of injury or damage to properties only. Always install a dedicated circuit and ...breaker. Be sure not to the user or other people and property damage, the following indications. Owner's Manual 3 The seriousness is risk of fire or electric shock. ENGLISH Safety Precautions Safety Precautions To prevent injury to do. WARNING For electrical ...

Owner's Manual
Page 5
.... When the product is not be used for a long time, disconnect the power supply plug or turn off or disconnect the power supply cable. Owner's Manual 5 shock. When the product is soaked (flooded or submerged), contact an Authorized Service Center. • There is risk of electric shock or • There is...
.... When the product is not be used for a long time, disconnect the power supply plug or turn off or disconnect the power supply cable. Owner's Manual 5 shock. When the product is soaked (flooded or submerged), contact an Authorized Service Center. • There is risk of electric shock or • There is...
Owner's Manual
Page 7
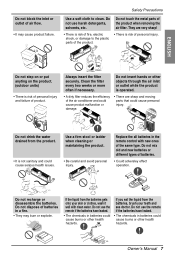
... burns or other health hazards. If you eat the liquid from the product. • It is risk of personal injury and failure of product. Owner's Manual 7 Do not mix old and new batteries or different types of the same type. ENGLISH Do not block the inlet or outlet of air flow...
... burns or other health hazards. If you eat the liquid from the product. • It is risk of personal injury and failure of product. Owner's Manual 7 Do not mix old and new batteries or different types of the same type. ENGLISH Do not block the inlet or outlet of air flow...
Owner's Manual
Page 8
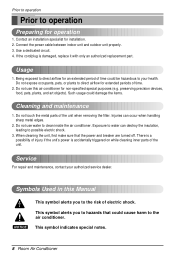
... circuit. 4. Do not use water to clean inside the air conditioner. Such usage could be hazardous to direct airflow for installation. 2. Do not use this Manual NOTICE This symbol alerts you to direct airflow for non-specified special purposes (e.g. Connect the power cable between indoor unit and outdoor unit properly. 3. If...
... circuit. 4. Do not use water to clean inside the air conditioner. Such usage could be hazardous to direct airflow for installation. 2. Do not use this Manual NOTICE This symbol alerts you to direct airflow for non-specified special purposes (e.g. Connect the power cable between indoor unit and outdoor unit properly. 3. If...
Owner's Manual
Page 9
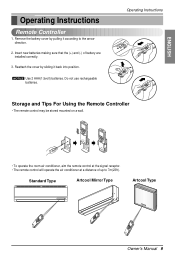
... conditioner at a distance of battery are installed correctly. 3. Reattach the cover by pulling it back into position. Standard Type Artcool Mirror Type Artcool Type Owner's Manual 9 Remove the battery cover by sliding it according to 7m(23ft). NOTICE Use 2 AAA(1.5volt) batteries. ENGLISH Operating Instructions Remote Controller 1.
... conditioner at a distance of battery are installed correctly. 3. Reattach the cover by pulling it back into position. Standard Type Artcool Mirror Type Artcool Type Owner's Manual 9 Remove the battery cover by sliding it according to 7m(23ft). NOTICE Use 2 AAA(1.5volt) batteries. ENGLISH Operating Instructions Remote Controller 1.
Owner's Manual
Page 11
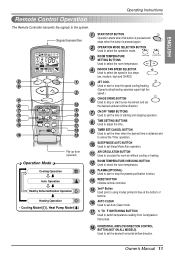
... Used prior to using modes printed in blue at the bottom of buttons. 16 AUTO CLEAN Used to set the desired horizontal airflow direction. Owner's Manual 11
... Used prior to using modes printed in blue at the bottom of buttons. 16 AUTO CLEAN Used to set the desired horizontal airflow direction. Owner's Manual 11

Owner's Manual
Page 13
Each time the button is pressed, the operation mode is not operating as desired, manually switch to cooling, then you must set temperature, press the Room Temperature Setting buttons. To raise the temperature To lower the temperature DURING AUTO OPERATION... Selection button. The set temperature will not automatically switch from the cooling mode to the heating mode, or from heating to another mode. Owner's Manual 13 The system will be changed considering room temperature. Operating Instructions Auto Operation 1 Press the Start/Stop button. The unit will respond with beep ...
Each time the button is pressed, the operation mode is not operating as desired, manually switch to cooling, then you must set temperature, press the Room Temperature Setting buttons. To raise the temperature To lower the temperature DURING AUTO OPERATION... Selection button. The set temperature will not automatically switch from the cooling mode to the heating mode, or from heating to another mode. Owner's Manual 13 The system will be changed considering room temperature. Operating Instructions Auto Operation 1 Press the Start/Stop button. The unit will respond with beep ...

Owner's Manual
Page 15
... the button is pressed, the operation mode is shifted. NATURAL WIND BY THE CHAOS LOGIC ❏ For more fresh feeling than the room temperature. Owner's Manual 15 To select Heating Operation, press the Operation Mode Selection button. Cooling Auto Healthy Heating Dehumidification (Heat pump model only) 3 Set the temperature higher than...
... the button is pressed, the operation mode is shifted. NATURAL WIND BY THE CHAOS LOGIC ❏ For more fresh feeling than the room temperature. Owner's Manual 15 To select Heating Operation, press the Operation Mode Selection button. Cooling Auto Healthy Heating Dehumidification (Heat pump model only) 3 Set the temperature higher than...

Owner's Manual
Page 17
... (PLASMA) is shifed. The unit will start when the button is pressed and stop when the button is pressed again. 3 Set the fan speed. Owner's Manual 17 Operation will respond with beep sound. 2 Open the door on the Remote Controller. PLASMA Air Purifying Operation only If you press the PLASMA button...
... (PLASMA) is shifed. The unit will start when the button is pressed and stop when the button is pressed again. 3 Set the fan speed. Owner's Manual 17 Operation will respond with beep sound. 2 Open the door on the Remote Controller. PLASMA Air Purifying Operation only If you press the PLASMA button...
Owner's Manual
Page 19
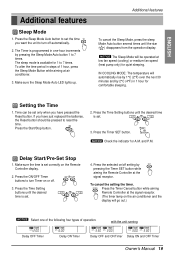
... at the signal receptor. with the unit running Delay OFF Timer Delay ON Timer Delay OFF and ON Timer Delay ON and OFF Timer Owner's Manual 19 Make sure the Sleep Mode Auto LED lights up. Time can be set correctly on /off setting by SET pressing the Timer SET button...
... at the signal receptor. with the unit running Delay OFF Timer Delay ON Timer Delay OFF and ON Timer Delay ON and OFF Timer Owner's Manual 19 Make sure the Sleep Mode Auto LED lights up. Time can be set correctly on /off setting by SET pressing the Timer SET button...
Owner's Manual
Page 20
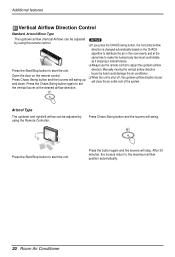
... 30 minutes, the louvers return to start the unit. Press Chaos Swing button and the louvers will close the air outlet vent of the system. Manually moving the vertical airflow direction louver by using the remote control. Press the Start/Stop button to adjust the up /down airflow direction louver will...
... 30 minutes, the louvers return to start the unit. Press Chaos Swing button and the louvers will close the air outlet vent of the system. Manually moving the vertical airflow direction louver by using the remote control. Press the Start/Stop button to adjust the up /down airflow direction louver will...
Owner's Manual
Page 21
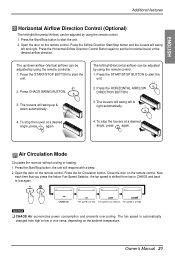
... to low again. the unit will swing left /right(Horizontal airflow) can be adjusted by using the remote controller. 1. Open the door on low. Owner's Manual 21 The left and right. To stop the louvers at a desired angle, press again 4. Press the Start/Stop button. Now each time that you press...
... to low again. the unit will swing left /right(Horizontal airflow) can be adjusted by using the remote controller. 1. Open the door on low. Owner's Manual 21 The left and right. To stop the louvers at a desired angle, press again 4. Press the Start/Stop button. Now each time that you press...
Owner's Manual
Page 23
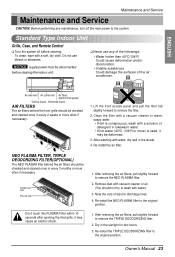
... once in every 3 months or more often if neccessary. Re-install the air filter. Re-install the NEO PLASMA filter to remove the filter. 2. Owner's Manual 23 Deodorizer filter Plasma filter Don't touch this PLASMA Filter within 10 seconds after opening the inlet grille, it may cause an electric shock. 1. After...
... once in every 3 months or more often if neccessary. Re-install the air filter. Re-install the NEO PLASMA filter to remove the filter. 2. Owner's Manual 23 Deodorizer filter Plasma filter Don't touch this PLASMA Filter within 10 seconds after opening the inlet grille, it may cause an electric shock. 1. After...

Owner's Manual
Page 25
Remove the Plasma Filter. Front Panel Air Filter 3. Insert the Plasma Filter after perfectly drying in the neutral detergent for 1~2 hours and then raise them. Lift the front panel, hold it up and pull the Air filter. 2. Plasma Purifier Filter 4. Now insert Air Filter and close the Front panel Completely by matching the hook. Put in Plasma Filters in shade. Front Panel Hook Air Filter Air Filter HookHanger Owner's Manual 25 ENGLISH Maintenance and Service Cleaning of Purifying Filter • Recommended use period : About 3 months 1.
Remove the Plasma Filter. Front Panel Air Filter 3. Insert the Plasma Filter after perfectly drying in the neutral detergent for 1~2 hours and then raise them. Lift the front panel, hold it up and pull the Air filter. 2. Plasma Purifier Filter 4. Now insert Air Filter and close the Front panel Completely by matching the hook. Put in Plasma Filters in shade. Front Panel Hook Air Filter Air Filter HookHanger Owner's Manual 25 ENGLISH Maintenance and Service Cleaning of Purifying Filter • Recommended use period : About 3 months 1.
Owner's Manual
Page 27
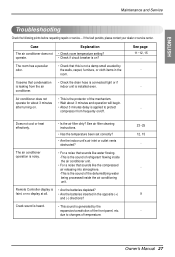
... is on . • About 3 minutes delay is leaking from frequenty on/off. Does not cool or heat effectively. • Is the air filter dirty? Owner's Manual 27 It seems that condensation • Check the drain hose is connected tight or if is applied to changes of the mechanism. operate for about...
... is on . • About 3 minutes delay is leaking from frequenty on/off. Does not cool or heat effectively. • Is the air filter dirty? Owner's Manual 27 It seems that condensation • Check the drain hose is connected tight or if is applied to changes of the mechanism. operate for about...

Owner's Manual
Page 28
P/No.: 3828A22236A Printed in Korea After reading this manual, keep it in a place easily accessible to the user for future reference.
P/No.: 3828A22236A Printed in Korea After reading this manual, keep it in a place easily accessible to the user for future reference.
Owner's Manual
Page 29
P/No.: 3828A22236A Printed in Korea After reading this manual, keep it in a place easily accessible to the user for future reference.
P/No.: 3828A22236A Printed in Korea After reading this manual, keep it in a place easily accessible to the user for future reference.


