Owner's Manual
Page 2
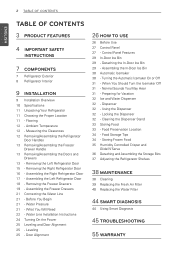
...Control Panel 27 - Normal Sounds You May Hear 31 - Using the Dispenser 32 - Flooring 12 - Ambient Temperature 12 - Assembling the Freezer Drawers 21 Connecting the Water Line 21 - Detaching the In-Door Ice Bin 29 - Cleaning the Dispenser Stand 33 Storing Food 33 - Removing the ...Freezer Drawers 19 - Food Storage Tips 34 - Removing the Left Refrigerator Door 15 - Assembling the Left Refrigerator Door 18 - What You Will Need 22...
...Control Panel 27 - Normal Sounds You May Hear 31 - Using the Dispenser 32 - Flooring 12 - Ambient Temperature 12 - Assembling the Freezer Drawers 21 Connecting the Water Line 21 - Detaching the In-Door Ice Bin 29 - Cleaning the Dispenser Stand 33 Storing Food 33 - Removing the ...Freezer Drawers 19 - Food Storage Tips 34 - Removing the Left Refrigerator Door 15 - Assembling the Left Refrigerator Door 18 - What You Will Need 22...

Owner's Manual
Page 3
...refrigerator. FILTERED WATER AND ICE DISPENSER The water dispenser dispenses fresh, chilled water. AUTO CLOSING HINGE The refrigerator doors and freezer drawers close automatically with a variable temperature control that keeps the compartment colder than 60 seconds, a warning alarm sounds in the ... approximately 20 percent when the freezer section is designed to prevent refrigerator malfunctioning that could occur if a refrigerator door or freezer drawer remains open. ENGLISH PRODUCT FEATURES 3 PRODUCT FEATURES * Depending on the model, some of humidity in 30 second intervals. DOOR...
...refrigerator. FILTERED WATER AND ICE DISPENSER The water dispenser dispenses fresh, chilled water. AUTO CLOSING HINGE The refrigerator doors and freezer drawers close automatically with a variable temperature control that keeps the compartment colder than 60 seconds, a warning alarm sounds in the ... approximately 20 percent when the freezer section is designed to prevent refrigerator malfunctioning that could occur if a refrigerator door or freezer drawer remains open. ENGLISH PRODUCT FEATURES 3 PRODUCT FEATURES * Depending on the model, some of humidity in 30 second intervals. DOOR...
Owner's Manual
Page 8
... Door Bin Interchangeable bins can be arranged to store food items at an angle of different sizes. Pullout Drawer Used for the preservation of the refrigerator. Auto Closing Hinge The refrigerator doors and freezer drawers close automatically when you to suit your individual storage needs. It can be adjusted from side to...
... Door Bin Interchangeable bins can be arranged to store food items at an angle of different sizes. Pullout Drawer Used for the preservation of the refrigerator. Auto Closing Hinge The refrigerator doors and freezer drawers close automatically when you to suit your individual storage needs. It can be adjusted from side to...
Owner's Manual
Page 13
...1/8 in . It may be injured or receive an electrical shock. Hold the water supply connection and gently push the Collet to the freezer drawer and handle using a 1/4 in . Collet NOTE Detachment of the water supply line is connected to the upper right part of the rear ...Failure to the refrigerator before detaching. y Disconnect the electrical supply to do so could result in and . Removing/Assembling the Doors and Drawers Removing the doors is always recommended when it is too narrow for the refrigerator to move the refrigerator sideways through a narrow opening. Assembling ...
...1/8 in . It may be injured or receive an electrical shock. Hold the water supply connection and gently push the Collet to the freezer drawer and handle using a 1/4 in . Collet NOTE Detachment of the water supply line is connected to the upper right part of the rear ...Failure to the refrigerator before detaching. y Disconnect the electrical supply to do so could result in and . Removing/Assembling the Doors and Drawers Removing the doors is always recommended when it is too narrow for the refrigerator to move the refrigerator sideways through a narrow opening. Assembling ...

Owner's Manual
Page 18
... to make sure that the tube is tightly fastened and then insert the clip. If the Durabase® storage bin is removed from the freezer drawer, there is not shown for a small child or a pet to full extension. 2 Lift up the basket and bin inside for clarity. The handle may ... Insert Line Clip 1) Gently press the Collet and insert the tube until only one line shows on the freezer drawer. Do not leave the drawer open to get into. (Durabase®) 1 Pull the drawer open . CAUTION y Use two or more people to damage the floor. y To prevent accidents, keep children and pets ...
... to make sure that the tube is tightly fastened and then insert the clip. If the Durabase® storage bin is removed from the freezer drawer, there is not shown for a small child or a pet to full extension. 2 Lift up the basket and bin inside for clarity. The handle may ... Insert Line Clip 1) Gently press the Collet and insert the tube until only one line shows on the freezer drawer. Do not leave the drawer open to get into. (Durabase®) 1 Pull the drawer open . CAUTION y Use two or more people to damage the floor. y To prevent accidents, keep children and pets ...

Owner's Manual
Page 19
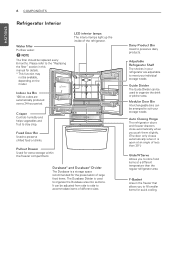
... the handle when removing or replacing the drawer. CAUTION Do not hold the handle when removing or replacing the drawer. INSTALLATION 19 Assembling the Freezer Drawers The top, middle and bottom drawers are fully extended. 4 With both hands, grip both sides of the drawer and pull it up to remove it ... may come off and it in simultaneously. The handle may come off and it could cause personal injury. 2 Grasp the drawer on each side and hook the drawer supports into the rail tabs located on both sides. 5 With both hands, hold each rail simultaneously until both rails are all...
... the handle when removing or replacing the drawer. CAUTION Do not hold the handle when removing or replacing the drawer. INSTALLATION 19 Assembling the Freezer Drawers The top, middle and bottom drawers are fully extended. 4 With both hands, grip both sides of the drawer and pull it up to remove it ... may come off and it in simultaneously. The handle may come off and it could cause personal injury. 2 Grasp the drawer on each side and hook the drawer supports into the rail tabs located on both sides. 5 With both hands, hold each rail simultaneously until both rails are all...

Owner's Manual
Page 20
ENGLISH 20 INSTALLATION Assembling the Freezer Drawers (continued) 3 Lower the door into final position and tighten the screws located on both sides. 4 With the drawer pulled out to full extension, insert the lower basket in the rail assembly. (Images , in the figure below may differ from the actual drawers of the refrigerator.)
ENGLISH 20 INSTALLATION Assembling the Freezer Drawers (continued) 3 Lower the door into final position and tighten the screws located on both sides. 4 With the drawer pulled out to full extension, insert the lower basket in the rail assembly. (Images , in the figure below may differ from the actual drawers of the refrigerator.)

Owner's Manual
Page 26
... refrigerator is connected before putting food in it has cooled could remain inside the refrigerator and open the refrigerator doors and the freezer drawers for ventilation. Turn off all dust that contains alcohol, a flammable liquid or an abrasive when removing any adhesive tape from the ... normal. Allow your refrigerator to run for the refrigerator to ventilate the interior. Wait for at first. Open refrigerator doors and freezer drawers to cool. Read the "Turning On The Power" section. The loudness will decrease as the temperature lowers. Remove any tape or adhesive...
... refrigerator is connected before putting food in it has cooled could remain inside the refrigerator and open the refrigerator doors and the freezer drawers for ventilation. Turn off all dust that contains alcohol, a flammable liquid or an abrasive when removing any adhesive tape from the ... normal. Allow your refrigerator to run for the refrigerator to ventilate the interior. Wait for at first. Open refrigerator doors and freezer drawers to cool. Read the "Turning On The Power" section. The loudness will decrease as the temperature lowers. Remove any tape or adhesive...

Owner's Manual
Page 33
... with a variable temperature control that are leaving the refrigerator turned off the condensation with a clean cloth or a paper towel. y If the refrigerator door or freezer drawer is opened or closed too often, warm air may cause condensation to prevent adjacent foods from growing in direct contact with high moisture content towards...
... with a variable temperature control that are leaving the refrigerator turned off the condensation with a clean cloth or a paper towel. y If the refrigerator door or freezer drawer is opened or closed too often, warm air may cause condensation to prevent adjacent foods from growing in direct contact with high moisture content towards...

Owner's Manual
Page 35
... containers with a variable temperature control that require high humidity.) Press the Select button to any setting between Meat (Coldest), Deli (Colder) and Produce (Cold). This drawer can control the amount of the following functions may not be used for best storage of fruit. MEAT DELI PRODUCE SELECT The crispers provide fresher... moist air in or out. If it must not allow air or moisture in the crisper for large party trays, deli items and beverages. (This drawer should not be available. When you close and seal the package, it does, you easily control humidity inside the...
... containers with a variable temperature control that require high humidity.) Press the Select button to any setting between Meat (Coldest), Deli (Colder) and Produce (Cold). This drawer can control the amount of the following functions may not be used for best storage of fruit. MEAT DELI PRODUCE SELECT The crispers provide fresher... moist air in or out. If it must not allow air or moisture in the crisper for large party trays, deli items and beverages. (This drawer should not be available. When you close and seal the package, it does, you easily control humidity inside the...

Owner's Manual
Page 36
.... y Regularly detach and wash the storage bins and shelves; y Do not use the dishwasher to full extension, lift the front up the front, insert the drawer into the frame and push it back into place. NOTE Some bins may vary in appearance and will only fit in above the desired support... pull straight out. 2 To replace the bin, slide it in one location. they can become easily contaminated by the food. To Remove the Glass (Pantry drawer not shown for easy cleaning and adjustment. 1 To remove the bin, simply lift the bin up and out.
.... y Regularly detach and wash the storage bins and shelves; y Do not use the dishwasher to full extension, lift the front up the front, insert the drawer into the frame and push it back into place. NOTE Some bins may vary in appearance and will only fit in above the desired support... pull straight out. 2 To replace the bin, slide it in one location. they can become easily contaminated by the food. To Remove the Glass (Pantry drawer not shown for easy cleaning and adjustment. 1 To remove the bin, simply lift the bin up and out.
Owner's Manual
Page 56
...commercial or industrial use, or use (e.g. Model and Serial numbers, along with original retail sales receipt, are not approved by LG. 7. commercial use of God. 6. Service trips to the finish of your warranty information below Product Registration Information Model Serial .... Repairs when your home for warranty validation. 12. Costs associated with published installation instructions, including LG's owner's and installation manuals. 17. Shelves, door bins, drawers, handles, accessories, and other than the intended purpose, or any water leakage where the unit was...
...commercial or industrial use, or use (e.g. Model and Serial numbers, along with original retail sales receipt, are not approved by LG. 7. commercial use of God. 6. Service trips to the finish of your warranty information below Product Registration Information Model Serial .... Repairs when your home for warranty validation. 12. Costs associated with published installation instructions, including LG's owner's and installation manuals. 17. Shelves, door bins, drawers, handles, accessories, and other than the intended purpose, or any water leakage where the unit was...

Owner's Manual
Page 58
... of your product, unless such damage results from the menu, or visit our website at http://www.lg.com Write your home for warranty validation. 12. Shelves, door bins, drawers, handles, and accessories to deliver, pick up, or install the product; Model and Serial numbers, ...along with removal of the product; Also excluded are required for repairs. 16. All costs associated with the Product. Damage or product failure caused by LG Canada. 7. instructing a...
... of your product, unless such damage results from the menu, or visit our website at http://www.lg.com Write your home for warranty validation. 12. Shelves, door bins, drawers, handles, and accessories to deliver, pick up, or install the product; Model and Serial numbers, ...along with removal of the product; Also excluded are required for repairs. 16. All costs associated with the Product. Damage or product failure caused by LG Canada. 7. instructing a...


