Owner's Manual
Page 2
... 25 Spaceplus Ice System 26 Automatic Icemaker 27 Storing Foods 28 Location of reliable service. Your new LG French Door Refrigerator combines advanced cooling technology with many years of Foods 29 Shelf Height Adjustment 30 Removing and Replacing Components 31 CARE AND CLEANING Cleaning the Refrigerator 35 General Information 35 Replacing the Water...
... 25 Spaceplus Ice System 26 Automatic Icemaker 27 Storing Foods 28 Location of reliable service. Your new LG French Door Refrigerator combines advanced cooling technology with many years of Foods 29 Shelf Height Adjustment 30 Removing and Replacing Components 31 CARE AND CLEANING Cleaning the Refrigerator 35 General Information 35 Replacing the Water...
Owner's Manual
Page 3
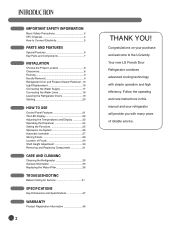
...off power at either or both controls to the OFF position does not remove power to the front of the ejector mechanism or with the heating element that releases the cubes. clearances between the doors and cabinet are finished, reconnect the refrigerator to persons when using your refrigerator... or injury to the electrical source and reset the control (Thermostat Refrigerator Control, or Freezer Control, or Freezer Control, depending on the refrigerator doors or shelves in . • Do not modify or extend the power cord length. Skin may result in the freezer compartment when hands are...
...off power at either or both controls to the OFF position does not remove power to the front of the ejector mechanism or with the heating element that releases the cubes. clearances between the doors and cabinet are finished, reconnect the refrigerator to persons when using your refrigerator... or injury to the electrical source and reset the control (Thermostat Refrigerator Control, or Freezer Control, or Freezer Control, depending on the refrigerator doors or shelves in . • Do not modify or extend the power cord length. Skin may result in the freezer compartment when hands are...
Owner's Manual
Page 4
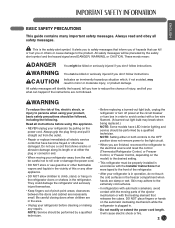
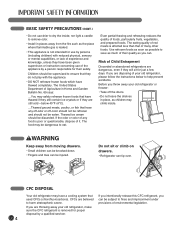
... use by a qualified servicer. 4 wWARNING Keep away from the fire such as much of any off-odor or off the doors. • Do not leave the shelves in places away from moving drawers. • Small children can be knocked down. • Fingers and toes can be ...supervised to ensure that they have any food is affected less than that used CFCs (chlorofluorocarbons). CFCs are believed to remove odor. • Install in place, as children may be discarded. BASIC SAFETY PRECAUTIONS (CONT.) • Do not use drier to dry the inside . The eating...
... use by a qualified servicer. 4 wWARNING Keep away from the fire such as much of any off-odor or off the doors. • Do not leave the shelves in places away from moving drawers. • Small children can be knocked down. • Fingers and toes can be ...supervised to ensure that they have any food is affected less than that used CFCs (chlorofluorocarbons). CFCs are believed to remove odor. • Install in place, as children may be discarded. BASIC SAFETY PRECAUTIONS (CONT.) • Do not use drier to dry the inside . The eating...

Owner's Manual
Page 7
... interchangeable bins can be arranged to suit your storage needs. 4 LED INTERIOR LAMPS Refrigerator interior is lit by the LED array. 5 CAN STORAGE BIN 6 FIXED DOOR BINS 3 REMOVABLE ICE STORAGE BIN The ice storage bin can be removed to fill ice buckets, coolers, or pitchers. 4 1 6 2 5 6 3 7
... interchangeable bins can be arranged to suit your storage needs. 4 LED INTERIOR LAMPS Refrigerator interior is lit by the LED array. 5 CAN STORAGE BIN 6 FIXED DOOR BINS 3 REMOVABLE ICE STORAGE BIN The ice storage bin can be removed to fill ice buckets, coolers, or pitchers. 4 1 6 2 5 6 3 7
Owner's Manual
Page 9
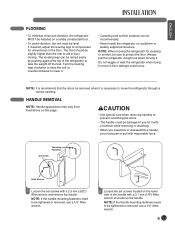
... to protect the floor. NOTE: It is recommend that the doors be tightened or removed, use a 1/4" Allen wrench. 9 floor damage could be tightened or removed, use a 1/4" Allen wrench. 2 Loosen the set screws with a 3.1 mm (1/8") Allen wrench and remove the handle. NOTE: If the handle mounting fasteners need to... attaching. • When you assemble or disassemble a handle, you hit it is necessary to aid in door closing. HANDLE REMOVAL NOTE: Handle appearance may vary from illustrations on a platform or weakly supported structure. NOTE: If the handle mounting fasteners ...
... to protect the floor. NOTE: It is recommend that the doors be tightened or removed, use a 1/4" Allen wrench. 9 floor damage could be tightened or removed, use a 1/4" Allen wrench. 2 Loosen the set screws with a 3.1 mm (1/8") Allen wrench and remove the handle. NOTE: If the handle mounting fasteners need to... attaching. • When you assemble or disassemble a handle, you hit it is necessary to aid in door closing. HANDLE REMOVAL NOTE: Handle appearance may vary from illustrations on a platform or weakly supported structure. NOTE: If the handle mounting fasteners ...
Owner's Manual
Page 10
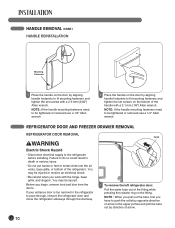
.... NOTE: If the handle mounting fasteners need to be tightened or removed use a 1/4" Allen wrench 2 Place the handle on the fitting. REFRIGERATOR DOOR AND FREEZER DRAWER REMOVAL REFRIGERATOR DOOR REMOVAL wWARNING Electric Shock Hazard • Disconnect electrical supply to pass through, remove the refrigerator door and move the refrigerator sideways through the doorway. You may be injured...
.... NOTE: If the handle mounting fasteners need to be tightened or removed use a 1/4" Allen wrench 2 Place the handle on the fitting. REFRIGERATOR DOOR AND FREEZER DRAWER REMOVAL REFRIGERATOR DOOR REMOVAL wWARNING Electric Shock Hazard • Disconnect electrical supply to pass through, remove the refrigerator door and move the refrigerator sideways through the doorway. You may be injured...
Owner's Manual
Page 11
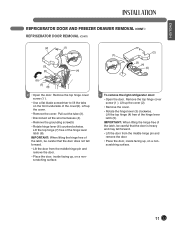
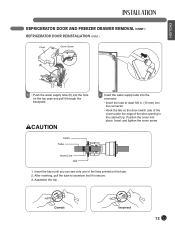
...(2). ENGLISH REFRIGERATOR DOOR AND FREEZER DRAWER REMOVAL (CONT.) REFRIGERATOR DOOR REMOVAL (CONT.) (2) (1) (3) (5) (4) (6) (7) (8) 2 • Open the door. Lift up the cover. • Remove the cover. IMPORTANT: When lifting the hinge free of the latch, be careful that the door does not fall forward. • Lift the door from the middle hinge pin and remove the door. • Place the door, inside facing...
...(2). ENGLISH REFRIGERATOR DOOR AND FREEZER DRAWER REMOVAL (CONT.) REFRIGERATOR DOOR REMOVAL (CONT.) (2) (1) (3) (5) (4) (6) (7) (8) 2 • Open the door. Lift up the cover. • Remove the cover. IMPORTANT: When lifting the hinge free of the latch, be careful that the door does not fall forward. • Lift the door from the middle hinge pin and remove the door. • Place the door, inside facing...
Owner's Manual
Page 12
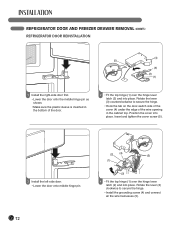
...the top hinge (1) over the hinge lever latch (2) and into place. Insert and tighten the cover screw (5). 3 Install the left-side door. • Lower the door onto middle hinge pin. (2) (4) (5) (1) (3) 4 • Fit the top hinge (1) over the hinge lever latch (2) and into... and connect all the wire harnesses (5). 12 Position the cover into place. REFRIGERATOR DOOR AND FREEZER DRAWER REMOVAL (CONT.) REFRIGERATOR DOOR REINSTALLATION (4) (5) (3) (2) (1) 1 Install the right-side door first. • Lower the door onto the middle hinge pin as shown. • Make sure the plastic sleeve ...
...the top hinge (1) over the hinge lever latch (2) and into place. Insert and tighten the cover screw (5). 3 Install the left-side door. • Lower the door onto middle hinge pin. (2) (4) (5) (1) (3) 4 • Fit the top hinge (1) over the hinge lever latch (2) and into... and connect all the wire harnesses (5). 12 Position the cover into place. REFRIGERATOR DOOR AND FREEZER DRAWER REMOVAL (CONT.) REFRIGERATOR DOOR REINSTALLATION (4) (5) (3) (2) (1) 1 Install the right-side door first. • Lower the door onto the middle hinge pin as shown. • Make sure the plastic sleeve ...
Owner's Manual
Page 13
...can see only one of the wire opening in the cabinet top. Position the cover into the connector. • Hook the tab on the door-switch side of the cover under the edge of the lines printed on the tube. 2. After inserting, pull the tube to ascertain that ...it through the backplate. ENGLISH REFRIGERATOR DOOR AND FREEZER DRAWER REMOVAL (CONT.) REFRIGERATOR DOOR REINSTALLATION (CONT.) Cover Cover Screw (6) 5 • Push the water supply tube (6) into the hole on the top case and pull...
...can see only one of the wire opening in the cabinet top. Position the cover into the connector. • Hook the tab on the door-switch side of the cover under the edge of the lines printed on the tube. 2. After inserting, pull the tube to ascertain that ...it through the backplate. ENGLISH REFRIGERATOR DOOR AND FREEZER DRAWER REMOVAL (CONT.) REFRIGERATOR DOOR REINSTALLATION (CONT.) Cover Cover Screw (6) 5 • Push the water supply tube (6) into the hole on the top case and pull...
Owner's Manual
Page 14
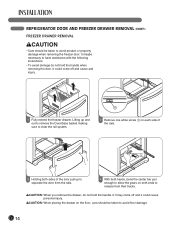
...each side of the rails. 3 Holding both sides of the door pull up to separate the door from the rails. 4 With both ends to release from their tracks. REFRIGERATOR DOOR AND FREEZER DRAWER REMOVAL (CONT.) FREEZER DRAWER REMOVAL wCAUTION • Care should be taken to avoid product or... property damage when removing the freezer door. wCAUTION: When placing the drawer on both hands, bend the center...
...each side of the rails. 3 Holding both sides of the door pull up to separate the door from the rails. 4 With both ends to release from their tracks. REFRIGERATOR DOOR AND FREEZER DRAWER REMOVAL (CONT.) FREEZER DRAWER REMOVAL wCAUTION • Care should be taken to avoid product or... property damage when removing the freezer door. wCAUTION: When placing the drawer on both hands, bend the center...
Owner's Manual
Page 15
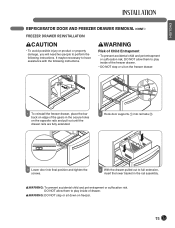
... NOT step or sit on the freezer drawer. 1 2 1 To reinstall the freezer drawer, place the bar back on edge of drawer. ENGLISH REFRIGERATOR DOOR AND FREEZER DRAWER REMOVAL (CONT.) FREEZER DRAWER REINSTALLATION wCAUTION • To avoid possible injury or product or property damage, you will need two people to perform the following...
... NOT step or sit on the freezer drawer. 1 2 1 To reinstall the freezer drawer, place the bar back on edge of drawer. ENGLISH REFRIGERATOR DOOR AND FREEZER DRAWER REMOVAL (CONT.) FREEZER DRAWER REINSTALLATION wCAUTION • To avoid possible injury or product or property damage, you will need two people to perform the following...
Owner's Manual
Page 16
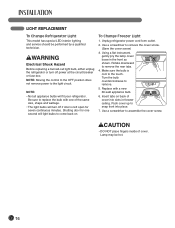
...control to the OFF position does not remove power to the touch. Unplug refrigerator power cord form outlet. 2. Use a screwdriver to remove. 5. Turn the bulb counterclockwise to remove the cover screw. (Save the cover screw) 3. Shutting door for seven continuous minutes. Rotate downward to... assemble the cover screw. Use a screwdriver to remove the rear tabs. 4. Lamp may be performed...
...control to the OFF position does not remove power to the touch. Unplug refrigerator power cord form outlet. 2. Use a screwdriver to remove. 5. Turn the bulb counterclockwise to remove the cover screw. (Save the cover screw) 3. Shutting door for seven continuous minutes. Rotate downward to... assemble the cover screw. Use a screwdriver to remove the rear tabs. 4. Lamp may be performed...
Owner's Manual
Page 19
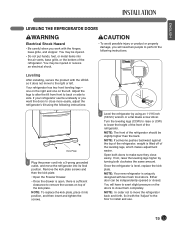
...front leveling legs- Turn the leveling legs (CCW) to raise or (CW) to remove the screws on top of the refrigerator. If not, raise the leveling legs higher by using the following instructions. Either door can be slightly higher than the back. You may be injured or receive an ...electrical shock. Remove the kick plate screws and then the kick plate. • Open the Freezer Drawer. •...
...front leveling legs- Turn the leveling legs (CCW) to raise or (CW) to remove the screws on top of the refrigerator. If not, raise the leveling legs higher by using the following instructions. Either door can be slightly higher than the back. You may be injured or receive an ...electrical shock. Remove the kick plate screws and then the kick plate. • Open the Freezer Drawer. •...
Owner's Manual
Page 20
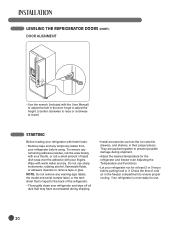
...at least 2 or 3 hours before putting food in the door hinge to adjust the height. (counter clockwise to raise or clockwise to lower) STARTING Before loading your refrigerator with fresh foods: • Remove tape and any remaining adhesive residue, rub the area briskly ...Functions). • Let your refrigerator before using. To remove any temporary labels from your refrigerator run for use sharp instruments, rubbing alcohol, flammable fluids, or abrasive cleaners to remove tape or glue. LEVELING THE REFRIGERATOR DOORS (CONT.) DOOR ALIGNMENT • Use the wrench (Included with the...
...at least 2 or 3 hours before putting food in the door hinge to adjust the height. (counter clockwise to raise or clockwise to lower) STARTING Before loading your refrigerator with fresh foods: • Remove tape and any remaining adhesive residue, rub the area briskly ...Functions). • Let your refrigerator before using. To remove any temporary labels from your refrigerator run for use sharp instruments, rubbing alcohol, flammable fluids, or abrasive cleaners to remove tape or glue. LEVELING THE REFRIGERATOR DOORS (CONT.) DOOR ALIGNMENT • Use the wrench (Included with the...

Owner's Manual
Page 26
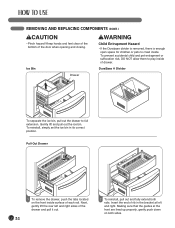
...ice bin occasionally to avoid contact with the icemaker. NOTE: Storing cans or other items in -door ice bin, slightly slant the bin during replacement to level the ice in the refrigerator compartment. ... NOTE: To open or close the ice room compartment, push or pull on the ice compartment door for an extended time, the ice compartment will gradually warm up near the icemaker, causing the ...wCAUTION While you need more than a few hours. See the label on the handle. 1 To remove the in-door ice bin, grip the front handle, slightly lift the lower part, and slowly pull out the bin...
...ice bin occasionally to avoid contact with the icemaker. NOTE: Storing cans or other items in -door ice bin, slightly slant the bin during replacement to level the ice in the refrigerator compartment. ... NOTE: To open or close the ice room compartment, push or pull on the ice compartment door for an extended time, the ice compartment will gradually warm up near the icemaker, causing the ...wCAUTION While you need more than a few hours. See the label on the handle. 1 To remove the in-door ice bin, grip the front handle, slightly lift the lower part, and slowly pull out the bin...
Owner's Manual
Page 27
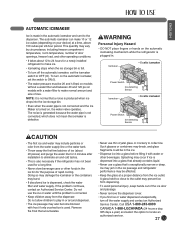
... 1-888-LGCANADA (24 hours a day, 365 days a year) and select the option to make normal amount and size of the ice door and passage. • Never remove the dispenser cover. • If you find ice or water dispensed unexpectedly, turn off the water supply and contact an Authorized Service Center... refrigerator performance may break, and glass fragments could be affected. • Keep the glass at a time, above 100 cubes per 24-hour period. Remove the frost that a noise is produced when ice drops into a glass before filling it with frost if only crushed ice is plugged in the ice...
... 1-888-LGCANADA (24 hours a day, 365 days a year) and select the option to make normal amount and size of the ice door and passage. • Never remove the dispenser cover. • If you find ice or water dispensed unexpectedly, turn off the water supply and contact an Authorized Service Center... refrigerator performance may break, and glass fragments could be affected. • Keep the glass at a time, above 100 cubes per 24-hour period. Remove the frost that a noise is produced when ice drops into a glass before filling it with frost if only crushed ice is plugged in the ice...

Owner's Manual
Page 30
... cold. wCAUTION Make sure that the hooks drop into small, pebble-sized pieces. Folding Shelf Tilt up the front of time the refrigerator door is open, saving energy. Storing similar food items together in your refrigerator and adjusting the shelves to the other. Shelves may result in... the shelf's falling or spilling food. Adjusting Shelves Remove shelves from one side to fit different heights of the shelf so that shelves are level from the shipping position and place shelves in...
... cold. wCAUTION Make sure that the hooks drop into small, pebble-sized pieces. Folding Shelf Tilt up the front of time the refrigerator door is open, saving energy. Storing similar food items together in your refrigerator and adjusting the shelves to the other. Shelves may result in... the shelf's falling or spilling food. Adjusting Shelves Remove shelves from one side to fit different heights of the shelf so that shelves are level from the shipping position and place shelves in...

Owner's Manual
Page 31
...tray and snap the ribs into place and push down until it stops. Dry it . wCAUTION • Personal injury can occur if the door bins are removable for removal. To reinstall the tray, slightly tilt the front of steps for easy cleaning and adjusting. NOTE: DO NOT adjust a loaded bin. &#...8226; DO NOT allow children to remove it with baskets. The sharp corners on the right-hand door. Dairy Bin Gallon Storage Bins To remove the dairy bin, simply lift it straight out to play with a cloth. The dispenser drip tray...
...tray and snap the ribs into place and push down until it stops. Dry it . wCAUTION • Personal injury can occur if the door bins are removable for removal. To reinstall the tray, slightly tilt the front of steps for easy cleaning and adjusting. NOTE: DO NOT adjust a loaded bin. &#...8226; DO NOT allow children to remove it with baskets. The sharp corners on the right-hand door. Dairy Bin Gallon Storage Bins To remove the dairy bin, simply lift it straight out to play with a cloth. The dispenser drip tray...

Owner's Manual
Page 33
... is recommended to full extension. • Lift the front of door bin scratches. 33 SELECTOR MEAT 1 wCAUTION • When you close the refrigerator door with GLIDE'N'SERVE DRAWER opened, that the drawer could be broken. • To remove, pull the drawer out to reduce the risk of the drawer up, then pull it...
... is recommended to full extension. • Lift the front of door bin scratches. 33 SELECTOR MEAT 1 wCAUTION • When you close the refrigerator door with GLIDE'N'SERVE DRAWER opened, that the drawer could be broken. • To remove, pull the drawer out to reduce the risk of the drawer up, then pull it...
Owner's Manual
Page 34
... drawer, push the tabs located on both rails. Making sure that the guides at left and right sides of rib in its correct position. REMOVING AND REPLACING COMPONENTS (CONT.) wCAUTION • Pinch hazard! To prevent accidental child and pet entrapment or suffocation risk, DO NOT allow them to full extension. ..., simply set the ice bin in the bracket at the front are lined up properly, gently push down on the front inside surface of the door when opening and closing.
... drawer, push the tabs located on both rails. Making sure that the guides at left and right sides of rib in its correct position. REMOVING AND REPLACING COMPONENTS (CONT.) wCAUTION • Pinch hazard! To prevent accidental child and pet entrapment or suffocation risk, DO NOT allow them to full extension. ..., simply set the ice bin in the bracket at the front are lined up properly, gently push down on the front inside surface of the door when opening and closing.


