
Owner's Manual
Page 17
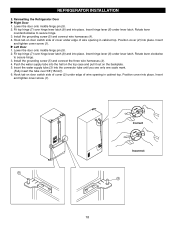
...Lift top hinge (7) free of hinge lever latch (8). Remove food and bins from middle hinge pin (9) and remove door. 6. u Left Door - Pull out the tube. 5. Lift top hinge (7) free of hinge lever latch (8). Place door, inside facing up , down onto a non-scratching surface. FIG.3 1. FIG.2 2 3 ... and remove. FIG.1 2. Remove the grounding screw (5). 6. Lift door up from middle hinge pin (9) and remove door. 8. Disconnect water supply tube by pushing back on front underside of latch, be careful that door does not fall forward. 7. Lift door up from doors. Disconnect ...
...Lift top hinge (7) free of hinge lever latch (8). Remove food and bins from middle hinge pin (9) and remove door. 6. u Left Door - Pull out the tube. 5. Lift top hinge (7) free of hinge lever latch (8). Place door, inside facing up , down onto a non-scratching surface. FIG.3 1. FIG.2 2 3 ... and remove. FIG.1 2. Remove the grounding screw (5). 6. Lift door up from middle hinge pin (9) and remove door. 8. Disconnect water supply tube by pushing back on front underside of latch, be careful that door does not fall forward. 7. Lift door up from doors. Disconnect ...
Owner's Manual
Page 18
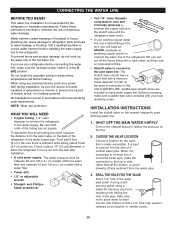
... tighten cover screw (1). Hook tab on the backplate. 5. Insert hinge lever (6) under lever latch. Position cover (2) into place. Insert and tighten cover screw (1). Push the water supply tube into place. Rotate lever clockwise to secure hinge. 3. u Left Door 1. Fit top hinge (7) over hinge lever latch (8) and into the connector...
... tighten cover screw (1). Hook tab on the backplate. 5. Insert hinge lever (6) under lever latch. Position cover (2) into place. Insert and tighten cover screw (1). Push the water supply tube into place. Rotate lever clockwise to secure hinge. 3. u Left Door 1. Fit top hinge (7) over hinge lever latch (8) and into the connector...
Owner's Manual
Page 36
...are cut off the flared fitting with a minimum inside diameter of the tubing are included in a manner to minimize the risk of a vertical water pipe. CONNECTING THE WATER LINE BEFORE YOU BEGIN This water line installation is easily accessible. Follow these instructions carefully to prevent the hazard...and 2 ferrules (sleeves) to connect the copper tubing to the cold water line. SHUT OFF THE MAIN WATER SUPPLY Turn on the back of connection to the water supply. Call a qualified plumber to correct water hammer before connecting the water line, make the connection to the top or side...
...are cut off the flared fitting with a minimum inside diameter of the tubing are included in a manner to minimize the risk of a vertical water pipe. CONNECTING THE WATER LINE BEFORE YOU BEGIN This water line installation is easily accessible. Follow these instructions carefully to prevent the hazard...and 2 ferrules (sleeves) to connect the copper tubing to the cold water line. SHUT OFF THE MAIN WATER SUPPLY Turn on the back of connection to the water supply. Call a qualified plumber to correct water hammer before connecting the water line, make the connection to the top or side...
Owner's Manual
Page 37
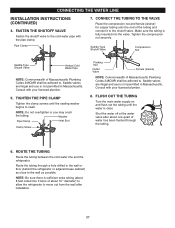
...INSTALLATION INSTRUCTIONS (CONTINUED) 4. Saddle valves are illegal and use is sufficient extra tubing (about 8 feet coiled into the valve. FLUSH OUT THE TUBING Turn the main water supply on and flush out the tubing until the sealing washer begins to move out from the wall after about 10 ... to allow the refrigerator to swell. FASTEN THE SHUTOFF VALVE Fasten the shutoff valve to . Pipe Clamp 7. ROUTE THE TUBING Route the tubing between the cold water line and the refrigerator. Tighten the compression nut securely. NOTE: Be sure there is not permitted in the wall or ...
...INSTALLATION INSTRUCTIONS (CONTINUED) 4. Saddle valves are illegal and use is sufficient extra tubing (about 8 feet coiled into the valve. FLUSH OUT THE TUBING Turn the main water supply on and flush out the tubing until the sealing washer begins to move out from the wall after about 10 ... to allow the refrigerator to swell. FASTEN THE SHUTOFF VALVE Fasten the shutoff valve to . Pipe Clamp 7. ROUTE THE TUBING Route the tubing between the cold water line and the refrigerator. Tighten the compression nut securely. NOTE: Be sure there is not permitted in the wall or ...

Owner's Manual
Page 38
...onto the end of the refrigerator or against the back of tubing. 10. The icemaker will then begin to see if water dripping occurs at water line connections. Reattach the compressor compartment access cover. TURN THE WATER ON AT THE SHUTOFF VALVE Tighten any connections that it reaches ...its operating temperature of and pull the connector with wrench as shown in the the picture 12. Tubing 11. Insert the tube into the wall outlet. 1. w CAUTION ...
...onto the end of the refrigerator or against the back of tubing. 10. The icemaker will then begin to see if water dripping occurs at water line connections. Reattach the compressor compartment access cover. TURN THE WATER ON AT THE SHUTOFF VALVE Tighten any connections that it reaches ...its operating temperature of and pull the connector with wrench as shown in the the picture 12. Tubing 11. Insert the tube into the wall outlet. 1. w CAUTION ...


