Owner's Manual
Page 2
... Version 86 Warranty (U.S.A.) 3 Warranty (CANADA) 4 Safety Instructions 5-10 Grounding Requirements 6 Parts And Features 11 Refrigerator Installation 12-21 Unpacking Your Refrigerator 12 Installation 12 Removing And Replacing Your Refrigerator Handles And Doors 13-20 Leveling And Door Alignment 21 Base Cover 21 Using...Cleaning 33-34 General Cleaning Tips 33 Outside 33 Inside Walls 33 Door Liner And Gaskets 33 Plastic Parts 33 Condenser Coils 33 Light Bulb Replacement 33-34 Power Interruptions 34 When You Go On Vacation 34 When You Move 34 About The ...
... Version 86 Warranty (U.S.A.) 3 Warranty (CANADA) 4 Safety Instructions 5-10 Grounding Requirements 6 Parts And Features 11 Refrigerator Installation 12-21 Unpacking Your Refrigerator 12 Installation 12 Removing And Replacing Your Refrigerator Handles And Doors 13-20 Leveling And Door Alignment 21 Base Cover 21 Using...Cleaning 33-34 General Cleaning Tips 33 Outside 33 Inside Walls 33 Door Liner And Gaskets 33 Plastic Parts 33 Condenser Coils 33 Light Bulb Replacement 33-34 Power Interruptions 34 When You Go On Vacation 34 When You Move 34 About The ...
Owner's Manual
Page 3
...Or visit our website at the time warranty service is good only to locate your LG refrigerator is required and must be borne by the consumer. O. PARTS: One Year from the Date of repair or replacement under normal use . • Damages caused during the warranty period ("Warranty Period... ANY IMPLIED WARRANTY IS REQUIRED BY LAW, IT IS LIMITED IN DURATION TO THE EXPRESS WARRANTY PERIOD ABOVE. LG ELECTRONICS, INC. Proof of Purchase. Territories. Replacement Units and Repair Parts are answered 24 hours a day, 365 days per year) and select the appropriate option from the date ...
...Or visit our website at the time warranty service is good only to locate your LG refrigerator is required and must be borne by the consumer. O. PARTS: One Year from the Date of repair or replacement under normal use . • Damages caused during the warranty period ("Warranty Period... ANY IMPLIED WARRANTY IS REQUIRED BY LAW, IT IS LIMITED IN DURATION TO THE EXPRESS WARRANTY PERIOD ABOVE. LG ELECTRONICS, INC. Proof of Purchase. Territories. Replacement Units and Repair Parts are answered 24 hours a day, 365 days per year) and select the appropriate option from the date ...
Owner's Manual
Page 4
...and have your Sales Receipt must be submitted at its option replace, without charge, your product which vary from the date of original purchase. PARTS: Seven years from the Date of Purchase. Replacement Units and Repair Parts are warranted for other than normal, single-family household use...product type (Refrigerator), model number, serial number, and ZIP/Postal Code ready. 4 visit our web site/http://www.lg.ca LIMITED WARRANTY CANADA LG Electronics LG Electronics will repair or at the time warranty service is provided. No other rights which proves to you. This warranty...
...and have your Sales Receipt must be submitted at its option replace, without charge, your product which vary from the date of original purchase. PARTS: Seven years from the Date of Purchase. Replacement Units and Repair Parts are warranted for other than normal, single-family household use...product type (Refrigerator), model number, serial number, and ZIP/Postal Code ready. 4 visit our web site/http://www.lg.ca LIMITED WARRANTY CANADA LG Electronics LG Electronics will repair or at the time warranty service is provided. No other rights which proves to you. This warranty...
Owner's Manual
Page 24
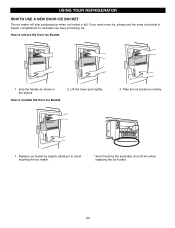
Grip the handle as shown in freezer compartment so icemaker can keep producing ice. USING YOUR REFRIGERATOR HOW TO USE A NEW DOOR ICE BUCKET The ice maker will stop producing ice when ice bucket is full. Lift the lower part slightly. 3. How to avoid touching the ice maker. * Avoid touching the automatic shut off arm when replacing the ice bucket. 24 Take the ice bucket out slowly. 1 . Replace ice bucket by slightly slanting it to remove the Door Ice Bucket. 1 . If you need more ice, please use the extra ice bucket in the picture How to reinstall the Door Ice Bucket. 2.
Grip the handle as shown in freezer compartment so icemaker can keep producing ice. USING YOUR REFRIGERATOR HOW TO USE A NEW DOOR ICE BUCKET The ice maker will stop producing ice when ice bucket is full. Lift the lower part slightly. 3. How to avoid touching the ice maker. * Avoid touching the automatic shut off arm when replacing the ice bucket. 24 Take the ice bucket out slowly. 1 . Replace ice bucket by slightly slanting it to remove the Door Ice Bucket. 1 . If you need more ice, please use the extra ice bucket in the picture How to reinstall the Door Ice Bucket. 2.
Owner's Manual
Page 32
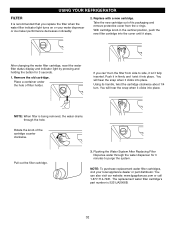
... is being removed, the water drains through the water dispenser for 3 seconds. 1. The replacement water filter cartridge's part number is 5231JA2006B. 32 Flushing the Water System After Replacing Filter Dispense water through the hole. With cartridge knob in firmly and twist it stops. ...Rotate the knob of filter holder. NOTE: To purchase replacement water filter cartridges, visit your ...
... is being removed, the water drains through the water dispenser for 3 seconds. 1. The replacement water filter cartridge's part number is 5231JA2006B. 32 Flushing the Water System After Replacing Filter Dispense water through the hole. With cartridge knob in firmly and twist it stops. ...Rotate the knob of filter holder. NOTE: To purchase replacement water filter cartridges, visit your ...
Owner's Manual
Page 33
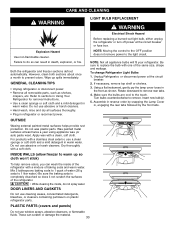
... new bulb(s). 5. Dry thoroughly with one of baking soda and warm water. CARE AND CLEANING WARNING LIGHT BULB REPLACEMENT WARNING Electrical Shock Hazard Before replacing a burned-out light bulb, either unplug the refrigerator or turn off power at the circuit breaker. 2. GENERAL CLEANING... TIPS • Unplug refrigerator or disconnect power. • Remove all removable parts, such as shown. Failure to replace the bulb with a soft cloth. Using a flat instrument, gently pry the lamp cover loose in death, explosion, or...
... new bulb(s). 5. Dry thoroughly with one of baking soda and warm water. CARE AND CLEANING WARNING LIGHT BULB REPLACEMENT WARNING Electrical Shock Hazard Before replacing a burned-out light bulb, either unplug the refrigerator or turn off power at the circuit breaker. 2. GENERAL CLEANING... TIPS • Unplug refrigerator or disconnect power. • Remove all removable parts, such as shown. Failure to replace the bulb with a soft cloth. Using a flat instrument, gently pry the lamp cover loose in death, explosion, or...
Owner's Manual
Page 34
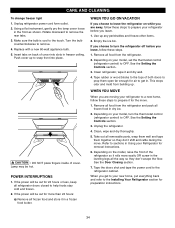
...control) to OFF. Using a flat instrument, gently pry the lamp cover loose in freezer ceiling. Rotate downward to help foods stay cold and frozen. 2. Replace with a new 60-watt appliance bulb. 5. w CAUTION : DO NOT place fingers inside of both doors to prop them together so they don't scrape ... closed to remove the rear tabs. 3. See the Setting the Controls section. 3. Clean, wipe and dry thoroughly. 5. Take out all removable parts, wrap them well and tape them open far enough for air to the Installing Your Refrigerator section for 24 hours or less, keep all frozen...
...control) to OFF. Using a flat instrument, gently pry the lamp cover loose in freezer ceiling. Rotate downward to help foods stay cold and frozen. 2. Replace with a new 60-watt appliance bulb. 5. w CAUTION : DO NOT place fingers inside of both doors to prop them together so they don't scrape ... closed to remove the rear tabs. 3. See the Setting the Controls section. 3. Clean, wipe and dry thoroughly. 5. Take out all removable parts, wrap them well and tape them open far enough for air to the Installing Your Refrigerator section for 24 hours or less, keep all frozen...


