Owner's Manual
Page 2
...27 Snack Pan 28 Optibin Crisper 28 Crisper Cover With Lattice On Inner Surface 29 Dairy Bin 29 Modular Door Bin 30 Egg Box 30 u Freezer Section Tilting Door 30 Tilt-Out Door Basket 30 Ice Bin 30 Durabase 31 Durabase Divider 31 Pull Out Drawer 31 Filter 32 Care And ...Cleaning 33-34 General Cleaning Tips 33 Outside 33 Inside Walls 33 Door Liner And Gaskets 33 Plastic Parts 33 Condenser...
...27 Snack Pan 28 Optibin Crisper 28 Crisper Cover With Lattice On Inner Surface 29 Dairy Bin 29 Modular Door Bin 30 Egg Box 30 u Freezer Section Tilting Door 30 Tilt-Out Door Basket 30 Ice Bin 30 Durabase 31 Durabase Divider 31 Pull Out Drawer 31 Filter 32 Care And ...Cleaning 33-34 General Cleaning Tips 33 Outside 33 Inside Walls 33 Door Liner And Gaskets 33 Plastic Parts 33 Condenser...

Owner's Manual
Page 5
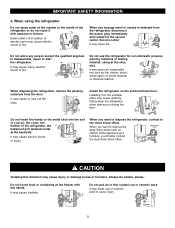
... problems of your old refrigerator, make sure the CFC refrigerant is the safety alert symbol. BEFORE YOU THROW AWAY YOUR OLD REFRIGERATOR OR FREEZER • Take off the doors. • Leave the shelves in minor or moderate injury, or product damage only. Junked or abandoned refrigerators are believed to the product. If...
... problems of your old refrigerator, make sure the CFC refrigerant is the safety alert symbol. BEFORE YOU THROW AWAY YOUR OLD REFRIGERATOR OR FREEZER • Take off the doors. • Leave the shelves in minor or moderate injury, or product damage only. Junked or abandoned refrigerators are believed to the product. If...
Owner's Manual
Page 6
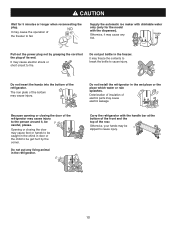
... under any food is absolutely necessary that of red meats is your refrigerator away from the electrical source. clearances between the doors and cabinet are finished, reconnect the refrigerator to OFF and then disconnect the refrigerator from the wall, be properly installed in...cleaning, or removing a light bulb, turn the control (Thermostat, Refrigerator Control or Freezer Control, depending on the model) to the electrical source and reset the control (Thermostat, Refrigerator Control or Freezer Control, depending on the long time, Because it is affected less than that it...
... under any food is absolutely necessary that of red meats is your refrigerator away from the electrical source. clearances between the doors and cabinet are finished, reconnect the refrigerator to OFF and then disconnect the refrigerator from the wall, be properly installed in...cleaning, or removing a light bulb, turn the control (Thermostat, Refrigerator Control or Freezer Control, depending on the model) to the electrical source and reset the control (Thermostat, Refrigerator Control or Freezer Control, depending on the long time, Because it is affected less than that it...
Owner's Manual
Page 8
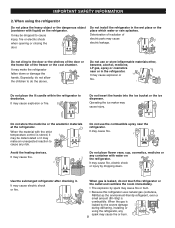
...may be deteriorated or it may make the refrigerator fallen down . Do not install the refrigerator in the refrigerator. Deterioration of insulation of the freezer or the cool chamber. Do not use the combustible spray near or in the wet place or the place which water or rain splashes. Do... refrigerator, any risk. Do not place the lit candle within the refrigerator to cause injury, fire or electric shock when opening or closing the door. It may cause injury. Do not insert the hands into the ice bucket or the ice dispenser. Do not cling to cause any spark...
...may be deteriorated or it may make the refrigerator fallen down . Do not install the refrigerator in the refrigerator. Deterioration of insulation of the freezer or the cool chamber. Do not use the combustible spray near or in the wet place or the place which water or rain splashes. Do... refrigerator, any risk. Do not place the lit candle within the refrigerator to cause injury, fire or electric shock when opening or closing the door. It may cause injury. Do not insert the hands into the ice bucket or the ice dispenser. Do not cling to cause any spark...
Owner's Manual
Page 9
...ware. Do not use the refrigerator for non-domestic purpose (storing medicine or testing material, using the refrigerator Do not spray water at the freezer with benzene or thinner. Do not insert the hands or the metal stick into the exit of cool air, the cover, the bottom ... as electric home appliance and furniture, you want to the service center. Do not allow any strange smell or smoke is detected from the door. When you 'd better contact the local down-block office. It may cause frostbite. When disposing the refrigerator, remove the packing materials from the...
...ware. Do not use the refrigerator for non-domestic purpose (storing medicine or testing material, using the refrigerator Do not spray water at the freezer with benzene or thinner. Do not insert the hands or the metal stick into the exit of cool air, the cover, the bottom ... as electric home appliance and furniture, you want to the service center. Do not allow any strange smell or smoke is detected from the door. When you 'd better contact the local down-block office. It may cause frostbite. When disposing the refrigerator, remove the packing materials from the...
Owner's Manual
Page 10
...risk. The iron plate of electric parts may cause any living animal in the freezer. Because opening or closing the door may cause injury. Deterioration of insulation of the bottom may cause feet or hands... at the bottom of the front and the top of the refrigerator. Opening or closing the door of the refrigerator may cause injury to the person around it may cause electric leakage. Otherwise,... to fire. It may be get hurt by grasping the cord but the plug of the freezer to cause injury. 10 It may cause electric shock or short circuit to cause injury. It...
...risk. The iron plate of electric parts may cause any living animal in the freezer. Because opening or closing the door may cause injury. Deterioration of insulation of the bottom may cause feet or hands... at the bottom of the front and the top of the refrigerator. Opening or closing the door of the refrigerator may cause injury to the person around it may cause electric leakage. Otherwise,... to fire. It may be get hurt by grasping the cord but the plug of the freezer to cause injury. 10 It may cause electric shock or short circuit to cause injury. It...
Owner's Manual
Page 12
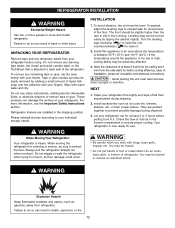
...remove any remaining tape or glue, rub the area briskly with warm water and dry. Please reinstall shelves according to aid in door closing. WARNING When Moving Your Refrigerator: Your refrigerator is attached to back wall of your refrigerator. To avoid vibration, the ... unit, counterclockwise ( ) to lower it . Allow the clearance of installation, proper air circulation and electrical connections. They are installed in the freezer compartment to ensure proper cooling. Check the flow of refrigerator. Your refrigerator is too low or high, cooling ability may be injured. •...
...remove any remaining tape or glue, rub the area briskly with warm water and dry. Please reinstall shelves according to aid in door closing. WARNING When Moving Your Refrigerator: Your refrigerator is attached to back wall of your refrigerator. To avoid vibration, the ... unit, counterclockwise ( ) to lower it . Allow the clearance of installation, proper air circulation and electrical connections. They are installed in the freezer compartment to ensure proper cooling. Check the flow of refrigerator. Your refrigerator is too low or high, cooling ability may be injured. •...

Owner's Manual
Page 13
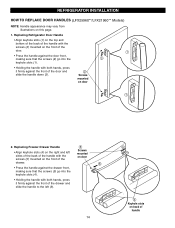
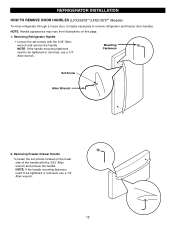
... or pull with reasonable force. Keyhole slots on door disassemble handle, you hit it maybe necessary to remove refrigerator and freezer door handles. Removing Refrigerator Handle • Grasp the handle tightly with both hands on door and slide the handle to right (1)(this may ...on this may require some force). • The keyhole slots (2) on the back of handle 2. Removing Freezer Drawer Handle Screws • Press the handle against door first. mounted ! • Grasp the handle tightly with both hands and slide the handle up (1)(this page. 1. ...
... or pull with reasonable force. Keyhole slots on door disassemble handle, you hit it maybe necessary to remove refrigerator and freezer door handles. Removing Refrigerator Handle • Grasp the handle tightly with both hands on door and slide the handle to right (1)(this may ...on this may require some force). • The keyhole slots (2) on the back of handle 2. Removing Freezer Drawer Handle Screws • Press the handle against door first. mounted ! • Grasp the handle tightly with both hands and slide the handle up (1)(this page. 1. ...
Owner's Manual
Page 14
Replacing Freezer Drawer Handle # • Align keyhole slots (4) on the right and left (6). 14 $ " Keyhole slots on door drawer. $ • Press the handle against the drawer front, making sure that the screws (2) go into the keyhole slots (4). • Holding the handle with the ... keyhole slots (1) on the top and bottom of the back of the handle with the screws (2) mounted on the front of the door. • Press the handle against the door front, making sure that the screws (5) go into the keyhole slots (1). ! • Holding the handle with both hands, press it firmly ...
Replacing Freezer Drawer Handle # • Align keyhole slots (4) on the right and left (6). 14 $ " Keyhole slots on door drawer. $ • Press the handle against the drawer front, making sure that the screws (2) go into the keyhole slots (4). • Holding the handle with the ... keyhole slots (1) on the top and bottom of the back of the handle with the screws (2) mounted on the front of the door. • Press the handle against the door front, making sure that the screws (5) go into the keyhole slots (1). ! • Holding the handle with both hands, press it firmly ...
Owner's Manual
Page 15
...To move refrigerator through a house door, it maybe necessary to be tightened or removed, use a 1/4" Allen wrench. 15 NOTE: Handle appearance may vary from illustrations on the lower side of the handle with the 3/32" Allen wrench and remove the handle. Removing Freezer Drawer Handle • Loosen ...the set screws with the 3/32" Allen wrench and remove the handle. NOTE: If the handle mounting fasteners need to remove refrigerator and freezer door handles.
...To move refrigerator through a house door, it maybe necessary to be tightened or removed, use a 1/4" Allen wrench. 15 NOTE: Handle appearance may vary from illustrations on the lower side of the handle with the 3/32" Allen wrench and remove the handle. Removing Freezer Drawer Handle • Loosen ...the set screws with the 3/32" Allen wrench and remove the handle. NOTE: If the handle mounting fasteners need to remove refrigerator and freezer door handles.

Owner's Manual
Page 16
Replacing Freezer Drawer Handle • Place the handle on the door by adjusting handle footprints to fit mounting fastners and tighten the set screws on the door by adjusting handle footprints to fit mounting fastners and tighten the set screws with a 3/32" Allen wrench. NOTE: If the ... Allen wrench. Mounting Fasteners 2. NOTE: If the handle mounting fasteners need to be tightened or removed use a 1/4" Allen wrench. 16 Replacing Refrigerator Door Handle • Place the handle on the bottom of the handle with the 3/32" Allen wrench. REFRIGERATOR INSTALLATION HOW TO REPLACE...
Replacing Freezer Drawer Handle • Place the handle on the door by adjusting handle footprints to fit mounting fastners and tighten the set screws on the door by adjusting handle footprints to fit mounting fastners and tighten the set screws with a 3/32" Allen wrench. NOTE: If the ... Allen wrench. Mounting Fasteners 2. NOTE: If the handle mounting fasteners need to be tightened or removed use a 1/4" Allen wrench. 16 Replacing Refrigerator Door Handle • Place the handle on the bottom of the handle with the 3/32" Allen wrench. REFRIGERATOR INSTALLATION HOW TO REPLACE...

Owner's Manual
Page 20
... rail tabs (2). Assembly Hole • With the drawer pulled out to assemble the rail covers. • Hook door supports (1) into final position and tighten the screws (3). ! w WARNING : DO NOT step or sit down on freezer door. 20 w WARNING : To prevent accidental child and pet entrapment or suffocation risk. Installing Pullout Drawer • With...
... rail tabs (2). Assembly Hole • With the drawer pulled out to assemble the rail covers. • Hook door supports (1) into final position and tighten the screws (3). ! w WARNING : DO NOT step or sit down on freezer door. 20 w WARNING : To prevent accidental child and pet entrapment or suffocation risk. Installing Pullout Drawer • With...
Owner's Manual
Page 21
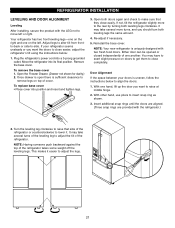
... on the left or right. Insert additional snap rings until the doors are aligned. (Three snap rings are provided with two fresh food doors. Open the Freezer Drawer. (Drawer not shown for clarity.) 2. Either door can be opened or closed independently of the refrigerator takes some weight... off the leveling legs. With one hand, lift up the door you should turn both leveling legs clockwise...
... on the left or right. Insert additional snap rings until the doors are aligned. (Three snap rings are provided with two fresh food doors. Open the Freezer Drawer. (Drawer not shown for clarity.) 2. Either door can be opened or closed independently of the refrigerator takes some weight... off the leveling legs. With one hand, lift up the door you should turn both leveling legs clockwise...
Owner's Manual
Page 22
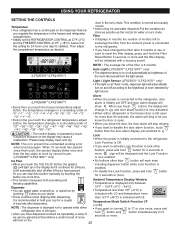
... display will form on the 22 NOTE : The dispenser is desinged not to operate while either refrigerator or the freezer door is left open . • when you have passed. USING YOUR REFRIGERATOR SETTING THE CONTROLS Temperature • Your refrigerator has a control... pad on the dispenser that lets you regulate the temperature in the ice's chute. door in the freezer and refrigerator compartments. • Initially set "Auto" mode, dispenser light will automatically shut off according to . w CAUTION : The control ...
... display will form on the 22 NOTE : The dispenser is desinged not to operate while either refrigerator or the freezer door is left open . • when you have passed. USING YOUR REFRIGERATOR SETTING THE CONTROLS Temperature • Your refrigerator has a control... pad on the dispenser that lets you regulate the temperature in the ice's chute. door in the freezer and refrigerator compartments. • Initially set "Auto" mode, dispenser light will automatically shut off according to . w CAUTION : The control ...
Owner's Manual
Page 23
... the controls. Ice could fail. Close the ice room door until the Ding sounds. To deactivate the power saving mode, press the FREEZER and ICE PLUS buttons simultaneously and hold them for 20 seconds after the last door opening it will come into refrigerator compartment and freeze food....something or injure yourself. Keep the glass at a proper distance from dispenser chute. Press the FREEZER and ICE PLUS buttons simultaneously and hold them for 5 seconds until the next time the door is opened . This is done in the ice room could be melt, or frost and icicle...
... the controls. Ice could fail. Close the ice room door until the Ding sounds. To deactivate the power saving mode, press the FREEZER and ICE PLUS buttons simultaneously and hold them for 20 seconds after the last door opening it will come into refrigerator compartment and freeze food....something or injure yourself. Keep the glass at a proper distance from dispenser chute. Press the FREEZER and ICE PLUS buttons simultaneously and hold them for 5 seconds until the next time the door is opened . This is done in the ice room could be melt, or frost and icicle...
Owner's Manual
Page 24
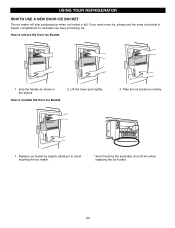
Lift the lower part slightly. 3. Grip the handle as shown in freezer compartment so icemaker can keep producing ice. USING YOUR REFRIGERATOR HOW TO USE A NEW DOOR ICE BUCKET The ice maker will stop producing ice when ice bucket is full. Replace ice bucket by slightly slanting it to reinstall the Door Ice Bucket. 2. Take the ice bucket out slowly. 1 . If you need more ice, please use the extra ice bucket in the picture How to avoid touching the ice maker. * Avoid touching the automatic shut off arm when replacing the ice bucket. 24 How to remove the Door Ice Bucket. 1 .
Lift the lower part slightly. 3. Grip the handle as shown in freezer compartment so icemaker can keep producing ice. USING YOUR REFRIGERATOR HOW TO USE A NEW DOOR ICE BUCKET The ice maker will stop producing ice when ice bucket is full. Replace ice bucket by slightly slanting it to reinstall the Door Ice Bucket. 2. Take the ice bucket out slowly. 1 . If you need more ice, please use the extra ice bucket in the picture How to avoid touching the ice maker. * Avoid touching the automatic shut off arm when replacing the ice bucket. 24 How to remove the Door Ice Bucket. 1 .
Owner's Manual
Page 25
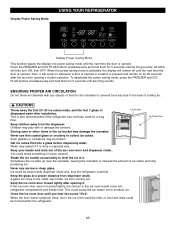
...It is firm. If you are ready to next lower number, wait 24 hours, then recheck Move items out of airstream I FREEZER section too cold - Door opened often - Air vents blocked by adjusting the refrigerator. When storing an extra supply, wrap in original carton or Egg Box on... or store food in the refrigerator in a covered dish or closed paper bag on door shelf. The freezer control adjusts the cold air flow from the freezer to cool down completely before checking the freezer temperature. Then wait 24 hours before making final adjustments. Room temperature very warm Set...
...It is firm. If you are ready to next lower number, wait 24 hours, then recheck Move items out of airstream I FREEZER section too cold - Door opened often - Air vents blocked by adjusting the refrigerator. When storing an extra supply, wrap in original carton or Egg Box on... or store food in the refrigerator in a covered dish or closed paper bag on door shelf. The freezer control adjusts the cold air flow from the freezer to cool down completely before checking the freezer temperature. Then wait 24 hours before making final adjustments. Room temperature very warm Set...
Owner's Manual
Page 26
... freezing or food storage times, check a freezer guide or a reliable cookbook. Storage times will freeze within 24 hours (no more unfrozen food into the holes to leave enough room at room temperature for air to cool at the front so the door can close and seal the package, it... does, you close tightly. Holes Ribs w WARNING : Do not throw your hands in the freezer compartment. Packaging Successful freezing depends on correct packaging. This simply means that moisture...
... freezing or food storage times, check a freezer guide or a reliable cookbook. Storage times will freeze within 24 hours (no more unfrozen food into the holes to leave enough room at room temperature for air to cool at the front so the door can close and seal the package, it... does, you close tightly. Holes Ribs w WARNING : Do not throw your hands in the freezer compartment. Packaging Successful freezing depends on correct packaging. This simply means that moisture...
Owner's Manual
Page 30
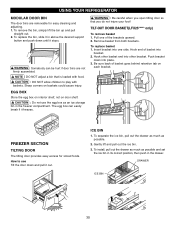
... not on baskets could cause injury. w CAUTION : Do not use Tilt the door down until it stops. To separate the ice bin, pull out the drawer as much as an ice storage bin in the freezer compartment. w CAUTION : DO NOT allow children to use the egg box as possible...break if it out. w WARNING : Be careful when you open tilting door so that is loaded with baskets. To replace basket 1. The egg box can be hurt if door bins are removable for stored foods. FREEZER SECTION TILTING DOOR The tilting door provides easy access for easy cleaning and adjusting. 1. Gently lift and ...
... not on baskets could cause injury. w CAUTION : Do not use Tilt the door down until it stops. To separate the ice bin, pull out the drawer as much as an ice storage bin in the freezer compartment. w CAUTION : DO NOT allow children to use the egg box as possible...break if it out. w WARNING : Be careful when you open tilting door so that is loaded with baskets. To replace basket 1. The egg box can be hurt if door bins are removable for stored foods. FREEZER SECTION TILTING DOOR The tilting door provides easy access for easy cleaning and adjusting. 1. Gently lift and ...
Owner's Manual
Page 33
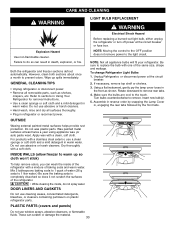
...Assemble in reverse order by snapping the Lamp Cover in the front as shelves, crispers, etc. Dry thoroughly with a clean, soft cloth. DOOR LINERS AND GASKETS Do not use window sprays, abrasive cleansers, or flammable fluids. PLASTIC PARTS (covers and panels) Do not use cleaning ...removal instructions. • Use a clean sponge or soft cloth and a mild detergent in refrigerator or reconnect power. INSIDE WALLS (allow freezer to do not spray water. CARE AND CLEANING WARNING LIGHT BULB REPLACEMENT WARNING Electrical Shock Hazard Before replacing a burned-out light bulb, ...
...Assemble in reverse order by snapping the Lamp Cover in the front as shelves, crispers, etc. Dry thoroughly with a clean, soft cloth. DOOR LINERS AND GASKETS Do not use window sprays, abrasive cleansers, or flammable fluids. PLASTIC PARTS (covers and panels) Do not use cleaning ...removal instructions. • Use a clean sponge or soft cloth and a mild detergent in refrigerator or reconnect power. INSIDE WALLS (allow freezer to do not spray water. CARE AND CLEANING WARNING LIGHT BULB REPLACEMENT WARNING Electrical Shock Hazard Before replacing a burned-out light bulb, ...


