Owner's Manual
Page 2
...12-21 Unpacking Your Refrigerator 12 Installation 12 Removing And Replacing Your Refrigerator Handles And Doors 13-20 Leveling And Door Alignment 21 Base Cover 21 Using Your Refrigerator 22-32 Setting The Controls 22 Ensuring Proper Air Circulation 23 Diagnosis (Failure Detection) Function 23 How To ...Cleaning 33-34 General Cleaning Tips 33 Outside 33 Inside Walls 33 Door Liner And Gaskets 33 Plastic Parts 33 Condenser Coils 33 Light Bulb Replacement 33-34 Power Interruptions 34 When You Go On Vacation 34 When You Move 34 About The Automatic Icemaker 35 ...
...12-21 Unpacking Your Refrigerator 12 Installation 12 Removing And Replacing Your Refrigerator Handles And Doors 13-20 Leveling And Door Alignment 21 Base Cover 21 Using Your Refrigerator 22-32 Setting The Controls 22 Ensuring Proper Air Circulation 23 Diagnosis (Failure Detection) Function 23 How To ...Cleaning 33-34 General Cleaning Tips 33 Outside 33 Inside Walls 33 Door Liner And Gaskets 33 Plastic Parts 33 Condenser Coils 33 Light Bulb Replacement 33-34 Power Interruptions 34 When You Go On Vacation 34 When You Move 34 About The Automatic Icemaker 35 ...
Owner's Manual
Page 11
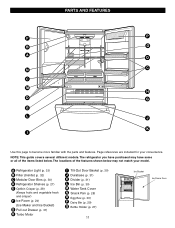
NOTE: This guide covers several different models. The locations of the items listed below may have purchased may not match your convenience. The refrigerator you have some or all of the features shown below . Page references are included for your model. A Refrigerator Light (p. 33) B Filter (Inside) (p....FEATURES F P B O A Q N C C M H D G E L J K I Tilt-Out Door Basket (p. 30) J Durabase (p. 31) K Divider (p. 31) L Ice Bin (p. 30) M Water Tank Cover N Snack Pan (p. 28) O Egg Box (p. 30) P Dairy Bin (p. 29) Q Bottle Holder (p. 27) 11 Ice Bucket Ice Room Door
NOTE: This guide covers several different models. The locations of the items listed below may have purchased may not match your convenience. The refrigerator you have some or all of the features shown below . Page references are included for your model. A Refrigerator Light (p. 33) B Filter (Inside) (p....FEATURES F P B O A Q N C C M H D G E L J K I Tilt-Out Door Basket (p. 30) J Durabase (p. 31) K Divider (p. 31) L Ice Bin (p. 30) M Water Tank Cover N Snack Pan (p. 28) O Egg Box (p. 30) P Dairy Bin (p. 29) Q Bottle Holder (p. 27) 11 Ice Bucket Ice Room Door
Owner's Manual
Page 32
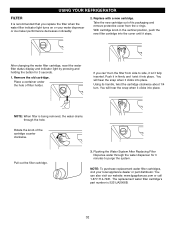
.... Push it in the vertical position, push the new filter cartridge into place. You will hear the snap when it clicks into the cover until it clicks into place. You will hear the snap when it stops. The replacement water filter cartridge's part number is recommended that ... to side, it into place. If you replace the filter when the water filter indicator light turns on or your local appliance dealer or part distributor. Using its packaging and remove protective cover from side to purge the system. Flushing the Water System After Replacing Filter Dispense water through...
.... Push it in the vertical position, push the new filter cartridge into place. You will hear the snap when it clicks into the cover until it clicks into place. You will hear the snap when it stops. The replacement water filter cartridge's part number is recommended that ... to side, it into place. If you replace the filter when the water filter indicator light turns on or your local appliance dealer or part distributor. Using its packaging and remove protective cover from side to purge the system. Flushing the Water System After Replacing Filter Dispense water through...
Owner's Manual
Page 33
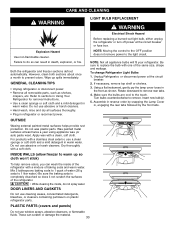
... to do not spray water. Mix 2 tablespoons baking soda to 1 quart of water (26 g soda to the touch. PLASTIC PARTS (covers and panels) Do not use abrasive or harsh cleaners. GENERAL CLEANING TIPS • Unplug refrigerator or disconnect power. • Remove all appliance...sections about once a month to the light circuit. To change Refrigerator Light Bulbs 1. Unplug Refrigerator, or disconnect power at the circuit breaker. 2. Using a flat instrument, gently pry the lamp cover loose in , engaging the rear tabs followed by snapping the Lamp Cover in the front as shelves, crispers...
... to do not spray water. Mix 2 tablespoons baking soda to 1 quart of water (26 g soda to the touch. PLASTIC PARTS (covers and panels) Do not use abrasive or harsh cleaners. GENERAL CLEANING TIPS • Unplug refrigerator or disconnect power. • Remove all appliance...sections about once a month to the light circuit. To change Refrigerator Light Bulbs 1. Unplug Refrigerator, or disconnect power at the circuit breaker. 2. Using a flat instrument, gently pry the lamp cover loose in , engaging the rear tabs followed by snapping the Lamp Cover in the front as shelves, crispers...
Owner's Manual
Page 34
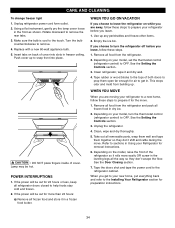
..., follow these steps. 1. Remove all food from building up. Unplug the refrigerator. 4. Replace with a new 60-watt appliance bulb. 5. Push cover up any perishables and freeze other items. 2. Depending on back of both doors to prop them together so they don't scrape the floor. Unplug... refrigerator power cord form outlet. 2. Empty the ice bin. See the Setting the Controls section. 3. CARE AND CLEANING To change freezer light 1. Make sure the bulb is cool to snap front into slots in the leveling legs all refrigerator doors closed to remove. 4. Insert ...
..., follow these steps. 1. Remove all food from building up. Unplug the refrigerator. 4. Replace with a new 60-watt appliance bulb. 5. Push cover up any perishables and freeze other items. 2. Depending on back of both doors to prop them together so they don't scrape the floor. Unplug... refrigerator power cord form outlet. 2. Empty the ice bin. See the Setting the Controls section. 3. CARE AND CLEANING To change freezer light 1. Make sure the bulb is cool to snap front into slots in the leveling legs all refrigerator doors closed to remove. 4. Insert ...


