Owner's Manual
Page 2
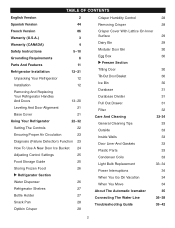
... Bin 30 Egg Box 30 u Freezer Section Tilting Door 30 Tilt-Out Door Basket 30 Ice Bin 30 Durabase 31 Durabase Divider 31 Pull Out Drawer 31 Filter 32 Care And Cleaning 33-34 General Cleaning Tips 33 Outside 33 Inside Walls 33 Door Liner And Gaskets 33 Plastic Parts 33...
... Bin 30 Egg Box 30 u Freezer Section Tilting Door 30 Tilt-Out Door Basket 30 Ice Bin 30 Durabase 31 Durabase Divider 31 Pull Out Drawer 31 Filter 32 Care And Cleaning 33-34 General Cleaning Tips 33 Outside 33 Inside Walls 33 Door Liner And Gaskets 33 Plastic Parts 33...
Owner's Manual
Page 11
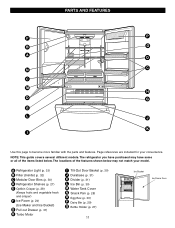
... Bins (p. 30) D Refrigerator Shelves (p. 27) E Optibin Crisper (p. 28) (Keeps fruits and vegetable fresh and crisper) F Ice Room (p. 24) (Ice Maker and Ice Bucket) G Pull out Drawer (p. 31) H Turbo Motor I Use this page to become more familiar with the parts and features. PARTS AND FEATURES F P B O A Q N C C M H D G E L J K I Tilt-Out Door Basket (p. 30) J Durabase (p. 31...
... Bins (p. 30) D Refrigerator Shelves (p. 27) E Optibin Crisper (p. 28) (Keeps fruits and vegetable fresh and crisper) F Ice Room (p. 24) (Ice Maker and Ice Bucket) G Pull out Drawer (p. 31) H Turbo Motor I Use this page to become more familiar with the parts and features. PARTS AND FEATURES F P B O A Q N C C M H D G E L J K I Tilt-Out Door Basket (p. 30) J Durabase (p. 31...
Owner's Manual
Page 12
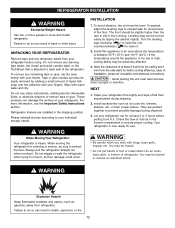
.... Install accessories such as gasoline, away from refrigerator. You may be level. WARNING Explosion Hazard Keep flammable materials and vapors, such as ice cube bin, drawers, shelves, etc., in back or other injury.
.... Install accessories such as gasoline, away from refrigerator. You may be level. WARNING Explosion Hazard Keep flammable materials and vapors, such as ice cube bin, drawers, shelves, etc., in back or other injury.

Owner's Manual
Page 13
... handles. Screws mounted ! w CAUTION : When you assemble or on the back of the handle allow the handle to separate from the mounting screws (3). Removing Freezer Drawer Handle Screws • Press the handle against door first. mounted ! • Grasp the handle tightly with both hands and slide the handle up (1)(this may...
... handles. Screws mounted ! w CAUTION : When you assemble or on the back of the handle allow the handle to separate from the mounting screws (3). Removing Freezer Drawer Handle Screws • Press the handle against door first. mounted ! • Grasp the handle tightly with both hands and slide the handle up (1)(this may...
Owner's Manual
Page 14
... and left sides of the back of the handle with the screws (5) mounted on the front of the Screws mounted on door drawer. $ • Press the handle against the drawer front, making sure that the screws (5) go into the keyhole slots (4). • Holding the handle with both hands, press it firmly against..., making sure that the screws (2) go into the keyhole slots (1). ! • Holding the handle with both hands, press it firmly against the front of the drawer and slide the handle to the left (6). 14 $ " Keyhole slots on door 2.
... and left sides of the back of the handle with the screws (5) mounted on the front of the Screws mounted on door drawer. $ • Press the handle against the drawer front, making sure that the screws (5) go into the keyhole slots (4). • Holding the handle with both hands, press it firmly against..., making sure that the screws (2) go into the keyhole slots (1). ! • Holding the handle with both hands, press it firmly against the front of the drawer and slide the handle to the left (6). 14 $ " Keyhole slots on door 2.
Owner's Manual
Page 15
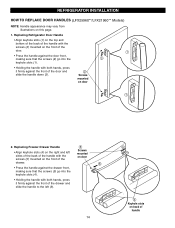
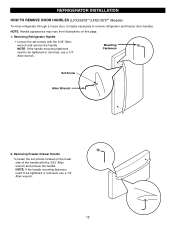
... REMOVE DOOR HANDLES (LFX25970**/LFX21970** Models) To move refrigerator through a house door, it maybe necessary to be tightened or removed, use a 1/4" Allen wrench. Removing Freezer Drawer Handle • Loosen the set screws with the 3/32" Allen wrench and remove the handle. NOTE: Handle appearance may vary from illustrations on the lower...
... REMOVE DOOR HANDLES (LFX25970**/LFX21970** Models) To move refrigerator through a house door, it maybe necessary to be tightened or removed, use a 1/4" Allen wrench. Removing Freezer Drawer Handle • Loosen the set screws with the 3/32" Allen wrench and remove the handle. NOTE: Handle appearance may vary from illustrations on the lower...

Owner's Manual
Page 16
... adjusting handle footprints to fit mounting fastners and tighten the set screws on the bottom of the handle with the 3/32" Allen wrench. Replacing Freezer Drawer Handle • Place the handle on this page. 1. NOTE: If the handle mounting fasteners need to be tightened or removed use a 1/4" Allen wrench. 16 NOTE...
... adjusting handle footprints to fit mounting fastners and tighten the set screws on the bottom of the handle with the 3/32" Allen wrench. Replacing Freezer Drawer Handle • Place the handle on this page. 1. NOTE: If the handle mounting fasteners need to be tightened or removed use a 1/4" Allen wrench. 16 NOTE...
Owner's Manual
Page 19
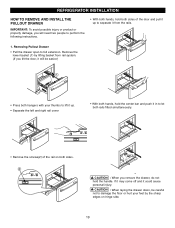
...left and right rail cover • With both hands, hold the handle. w CAUTION : When laying the drawer down, be easier.) • Press both hangers with your feet by lifting basket from the rails.... 1. REFRIGERATOR INSTALLATION HOW TO REMOVE AND INSTALL THE PULLOUT DRAWER IMPORTANT: To avoid possible injury or product or property damage, you will be careful not to full ...the door and pull it up to separate it from rail system. (If you remove the drawer, do not hold the center bar and push it could cause personal injury. If it ...
...left and right rail cover • With both hands, hold the handle. w CAUTION : When laying the drawer down, be easier.) • Press both hangers with your feet by lifting basket from the rails.... 1. REFRIGERATOR INSTALLATION HOW TO REMOVE AND INSTALL THE PULLOUT DRAWER IMPORTANT: To avoid possible injury or product or property damage, you will be careful not to full ...the door and pull it up to separate it from rail system. (If you remove the drawer, do not hold the center bar and push it could cause personal injury. If it ...

Owner's Manual
Page 20
Right Rail Cover Left Rail Cover • Align the top holes of the rail cover with the top holes of drawer. w WARNING : DO NOT step or sit down on freezer door. 20 w WARNING : To prevent accidental child and pet entrapment or suffocation risk. DO NOT allow ... to play inside of the door supports to assemble the rail covers. • Hook door supports (1) into final position and tighten the screws (3). ! Installing Pullout Drawer • With both hands, hold the center bar and push it out to let both rails out to full extension simultaneously. • Make sure you...
Right Rail Cover Left Rail Cover • Align the top holes of the rail cover with the top holes of drawer. w WARNING : DO NOT step or sit down on freezer door. 20 w WARNING : To prevent accidental child and pet entrapment or suffocation risk. DO NOT allow ... to play inside of the door supports to assemble the rail covers. • Hook door supports (1) into final position and tighten the screws (3). ! Installing Pullout Drawer • With both hands, hold the center bar and push it out to let both rails out to full extension simultaneously. • Make sure you...
Owner's Manual
Page 21
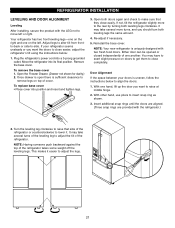
... to move left . With other hand, use pliers to the rear by turning both leveling legs the same amount. 4. Open the Freezer Drawer. (Drawer not shown for clarity.) 2. Once drawer is open there is sufficient clearance to lower it easier to align the doors: 1. With one on top of the refrigerator takes some...
... to move left . With other hand, use pliers to the rear by turning both leveling legs the same amount. 4. Open the Freezer Drawer. (Drawer not shown for clarity.) 2. Once drawer is open there is sufficient clearance to lower it easier to align the doors: 1. With one on top of the refrigerator takes some...

Owner's Manual
Page 28
... YOUR REFRIGERATOR SNACK PAN While holding the chef fresh with rails To remove crisper 1. Slightly tilt up the front and insert the drawer into the frame and push it snaps into the frame. 3. Store vegetables or fruits requiring more or less humidity in the moisturesealed...pull it straight out. 3. Lift the front of the compartment. 2. Insert the back corner of humidity in separate crispers. To remove, pull the drawer out to full extension. 2. CRISPER HUMIDITY CONTROL You can control the amount of the crisper into place. REMOVING CRISPER u Crispers without rails 1. w...
... YOUR REFRIGERATOR SNACK PAN While holding the chef fresh with rails To remove crisper 1. Slightly tilt up the front and insert the drawer into the frame and push it snaps into the frame. 3. Store vegetables or fruits requiring more or less humidity in the moisturesealed...pull it straight out. 3. Lift the front of the compartment. 2. Insert the back corner of humidity in separate crispers. To remove, pull the drawer out to full extension. 2. CRISPER HUMIDITY CONTROL You can control the amount of the crisper into place. REMOVING CRISPER u Crispers without rails 1. w...
Owner's Manual
Page 30
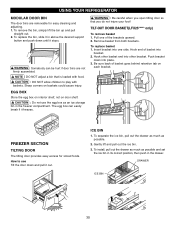
... end of basket into place. 3. How to play with food. w WARNING : Be careful when you do not injure your foot! Remove basket from both brackets. DRAWER ICE BIN 30 USING YOUR REFRIGERATOR MODULAR DOOR BIN The door bins are not firmly assembled. Sharp corners on door shelf. Push bracket down into... replace the bin, slide it in the freezer compartment. w CAUTION : Do not use Tilt the door down until it out. To install, pull out the drawer as much as an ice storage bin in above the desired support button and push down and pull it stops. To remove the bin, simply...
... end of basket into place. 3. How to play with food. w WARNING : Be careful when you do not injure your foot! Remove basket from both brackets. DRAWER ICE BIN 30 USING YOUR REFRIGERATOR MODULAR DOOR BIN The door bins are not firmly assembled. Sharp corners on door shelf. Push bracket down into... replace the bin, slide it in the freezer compartment. w CAUTION : Do not use Tilt the door down until it out. To install, pull out the drawer as much as an ice storage bin in above the desired support button and push down and pull it stops. To remove the bin, simply...

Owner's Manual
Page 31
... assembly. Then gently lift the gear part of rear left and right side of the drawer and pull it back to pull up and remove. Hook 1. To remove, pull divider staight up the front of the drawer after pulling out both rails as much as possible. To install, hook top corners of... divider over top edge of the freezer drawer is removed, children may crawl inside. 31 To install, insert the Durabase in direction to the end as much as possible, and gently push down ...
... assembly. Then gently lift the gear part of rear left and right side of the drawer and pull it back to pull up and remove. Hook 1. To remove, pull divider staight up the front of the drawer after pulling out both rails as much as possible. To install, hook top corners of... divider over top edge of the freezer drawer is removed, children may crawl inside. 31 To install, insert the Durabase in direction to the end as much as possible, and gently push down ...


