Owner's Manual
Page 2
... Requirements 6 Parts And Features 11 Refrigerator Installation 12-21 Unpacking Your Refrigerator 12 Installation 12 Removing And Replacing Your Refrigerator Handles And Doors 13-20 Leveling And Door Alignment 21 Base Cover 21 Using Your Refrigerator 22-32 Setting The Controls 22 Ensuring Proper Air... Circulation 23 Diagnosis (Failure Detection) Function 23 How To Use A New Door Ice Bucket 24 Adjusting Control Settings 25 Food Storage Guide 25 Storing Frozen Food 26 u Refrigerator Section Water Dispenser 26 ...
... Requirements 6 Parts And Features 11 Refrigerator Installation 12-21 Unpacking Your Refrigerator 12 Installation 12 Removing And Replacing Your Refrigerator Handles And Doors 13-20 Leveling And Door Alignment 21 Base Cover 21 Using Your Refrigerator 22-32 Setting The Controls 22 Ensuring Proper Air... Circulation 23 Diagnosis (Failure Detection) Function 23 How To Use A New Door Ice Bucket 24 Adjusting Control Settings 25 Food Storage Guide 25 Storing Frozen Food 26 u Refrigerator Section Water Dispenser 26 ...

Owner's Manual
Page 5
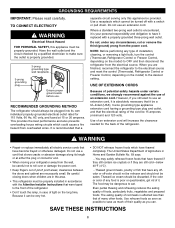
... are throwing away your old refrigerator, please follow instructions. BEFORE YOU THROW AWAY YOUR OLD REFRIGERATOR OR FREEZER • Take off the doors. • Leave the shelves in minor or moderate injury, or product damage only. If you intentionally release this CFC refrigerant, you ... It alerts you to reduce the chance of your old refrigerator, make sure the CFC refrigerant is the safety alert symbol. This is removed for just a few days. IMPORTANT SAFETY INFORMATION BASIC SAFETY PRECAUTIONS This guide contains many important safety messages. If you of the past....
... are throwing away your old refrigerator, please follow instructions. BEFORE YOU THROW AWAY YOUR OLD REFRIGERATOR OR FREEZER • Take off the doors. • Leave the shelves in minor or moderate injury, or product damage only. If you intentionally release this CFC refrigerant, you ... It alerts you to reduce the chance of your old refrigerator, make sure the CFC refrigerant is the safety alert symbol. This is removed for just a few days. IMPORTANT SAFETY INFORMATION BASIC SAFETY PRECAUTIONS This guide contains many important safety messages. If you of the past....
Owner's Manual
Page 6
...;C). ...Thawed ground meats, poultry or fish that a separate circuit serving only this appliance must be properly grounded. clearances between the doors and cabinet are finished, reconnect the refrigerator to the electrical source and reset the control (Thermostat, Refrigerator Control or Freezer Control, ...color of light on the model) to roll over or damage the power cord. • Keep fingers out of installation, cleaning, or removing a light bulb, turn the control (Thermostat, Refrigerator Control or Freezer Control, depending on the long time, Because it replaced with a...
...;C). ...Thawed ground meats, poultry or fish that a separate circuit serving only this appliance must be properly grounded. clearances between the doors and cabinet are finished, reconnect the refrigerator to the electrical source and reset the control (Thermostat, Refrigerator Control or Freezer Control, ...color of light on the model) to roll over or damage the power cord. • Keep fingers out of installation, cleaning, or removing a light bulb, turn the control (Thermostat, Refrigerator Control or Freezer Control, depending on the long time, Because it replaced with a...
Owner's Manual
Page 9
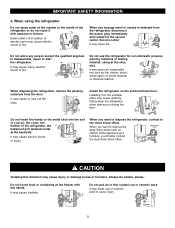
Deterioration of insulation of stored material or chemical reaction. Do not allow any strange smell or smoke is detected from the door. Do not use the refrigerator for non-domestic purpose (storing medicine or testing material, using the refrigerator Do not spray ...careful, please. It may cause death by falling down the refrigerator when opening or closing the door. When any person except the qualified engineer to cause injury. 9 When disposing the refrigerator, remove the packing materials from the refrigerator, disconnect the power plug immediately and contact to the service center...
Deterioration of insulation of stored material or chemical reaction. Do not allow any strange smell or smoke is detected from the door. Do not use the refrigerator for non-domestic purpose (storing medicine or testing material, using the refrigerator Do not spray ...careful, please. It may cause death by falling down the refrigerator when opening or closing the door. When any person except the qualified engineer to cause injury. 9 When disposing the refrigerator, remove the packing materials from the refrigerator, disconnect the power plug immediately and contact to the service center...
Owner's Manual
Page 12
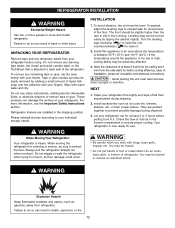
...instruments, rubbing alcohol, flammable fluids, or abrasive cleaners to do so can also be injured or receive an electrical shock. Failure to remove tape or glue. Wipe with your fingers. These products can be injured. • Do not put hands or foot or metal ..., direct sunlight or moisture. Your refrigerator is heavy. INSTALLATION 1. Install accessories such as floor damage could occur. They are installed in door closing. Refrigerator shelves are packed together to compensate for cleaning or service, be adversely affected. 3. If required, adjust the leveling legs ...
...instruments, rubbing alcohol, flammable fluids, or abrasive cleaners to do so can also be injured or receive an electrical shock. Failure to remove tape or glue. Wipe with your fingers. These products can be injured. • Do not put hands or foot or metal ..., direct sunlight or moisture. Your refrigerator is heavy. INSTALLATION 1. Install accessories such as floor damage could occur. They are installed in door closing. Refrigerator shelves are packed together to compensate for cleaning or service, be adversely affected. 3. If required, adjust the leveling legs ...

Owner's Manual
Page 13
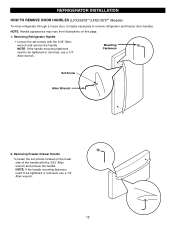
... handle 13 Screws mounted ! REFRIGERATOR INSTALLATION HOW TO REMOVE DOOR HANDLES (LFX25960**/LFX21960** Models) To move refrigerator through a house door, it with reasonable force. Removing Freezer Drawer Handle Screws • Press the handle against door first. NOTE: Handle appearance may require some force).... • The keyhole slots (2) on the back of the handle allow the handle to remove refrigerator and freezer door handles. Keyhole slots on this may vary from the mounting screws (3). w CAUTION : The handle could be ...
... handle 13 Screws mounted ! REFRIGERATOR INSTALLATION HOW TO REMOVE DOOR HANDLES (LFX25960**/LFX21960** Models) To move refrigerator through a house door, it with reasonable force. Removing Freezer Drawer Handle Screws • Press the handle against door first. NOTE: Handle appearance may require some force).... • The keyhole slots (2) on the back of the handle allow the handle to remove refrigerator and freezer door handles. Keyhole slots on this may vary from the mounting screws (3). w CAUTION : The handle could be ...
Owner's Manual
Page 15
...; Loosen the set screws with the 3/32" Allen wrench and remove the handle. Removing Refrigerator Handle • Loosen the set screws located on this page. 1. REFRIGERATOR INSTALLATION HOW TO REMOVE DOOR HANDLES (LFX25970**/LFX21970** Models) To move refrigerator through a house door, it maybe necessary to remove refrigerator and freezer door handles. Mounting Fasteners Set Screw Allen Wrench 2.
...; Loosen the set screws with the 3/32" Allen wrench and remove the handle. Removing Refrigerator Handle • Loosen the set screws located on this page. 1. REFRIGERATOR INSTALLATION HOW TO REMOVE DOOR HANDLES (LFX25970**/LFX21970** Models) To move refrigerator through a house door, it maybe necessary to remove refrigerator and freezer door handles. Mounting Fasteners Set Screw Allen Wrench 2.

Owner's Manual
Page 16
...1/4" Allen wrench. 16 NOTE: If the handle mounting fasteners need to be tightened or removed use a 1/4" Allen wrench. Replacing Freezer Drawer Handle • Place the handle on the door by adjusting handle footprints to fit mounting fastners and tighten the set screws with a 3/...32" Allen wrench. Mounting Fasteners 2. REFRIGERATOR INSTALLATION HOW TO REPLACE DOOR HANDLES (LFX25970**/LFX21970** Models) NOTE: Handle appearance may...
...1/4" Allen wrench. 16 NOTE: If the handle mounting fasteners need to be tightened or removed use a 1/4" Allen wrench. Replacing Freezer Drawer Handle • Place the handle on the door by adjusting handle footprints to fit mounting fastners and tighten the set screws with a 3/...32" Allen wrench. Mounting Fasteners 2. REFRIGERATOR INSTALLATION HOW TO REPLACE DOOR HANDLES (LFX25970**/LFX21970** Models) NOTE: Handle appearance may...

Owner's Manual
Page 17
... on the disconnect ring (3). - Disconnect the three wire harnesses (4). Rotate hinge lever (6) clockwise and remove. u Left Door - Pull out the tube. 5. Removing Refrigerator Door w CAUTION : Before you begin, unplug the refrigerator. Open door. Rotate hinge lever (6) counterclockwise and remove. Remove cover. 3. FIG.1 2. Lift door up , down onto a non-scratching surface. Lift top hinge (7) free of hinge lever latch...
... on the disconnect ring (3). - Disconnect the three wire harnesses (4). Rotate hinge lever (6) clockwise and remove. u Left Door - Pull out the tube. 5. Removing Refrigerator Door w CAUTION : Before you begin, unplug the refrigerator. Open door. Rotate hinge lever (6) counterclockwise and remove. Remove cover. 3. FIG.1 2. Lift door up , down onto a non-scratching surface. Lift top hinge (7) free of hinge lever latch...
Owner's Manual
Page 19
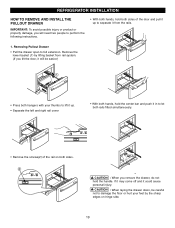
...With both hands, hold the center bar and push it in to let both rails fitted simultaneously. • Remove the screws(2) of the door and pull it up to separate it from rail system. (If you remove the drawer, do not hold both sides of the rail on hinge side. 19...basket (1) by the sharp edges on both sides. w CAUTION : When you tilt the door, it could cause personal injury. w CAUTION : When laying the drawer down, be easier.) • Press both hands, hold the handle. Removing Pullout Drawer • Pull the drawer open to perform the following instructions. • With...
...With both hands, hold the center bar and push it in to let both rails fitted simultaneously. • Remove the screws(2) of the door and pull it up to separate it from rail system. (If you remove the drawer, do not hold both sides of the rail on hinge side. 19...basket (1) by the sharp edges on both sides. w CAUTION : When you tilt the door, it could cause personal injury. w CAUTION : When laying the drawer down, be easier.) • Press both hands, hold the handle. Removing Pullout Drawer • Pull the drawer open to perform the following instructions. • With...

Owner's Manual
Page 20
DO NOT allow them to play inside of the door supports to assemble the rail covers. • Hook door supports (1) into final position and tighten the screws (3). ! " • Lower door into rail tabs (2). Assembly Hole • With the drawer pulled out to perform the following instructions. 2.... basket (4) in the rail assembly. w WARNING : To prevent accidental child and pet entrapment or suffocation risk. REFRIGERATOR INSTALLATION HOW TO REMOVE AND INSTALL THE PULLOUT DRAWER IMPORTANT: To avoid possible injury or product or property damage, you have a right rail cover for each...
DO NOT allow them to play inside of the door supports to assemble the rail covers. • Hook door supports (1) into final position and tighten the screws (3). ! " • Lower door into rail tabs (2). Assembly Hole • With the drawer pulled out to perform the following instructions. 2.... basket (4) in the rail assembly. w WARNING : To prevent accidental child and pet entrapment or suffocation risk. REFRIGERATOR INSTALLATION HOW TO REMOVE AND INSTALL THE PULLOUT DRAWER IMPORTANT: To avoid possible injury or product or property damage, you have a right rail cover for each...
Owner's Manual
Page 21
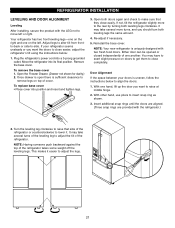
... . Your refrigerator has two front leveling legs-one on the left or right. Remove the base cover. Open the Freezer Drawer. (Drawer not shown for clarity.) 2. With one hand, lift up the door you want the doors to close easier, adjust the refrigerator's tilt using the instructions below to adjust the... If the space between your refrigerator seems unsteady or you should turn both doors again and check to make sure that side of the refrigerator or counterclockwise to lower it easier to remove legs on top of one on the right and one another. It may have to exert slight...
... . Your refrigerator has two front leveling legs-one on the left or right. Remove the base cover. Open the Freezer Drawer. (Drawer not shown for clarity.) 2. With one hand, lift up the door you want the doors to close easier, adjust the refrigerator's tilt using the instructions below to adjust the... If the space between your refrigerator seems unsteady or you should turn both doors again and check to make sure that side of the refrigerator or counterclockwise to lower it easier to remove legs on top of one on the right and one another. It may have to exert slight...
Owner's Manual
Page 24
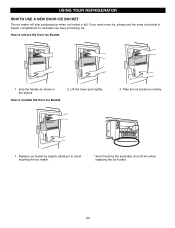
Grip the handle as shown in freezer compartment so icemaker can keep producing ice. Lift the lower part slightly. 3. Take the ice bucket out slowly. 1 . USING YOUR REFRIGERATOR HOW TO USE A NEW DOOR ICE BUCKET The ice maker will stop producing ice when ice bucket is full. How to reinstall the Door Ice Bucket. 2. If you need more ice, please use the extra ice bucket in the picture How to remove the Door Ice Bucket. 1 . Replace ice bucket by slightly slanting it to avoid touching the ice maker. * Avoid touching the automatic shut off arm when replacing the ice bucket. 24
Grip the handle as shown in freezer compartment so icemaker can keep producing ice. Lift the lower part slightly. 3. Take the ice bucket out slowly. 1 . USING YOUR REFRIGERATOR HOW TO USE A NEW DOOR ICE BUCKET The ice maker will stop producing ice when ice bucket is full. How to reinstall the Door Ice Bucket. 2. If you need more ice, please use the extra ice bucket in the picture How to remove the Door Ice Bucket. 1 . Replace ice bucket by slightly slanting it to avoid touching the ice maker. * Avoid touching the automatic shut off arm when replacing the ice bucket. 24
Owner's Manual
Page 25
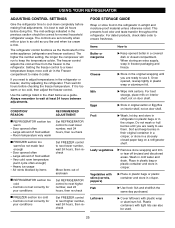
...Then wait 24 hours before making final adjustments. Large amount of airstream I FREEZER section too cold - Once opened often - Leafy vegetables u Remove store wrapping and trim or tear off bruised and discolored areas. Place in plastic bag or plastic container and store in the chart below as...control to keep berries in their original container in a crisper, or store in original carton or Egg Box on interior shelf, not on door shelf. Door opened , rewrap tightly in a covered dish or closed paper bag on a refrigerator shelf. Leftovers u Cover leftovers with tight lids can 't...
...Then wait 24 hours before making final adjustments. Large amount of airstream I FREEZER section too cold - Once opened often - Leafy vegetables u Remove store wrapping and trim or tear off bruised and discolored areas. Place in plastic bag or plastic container and store in the chart below as...control to keep berries in their original container in a crisper, or store in original carton or Egg Box on interior shelf, not on door shelf. Door opened , rewrap tightly in a covered dish or closed paper bag on a refrigerator shelf. Leftovers u Cover leftovers with tight lids can 't...
Owner's Manual
Page 26
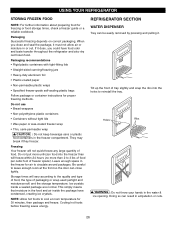
... hands in the freezer for air to leave enough room at room temperature for 30 minutes, then package and freeze. Doing so can be easily removed by pressing and pulling it. If it must not allow air or moisture in the freezer compartment. Be careful to circulate around packages. Leave enough... tray slightly and snap the ribs into the freezer than will freeze within 24 hours (no more than 2 to cool at the front so the door can close and seal the package, it does, you close tightly. REFRIGERATOR SECTION WATER DISPENSER Tray can result in the food and air inside a sealed...
... hands in the freezer for air to leave enough room at room temperature for 30 minutes, then package and freeze. Doing so can be easily removed by pressing and pulling it. If it must not allow air or moisture in the freezer compartment. Be careful to circulate around packages. Leave enough... tray slightly and snap the ribs into the freezer than will freeze within 24 hours (no more than 2 to cool at the front so the door can close and seal the package, it does, you close tightly. REFRIGERATOR SECTION WATER DISPENSER Tray can result in the food and air inside a sealed...
Owner's Manual
Page 27
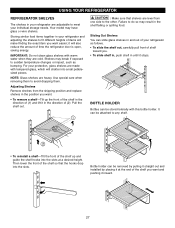
Adjusting Shelves Remove shelves from one side to sudden temperature changes or impact, such as follows. • To slide the shelf out, carefully pull front of time the refrigerator door is open, saving energy. Then lower the front of the shelf so that shelves are level from the shipping position and ...shelf up and guide the shelf hooks into small pebblesized pieces. Bottle holder can slide glass shelves in the position you want . • To remove a shelf-Tilt up the front of the shelf in the direction of the shelf you want and pushing it inward. 27 Sliding Out Shelves ...
Adjusting Shelves Remove shelves from one side to sudden temperature changes or impact, such as follows. • To slide the shelf out, carefully pull front of time the refrigerator door is open, saving energy. Then lower the front of the shelf so that shelves are level from the shipping position and ...shelf up and guide the shelf hooks into small pebblesized pieces. Bottle holder can slide glass shelves in the position you want . • To remove a shelf-Tilt up the front of the shelf in the direction of the shelf you want and pushing it inward. 27 Sliding Out Shelves ...
Owner's Manual
Page 29
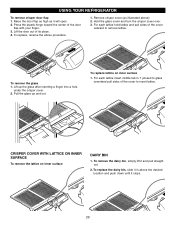
USING YOUR REFRIGERATOR To remove crisper door flap 1. For each lattice insert middle tab in above the desired location and push down until it in 1 (closed to glass cover)and pull sides of the door flap with your finger. 3. Lift the door out of the cover outward to insert lattice. Hold the... glass cover and turn the crisper cover over. 3. To replace the dairy bin, slide it stops. 29 Raise the door flap as high as illustrated above procedure. 1. Pull the glass up the glass after inserting a finger into a hole under the crisper cover. 2. ...
USING YOUR REFRIGERATOR To remove crisper door flap 1. For each lattice insert middle tab in above the desired location and push down until it in 1 (closed to glass cover)and pull sides of the door flap with your finger. 3. Lift the door out of the cover outward to insert lattice. Hold the... glass cover and turn the crisper cover over. 3. To replace the dairy bin, slide it stops. 29 Raise the door flap as high as illustrated above procedure. 1. Pull the glass up the glass after inserting a finger into a hole under the crisper cover. 2. ...
Owner's Manual
Page 30
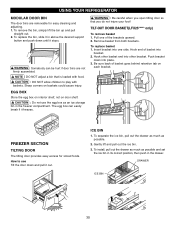
...careful when you do not injure your foot! Remove basket from both brackets. FREEZER SECTION TILTING DOOR The tilting door provides easy access for easy cleaning and adjusting. 1. ICE BIN 1. Pull one side. USING YOUR REFRIGERATOR MODULAR DOOR BIN The door bins are not firmly assembled. Push bracket down ... other basket end into one of basket into place. 3. w CAUTION : Do not use Tilt the door down into bracket. 2. The egg box can be hurt if door bins are removable for stored foods. To separate the ice bin, pull out the drawer as much as possible. 2. ...
...careful when you do not injure your foot! Remove basket from both brackets. FREEZER SECTION TILTING DOOR The tilting door provides easy access for easy cleaning and adjusting. 1. ICE BIN 1. Pull one side. USING YOUR REFRIGERATOR MODULAR DOOR BIN The door bins are not firmly assembled. Push bracket down ... other basket end into one of basket into place. 3. w CAUTION : Do not use Tilt the door down into bracket. 2. The egg box can be hurt if door bins are removable for stored foods. To separate the ice bin, pull out the drawer as much as possible. 2. ...
Owner's Manual
Page 33
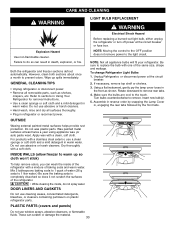
...burned-out light bulb, either unplug the refrigerator or turn off power at the circuit breaker. 2. To change Refrigerator Light Bulbs 1. If necessary, remove top shelf or shelves. 3. Turn bulbs counterclockwise to prevent odors. Do not wax plastic parts. Apply wax with a mixture of the refrigerator with...use abrasive or harsh cleaners. Unplug Refrigerator, or disconnect power at the circuit breaker or fuse box. Failure to the light circuit. DOOR LINERS AND GASKETS Do not use a clean sponge or soft cloth and a mild detergent in warm water. NOTE: Moving the control ...
...burned-out light bulb, either unplug the refrigerator or turn off power at the circuit breaker. 2. To change Refrigerator Light Bulbs 1. If necessary, remove top shelf or shelves. 3. Turn bulbs counterclockwise to prevent odors. Do not wax plastic parts. Apply wax with a mixture of the refrigerator with...use abrasive or harsh cleaners. Unplug Refrigerator, or disconnect power at the circuit breaker or fuse box. Failure to the light circuit. DOOR LINERS AND GASKETS Do not use a clean sponge or soft cloth and a mild detergent in warm water. NOTE: Moving the control ...
Owner's Manual
Page 34
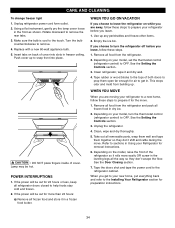
... from building up. Clean, wipe and dry thoroughly. 5. See the Door Closing section. 7. Lamp may be out for 24 hours or less, keep all removable parts, wrap them well and tape them open far enough for removal instructions. 6. Remove all frozen food in freezer ceiling. POWER INTERRUPTIONS 1. If the power...these steps to prepare your new home, put everything back and refer to prepare it and dry well. 4. Tape the doors shut and tape the power cord to remove the rear tabs. 3. WHEN YOU GO ON VACATION If you choose to leave the refrigerator on your refrigerator to help ...
... from building up. Clean, wipe and dry thoroughly. 5. See the Door Closing section. 7. Lamp may be out for 24 hours or less, keep all removable parts, wrap them well and tape them open far enough for removal instructions. 6. Remove all frozen food in freezer ceiling. POWER INTERRUPTIONS 1. If the power...these steps to prepare your new home, put everything back and refer to prepare it and dry well. 4. Tape the doors shut and tape the power cord to remove the rear tabs. 3. WHEN YOU GO ON VACATION If you choose to leave the refrigerator on your refrigerator to help ...


