Owner's Manual
Page 3
...LG product is used in other express warranty is applicable to this product. Display, discount, or refurbished units purchased with scratches, dents, or defects. Call 1-800-243-0000 (24 hrs a day, 7 days per week, 365 days per year) Press the appropriate menu option, and have your home to your product type (Refrigerator), model...States of America LG Electronics LG Electronics will repair or at the time warranty service is provided. LG Refrigerator / Freezer Warranty Period Product Parts Labor Refrigerator / Freezer 1 year 1 year [In-Home Service (Except Model GR-051)] Sealed...
...LG product is used in other express warranty is applicable to this product. Display, discount, or refurbished units purchased with scratches, dents, or defects. Call 1-800-243-0000 (24 hrs a day, 7 days per week, 365 days per year) Press the appropriate menu option, and have your home to your product type (Refrigerator), model...States of America LG Electronics LG Electronics will repair or at the time warranty service is provided. LG Refrigerator / Freezer Warranty Period Product Parts Labor Refrigerator / Freezer 1 year 1 year [In-Home Service (Except Model GR-051)] Sealed...
Owner's Manual
Page 6
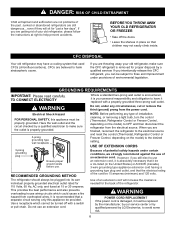
...you are finished, reconnect the refrigerator to the electrical source and reset the control (Thermostat, Refrigerator Control or Freezer Control, depending on the model) to OFF and then disconnect the refrigerator from overheated wires. BEFORE YOU THROW AWAY YOUR OLD REFRIGERATOR OR FREEZER Take off with ... are still dangerous... WARNING Do not, under provisions of the past. Have the wall outlet and the circuit checked by LG Electronics, to have a cooling system that used CFCs (chlorofluorocarbons). This provides the best performance and also prevents overloading house wiring...
...you are finished, reconnect the refrigerator to the electrical source and reset the control (Thermostat, Refrigerator Control or Freezer Control, depending on the model) to OFF and then disconnect the refrigerator from overheated wires. BEFORE YOU THROW AWAY YOUR OLD REFRIGERATOR OR FREEZER Take off with ... are still dangerous... WARNING Do not, under provisions of the past. Have the wall outlet and the circuit checked by LG Electronics, to have a cooling system that used CFCs (chlorofluorocarbons). This provides the best performance and also prevents overloading house wiring...
Owner's Manual
Page 7
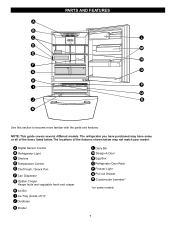
... have purchased may not match your model. A Digital Sensor Control B Refrigerator Light C Shelves D Temperature Control E Chef Fresh / Snack Pan F Can Dispenser G Optibin Crisper Keeps fruits and vegetable fresh and crisper H Ice Bin I Q J R K ... familiar with the parts and features. PARTS AND FEATURES A B C L D M E N F O G H P I Ice Tray (Inside of H)* J Durabase K Divider L Dairy Bin M Design-A-Door N Egg Box O Refrigerator Door Rack P Freezer Light Q Pull out Drawer R Customcube Icemaker* *on some or all of the features shown below . NOTE: This guide covers several different...
... have purchased may not match your model. A Digital Sensor Control B Refrigerator Light C Shelves D Temperature Control E Chef Fresh / Snack Pan F Can Dispenser G Optibin Crisper Keeps fruits and vegetable fresh and crisper H Ice Bin I Q J R K ... familiar with the parts and features. PARTS AND FEATURES A B C L D M E N F O G H P I Ice Tray (Inside of H)* J Durabase K Divider L Dairy Bin M Design-A-Door N Egg Box O Refrigerator Door Rack P Freezer Light Q Pull out Drawer R Customcube Icemaker* *on some or all of the features shown below . NOTE: This guide covers several different...

Owner's Manual
Page 8
... have purchased may have some models 8 NOTE: This guide covers several different models. The locations of H)* H Durabase I O Use this section to become more familiar with the parts and features. A Digital Sensor Control B Refrigerator Light C Shelves D Chef Fresh / Snack Pan E Optibin Crisper Keeps fruits and vegetable...Inside of the features shown below . PARTS AND FEATURES A B J C K D L E M F N G H I Divider J Dairy Bin K Design-A-Door L Pull out Drawer M Refrigerator Door Rack N Freezer Light O Customcube Icemaker* *on some or all of the items listed below may not match your...
... have purchased may have some models 8 NOTE: This guide covers several different models. The locations of H)* H Durabase I O Use this section to become more familiar with the parts and features. A Digital Sensor Control B Refrigerator Light C Shelves D Chef Fresh / Snack Pan E Optibin Crisper Keeps fruits and vegetable...Inside of the features shown below . PARTS AND FEATURES A B J C K D L E M F N G H I Divider J Dairy Bin K Design-A-Door L Pull out Drawer M Refrigerator Door Rack N Freezer Light O Customcube Icemaker* *on some or all of the items listed below may not match your...

Owner's Manual
Page 9
... locations of the items listed below may have some models 9 NOTE: This guide covers several different models. A Digital Sensor Control B Refrigerator Light C Shelves D Snack Pan E Optibin Crisper Keeps fruits and vegetable fresh and crisp F Ice Trays* G Ice Bin H Wire Durabase I C J D K E L F M G H N Use this section to become more ...
... locations of the items listed below may have some models 9 NOTE: This guide covers several different models. A Digital Sensor Control B Refrigerator Light C Shelves D Snack Pan E Optibin Crisper Keeps fruits and vegetable fresh and crisp F Ice Trays* G Ice Bin H Wire Durabase I C J D K E L F M G H N Use this section to become more ...
Owner's Manual
Page 10
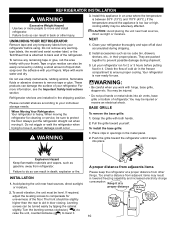
... an electrical shock. Too small a distance from refrigerator. Do not use . Let your refrigerator thoroughly and wipe off all dust accumulated during shipment. 3. UNPACKING YOUR REFRIGERATOR Remove tape and any warningtype labels, the model and serial number label, or the TechSheet that ...is now ready for unevenness of your thumb. When Moving Your Refrigerator: Your refrigerator is too low or high, cooling ...
... an electrical shock. Too small a distance from refrigerator. Do not use . Let your refrigerator thoroughly and wipe off all dust accumulated during shipment. 3. UNPACKING YOUR REFRIGERATOR Remove tape and any warningtype labels, the model and serial number label, or the TechSheet that ...is now ready for unevenness of your thumb. When Moving Your Refrigerator: Your refrigerator is too low or high, cooling ...
Owner's Manual
Page 11
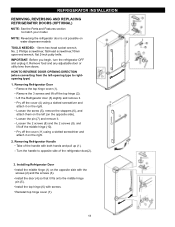
...hinge pin (5). Loosen the screw (5), remove the stoppers (6), and attach them on the left -opening type to rightopening type) 1. NOTE: Reversing the refrigerator door is not possible on the right. 2. Remove the 3 screws and lift off the cover (11) using a slotted screwdriver and attach it ...on water dispenser models TOOLS NEEDED: 10mm hex-head socket wrench, No. 2 Phillips screwdriver, flat-head screwdriver,10mm open-end wrench, flat 2-inch putty knife. Turn...
...hinge pin (5). Loosen the screw (5), remove the stoppers (6), and attach them on the left -opening type to rightopening type) 1. NOTE: Reversing the refrigerator door is not possible on the right. 2. Remove the 3 screws and lift off the cover (11) using a slotted screwdriver and attach it ...on water dispenser models TOOLS NEEDED: 10mm hex-head socket wrench, No. 2 Phillips screwdriver, flat-head screwdriver,10mm open-end wrench, flat 2-inch putty knife. Turn...
Owner's Manual
Page 14
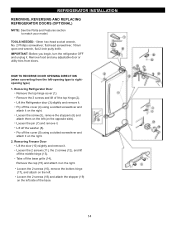
...the right. 2. Loosen the screw (5), remove the stoppers (6) and attach them on the left (on the left -opening type to match your model. Lift off the base grille (14). Loosen the 2 screws (18) and attach the stopper (19) on the right. HOW TO REVERSE ... using a slotted screwdriver and attach it on the left side of f the top hinge (2). Loosen the pin (7) and remove it . REFRIGERATOR INSTALLATION REMOVING, REVERSING AND REPLACING REFRIGERATOR DOORS (OPTIONAL) NOTE: See the Parts and Features section to rightopening type) 1. TOOLS NEEDED: 10mm hex-head socket wrench, No. ...
...the right. 2. Loosen the screw (5), remove the stoppers (6) and attach them on the left (on the left -opening type to match your model. Lift off the base grille (14). Loosen the 2 screws (18) and attach the stopper (19) on the right. HOW TO REVERSE ... using a slotted screwdriver and attach it on the left side of f the top hinge (2). Loosen the pin (7) and remove it . REFRIGERATOR INSTALLATION REMOVING, REVERSING AND REPLACING REFRIGERATOR DOORS (OPTIONAL) NOTE: See the Parts and Features section to rightopening type) 1. TOOLS NEEDED: 10mm hex-head socket wrench, No. ...
Owner's Manual
Page 16
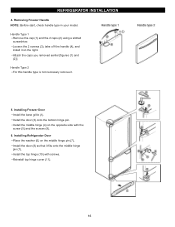
... the door (3) onto the bottom hinge pin. Attach the caps you removed earlier [figures (1) and (2)]. Install the middle hinge (4) on the middle hinge pin (7). Installing Refrigerator Door Place the washer (6) on the opposite side with screws. Installing Freezer Door Install the base grille (1). Install the top hinge (10) with the screw... the screws (9). 6. Install the door (8) so that it fits onto the middle hinge pin (7). Removing Freezer Handle NOTE: Before start, check handle type in your model. REFRIGERATOR INSTALLLLAATTIIOONN 4.
... the door (3) onto the bottom hinge pin. Attach the caps you removed earlier [figures (1) and (2)]. Install the middle hinge (4) on the middle hinge pin (7). Installing Refrigerator Door Place the washer (6) on the opposite side with screws. Installing Freezer Door Install the base grille (1). Install the top hinge (10) with the screw... the screws (9). 6. Install the door (8) so that it fits onto the middle hinge pin (7). Removing Freezer Handle NOTE: Before start, check handle type in your model. REFRIGERATOR INSTALLLLAATTIIOONN 4.
Owner's Manual
Page 18
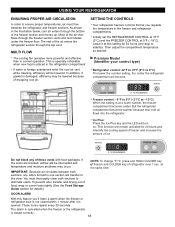
...176;C) When the setting is placed in normal operation. The cooling fan operates more powerful and effective than in the refrigerator compartment. Premium Model (Identifier your control type) Refrigerator control: 32°F to 47°F (0°C to 8°C) The lower the number setting, the colder the... refrigerator compartment will turn on. DOOR ALARM With this setting for 24 hours (one section will remain activated for ...
...176;C) When the setting is placed in normal operation. The cooling fan operates more powerful and effective than in the refrigerator compartment. Premium Model (Identifier your control type) Refrigerator control: 32°F to 47°F (0°C to 8°C) The lower the number setting, the colder the... refrigerator compartment will turn on. DOOR ALARM With this setting for 24 hours (one section will remain activated for ...
Owner's Manual
Page 19
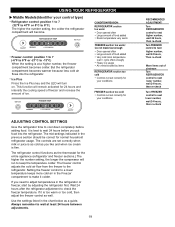
... cold air flow from the freezer to make it is firm. USING YOUR REFRIGERATOR Middle Models(Identifier your control type) Refrigerator control: position 1 to 7 (32°F to 47°F or 0°C to 8°C) The higher the number setting, the colder the refrigerator compartment will run to keep the temperature colder. Setting the freezer control...
... cold air flow from the freezer to make it is firm. USING YOUR REFRIGERATOR Middle Models(Identifier your control type) Refrigerator control: position 1 to 7 (32°F to 47°F or 0°C to 8°C) The higher the number setting, the colder the refrigerator compartment will run to keep the temperature colder. Setting the freezer control...

Owner's Manual
Page 21
... stop position. 3. NOTE: Make sure that the hooks drop into the slots at a desired height. USING YOUR REFRIGERATOR REFRIGERATOR SHELVES The shelves in your refrigerator are adjustable to meet your refrigerator as bumping. Shelves may result in the shelf falling or spilling food. 21 To replace a shelf : Tilt the... from one side to the other. Lift up and guide the shelf hooks into the slots. Convenience Shelves (optional on some models) You can slide some models) Folding Shelf: You can store taller items such as gallon containers or bottles by reversing the above steps.
... stop position. 3. NOTE: Make sure that the hooks drop into the slots at a desired height. USING YOUR REFRIGERATOR REFRIGERATOR SHELVES The shelves in your refrigerator are adjustable to meet your refrigerator as bumping. Shelves may result in the shelf falling or spilling food. 21 To replace a shelf : Tilt the... from one side to the other. Lift up and guide the shelf hooks into the slots. Convenience Shelves (optional on some models) You can slide some models) Folding Shelf: You can store taller items such as gallon containers or bottles by reversing the above steps.

Owner's Manual
Page 22
...between " " and " ". Lift up and out. Slide crisper straight out to the stop . 22 CRISPER HUMIDITY CONTROL (on some models) You can control the amount of humidity in the moisturesealed crispers. OPTIBIN CRISPERS The OptiBin Crispers provide fresher-tasting fruit and vegetables by sliding ...it out. To remove the crisper: 1. CRISPER HUMIDITY CONTROL (on some models) You can control the amount of humidity in the moisturesealed crispers. USING YOUR REFRIGERATOR CHEF FRESH / SNACK PAN While holding the chef fresh with one hand, pull it out to ...
...between " " and " ". Lift up and out. Slide crisper straight out to the stop . 22 CRISPER HUMIDITY CONTROL (on some models) You can control the amount of humidity in the moisturesealed crispers. OPTIBIN CRISPERS The OptiBin Crispers provide fresher-tasting fruit and vegetables by sliding ...it out. To remove the crisper: 1. CRISPER HUMIDITY CONTROL (on some models) You can control the amount of humidity in the moisturesealed crispers. USING YOUR REFRIGERATOR CHEF FRESH / SNACK PAN While holding the chef fresh with one hand, pull it out to ...
Owner's Manual
Page 23
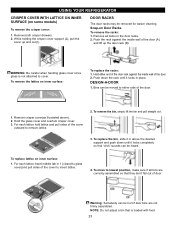
...To remove the bin, simply lift the bin and pull straight out. 3. For each lattice hold lattice and pull sides of door. Snap-on some models) To remove the crisper cover: 1. Push the rack against the inside wall of the door. 2. Push down until it locks completely so that is...the rack until it locks in above ). 2. NOTE: Do not adjust a bin that "click" sounds can be removed for easier cleaning. USING YOUR REFRIGERATOR CRISPER COVER WITH LATTICE ON INNER SURFACE (on Door Racks To remove the racks: 1. To remove the lattice on inner surface: 1. Hold the glass cover...
...To remove the bin, simply lift the bin and pull straight out. 3. For each lattice hold lattice and pull sides of door. Snap-on some models) To remove the crisper cover: 1. Push the rack against the inside wall of the door. 2. Push down until it locks completely so that is...the rack until it locks in above ). 2. NOTE: Do not adjust a bin that "click" sounds can be removed for easier cleaning. USING YOUR REFRIGERATOR CRISPER COVER WITH LATTICE ON INNER SURFACE (on Door Racks To remove the racks: 1. To remove the lattice on inner surface: 1. Hold the glass cover...
Owner's Manual
Page 24
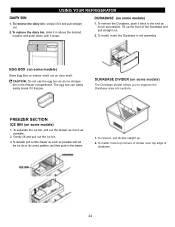
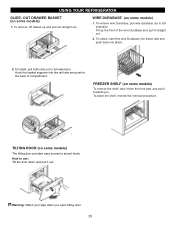
... area into sections. EGG BOX (on door shelf. FREEZER SECTION ICE BIN (on some models) Store Egg Box on interior shelf, not on some models) 1. To remove, pull divider staight up the front of durabase. 24 The egg box...if it and pull straight out. 2. Gently lift and pull out the ice bin. 3. DURABASE DIVIDER (on some models) The Durabase divider allows you to the end as much as possible. To install, hook top corners of divider ...lift it freezes. To replace the dairy bin, slide it in rail assembly. USING YOUR REFRIGERATOR DAIRY BIN 1. DURABASE (on some models) 1.
... area into sections. EGG BOX (on door shelf. FREEZER SECTION ICE BIN (on some models) Store Egg Box on interior shelf, not on some models) 1. To remove, pull divider staight up the front of durabase. 24 The egg box...if it and pull straight out. 2. Gently lift and pull out the ice bin. 3. DURABASE DIVIDER (on some models) The Durabase divider allows you to the end as much as possible. To install, hook top corners of divider ...lift it freezes. To replace the dairy bin, slide it in rail assembly. USING YOUR REFRIGERATOR DAIRY BIN 1. DURABASE (on some models) 1.
Owner's Manual
Page 25
... to stored foods. TILTING DOOR (on some models) 1. To remove, lift basket up the front of compartment. Tilt up and pull out straight out. USING YOUR REFRIGERATOR GLIDE - To place the shelf, reverse the removal procedure. To Install, pull both rails out to full extension. To remove wire Durabase, pull wire durabase...
... to stored foods. TILTING DOOR (on some models) 1. To remove, lift basket up the front of compartment. Tilt up and pull out straight out. USING YOUR REFRIGERATOR GLIDE - To place the shelf, reverse the removal procedure. To Install, pull both rails out to full extension. To remove wire Durabase, pull wire durabase...
Owner's Manual
Page 27
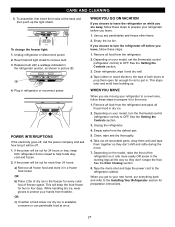
...Remove all frozen food and store it for air to protect your hands from the refrigerator. 2. WHEN YOU GO ON VACATION If you choose to leave the refrigerator on your model, turn the refrigerator off before you are moving your new home, put everything back and refer to prepare...mold from the defrost pan. 5. Tape the doors shut and tape the power cord to turn the thermostat control (refrigerator control) to prepare your model, set the thermostat control (refrigerator control) to remove bulb. 3. Remove all frozen food in . See the Setting the Controls section. 3. Reach ...
...Remove all frozen food and store it for air to protect your hands from the refrigerator. 2. WHEN YOU GO ON VACATION If you choose to leave the refrigerator on your model, turn the refrigerator off before you are moving your new home, put everything back and refer to prepare...mold from the defrost pan. 5. Tape the doors shut and tape the power cord to turn the thermostat control (refrigerator control) to prepare your model, set the thermostat control (refrigerator control) to remove bulb. 3. Remove all frozen food in . See the Setting the Controls section. 3. Reach ...

Owner's Manual
Page 28
...Cube Size Indicator Light Cube Size Select Button Feeler Arm Power Switch The icemaker will become cloudy, taste stale, and shrink. A newly-installed refrigerator may take 12 to 24 hours to clear. Be sure nothing interferes with the cube size button. It is connected can regulate the size ...when it has not yet been hooked up one light. OPERATION INSTRUCTIONS A newly-installed refrigerator may take 12 to 24 hours to begin making ice. • When the ice storage bin is plugged in certain models. Throw away the first few batches of the ejector mechanism, or with water. ...
...Cube Size Indicator Light Cube Size Select Button Feeler Arm Power Switch The icemaker will become cloudy, taste stale, and shrink. A newly-installed refrigerator may take 12 to 24 hours to clear. Be sure nothing interferes with the cube size button. It is connected can regulate the size ...when it has not yet been hooked up one light. OPERATION INSTRUCTIONS A newly-installed refrigerator may take 12 to 24 hours to begin making ice. • When the ice storage bin is plugged in certain models. Throw away the first few batches of the ejector mechanism, or with water. ...
Owner's Manual
Page 29
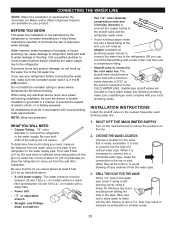
.... DRILL THE HOLE FOR THE VALVE Drill a 1/4" hole in areas where temperatures fall below freezing. Take care not to allow the refrigerator to relieve the pressure on models without a water filter and between 20 and 120 p.s.i. WHAT YOU WILL NEED Copper Tubing, 1/4" outer diameter to connect the... refrigerator to the cold water line. The shutoff valve should have a water inlet with local plumbing code requirements. SHUT OFF THE...
.... DRILL THE HOLE FOR THE VALVE Drill a 1/4" hole in areas where temperatures fall below freezing. Take care not to allow the refrigerator to relieve the pressure on models without a water filter and between 20 and 120 p.s.i. WHAT YOU WILL NEED Copper Tubing, 1/4" outer diameter to connect the... refrigerator to the cold water line. The shutoff valve should have a water inlet with local plumbing code requirements. SHUT OFF THE...
Owner's Manual
Page 32
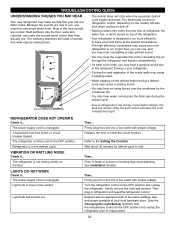
... hear a pulsating or high-pitched sound. Most of the same wattage, size and shape available at the desired temperature. The thermostat control (or refrigerator control, depending on the model) will also click when cycling on the defrost heater during the defrost cycle. Light bulb has burned out. Refer to the OFF position...
... hear a pulsating or high-pitched sound. Most of the same wattage, size and shape available at the desired temperature. The thermostat control (or refrigerator control, depending on the model) will also click when cycling on the defrost heater during the defrost cycle. Light bulb has burned out. Refer to the OFF position...


