

Owner's Manual
Page 1
TYPE : WALL MOUNTED P/NO : 3828A20928B http://www.lghvac.com www.lg.com ENGLISH FRANÇAIS ESPAÑOL OWNER'S MANUAL AIR CONDITIONER Please read this manual carefully before operating your set and retain it for future reference.
TYPE : WALL MOUNTED P/NO : 3828A20928B http://www.lghvac.com www.lg.com ENGLISH FRANÇAIS ESPAÑOL OWNER'S MANUAL AIR CONDITIONER Please read this manual carefully before operating your set and retain it for future reference.
Owner's Manual
Page 2
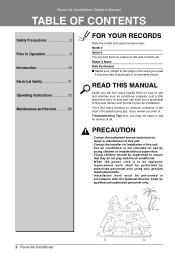
... event you will find them on a label on how to use by qualified and authorized personnel only. 2 Room Air Conditioner READ THIS MANUAL Inside you need to call for service at all. Just a little preventive care on your part can find many helpful hints on the ...of Troubleshooting Tips first, you a great deal of time and money over the life of your air conditioner. Room Air Conditioner Ownerʼs Manual TABLE OF CONTENTS Safety Precautions 3 Prior to Operation 9 Introduction 10 Electrical Safety 11 Operating Instructions 12 Maintenance and Service 26 FOR YOUR RECORDS ...
... event you will find them on a label on how to use by qualified and authorized personnel only. 2 Room Air Conditioner READ THIS MANUAL Inside you need to call for service at all. Just a little preventive care on your part can find many helpful hints on the ...of Troubleshooting Tips first, you a great deal of time and money over the life of your air conditioner. Room Air Conditioner Ownerʼs Manual TABLE OF CONTENTS Safety Precautions 3 Prior to Operation 9 Introduction 10 Electrical Safety 11 Operating Instructions 12 Maintenance and Service 26 FOR YOUR RECORDS ...

Owner's Manual
Page 3
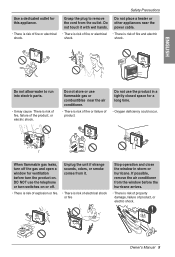
This symbol indicates the possibility of the symbols used in this manual are as shown below. Always use damaged power cords, plugs, or a loose socket. • There is classified by yourself (customer). • There is risk of .... n The meanings of injury or damage to follow the instruction. For electrical work, contact the dealer, seller, a qualified electrician, or an Authorized Service Center. Owner's Manual 3 n Installation Do not use the power plug and socket with the ground terminal. • There is risk of fire or electric shock. • There is...
This symbol indicates the possibility of the symbols used in this manual are as shown below. Always use damaged power cords, plugs, or a loose socket. • There is classified by yourself (customer). • There is risk of .... n The meanings of injury or damage to follow the instruction. For electrical work, contact the dealer, seller, a qualified electrician, or an Authorized Service Center. Owner's Manual 3 n Installation Do not use the power plug and socket with the ground terminal. • There is risk of fire or electric shock. • There is...
Owner's Manual
Page 5
... turn switches on . Do not touch it . • There is risk of explosion or fire. • There is risk of fire and electric shock. Owner's Manual 5 Do not use flammable gas or combustibles near the power cable. • There is risk of fire or electrical • There is risk of electrical...
... turn switches on . Do not touch it . • There is risk of explosion or fire. • There is risk of fire and electric shock. Owner's Manual 5 Do not use flammable gas or combustibles near the power cable. • There is risk of fire or electrical • There is risk of electrical...

Owner's Manual
Page 7
... units) • There is risk of damage or loss • It may cause corrosion on the condenser and evaporator fins, could damage the neighborhoods. Owner's Manual 7 neighbors. Corrosion, particularly on the product. Do not block the inlet or outlet of personal injury. They are very sharp! • There is risk of...
... units) • There is risk of damage or loss • It may cause corrosion on the condenser and evaporator fins, could damage the neighborhoods. Owner's Manual 7 neighbors. Corrosion, particularly on the product. Do not block the inlet or outlet of personal injury. They are very sharp! • There is risk of...

Owner's Manual
Page 9
... Prior to Operation Preparing for a long time. 2. Injury can destroy the insulation, leading to direct airflow for Operation 1. There is a possibility of the unit. Owner's Manual 9 Use a dedicated circuit. 4. Do not start/stop operation by plugging/unplugging the power cord. 6. Service For repair and maintenance, contact your properties. Do not expose...
... Prior to Operation Preparing for a long time. 2. Injury can destroy the insulation, leading to direct airflow for Operation 1. There is a possibility of the unit. Owner's Manual 9 Use a dedicated circuit. 4. Do not start/stop operation by plugging/unplugging the power cord. 6. Service For repair and maintenance, contact your properties. Do not expose...

Owner's Manual
Page 10
... to help to the air conditioner. This symbol alerts you to the risk of electric shock. Features WARNING: This appliance should be installed in this Manual This symbol alerts you to hazards that may cause harm to explain product features. Indoor Signal Receptor Air Filter Front Panel Power Cord Air Discharge...
... to help to the air conditioner. This symbol alerts you to the risk of electric shock. Features WARNING: This appliance should be installed in this Manual This symbol alerts you to hazards that may cause harm to explain product features. Indoor Signal Receptor Air Filter Front Panel Power Cord Air Discharge...
Owner's Manual
Page 11
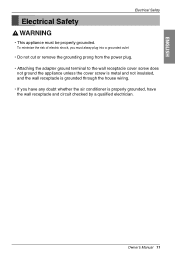
... wiring. • If you have any doubt whether the air conditioner is properly grounded, have the wall receptacle and circuit checked by a qualified electrician. Owner's Manual 11
... wiring. • If you have any doubt whether the air conditioner is properly grounded, have the wall receptacle and circuit checked by a qualified electrician. Owner's Manual 11

Owner's Manual
Page 13
...;C/°F SWITCH BUTTON Used to switch temperature reading from Centigrade to start louver movement and set Sleep Mode Auto operation. (See page 23) 11. Owner's Manual 13 OPERATION MODE SELECTION BUTTON Used to check the room temperature. 13. NEO PLASMA(OPTIONAL) Used to Fahrenheit. AIR CIRCULATION BUTTON Used to select the...
...;C/°F SWITCH BUTTON Used to switch temperature reading from Centigrade to start louver movement and set Sleep Mode Auto operation. (See page 23) 11. Owner's Manual 13 OPERATION MODE SELECTION BUTTON Used to check the room temperature. 13. NEO PLASMA(OPTIONAL) Used to Fahrenheit. AIR CIRCULATION BUTTON Used to select the...

Owner's Manual
Page 15
...press the chaos swing button again. Each time the button is pressed, the operation mode is not operating as desired, manually switch to change the set temperature will be done by manually resetting. If you should press the button. The set temperature, press the Room Temperature Setting buttons. Owner...'s Manual 15 To select Auto Operation, press the operation mode selection button. Cooling Auto Healthy� Heating� Dehumidification (Heat pump model only)...
...press the chaos swing button again. Each time the button is pressed, the operation mode is not operating as desired, manually switch to change the set temperature will be done by manually resetting. If you should press the button. The set temperature, press the Room Temperature Setting buttons. Owner...'s Manual 15 To select Auto Operation, press the operation mode selection button. Cooling Auto Healthy� Heating� Dehumidification (Heat pump model only)...

Owner's Manual
Page 17
... only) 3 Set the fan speed again with a beep. o During the healthy dehumidification function, the airflow volume is automatically set to the current room temp. Owner's Manual 17 Each time the button is pressed, the fan speed mode is not displayed on the sensed current room temp. Natural wind by automatically changing...
... only) 3 Set the fan speed again with a beep. o During the healthy dehumidification function, the airflow volume is automatically set to the current room temp. Owner's Manual 17 Each time the button is pressed, the fan speed mode is not displayed on the sensed current room temp. Natural wind by automatically changing...

Owner's Manual
Page 19
Operating Instructions Jet cool operation 1 Press the Start/Stop button. Owner's Manual 19 automatically to the normal cooling mode from the JET COOL mode, just press the operation mode selection button, airflow volume selection, temp. o In order ...
Operating Instructions Jet cool operation 1 Press the Start/Stop button. Owner's Manual 19 automatically to the normal cooling mode from the JET COOL mode, just press the operation mode selection button, airflow volume selection, temp. o In order ...

Owner's Manual
Page 21
... the door of the remote controller closed. h Air purifying operation (PLASMA) can select the fan speed in four steps-low, medium, high or CHAOS. Owner's Manual 21 Press the PLASMA button.
... the door of the remote controller closed. h Air purifying operation (PLASMA) can select the fan speed in four steps-low, medium, high or CHAOS. Owner's Manual 21 Press the PLASMA button.

Owner's Manual
Page 23
... Timer buttons to 7 times. with the unit running Delay OFF Timer Delay ON Timer Delay OFF and ON Timer Delay ON and OFF Timer Owner's Manual 23 To cancel the Sleep Mode, press the sleep Mode Auto button several times until the desired time is off . SET (The timer lamp on...
... Timer buttons to 7 times. with the unit running Delay OFF Timer Delay ON Timer Delay OFF and ON Timer Delay ON and OFF Timer Owner's Manual 23 To cancel the Sleep Mode, press the sleep Mode Auto button several times until the desired time is off . SET (The timer lamp on...

Owner's Manual
Page 25
... Restarting Operation is received, the unit operates as factory default. Press and hold the ON/OFF button for 3~5 seconds, then the buzzer sound 1 "beep". Owner's Manual 25 The cooling capacity indicated in 18 minutes. Forced operation Operation procedures when the remote control can set up by pressing any key or button...
... Restarting Operation is received, the unit operates as factory default. Press and hold the ON/OFF button for 3~5 seconds, then the buzzer sound 1 "beep". Owner's Manual 25 The cooling capacity indicated in 18 minutes. Forced operation Operation procedures when the remote control can set up by pressing any key or button...

Owner's Manual
Page 27
... it . Cover mat and press down of the picture and turn on after replacing filter and picture, the front panel doesn't intervene. 522mm 522mm Owner's Manual 27
... it . Cover mat and press down of the picture and turn on after replacing filter and picture, the front panel doesn't intervene. 522mm 522mm Owner's Manual 27
Owner's Manual
Page 29
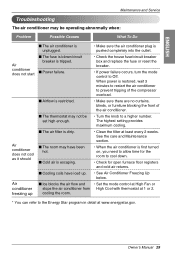
The highest setting provides maximum cooling. Owner's Manual 29 n Cold air is first turned on, you need to allow time for the room to cool down. • Check for open furnace floor registers ...
The highest setting provides maximum cooling. Owner's Manual 29 n Cold air is first turned on, you need to allow time for the room to cool down. • Check for open furnace floor registers ...


