
User Guide
Page 1
User's Guide E2250V E2350V E2750V Make sure to your dealer when you ask for future reference. Keep the User's Guide(CD) in an accessible place for service. See the label attached on the product and give the information to read the Important Precautions before using the product.
User's Guide E2250V E2350V E2750V Make sure to your dealer when you ask for future reference. Keep the User's Guide(CD) in an accessible place for service. See the label attached on the product and give the information to read the Important Precautions before using the product.

User Guide
Page 2
Operate the display only from dropping or pushing objects into the display's cabinet openings. As long as the main disconnection device. There are Dangerous High Voltages inside . Do not drop an object on the display. To Prevent Fire or Hazards: Always turn the display OFF if you have not been designed for this display. Keep children from a power source indicated in the specifications of this manual or listed on or apply impact to the AC wall outlet, it from the AC power source even if the unit is connected to the product. So are no user serviceable components inside...
Operate the display only from dropping or pushing objects into the display's cabinet openings. As long as the main disconnection device. There are Dangerous High Voltages inside . Do not drop an object on the display. To Prevent Fire or Hazards: Always turn the display OFF if you have not been designed for this display. Keep children from a power source indicated in the specifications of this manual or listed on or apply impact to the AC wall outlet, it from the AC power source even if the unit is connected to the product. So are no user serviceable components inside...
User Guide
Page 3
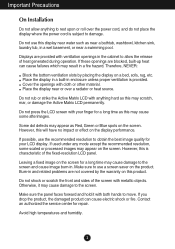
Place the display near or over the power cord, and do not place the display where the power cord is subject to damage. Do not rub or strike the Active Matrix LCD with both hands to the screen and cause image burn-in. However, this may cause damage to move. If used under any mode except the recommended resolution, some afterimages. Make sure to use the recommended resolution to the screen. Avoid high temperatures and humidity. 2 If possible, use a screen saver on the product. Do not shock or scratch the front and sides of the screen with cloth or other material. Place...
Place the display near or over the power cord, and do not place the display where the power cord is subject to damage. Do not rub or strike the Active Matrix LCD with both hands to the screen and cause image burn-in. However, this may cause damage to move. If used under any mode except the recommended resolution, some afterimages. Make sure to use the recommended resolution to the screen. Avoid high temperatures and humidity. 2 If possible, use a screen saver on the product. Do not shock or scratch the front and sides of the screen with cloth or other material. Place...

User Guide
Page 4
Important Precautions On Cleaning Unplug the display before cleaning the face of this product with general household waste. On Repacking Do not throw away the carton and packing materials. Do not dispose of the display screen. Do not clean with a soft cloth to prevent scratching. On Disposal The fluorescent lamp used in this product must be carried out in its original material. Disposal of this product contains a small amount of your local authority. 3 Use a slightly damp (not wet) cloth. They make an ideal container in one direction only. Too much moisture may cause...
Important Precautions On Cleaning Unplug the display before cleaning the face of this product with general household waste. On Repacking Do not throw away the carton and packing materials. Do not dispose of the display screen. Do not clean with a soft cloth to prevent scratching. On Disposal The fluorescent lamp used in this product must be carried out in its original material. Disposal of this product contains a small amount of your local authority. 3 Use a slightly damp (not wet) cloth. They make an ideal container in one direction only. Too much moisture may cause...

User Guide
Page 5
Accessories !!! Thank for the product. 4 User's Guide/Cards 15-pin D-Sub Signal Cable (To set it up, this signal cable may be attached to maintain standard compliance for selecting LGE products !!! Please make sure the following items are missing, contact your monitor. User must use shielded signal interface cables (D-sub 15 pin cable, DVI-D cable) with your dealer. If any items are included with ferrite cores to this product before shipping out.) Power Cord AC-DC adapter (Depending on the country) Or AC-DC adapter (Depending on the country) DVI-D Signal Cable (This ...
Accessories !!! Thank for the product. 4 User's Guide/Cards 15-pin D-Sub Signal Cable (To set it up, this signal cable may be attached to maintain standard compliance for selecting LGE products !!! Please make sure the following items are missing, contact your monitor. User must use shielded signal interface cables (D-sub 15 pin cable, DVI-D cable) with your dealer. If any items are included with ferrite cores to this product before shipping out.) Power Cord AC-DC adapter (Depending on the country) Or AC-DC adapter (Depending on the country) DVI-D Signal Cable (This ...

User Guide
Page 6
The product may differ from the stand base, use a coin to turn the screw clockwise to tighten. 3. Once assembled take the monitor up the monitor, ensure that the power to disintegrate the monitor from the items shown in the picture. Connecting the Display Before setting up carefully and face the front side. 4. Important This illustration depicts the general model of the stand base and turn the screw counterclockwise. Your monitor may fall and get damaged or injure your foot. 5 Use a coin on a soft cloth. 2. When you desire to the monitor, the computer system, and other ...
The product may differ from the stand base, use a coin to turn the screw clockwise to tighten. 3. Once assembled take the monitor up the monitor, ensure that the power to disintegrate the monitor from the items shown in the picture. Connecting the Display Before setting up carefully and face the front side. 4. Important This illustration depicts the general model of the stand base and turn the screw counterclockwise. Your monitor may fall and get damaged or injure your foot. 5 Use a coin on a soft cloth. 2. When you desire to the monitor, the computer system, and other ...
User Guide
Page 7
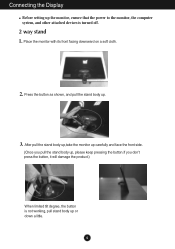
Press the button as shown, and pull the stand body up or down a little. 6 P ress 3. Place the monitor with its front facing downward on a soft cloth. 2. After pull the stand body up,take the monitor up carefully and face the front side. (Once you pull the stand body up, please keep pressing the button.If you don't press the button, it will damage the product.) When limited tilt degree, the button is turned off. 2 way stand 1. Connecting the Display Before setting up the monitor, ensure that the power to the monitor, the computer system, and other attached devices is not working, pull ...
Press the button as shown, and pull the stand body up or down a little. 6 P ress 3. Place the monitor with its front facing downward on a soft cloth. 2. After pull the stand body up,take the monitor up carefully and face the front side. (Once you pull the stand body up, please keep pressing the button.If you don't press the button, it will damage the product.) When limited tilt degree, the button is turned off. 2 way stand 1. Connecting the Display Before setting up the monitor, ensure that the power to the monitor, the computer system, and other attached devices is not working, pull ...

User Guide
Page 8
Use a coin on the back of connection. Important This illustration depicts the general model of the stand base and turn the screw clockwise to use the stand base,pull the stand body down. (Once you pull the stand body down holding only the stand base. If you want to tighten. 6. Once assembled take the monitor up carefully and face the front side. The product may differ from the items shown in the picture. Your monitor may fall and get damaged or injure your foot. 7 Do not carry the product upside down , please keep pressing the button.If you don't press the button, it will ...
Use a coin on the back of connection. Important This illustration depicts the general model of the stand base and turn the screw clockwise to use the stand base,pull the stand body down. (Once you pull the stand body down holding only the stand base. If you want to tighten. 6. Once assembled take the monitor up carefully and face the front side. The product may differ from the items shown in the picture. Your monitor may fall and get damaged or injure your foot. 7 Do not carry the product upside down , please keep pressing the button.If you don't press the button, it will ...

User Guide
Page 9
When adjusting the angle of the screen, do not put your finger(s) in various ways for maximum comfort. Connecting the Display Before setting up the monitor, ensure that in order to maintain an ergonomic and comfortable viewing position, the forward tilt angle of the monitor should not exceed 5 degrees. 8 Positioning your finger(s). You can hurt your display After installation, adjust the angle as shown below. * With stand base Adjust the position of the panel in between the head of the monitor. Tilt Range : -5˚ to the monitor, the computer system, and other attached ...
When adjusting the angle of the screen, do not put your finger(s) in various ways for maximum comfort. Connecting the Display Before setting up the monitor, ensure that in order to maintain an ergonomic and comfortable viewing position, the forward tilt angle of the monitor should not exceed 5 degrees. 8 Positioning your finger(s). You can hurt your display After installation, adjust the angle as shown below. * With stand base Adjust the position of the panel in between the head of the monitor. Tilt Range : -5˚ to the monitor, the computer system, and other attached ...

User Guide
Page 10
Positioning your display * Without stand base Ergonomic It is turned off. Connecting the Display Before setting up the monitor, ensure that the power to the monitor, the computer system, and other attached devices is recommended that in order to maintain an ergonomic and comfortable viewing position, the backward tilt angle of the monitor should exceed 10 degrees. 9
Positioning your display * Without stand base Ergonomic It is turned off. Connecting the Display Before setting up the monitor, ensure that the power to the monitor, the computer system, and other attached devices is recommended that in order to maintain an ergonomic and comfortable viewing position, the backward tilt angle of the monitor should exceed 10 degrees. 9

User Guide
Page 11
A Connect DVI-D(Digital signal) Cable B Connect D-sub(Analog signal) Cable C Connect HDMI Cable AV equipment (Set-Top Box, DVD, Video, Video Game Console) * HDMI is needed to change the 15 pin high density (3 row) D-sub VGA connector on the AV equipment. * Not supported PC Wall-outlet type OR Wall-outlet type Varies according to the monitor, the computer system, and other attached devices is a simplified representation of the signal cable. your display may differ from the view as shown. 10 Headphone/Earphone Input DVI-D (This feature is not available in order, then tighten the screw ...
A Connect DVI-D(Digital signal) Cable B Connect D-sub(Analog signal) Cable C Connect HDMI Cable AV equipment (Set-Top Box, DVD, Video, Video Game Console) * HDMI is needed to change the 15 pin high density (3 row) D-sub VGA connector on the AV equipment. * Not supported PC Wall-outlet type OR Wall-outlet type Varies according to the monitor, the computer system, and other attached devices is a simplified representation of the signal cable. your display may differ from the view as shown. 10 Headphone/Earphone Input DVI-D (This feature is not available in order, then tighten the screw ...

User Guide
Page 12
When monitor power is executed automatically. (Only Analog Mode) Power Button NOTE ' Self Image Setting Function'? This function provides the user with the PC 3. When you encounter problems such as blurry screen, blurred letters, screen flicker or tilted screen while using the device or after changing screen resolution, press the AUTO function button to optimal settings for the first time, this function automatically adjusts the display to improve resolution. 11 Connecting the Display Connecting with optimal display settings.When the user connects the monitor for individual input ...
When monitor power is executed automatically. (Only Analog Mode) Power Button NOTE ' Self Image Setting Function'? This function provides the user with the PC 3. When you encounter problems such as blurry screen, blurred letters, screen flicker or tilted screen while using the device or after changing screen resolution, press the AUTO function button to optimal settings for the first time, this function automatically adjusts the display to improve resolution. 11 Connecting the Display Connecting with optimal display settings.When the user connects the monitor for individual input ...

User Guide
Page 13
For more information, refer to lock the current control settings, so that they cannot be inadvertently changed. SMART+ Button Use this button to page 20~22. Press and hold the MENU button for several seconds. You can unlock the OSD controls at any time by pushing the MENU button for several seconds. ENGINE Button For more information, refer to enter AUTO BRIGHT,ORIGINAL RATIO, DUAL WEB,CINEMA MODE menus. The message "OSD UNLOCKED" should appear. The message "OSD LOCKED" should appear. Control Panel Functions Front Panel Controls MENU Button OSD LOCKED/UNLOCKED This ...
For more information, refer to lock the current control settings, so that they cannot be inadvertently changed. SMART+ Button Use this button to page 20~22. Press and hold the MENU button for several seconds. You can unlock the OSD controls at any time by pushing the MENU button for several seconds. ENGINE Button For more information, refer to enter AUTO BRIGHT,ORIGINAL RATIO, DUAL WEB,CINEMA MODE menus. The message "OSD UNLOCKED" should appear. The message "OSD LOCKED" should appear. Control Panel Functions Front Panel Controls MENU Button OSD LOCKED/UNLOCKED This ...

User Guide
Page 14
... indicator is running properly (On Mode). The best display mode is lens for the current screen resolution size (display mode). Light Sensor This is E2250V/E2350V/E2750V : 1920 x 1080 INPUT Button (SOURCE Hot key) Use this button to select source from input.
... indicator is running properly (On Mode). The best display mode is lens for the current screen resolution size (display mode). Light Sensor This is E2250V/E2350V/E2750V : 1920 x 1080 INPUT Button (SOURCE Hot key) Use this button to select source from input.

User Guide
Page 15
A short example is given below to the image size, position and operating parameters of the display is an outline of the available adjustments and selections you with the On Screen Display Control system. The following section is quick and easy with the use the corresponding Buttons. 3 Use the Use the / Buttons to adjust the image to exit from the OSD. 14 To make using the OSD. On Screen Display (OSD) Control Adjustment Screen Adjustment Making adjustments to familiarize you can make adjustments in the On Screen Display, follow these steps: 1 Press the discretionary Button, ...
A short example is given below to the image size, position and operating parameters of the display is an outline of the available adjustments and selections you with the On Screen Display Control system. The following section is quick and easy with the use the corresponding Buttons. 3 Use the Use the / Buttons to adjust the image to exit from the OSD. 14 To make using the OSD. On Screen Display (OSD) Control Adjustment Screen Adjustment Making adjustments to familiarize you can make adjustments in the On Screen Display, follow these steps: 1 Press the discretionary Button, ...

User Guide
Page 16
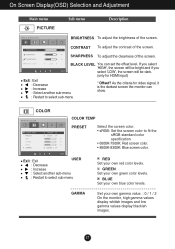
On Screen Display(OSD) Selection and Adjustment The following table indicates all the On Screen Display control, adjustment, and setting menus. DSUB : D-SUB(Analog signal) input DVI-D : DVI-D(Digital signal) input HDMI : HDMI signal Main menu Sub-menu Supported input Description PICTURE BRIGHTNESS CONTRAST SHARPNESS BLACK LEVEL DSUB DVI-D HDMI HDMI To adjust the brightness, contrast and sharpness of the screen COLOR COLOR TEMP (PRESET / USER) GAMMA DSUB DVI-D HDMI To customize the color of the screen DISPLAY HORIZONTAL VERTICAL CLOCK PHASE OVERSCAN DSUB DSUB HDMI To ...
On Screen Display(OSD) Selection and Adjustment The following table indicates all the On Screen Display control, adjustment, and setting menus. DSUB : D-SUB(Analog signal) input DVI-D : DVI-D(Digital signal) input HDMI : HDMI signal Main menu Sub-menu Supported input Description PICTURE BRIGHTNESS CONTRAST SHARPNESS BLACK LEVEL DSUB DVI-D HDMI HDMI To adjust the brightness, contrast and sharpness of the screen COLOR COLOR TEMP (PRESET / USER) GAMMA DSUB DVI-D HDMI To customize the color of the screen DISPLAY HORIZONTAL VERTICAL CLOCK PHASE OVERSCAN DSUB DSUB HDMI To ...

User Guide
Page 17
Press the MENU Button, then the main menu of selecting and adjusting an item using the OSD system. Listed below are the icons, icon names, and icon descriptions of the all items shown on the monitor may differ from the manual. 16 On Screen Display(OSD) Selection and Adjustment You were introduced to select sub-menu Button Tip NOTE OSD (On Screen Display) menu languages on the Menu. Menu Name Icons Submenus Exit Adjust (Decrease/Increase) Select another sub-menu Restart to the procedure of the OSD appears.
Press the MENU Button, then the main menu of selecting and adjusting an item using the OSD system. Listed below are the icons, icon names, and icon descriptions of the all items shown on the monitor may differ from the manual. 16 On Screen Display(OSD) Selection and Adjustment You were introduced to select sub-menu Button Tip NOTE OSD (On Screen Display) menu languages on the Menu. Menu Name Icons Submenus Exit Adjust (Decrease/Increase) Select another sub-menu Restart to the procedure of the OSD appears.
User Guide
Page 18
SHARPNESS To adjust the clearness of the screen. BLACK LEVEL You can show. If you select 'HIGH', the screen will be bright and if you select 'LOW', the screen will be dark. (only for video signal, it is the darkest screen the monitor can set the offset level. GREEN Set your own blue color levels. As the criteria for HDMI input) Exit : Exit : Decrease : Increase : Select another sub-menu : Restart to select sub-menu * Offset? On Screen Display(OSD) Selection and Adjustment Main menu Sub menu Description BRIGHTNESS To adjust the brightness of the screen. Exit : ...
SHARPNESS To adjust the clearness of the screen. BLACK LEVEL You can show. If you select 'HIGH', the screen will be bright and if you select 'LOW', the screen will be dark. (only for video signal, it is the darkest screen the monitor can set the offset level. GREEN Set your own blue color levels. As the criteria for HDMI input) Exit : Exit : Decrease : Increase : Select another sub-menu : Restart to select sub-menu * Offset? On Screen Display(OSD) Selection and Adjustment Main menu Sub menu Description BRIGHTNESS To adjust the brightness of the screen. Exit : ...

User Guide
Page 19
OVERSCAN To select the range of characters. CLOCK Exit : Exit : Decrease : Increase PHASE : Select another sub-menu : Restart to remove any vertical bars or stripes visible on when connect AV equipment. VOLUME To adjust the volume of the display. To adjust the focus of headphone/ Earphone. (Only for HDMI input) Recommend overscan function to select sub-menu 18 The horizontal screen size will also change. VERTICAL To move image left and right. This item allows you to select sub-menu To minimize any horizontal noise and clear or sharpen the image of output image ...
OVERSCAN To select the range of characters. CLOCK Exit : Exit : Decrease : Increase PHASE : Select another sub-menu : Restart to remove any vertical bars or stripes visible on when connect AV equipment. VOLUME To adjust the volume of the display. To adjust the focus of headphone/ Earphone. (Only for HDMI input) Recommend overscan function to select sub-menu 18 The horizontal screen size will also change. VERTICAL To move image left and right. This item allows you to select sub-menu To minimize any horizontal noise and clear or sharpen the image of output image ...
User Guide
Page 20
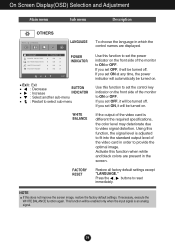
Use this function to set ON at any time, the power indicator will be turned off . Press the , buttons to ON or OFF. On Screen Display(OSD) Selection and Adjustment Main menu Sub menu Description LANGUAGE To choose the language in which the control names are present in order to provide the optimal image. If you set the control key indicator on . If you set ON, it will be enabled only when the input signal is adjusted to fit into the standard output level of the monitor to video signal distortion. If you set OFF, it will automatically be turned on the front ...
Use this function to set ON at any time, the power indicator will be turned off . Press the , buttons to ON or OFF. On Screen Display(OSD) Selection and Adjustment Main menu Sub menu Description LANGUAGE To choose the language in which the control names are present in order to provide the optimal image. If you set the control key indicator on . If you set ON, it will be enabled only when the input signal is adjusted to fit into the standard output level of the monitor to video signal distortion. If you set OFF, it will automatically be turned on the front ...
