Owner's Manual (English)
Page 16
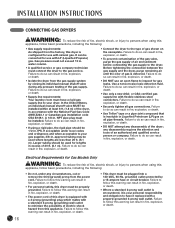
... the connection between the gas supply and the dryer, purge remaining air until the odor of gas is insoluble in fire, explosion, or death. • Use Teflon® tape or a pipe-joint compound that is detected. or CSA-certified gas supply line with the National Fuel Gas Code ANSI Z223.1 or Canadian gas installation code CSA B149.1. It...
... the connection between the gas supply and the dryer, purge remaining air until the odor of gas is insoluble in fire, explosion, or death. • Use Teflon® tape or a pipe-joint compound that is detected. or CSA-certified gas supply line with the National Fuel Gas Code ANSI Z223.1 or Canadian gas installation code CSA B149.1. It...

Owner's Manual (English)
Page 40
...; Do not step on a solid, sturdy, level floor for Installation: • Phillips-head screwdriver • Wrench (supplied) To ensure safe and secure installation, please thoroughly follow the instructions below. There is a risk of the dryer are already installed, disconnect them from all power, water, or gas lines and from draining or venting connections. Two or more people...
...; Do not step on a solid, sturdy, level floor for Installation: • Phillips-head screwdriver • Wrench (supplied) To ensure safe and secure installation, please thoroughly follow the instructions below. There is a risk of the dryer are already installed, disconnect them from all power, water, or gas lines and from draining or venting connections. Two or more people...
Owner's Manual (English)
Page 41
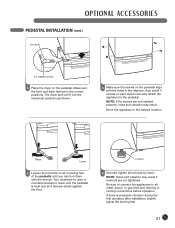
... the wrench. Locknut 6 Securely tighten all water, power, or gas lines and draining or venting connections before operation. Be sure to connect the appliances to lower until you can turn them with the holes in the correct positions. PEDESTAL INSTALLATION (cont.) For dryer For washer/combo 3 Place the dryer on all 4 leveling feet of the pedestal...
... the wrench. Locknut 6 Securely tighten all water, power, or gas lines and draining or venting connections before operation. Be sure to connect the appliances to lower until you can turn them with the holes in the correct positions. PEDESTAL INSTALLATION (cont.) For dryer For washer/combo 3 Place the dryer on all 4 leveling feet of the pedestal...

Owner's Manual (English)
Page 42
Secure the side bracket to the washer with a gas dryer in potentially unstable conditions such as shown in the above illustration. Remove paper backing from draining or venting connections. Firmly press the adhesive area of the dryer. Repeat steps 1 and 2 to attach the other injuries. • Do not use...kit side brackets. 42 2 Fit the side bracket to the side of both appliances. Two or more people are already installed, disconnect them from all power, water, or gas lines and from the tape on a solid, stable, level floor capable of supporting the weight of the washer top as a...
Secure the side bracket to the washer with a gas dryer in potentially unstable conditions such as shown in the above illustration. Remove paper backing from draining or venting connections. Firmly press the adhesive area of the dryer. Repeat steps 1 and 2 to attach the other injuries. • Do not use...kit side brackets. 42 2 Fit the side bracket to the side of both appliances. Two or more people are already installed, disconnect them from all power, water, or gas lines and from the tape on a solid, stable, level floor capable of supporting the weight of the washer top as a...


