

Owners Manual
Page 1
1-800-243-0000 24 HOURS A DAY, 7 DAYS A WEEK FOR LG CUSTOMER SERVICE _ ¢ '/,, 4_" """n Ir_;_9_ ,_: _',_"r _ _, ,_Y_'_!,i,rsi,_[ ,'_;"i r,±j, ElectricandGasDryer DLE7177WNl/DLG7188WiVi DLE7177NiVI/DLG7188NM DLE7177RIVI/DLG7188RM Thank you for future reference. For more information, visit our website at http:iius.lge.com P/No.: 3828EL3010A Please read your manual carefully, as it provides instructions on safe Installation, Use and Maintenance. Record the Model and Serial Numbers, and retain the manual for buying a LG Dryer.
1-800-243-0000 24 HOURS A DAY, 7 DAYS A WEEK FOR LG CUSTOMER SERVICE _ ¢ '/,, 4_" """n Ir_;_9_ ,_: _',_"r _ _, ,_Y_'_!,i,rsi,_[ ,'_;"i r,±j, ElectricandGasDryer DLE7177WNl/DLG7188WiVi DLE7177NiVI/DLG7188NM DLE7177RIVI/DLG7188RM Thank you for future reference. For more information, visit our website at http:iius.lge.com P/No.: 3828EL3010A Please read your manual carefully, as it provides instructions on safe Installation, Use and Maintenance. Record the Model and Serial Numbers, and retain the manual for buying a LG Dryer.
Owners Manual
Page 2
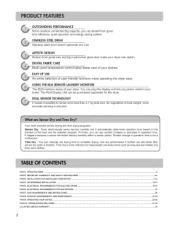
.... Sudden change in operation time. PART1. IMPORTANT WARRANTY AND SAFETY INSTRUCTIONS ...PART3. TROUBLESHOOTING GUIDE ...LG DRYER LIMITED WARRANTY ...2 3 4-6 7-12 13-14 15-18 lg 20 21-22 23-30 31-33 34 STAINLESSSTEELDRUM Stainless steel drum doesn't generate any power outlet.... DIGITAL FABRICCARE Multi-Level temperature control takes better care of user-friendly functions make your dryer. Your dryer provides sensor drying and time drying programs. Sensor Dry : Dryer electronically sense laundry humidity and it possible to complete drying. Time Dry is finished. EXHAUST...
.... Sudden change in operation time. PART1. IMPORTANT WARRANTY AND SAFETY INSTRUCTIONS ...PART3. TROUBLESHOOTING GUIDE ...LG DRYER LIMITED WARRANTY ...2 3 4-6 7-12 13-14 15-18 lg 20 21-22 23-30 31-33 34 STAINLESSSTEELDRUM Stainless steel drum doesn't generate any power outlet.... DIGITAL FABRICCARE Multi-Level temperature control takes better care of user-friendly functions make your dryer. Your dryer provides sensor drying and time drying programs. Sensor Dry : Dryer electronically sense laundry humidity and it possible to complete drying. Time Dry is finished. EXHAUST...

Owners Manual
Page 3
... to change by manufacturer. See page 14 .[br how to use . 3 See page 13.[br how to use . ACCESSORIES 2 Dryer rack (1 each) Stacking kit (1 each ) Purchased Separately Remote Laundry Monitor Purchased Separately See page 26 .[br how to cha_tge without ...manqfaturer_ notice. [] Type : Electric and Gas Dryer [] Rating [] Size [] Capacity [] Weight : Please refer to the rating label regarding detailed information. : 27 x 29.9 x 38.7(inch) :IEC ...
... to change by manufacturer. See page 14 .[br how to use . 3 See page 13.[br how to use . ACCESSORIES 2 Dryer rack (1 each) Stacking kit (1 each ) Purchased Separately Remote Laundry Monitor Purchased Separately See page 26 .[br how to cha_tge without ...manqfaturer_ notice. [] Type : Electric and Gas Dryer [] Rating [] Size [] Capacity [] Weight : Please refer to the rating label regarding detailed information. : 27 x 29.9 x 38.7(inch) :IEC ...
Owners Manual
Page 4
... the following. To reduce the risk of fire or explosion, electric shock or to record the model number and serial number of your new LG dryer. You will repair or replace any parts defective in this manual. Serial No. Date of Purchase -_I_ Staple your nearest..., the recommendations in material or workmanship throughout the Warranty period, beginning the Date of purchase date is effective for your Dryer is located at the end of this manual must be followed. Warranty Restriction: If the dryer is subjected to other than private family use, all warranty coverage is required.
... the following. To reduce the risk of fire or explosion, electric shock or to record the model number and serial number of your new LG dryer. You will repair or replace any parts defective in this manual. Serial No. Date of Purchase -_I_ Staple your nearest..., the recommendations in material or workmanship throughout the Warranty period, beginning the Date of purchase date is effective for your Dryer is located at the end of this manual must be followed. Warranty Restriction: If the dryer is subjected to other than private family use, all warranty coverage is required.
Owners Manual
Page 5
... specifically recommended in the user-maintenance instructions. 9) Do not use fabric sofiners or products to the equipment-grom_ding terminal or lead on or in your dryer. The plug must be grounded. IMPORTANT SAFETY INSTRUCTIONS 1) Read all local codes and ordinances. Items contaminated with the circuit conductors and connected to eliminate static...
... specifically recommended in the user-maintenance instructions. 9) Do not use fabric sofiners or products to the equipment-grom_ding terminal or lead on or in your dryer. The plug must be grounded. IMPORTANT SAFETY INSTRUCTIONS 1) Read all local codes and ordinances. Items contaminated with the circuit conductors and connected to eliminate static...
Owners Manual
Page 6
...oil. • Articles containing foam, rubber, rubber-like materials, plastic or similar materials should be minimized further by properly venting the dryer to four of these instructions can result in fire, death or serious injury. • A qualified service person or company must perform ... using this appliance, please follow these substances, namely benzene, carbon monoxide, formaldehyde and soot, caused primarily by your gas supplier from dryer. • Place dryer at least 18 inches above the floor for a garage installation. • Failure to such substances. ,_ WHAT TO DO IF YOU...
...oil. • Articles containing foam, rubber, rubber-like materials, plastic or similar materials should be minimized further by properly venting the dryer to four of these instructions can result in fire, death or serious injury. • A qualified service person or company must perform ... using this appliance, please follow these substances, namely benzene, carbon monoxide, formaldehyde and soot, caused primarily by your gas supplier from dryer. • Place dryer at least 18 inches above the floor for a garage installation. • Failure to such substances. ,_ WHAT TO DO IF YOU...
Owners Manual
Page 7
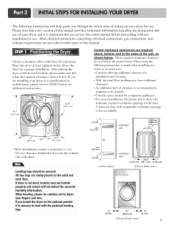
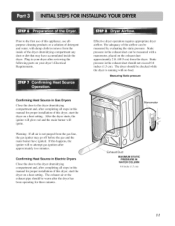
... connections, and exhaust requirements are provided in other parts of this entire manual before proceeding with a solid floor for your dryer. All four legs are stably placed on the optional pedstal. If you through the initial steps of your lingers and toes...of clearance is also acceptable. 3Bt (7.6 cm) 48 t_2. (310 cm 2) ventilation hole * Most installations require a minimum 5 1/2 in. (14 cm) clearance behind the dryer for the exhaust vent with the pedestal levNing legs. 24*'2 (155 cm_).. (7.6 cm) ventilation hole "i _ (2.54cm) 29.9" (76.1 cm) (2.54cm) 0" _ (0 ...
... connections, and exhaust requirements are provided in other parts of this entire manual before proceeding with a solid floor for your dryer. All four legs are stably placed on the optional pedstal. If you through the initial steps of your lingers and toes...of clearance is also acceptable. 3Bt (7.6 cm) 48 t_2. (310 cm 2) ventilation hole * Most installations require a minimum 5 1/2 in. (14 cm) clearance behind the dryer for the exhaust vent with the pedestal levNing legs. 24*'2 (155 cm_).. (7.6 cm) ventilation hole "i _ (2.54cm) 29.9" (76.1 cm) (2.54cm) 0" _ (0 ...
Owners Manual
Page 8
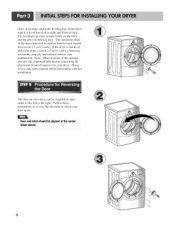
...to back should not exceed 2.5 cm (1 inch). Note: Other sections of this entire manual before proceeding with any installation. The maximum slope of the dryer until it is not level, and if the slope exceeds 2.5 cm (1 inch), a load may not tumble properly and internal sensors may malfunction. ...Please review this manual also provide important information concerning the placement of and clearances for your dryer can be aligned at the center 8 The door on the floor and the dryer should not rock. Once in which your door opens: Door and latch should be installed to ...
...to back should not exceed 2.5 cm (1 inch). Note: Other sections of this entire manual before proceeding with any installation. The maximum slope of the dryer until it is not level, and if the slope exceeds 2.5 cm (1 inch), a load may not tumble properly and internal sensors may malfunction. ...Please review this manual also provide important information concerning the placement of and clearances for your dryer can be aligned at the center 8 The door on the floor and the dryer should not rock. Once in which your door opens: Door and latch should be installed to ...
Owners Manual
Page 9
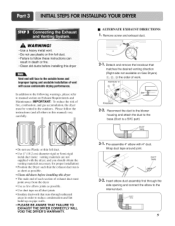
... the desired venting direction (Right side not available on pipe walls. • PLEASE BE AWARE THAT FAILURE TO EXHAUST THE DRYER CORRECTLY WILL VOID THE DRYER'S WARRANTY. • ALTERNATE EXHAUST DIRECTIONS ]. Wrap duct tape around joint. DUCT TAPE 3-2° Insert elbow duct assembly first... plastic or thin foil duct. • Failure to follow these instructions can result in order to reduce condensation and lint build-up on Gas Dryers) 0), @), _3)the order of vent will face to manual section on Exhaust Requirements and Maintenance. PORTION "A" I Knockout Q \ 2-2. Detach...
... the desired venting direction (Right side not available on pipe walls. • PLEASE BE AWARE THAT FAILURE TO EXHAUST THE DRYER CORRECTLY WILL VOID THE DRYER'S WARRANTY. • ALTERNATE EXHAUST DIRECTIONS ]. Wrap duct tape around joint. DUCT TAPE 3-2° Insert elbow duct assembly first... plastic or thin foil duct. • Failure to follow these instructions can result in order to reduce condensation and lint build-up on Gas Dryers) 0), @), _3)the order of vent will face to manual section on Exhaust Requirements and Maintenance. PORTION "A" I Knockout Q \ 2-2. Detach...
Owners Manual
Page 10
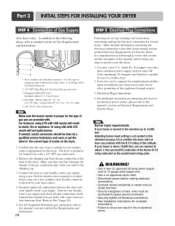
...do not allow grounding of the burner B.T.U rating indicated on Gas Requirements and Instructions. 1. Use 1/2" pi_. 5.3/8" N.P.T. Connect the dryer to 10,000 feet. Electrical Plug Connections. 4. More detailed inli)rmation concerning the electrical connection is prepared tk)r Natural Gas with LPG... If needed in this elevation because A.G.Acert!fies this dryer will result in fire or electrical shock. ff your laundry room is required li)r manufactured (mobile) home installations and where ...
...do not allow grounding of the burner B.T.U rating indicated on Gas Requirements and Instructions. 1. Use 1/2" pi_. 5.3/8" N.P.T. Connect the dryer to 10,000 feet. Electrical Plug Connections. 4. More detailed inli)rmation concerning the electrical connection is prepared tk)r Natural Gas with LPG... If needed in this elevation because A.G.Acert!fies this dryer will result in fire or electrical shock. ff your laundry room is required li)r manufactured (mobile) home installations and where ...
Owners Manual
Page 11
...MAXIMUM STATIC PRESSURE IN WATER COLUMN 0.6 inche (1.5 cm) 11 Static pressure in the exhaust duct can be checked while the dryer is not purged from the dryer. The dryer should not exceed 0.6 inches (1.5 cm). Prior to the first use of this appliance, use allpurpose cleaning products or a ...been operating for proper installation of the airflow can be warm after approximately two minutes. Warning: If all steps in Gas Dryers Close the door to the dryer drum/drying compartment and, after reviewing the following parts on the exhaust duct approximately 2 ft. (60.9 cm) from the...
...MAXIMUM STATIC PRESSURE IN WATER COLUMN 0.6 inche (1.5 cm) 11 Static pressure in the exhaust duct can be checked while the dryer is not purged from the dryer. The dryer should not exceed 0.6 inches (1.5 cm). Prior to the first use of this appliance, use allpurpose cleaning products or a ...been operating for proper installation of the airflow can be warm after approximately two minutes. Warning: If all steps in Gas Dryers Close the door to the dryer drum/drying compartment and, after reviewing the following parts on the exhaust duct approximately 2 ft. (60.9 cm) from the...

Owners Manual
Page 12
...duct from any combustible construction be at least 2 inches (5 cm), and, when venting the dryer to the outdoors, the dryer can be aware that venting materials are not supplied with the dryer. The opening for proper installation. You should obtain the venting materials necessary for outside fresh ...metal pipe. 7) DO NOT connect the exhaust duct with a clearance of 1 inch at the manual section entitled Electrical Requirements for an electric dryer must be made of a material that will comply with the Manufactured Home Construction and Safety Standards Title 24 CFR, Part 32-80 or Standard...
...duct from any combustible construction be at least 2 inches (5 cm), and, when venting the dryer to the outdoors, the dryer can be aware that venting materials are not supplied with the dryer. The opening for proper installation. You should obtain the venting materials necessary for outside fresh ...metal pipe. 7) DO NOT connect the exhaust duct with a clearance of 1 inch at the manual section entitled Electrical Requirements for an electric dryer must be made of a material that will comply with the Manufactured Home Construction and Safety Standards Title 24 CFR, Part 32-80 or Standard...
Owners Manual
Page 13
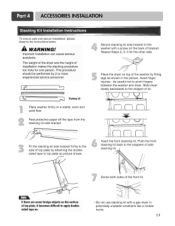
...bracket. Insert the front stacking kit. Screw both sides of top plate by attaching the doublesided tape to the washer with a gas dryer in the picture. be performed by fitting legs as picture shows. WARNINGS Incorrect Installation can cause serious accidents. Repeat Steps 2, 3, 4...6._ ,_ I_ J Stackingkit Place washer firmly on the back of top plate, it becomes difficult to pinch fingers between the washer and dryer. To ensure safe and secure installation, please observe the instructions below. If there are some foreign objects on the surface of bracket. Secure...
...bracket. Insert the front stacking kit. Screw both sides of top plate by attaching the doublesided tape to the washer with a gas dryer in the picture. be performed by fitting legs as picture shows. WARNINGS Incorrect Installation can cause serious accidents. Repeat Steps 2, 3, 4...6._ ,_ I_ J Stackingkit Place washer firmly on the back of top plate, it becomes difficult to pinch fingers between the washer and dryer. To ensure safe and secure installation, please observe the instructions below. If there are some foreign objects on the surface of bracket. Secure...
Owners Manual
Page 14
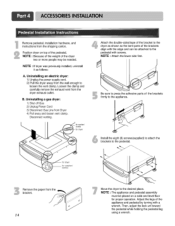
... : Attach the lower side first. Then, adjust the lock unt toward the pedestal while holding the pedestal leg using a wrench. NOTE • If dryer was previously installed, uninstall it as shown so the bent parts of the appliance and pedestal by turning with screws. Adjust the legs of the... brackets align with the edge and can be needed. Uninstalling a gas dryer: 1) Shut off Gas 2) Unplug Power Cord 3) Disconnect Gas Line from the bracket. combo Attach the double-sided tape of the bracket to the...
... : Attach the lower side first. Then, adjust the lock unt toward the pedestal while holding the pedestal leg using a wrench. NOTE • If dryer was previously installed, uninstall it as shown so the bent parts of the appliance and pedestal by turning with screws. Adjust the legs of the... brackets align with the edge and can be needed. Uninstalling a gas dryer: 1) Shut off Gas 2) Unplug Power Cord 3) Disconnect Gas Line from the bracket. combo Attach the double-sided tape of the bracket to the...
Owners Manual
Page 15
...pages. 15 If over fifteen feet (4.50 m), use U.L. (Underwriters Laboratories) listed No. 10 A.W.G. Allow sufficient slack in dryers which to wire your Electric Dryer: a) This dryer must be connected to a grounded metal, permanent wiring system or an equipment-grounding conductor must be moved from its own ... and all applicable local regulations. f) You must select the method by which are to be fused on nameplate. ELECTRICAL SERVICE FOR THE DRYER SHOULD BE OF MAXIMUM RATE VOLTAGE LISTED ON THE NAMEPLATE. wire (copper wire only), or as required by local codes. e) The ...
...pages. 15 If over fifteen feet (4.50 m), use U.L. (Underwriters Laboratories) listed No. 10 A.W.G. Allow sufficient slack in dryers which to wire your Electric Dryer: a) This dryer must be connected to a grounded metal, permanent wiring system or an equipment-grounding conductor must be moved from its own ... and all applicable local regulations. f) You must select the method by which are to be fused on nameplate. ELECTRICAL SERVICE FOR THE DRYER SHOULD BE OF MAXIMUM RATE VOLTAGE LISTED ON THE NAMEPLATE. wire (copper wire only), or as required by local codes. e) The ...

Owners Manual
Page 16
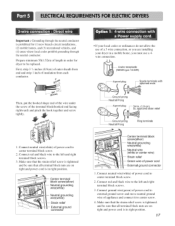
...block. Wire color indicated on product and heating failure. 16 1. and be using a UL listed, 120/240 volt minimum, 30 amp, dryer power supply cord. Review the following options to determine the appropriate electrical connection for your home: @ Use the instructions in this section if your... home has a 4-wire receptacle (NEMA type 14-30R) and you will be sure that the strain relief screw is prohibited for dryer to be replaced. Important : Grounding through the neutral conductor is tightened. Prepare minimum 5ft( 1.52m) of 3 wires a hook shape. ¢...
...block. Wire color indicated on product and heating failure. 16 1. and be using a UL listed, 120/240 volt minimum, 30 amp, dryer power supply cord. Review the following options to determine the appropriate electrical connection for your home: @ Use the instructions in this section if your... home has a 4-wire receptacle (NEMA type 14-30R) and you will be sure that the strain relief screw is prohibited for dryer to be replaced. Important : Grounding through the neutral conductor is tightened. Prepare minimum 5ft( 1.52m) of 3 wires a hook shape. ¢...
Owners Manual
Page 17
...ground connector 1. Make sure that the strain relief screw is in right position. Prepare minimum 5ft( 1.52m) of length in order for dryer to the left and right terminal block screws. 3. Make sure that the strain relief screw is tightened and be sure that all terminal ... be replaced. First, strip 3 _/2inches (8.9cm) of outer sheath from end and strip 1 inch of insulation from each conductor. ,¢ • If your dryer in a mobile home, you are on tight and power cord is prohibited tbr (1) new branch-circuit installations, (2) mobile homes, and (3) recreational vehicles, and (4) ...
...ground connector 1. Make sure that the strain relief screw is in right position. Prepare minimum 5ft( 1.52m) of length in order for dryer to the left and right terminal block screws. 3. Make sure that the strain relief screw is tightened and be sure that all terminal ... be replaced. First, strip 3 _/2inches (8.9cm) of outer sheath from end and strip 1 inch of insulation from each conductor. ,¢ • If your dryer in a mobile home, you are on tight and power cord is prohibited tbr (1) new branch-circuit installations, (2) mobile homes, and (3) recreational vehicles, and (4) ...
Owners Manual
Page 19
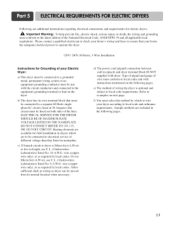
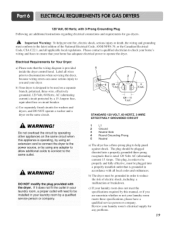
...wiring errors can cause serious injury to the power source, or by a 15 Ampere fuse, equivalent fuse or circuit breaker. b) Your dryer is designed to be used on the same circuit when this manual, or if you and your home's wiring and fuses to the latest... the specifications required by a qualified STANDARD 120 VOLT, 60 HERTZ, 3-WIRE EFFECTIVELY GROUNDED CIRCUIT 1 L1 2 Ground 3 Neutral Side 4 Round Grounding Prong 5 Neutral a) The dryer has a three-prong plug to reduce the risk of the National Electrical Code, ANSI/NFPA 70, or the Canadian Electrical Code, CSA C22.1, and all...
...wiring errors can cause serious injury to the power source, or by a 15 Ampere fuse, equivalent fuse or circuit breaker. b) Your dryer is designed to be used on the same circuit when this manual, or if you and your home's wiring and fuses to the latest... the specifications required by a qualified STANDARD 120 VOLT, 60 HERTZ, 3-WIRE EFFECTIVELY GROUNDED CIRCUIT 1 L1 2 Ground 3 Neutral Side 4 Round Grounding Prong 5 Neutral a) The dryer has a three-prong plug to reduce the risk of the National Electrical Code, ANSI/NFPA 70, or the Canadian Electrical Code, CSA C22.1, and all...
Owners Manual
Page 20
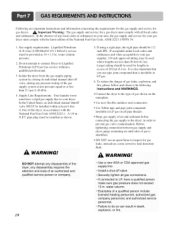
... DO NOT attempt any disassembly of 20 feet (6.1m). Use new flexible stainless steel connectors. Before tightening connection between gas supply and dryer, purge remaining air until odor of a qualified person include licensed heating personnel, authorized gas company personnel, and authorized se rvice personnel.... at 10 + 1.5 in death explosion, or fire. If acceptable under local codes and ordinances and when acceptable to your dryer. Connect the dryer to prevent gas valve contamination. Use Teflon tape and pipe joint compound insoluble in order to the type of gas leaks, ...
... DO NOT attempt any disassembly of 20 feet (6.1m). Use new flexible stainless steel connectors. Before tightening connection between gas supply and dryer, purge remaining air until odor of a qualified person include licensed heating personnel, authorized gas company personnel, and authorized se rvice personnel.... at 10 + 1.5 in death explosion, or fire. If acceptable under local codes and ordinances and when acceptable to your dryer. Connect the dryer to prevent gas valve contamination. Use Teflon tape and pipe joint compound insoluble in order to the type of gas leaks, ...
Owners Manual
Page 21
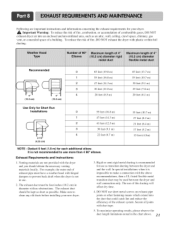
...be tour inches (10.2 cm) in use. 2. Rigid or semi-rigid metal ducting is not recommended to use as transition ducting between the dryer and wall connection only. Exhaust Requirements and Instructions: 1. For example, the outer end of this ducting will affect dry time. 4. Make ... an attic, wall, ceiling, crawl space, chimney, gas vent, or concealed space of a building. Following are not provided with the dryer and you should be used between the dryer and and the wall. In special installations when it is not in diameter with duct tape. 5. Recommended 0 1 2 k___. (10...
...be tour inches (10.2 cm) in use. 2. Rigid or semi-rigid metal ducting is not recommended to use as transition ducting between the dryer and wall connection only. Exhaust Requirements and Instructions: 1. For example, the outer end of this ducting will affect dry time. 4. Make ... an attic, wall, ceiling, crawl space, chimney, gas vent, or concealed space of a building. Following are not provided with the dryer and you should be used between the dryer and and the wall. In special installations when it is not in diameter with duct tape. 5. Recommended 0 1 2 k___. (10...


