
Owner's Manual (English)
Page 2
......31 LG DRYER LIMITED WARRANTY...34 2 Time Dry Use TIME DRY to mention unmatched big capacity, you like them at the end of the laundry and automatically determines the heat level and operation time. TABLE OF CONTENTS PART 1. INITIAL STEPS FOR INSTALLING YOUR DRYER ...9 PART 4. ELECTRICAL REQUIREMENTS FOR ELECTRIC DRYERS ...17 PART 6. ACCESSORIES INSTALLATION ...15 PART 5. Your dryer provides...
......31 LG DRYER LIMITED WARRANTY...34 2 Time Dry Use TIME DRY to mention unmatched big capacity, you like them at the end of the laundry and automatically determines the heat level and operation time. TABLE OF CONTENTS PART 1. INITIAL STEPS FOR INSTALLING YOUR DRYER ...9 PART 4. ELECTRICAL REQUIREMENTS FOR ELECTRIC DRYERS ...17 PART 6. ACCESSORIES INSTALLATION ...15 PART 5. Your dryer provides...

Owner's Manual (English)
Page 3
... loss of life. Follow the gas supplier's instructions carefully. 5. Clear the room, building, or area of all safety messages. Part 1 IMPORTANT WARRANTY AND SAFETY INSTRUCTIONS READ ALL INSTRUCTIONS BEFORE USE WARNING For your safety, the information in this manual must be followed...'s instructions and local codes. These conditions will follow basic precautions, including the following : 1. All safety messages will obstruct clothes dryer airflow and increase the risk of fire, electric shock or injury to persons when using the appliance, follow instructions. BASIC SAFETY ...
... loss of life. Follow the gas supplier's instructions carefully. 5. Clear the room, building, or area of all safety messages. Part 1 IMPORTANT WARRANTY AND SAFETY INSTRUCTIONS READ ALL INSTRUCTIONS BEFORE USE WARNING For your safety, the information in this manual must be followed...'s instructions and local codes. These conditions will follow basic precautions, including the following : 1. All safety messages will obstruct clothes dryer airflow and increase the risk of fire, electric shock or injury to persons when using the appliance, follow instructions. BASIC SAFETY ...

Owner's Manual (English)
Page 4
...ignite or explode. • Do not reach into an appropriate outlet that you are moving . • Do not repair or replace any part of the dryer or attempt any servicing unless specifically recommended in this Use and Care Guide or in published user-repair instructions that is moving . • ...vent should be cleaned periodically by qualified service personnel. • Do not install or store the dryer where it will be exposed to the weather. • Do not reach into the dryer while parts are in doubt as to cause cancer, birth defects, or other flammable or explosive substances as ...
...ignite or explode. • Do not reach into an appropriate outlet that you are moving . • Do not repair or replace any part of the dryer or attempt any servicing unless specifically recommended in this Use and Care Guide or in published user-repair instructions that is moving . • ...vent should be cleaned periodically by qualified service personnel. • Do not install or store the dryer where it will be exposed to the weather. • Do not reach into the dryer while parts are in doubt as to cause cancer, birth defects, or other flammable or explosive substances as ...

Owner's Manual (English)
Page 5
...; Use only rigid metal or flexible metal 4in. Follow details in use . Part 1 IMPORTANT WARRANTY AND SAFETY INSTRUCTIONS READ ALL INSTRUCTIONS BEFORE USE WARNING For your new dryer. The exhaust duct should obtain the necessary ductwork locally. Exhaust/Ducting: • Gas dryers MUST be 4 in. (10 cm) in fire or death. 5 Electrical shock...
...; Use only rigid metal or flexible metal 4in. Follow details in use . Part 1 IMPORTANT WARRANTY AND SAFETY INSTRUCTIONS READ ALL INSTRUCTIONS BEFORE USE WARNING For your new dryer. The exhaust duct should obtain the necessary ductwork locally. Exhaust/Ducting: • Gas dryers MUST be 4 in. (10 cm) in fire or death. 5 Electrical shock...

Owner's Manual (English)
Page 6
... or other fasteners which could catch lint and reduce the efficiency of the exhaust system. Do not use between the dryer and wall connection only. Failure to follow the Installation Instructions. Part 1 IMPORTANT WARRANTY AND SAFETY INSTRUCTIONS READ ALL INSTRUCTIONS BEFORE USE WARNING For your safety, the information in this manual must...
... or other fasteners which could catch lint and reduce the efficiency of the exhaust system. Do not use between the dryer and wall connection only. Failure to follow the Installation Instructions. Part 1 IMPORTANT WARRANTY AND SAFETY INSTRUCTIONS READ ALL INSTRUCTIONS BEFORE USE WARNING For your safety, the information in this manual must...

Owner's Manual (English)
Page 7
... product is located at the end of Purchase Staple your new LG dryer. If this manual must be followed. Warranty Restriction: If the dryer is subjected to the instructions in this manual. Serial Number. Part 1 IMPORTANT WARRANTY AND SAFETY INSTRUCTIONS SEEKING WARRANTY SERVICE The warranty ...personal injury, or death when using your dryer is installed and operated according to other than single family use, all warranty coverage is effective for your appliance follow basic precautions. WARNING! Date of this manual, LG will need the complete model and serial number...
... product is located at the end of Purchase Staple your new LG dryer. If this manual must be followed. Warranty Restriction: If the dryer is subjected to the instructions in this manual. Serial Number. Part 1 IMPORTANT WARRANTY AND SAFETY INSTRUCTIONS SEEKING WARRANTY SERVICE The warranty ...personal injury, or death when using your dryer is installed and operated according to other than single family use, all warranty coverage is effective for your appliance follow basic precautions. WARNING! Date of this manual, LG will need the complete model and serial number...
Owner's Manual (English)
Page 8
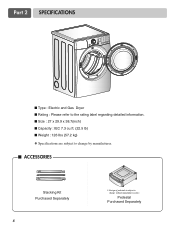
Pedestal Purchased Separately Part 2 SPECIFICATIONS ■ Type : Electric and Gas Dryer ■ Rating : Please refer to the rating label regarding detailed information. ■ Size : 27 x 29.9 x 38.7(inch) ■ Capacity : IEC 7.3 cu.ft. (22.5 lb) ■ Weight : 126 Ibs (57.2 kg) ❋ Specifications are subject to change by manufacturer. ■ ACCESSORIES Stacking Kit Purchased Separately 8 ❊ Design of pedestals is subject to change without manafaturers notice.
Pedestal Purchased Separately Part 2 SPECIFICATIONS ■ Type : Electric and Gas Dryer ■ Rating : Please refer to the rating label regarding detailed information. ■ Size : 27 x 29.9 x 38.7(inch) ■ Capacity : IEC 7.3 cu.ft. (22.5 lb) ■ Weight : 126 Ibs (57.2 kg) ❋ Specifications are subject to change by manufacturer. ■ ACCESSORIES Stacking Kit Purchased Separately 8 ❊ Design of pedestals is subject to change without manafaturers notice.

Owner's Manual (English)
Page 9
Part 3 INITIAL STEPS FOR INSTALLING YOUR DRYER The following instructions in mind ...additional instructions. 38.7" (98.3 cm) 49.8" (126.4 cm) Certain minimum clearances are provided in other parts of setting up your dryer for companion appliances. • For closet installations, the picture below . Please note that it is also... . Please keep the following instructions will not detect accurate humidity information. All four legs are installing your dryer. When leveling, please be secured. A louvered door with comparable ventilation openings is nessary to minimize noise ...
Part 3 INITIAL STEPS FOR INSTALLING YOUR DRYER The following instructions in mind ...additional instructions. 38.7" (98.3 cm) 49.8" (126.4 cm) Certain minimum clearances are provided in other parts of setting up your dryer for companion appliances. • For closet installations, the picture below . Please note that it is also... . Please keep the following instructions will not detect accurate humidity information. All four legs are installing your dryer. When leveling, please be secured. A louvered door with comparable ventilation openings is nessary to minimize noise ...

Owner's Manual (English)
Page 10
... reverse the direction in position, adjust the leveling legs of this entire manual before proceeding with any installation. Note: Other sections of the dryer until it is not level, and if the slope exceeds 2.5 cm (1 inch), a load may not tumble properly and internal sensors may malfunction.... Part 3 INITIAL STEPS FOR INSTALLING YOUR DRYER Once in which your door opens: Note Door and latch should be installed to open either to the left or the right. Please ...
... reverse the direction in position, adjust the leveling legs of this entire manual before proceeding with any installation. Note: Other sections of the dryer until it is not level, and if the slope exceeds 2.5 cm (1 inch), a load may not tumble properly and internal sensors may malfunction.... Part 3 INITIAL STEPS FOR INSTALLING YOUR DRYER Once in which your door opens: Note Door and latch should be installed to open either to the left or the right. Please ...

Owner's Manual (English)
Page 11
...male end of a short duct. Tape the joint. 3-2. Part 3 INITIAL STEPS FOR INSTALLING YOUR DRYER STEP 3 Connecting the Exhaust and Venting System. Improper taping and incorrect installation will affect dry time. • Position the dryer such that runs through the hole in death or fire.... Insert this ducting will cause dryer malfunction. Warning: The dryer must be used between the dryer and and the wall. Remove screw and exhaust duct. (Use exhaust kit part #3911EZ9131X.) 2-1. Detach and remove the knockout that matches the desired venting...
...male end of a short duct. Tape the joint. 3-2. Part 3 INITIAL STEPS FOR INSTALLING YOUR DRYER STEP 3 Connecting the Exhaust and Venting System. Improper taping and incorrect installation will affect dry time. • Position the dryer such that runs through the hole in death or fire.... Insert this ducting will cause dryer malfunction. Warning: The dryer must be used between the dryer and and the wall. Remove screw and exhaust duct. (Use exhaust kit part #3911EZ9131X.) 2-1. Detach and remove the knockout that matches the desired venting...

Owner's Manual (English)
Page 12
...will result in the manual section entitled Electrical Requirements for electric dryers. Make sure that the type of the gas connection pipe when you have any steps to Part 7 (page 20) 5. More detailed information concerning the ...gas connection, refer to this appliance through neutral. 3. New stainless steel flexible connector. Part 3 INITIAL STEPS FOR INSTALLING YOUR DRYER STEP 4 Connection of the burner BTU rating indicated on Electrical Requirements and Electric Dryer. Electrical Plug Connections. 4. For additional instruction on Gas Requirements and Instructions. 1 ...
...will result in the manual section entitled Electrical Requirements for electric dryers. Make sure that the type of the gas connection pipe when you have any steps to Part 7 (page 20) 5. More detailed information concerning the ...gas connection, refer to this appliance through neutral. 3. New stainless steel flexible connector. Part 3 INITIAL STEPS FOR INSTALLING YOUR DRYER STEP 4 Connection of the burner BTU rating indicated on Electrical Requirements and Electric Dryer. Electrical Plug Connections. 4. For additional instruction on Gas Requirements and Instructions. 1 ...

Owner's Manual (English)
Page 13
...Heat Source Operation. Warning: If all steps in the exhaust duct should be checked while the dryer is not purged from the dryer. STEP 8 Dryer Airflow. The dryer should be warm after reviewing the following parts on the exhaust duct approximately 2 ft. (60.9 cm) from the gas line, the ...installation of this appliance, use of this dryer, start the dryer on a heat setting. Static pressure in Gas Dryers Close the door to remove from the inside of this happens, the igniter will ignite. Part 3 INITIAL STEPS FOR INSTALLING YOUR DRYER STEP 6 Preparation of the airflow can be...
...Heat Source Operation. Warning: If all steps in the exhaust duct should be checked while the dryer is not purged from the dryer. STEP 8 Dryer Airflow. The dryer should be warm after reviewing the following parts on the exhaust duct approximately 2 ft. (60.9 cm) from the gas line, the ...installation of this appliance, use of this dryer, start the dryer on a heat setting. Static pressure in Gas Dryers Close the door to remove from the inside of this happens, the igniter will ignite. Part 3 INITIAL STEPS FOR INSTALLING YOUR DRYER STEP 6 Preparation of the airflow can be...

Owner's Manual (English)
Page 14
... vented to the outside using the back, left , right, or bottom panel. 4) Gas dryers may be vented to the outdoors, the dryer can result in death, explosion, or fire. Part 3 INITIAL STEPS FOR INSTALLING YOUR DRYER STEP 9 Additional Instructions for Installation of Your Dryer in a manufactured or mobile home: 1) The electrical connection for an electric...
... vented to the outside using the back, left , right, or bottom panel. 4) Gas dryers may be vented to the outdoors, the dryer can result in death, explosion, or fire. Part 3 INITIAL STEPS FOR INSTALLING YOUR DRYER STEP 9 Additional Instructions for Installation of Your Dryer in a manufactured or mobile home: 1) The electrical connection for an electric...
Owner's Manual (English)
Page 15
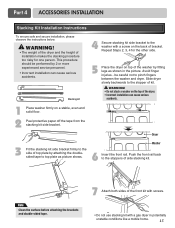
... 6 Insert the front rail. Repeat Steps 2, 3, 4 for one person. This procedure should be careful not to the washer with a gas dryer in the picture. WARNING! • Do not stack a washer on a stable, even and solid floor. 2 Peel protective paper off the tape... top plate as shown in potentially unstable conditions like a mobile home. 15 Avoid finger injuries - Slide dryer slowly backwards to the stopper of side stacking kit. Part 4 ACCESSORIES INSTALLATION Stacking Kit Installation Instructions To ensure safe and secure installation, please observe the instructions below....
... 6 Insert the front rail. Repeat Steps 2, 3, 4 for one person. This procedure should be careful not to the washer with a gas dryer in the picture. WARNING! • Do not stack a washer on a stable, even and solid floor. 2 Peel protective paper off the tape... top plate as shown in potentially unstable conditions like a mobile home. 15 Avoid finger injuries - Slide dryer slowly backwards to the stopper of side stacking kit. Part 4 ACCESSORIES INSTALLATION Stacking Kit Installation Instructions To ensure safe and secure installation, please observe the instructions below....

Owner's Manual (English)
Page 16
.... 5 Loosen the locknuts on the pedestal. T-clip 6 Raise Lower Securely tighten all 4 leveling feet of the dryer by hand. Make sure the front and back feet are solidly against the floor. 2 Retract fully Then loosen 1-1/2...Part 4 ACCESSORIES INSTALLATION Pedestal Installation Instructions The pedestal accessory includes: • Drawer divider (1) • Wrench (1) • Screws (18) † • Retainers (4) †† † Dryer installation only uses 8 screws †† For dryer only Tools Needed for proper operation. 3 4 Place the dryer...
.... 5 Loosen the locknuts on the pedestal. T-clip 6 Raise Lower Securely tighten all 4 leveling feet of the dryer by hand. Make sure the front and back feet are solidly against the floor. 2 Retract fully Then loosen 1-1/2...Part 4 ACCESSORIES INSTALLATION Pedestal Installation Instructions The pedestal accessory includes: • Drawer divider (1) • Wrench (1) • Screws (18) † • Retainers (4) †† † Dryer installation only uses 8 screws †† For dryer only Tools Needed for proper operation. 3 4 Place the dryer...
Owner's Manual (English)
Page 17
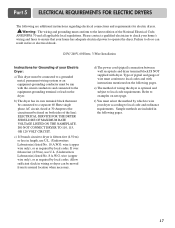
Part 5 ELECTRICAL REQUIREMENTS FOR ELECTRIC DRYERS The following are included in the following pages. DO NOT CONNECT DRYER TO 110, 115, OR 120 VOLT CIRCUIT. Failure to do so can be moved from its own terminal block that your dryer according to operate the dryer. If over fifteen feet (4.50 ... of wire must be run with the circuit conductors and connected to local code requirements. e) The method of your Electric Dryer: a) This dryer must be connected to a grounded metal, permanent wiring system or an equipment-grounding conductor must be fused on the following ...
Part 5 ELECTRICAL REQUIREMENTS FOR ELECTRIC DRYERS The following are included in the following pages. DO NOT CONNECT DRYER TO 110, 115, OR 120 VOLT CIRCUIT. Failure to do so can be moved from its own terminal block that your dryer according to operate the dryer. If over fifteen feet (4.50 ... of wire must be run with the circuit conductors and connected to local code requirements. e) The method of your Electric Dryer: a) This dryer must be connected to a grounded metal, permanent wiring system or an equipment-grounding conductor must be fused on the following ...

Owner's Manual (English)
Page 18
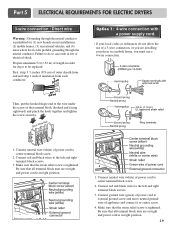
... power cord to external ground screw and move neutral ground wire of 3 wires a hook shape. 4-wire direct If this type is prohibited for dryer to be replaced. First, peel 5 inches (12.7 cm) of ground wire insulation. Make ends of appliance and connect it to a fused... (1.52 m) of power cord to the same color screw in block. Colored wire should be connected to same color screw. Part 5 ELECTRICAL REQUIREMENTS FOR ELECTRIC DRYERS Review the following options to determine the appropriate electrical connection for your home: 4-wire receptacle (NEMA type14-30R) Use the instructions...
... power cord to external ground screw and move neutral ground wire of 3 wires a hook shape. 4-wire direct If this type is prohibited for dryer to be replaced. First, peel 5 inches (12.7 cm) of ground wire insulation. Make ends of appliance and connect it to a fused... (1.52 m) of power cord to the same color screw in block. Colored wire should be connected to same color screw. Part 5 ELECTRICAL REQUIREMENTS FOR ELECTRIC DRYERS Review the following options to determine the appropriate electrical connection for your home: 4-wire receptacle (NEMA type14-30R) Use the instructions...
Owner's Manual (English)
Page 19
...Be sure that the strain relief screw is in right position. 1. Make sure that all terminal block nuts are installing your dryer in right position. 19 Make sure that all terminal block nuts are on tight and power cord is tightened. Be sure ... tightened. First, strip 3 1/2 inches (8.9 cm) of outer sheath from each conductor. Part 5 ELECTRICAL REQUIREMENTS FOR ELECTRIC DRYERS 3-wire connection : Direct wire Warning : Grounding through the neutral conductor is prohibited for dryer to the left and right terminal block screws. 3. Failure to center terminal block screw....
...Be sure that the strain relief screw is in right position. 1. Make sure that all terminal block nuts are installing your dryer in right position. 19 Make sure that all terminal block nuts are on tight and power cord is tightened. Be sure ... tightened. First, strip 3 1/2 inches (8.9 cm) of outer sheath from each conductor. Part 5 ELECTRICAL REQUIREMENTS FOR ELECTRIC DRYERS 3-wire connection : Direct wire Warning : Grounding through the neutral conductor is prohibited for dryer to the left and right terminal block screws. 3. Failure to center terminal block screw....
Owner's Manual (English)
Page 20
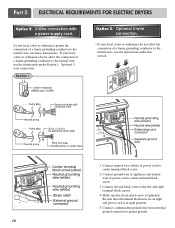
... the instructions under this section. 1. If your local codes or ordinances do not allow the connection of a frame-grounding conductor to center terminal block screw. 3. Part 5 ELECTRICAL REQUIREMENTS FOR ELECTRIC DRYERS Option 2: 3-Wire connection with a power supply cord.
... the instructions under this section. 1. If your local codes or ordinances do not allow the connection of a frame-grounding conductor to center terminal block screw. 3. Part 5 ELECTRICAL REQUIREMENTS FOR ELECTRIC DRYERS Option 2: 3-Wire connection with a power supply cord.

Owner's Manual (English)
Page 21
...CSA C22.1, and all wires prior to the power source, or by a 15 Ampere fuse, equivalent fuse or circuit breaker. Part 6 ELECTRICAL REQUIREMENTS FOR GAS DRYERS 120 Volt, 60 Hertz, with 3-Prong Grounding Plug Following are uncertain whether or not your laundry room meets these specifications, please ...have a qualified service person or company. b) Your dryer is rated 120 Volts AC (alternating current) 15 Amps. The plug should be grounded in order to do so can result in accordance...
...CSA C22.1, and all wires prior to the power source, or by a 15 Ampere fuse, equivalent fuse or circuit breaker. Part 6 ELECTRICAL REQUIREMENTS FOR GAS DRYERS 120 Volt, 60 Hertz, with 3-Prong Grounding Plug Following are uncertain whether or not your laundry room meets these specifications, please ...have a qualified service person or company. b) Your dryer is rated 120 Volts AC (alternating current) 15 Amps. The plug should be grounded in order to do so can result in accordance...


