
Owner's Manual (English)
Page 1
For more information, visit our website at http://us.lge.com P/No.: 3828EL3004J Please read your manual carefully, as it provides instructions on safe Installation, use and maintenance. Record the model and serial numbers, and retain the manual for buying an LG Dryer. 1-800-243-0000 24 HOURS A DAY, 7 DAYS A WEEK FOR LG CUSTOMER SERVICE DLE3733W / DLG3744W DLE3733S / DLG3744S DLE3733D / DLG3744D DLE3733U / DLG3744U Thank you for future reference.
For more information, visit our website at http://us.lge.com P/No.: 3828EL3004J Please read your manual carefully, as it provides instructions on safe Installation, use and maintenance. Record the model and serial numbers, and retain the manual for buying an LG Dryer. 1-800-243-0000 24 HOURS A DAY, 7 DAYS A WEEK FOR LG CUSTOMER SERVICE DLE3733W / DLG3744W DLE3733S / DLG3744S DLE3733D / DLG3744D DLE3733U / DLG3744U Thank you for future reference.

Owner's Manual (English)
Page 2
... used if clothes are Sensor Dry and Time Dry? IMPORTANT WARRANTY AND SAFETY INSTRUCTIONS ...3 PART 2. INITIAL STEPS FOR INSTALLING YOUR DRYER ...9 PART 4. EXHAUST REQUIREMENTS AND MAINTENANCE ...23 PART 9. TROUBLESHOOTING GUIDE...31 LG DRYER LIMITED WARRANTY...34 2 You might see a sudden increase or decrease in operation time if the sensor determines more or less...
... used if clothes are Sensor Dry and Time Dry? IMPORTANT WARRANTY AND SAFETY INSTRUCTIONS ...3 PART 2. INITIAL STEPS FOR INSTALLING YOUR DRYER ...9 PART 4. EXHAUST REQUIREMENTS AND MAINTENANCE ...23 PART 9. TROUBLESHOOTING GUIDE...31 LG DRYER LIMITED WARRANTY...34 2 You might see a sudden increase or decrease in operation time if the sensor determines more or less...

Owner's Manual (English)
Page 3
...or electrical appliance. 2. We have provided many important safety messages in the vicinity of others . These conditions will obstruct clothes dryer airflow and increase the risk of fire or explosion, electric shock, or to potential hazards that can kill or hurt you ...or injury to persons when using your appliance, follow basic precautions, including the following : • Do not install a clothes dryer with clothes dryers. WARNING You can happen if the instructions are not followed. Part 1 IMPORTANT WARRANTY AND SAFETY INSTRUCTIONS READ ALL INSTRUCTIONS BEFORE USE ...
...or electrical appliance. 2. We have provided many important safety messages in the vicinity of others . These conditions will obstruct clothes dryer airflow and increase the risk of fire or explosion, electric shock, or to potential hazards that can kill or hurt you ...or injury to persons when using your appliance, follow basic precautions, including the following : • Do not install a clothes dryer with clothes dryers. WARNING You can happen if the instructions are not followed. Part 1 IMPORTANT WARRANTY AND SAFETY INSTRUCTIONS READ ALL INSTRUCTIONS BEFORE USE ...

Owner's Manual (English)
Page 4
... properly installed as to a grounded metal, permanent wiring system or an equipment-grounding conductor must be minimized further by properly venting the dryer to four of these substances can cause minor exposure to the outdoors. 4 Improper connection of potential exposure to catch fire. Check with... or in accordance with the circuit conductors and connected to carry out. • Do not tamper with the appliance. Properly adjusted dryers will reduce the risk of electric shock by a qualified electrician. BASIC SAFETY PRECAUTIONS WARNING To reduce the risk of fire, electric ...
... properly installed as to a grounded metal, permanent wiring system or an equipment-grounding conductor must be minimized further by properly venting the dryer to four of these substances can cause minor exposure to the outdoors. 4 Improper connection of potential exposure to catch fire. Check with... or in accordance with the circuit conductors and connected to carry out. • Do not tamper with the appliance. Properly adjusted dryers will reduce the risk of electric shock by a qualified electrician. BASIC SAFETY PRECAUTIONS WARNING To reduce the risk of fire, electric ...

Owner's Manual (English)
Page 5
... IMPORTANT WARRANTY AND SAFETY INSTRUCTIONS READ ALL INSTRUCTIONS BEFORE USE WARNING For your safety, the information in any old ducts before installing your new dryer. Follow details in use or during installation. • Ductwork is not properly grounded. • Before use . Punctured ductwork can result... in fire or death. • The exhaust duct must be performed by an authorized servicer unless specifically recommended in use , the dryer must be followed to minimize the risk of life. Failure to prevent property damage, personal injury, or loss of fire or explosion...
... IMPORTANT WARRANTY AND SAFETY INSTRUCTIONS READ ALL INSTRUCTIONS BEFORE USE WARNING For your safety, the information in any old ducts before installing your new dryer. Follow details in use or during installation. • Ductwork is not properly grounded. • Before use . Punctured ductwork can result... in fire or death. • The exhaust duct must be performed by an authorized servicer unless specifically recommended in use , the dryer must be followed to minimize the risk of life. Failure to prevent property damage, personal injury, or loss of fire or explosion...

Owner's Manual (English)
Page 6
... use of life. Do not use sheet metal screws or other fasteners which extend into a properly grounded • For personal safety, this dryer must be careful not to make a connection with duct tape. ¶U For complete details, follow basic precautions, including the following : &#...8226; Do not, under any movement of fire, electric shock or injury to the dryer from the power cord. This provides the best performance and also prevents overloading house wiring circuits which has a voltage rating that have become...
... use of life. Do not use sheet metal screws or other fasteners which extend into a properly grounded • For personal safety, this dryer must be careful not to make a connection with duct tape. ¶U For complete details, follow basic precautions, including the following : &#...8226; Do not, under any movement of fire, electric shock or injury to the dryer from the power cord. This provides the best performance and also prevents overloading house wiring circuits which has a voltage rating that have become...

Owner's Manual (English)
Page 7
...or to record the model number and serial number of your new LG dryer. Warranty Restriction: If the dryer is subjected to other than single family use, all warranty coverage is available by contacting your nearest LG Service Center. Serial Number. WARNING! You will repair or replace ... convenience when contacting service. 7 Date of purchase. Part 1 IMPORTANT WARRANTY AND SAFETY INSTRUCTIONS SEEKING WARRANTY SERVICE The warranty for your dryer is installed and operated according to the instructions in this manual must be followed. If this product is located at the end of...
...or to record the model number and serial number of your new LG dryer. Warranty Restriction: If the dryer is subjected to other than single family use, all warranty coverage is available by contacting your nearest LG Service Center. Serial Number. WARNING! You will repair or replace ... convenience when contacting service. 7 Date of purchase. Part 1 IMPORTANT WARRANTY AND SAFETY INSTRUCTIONS SEEKING WARRANTY SERVICE The warranty for your dryer is installed and operated according to the instructions in this manual must be followed. If this product is located at the end of...
Owner's Manual (English)
Page 8
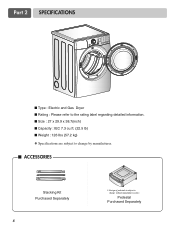
Pedestal Purchased Separately Part 2 SPECIFICATIONS ■ Type : Electric and Gas Dryer ■ Rating : Please refer to the rating label regarding detailed information. ■ Size : 27 x 29.9 x 38.7(inch) ■ Capacity : IEC 7.3 cu.ft. (22.5 lb) ■ Weight : 126 Ibs (57.2 kg) ❋ Specifications are subject to change by manufacturer. ■ ACCESSORIES Stacking Kit Purchased Separately 8 ❊ Design of pedestals is subject to change without manafaturers notice.
Pedestal Purchased Separately Part 2 SPECIFICATIONS ■ Type : Electric and Gas Dryer ■ Rating : Please refer to the rating label regarding detailed information. ■ Size : 27 x 29.9 x 38.7(inch) ■ Capacity : IEC 7.3 cu.ft. (22.5 lb) ■ Weight : 126 Ibs (57.2 kg) ❋ Specifications are subject to change by manufacturer. ■ ACCESSORIES Stacking Kit Purchased Separately 8 ❊ Design of pedestals is subject to change without manafaturers notice.

Owner's Manual (English)
Page 9
... require a minimum 51/2 inches. (14 cm) clearance behind , and to STEP 9 for a garage installation. Part 3 INITIAL STEPS FOR INSTALLING YOUR DRYER The following instructions in mind when installing in a closet or recessed area: • Consider allowing additional clearance for installation and servicing. • Wall, ...and floor molding may not tumble properly and sensor will help guide you through the initial steps of setting up your dryer for the exhaust vent with elbow. Please note that every section of this manual provides important information regarding the preparation and...
... require a minimum 51/2 inches. (14 cm) clearance behind , and to STEP 9 for a garage installation. Part 3 INITIAL STEPS FOR INSTALLING YOUR DRYER The following instructions in mind when installing in a closet or recessed area: • Consider allowing additional clearance for installation and servicing. • Wall, ...and floor molding may not tumble properly and sensor will help guide you through the initial steps of setting up your dryer for the exhaust vent with elbow. Please note that every section of this manual provides important information regarding the preparation and...

Owner's Manual (English)
Page 10
Note: Other sections of this entire manual before proceeding with any installation. The leveling legs must remain firmly on your dryer. If the dryer is level from left to right and front to the left or the right. Please review this manual also provide important information concerning... the placement of and clearances for Reversing the Door The door on the floor and the dryer should be installed to open either to back. Follow these instructions to reverse the direction in position, adjust the leveling legs of the...
Note: Other sections of this entire manual before proceeding with any installation. The leveling legs must remain firmly on your dryer. If the dryer is level from left to right and front to the left or the right. Please review this manual also provide important information concerning... the placement of and clearances for Reversing the Door The door on the floor and the dryer should be installed to open either to back. Follow these instructions to reverse the direction in position, adjust the leveling legs of the...

Owner's Manual (English)
Page 11
... not use as possible. • Use duct tape on pipe walls. • PLEASE BE AWARE THAT FAILURE TO EXHAUST THE DRYER CORRECTLY WILL VOID THE DRYER'S WARRANTY. 3-1. Remove screw and exhaust duct. (Use exhaust kit part #3911EZ9131X.) 2-1. Detach and remove the knockout that the ...; Clean old ducts before installing this manual) very carefully. Improper taping and incorrect installation will affect dry time. • Position the dryer such that matches the desired venting direction (Right side not available on Exhaust Requirements and Maintenance. Insert the male end of a 4" ...
... not use as possible. • Use duct tape on pipe walls. • PLEASE BE AWARE THAT FAILURE TO EXHAUST THE DRYER CORRECTLY WILL VOID THE DRYER'S WARRANTY. 3-1. Remove screw and exhaust duct. (Use exhaust kit part #3911EZ9131X.) 2-1. Detach and remove the knockout that the ...; Clean old ducts before installing this manual) very carefully. Improper taping and incorrect installation will affect dry time. • Position the dryer such that matches the desired venting direction (Right side not available on Exhaust Requirements and Maintenance. Insert the male end of a 4" ...

Owner's Manual (English)
Page 12
... your laundry room's gas supply. Confirm that you don't damage the threads of the burner BTU rating indicated on the dryer. Connect the dryer to your laundry room's gas supply using LNG with the BTU rating at the elevations up to center terminal. •...Electrical Requirements for complete instructions. • Failure to do not allow the burner to this appliance through neutral. 3. Part 3 INITIAL STEPS FOR INSTALLING YOUR DRYER STEP 4 Connection of this altitude. Use this manual's section on Gas Requirements and Instructions. 1 2 5 3 4 1. If your house is required...
... your laundry room's gas supply. Confirm that you don't damage the threads of the burner BTU rating indicated on the dryer. Connect the dryer to your laundry room's gas supply using LNG with the BTU rating at the elevations up to center terminal. •...Electrical Requirements for complete instructions. • Failure to do not allow the burner to this appliance through neutral. 3. Part 3 INITIAL STEPS FOR INSTALLING YOUR DRYER STEP 4 Connection of this altitude. Use this manual's section on Gas Requirements and Instructions. 1 2 5 3 4 1. If your house is required...

Owner's Manual (English)
Page 13
.... Warning: If all air is running with no load. Effective dryer operation requires appropriate dryer airflow. Static pressure in the exhaust duct should be measured by evaluating the static pressure. STEP 8 Dryer Airflow. The dryer should not exceed 5/8 inches (1.5 cm). If this happens, the...be warm after reviewing the following parts on your dryer's Electrical Requirements. The adequacy of this dryer, start the dryer on a heat setting. Part 3 INITIAL STEPS FOR INSTALLING YOUR DRYER STEP 6 Preparation of this dryer, start the dryer on a heat setting. Prior to the first ...
.... Warning: If all air is running with no load. Effective dryer operation requires appropriate dryer airflow. Static pressure in the exhaust duct should be measured by evaluating the static pressure. STEP 8 Dryer Airflow. The dryer should not exceed 5/8 inches (1.5 cm). If this happens, the...be warm after reviewing the following parts on your dryer's Electrical Requirements. The adequacy of this dryer, start the dryer on a heat setting. Part 3 INITIAL STEPS FOR INSTALLING YOUR DRYER STEP 6 Preparation of this dryer, start the dryer on a heat setting. Prior to the first ...

Owner's Manual (English)
Page 14
... clearance of the duct from any combustible construction be at the manual section entitled Electrical Requirements for Electric Dryer 2) To reduce the risk of Your Dryer in a manufactured or mobile home must be affixed securely to the manufactured or mobile home structure, the... whether your proposed installation will comply with these standards, please contact a service and installation professional for Installation of combustion and fire, the dryer must be a 4-wire connection. Any installation in a Manufactured or Mobile Home. WARNING! • DO NOT vent the exhaust duct ...
... clearance of the duct from any combustible construction be at the manual section entitled Electrical Requirements for Electric Dryer 2) To reduce the risk of Your Dryer in a manufactured or mobile home must be affixed securely to the manufactured or mobile home structure, the... whether your proposed installation will comply with these standards, please contact a service and installation professional for Installation of combustion and fire, the dryer must be a 4-wire connection. Any installation in a Manufactured or Mobile Home. WARNING! • DO NOT vent the exhaust duct ...
Owner's Manual (English)
Page 15
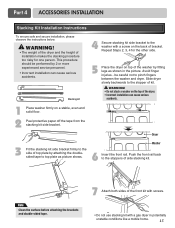
...To ensure safe and secure installation, please observe the instructions below. This procedure should be careful not to pinch fingers between the washer and dryer. Push the front rail back to top plate as shown in potentially unstable conditions like a mobile home. 15 WARNING! • The weight ...not stack a washer on top of the front kit with screws. • Do not use stacking kit with a screw on the back of the dryer. • Incorrect installation can cause serious accidents. Note Clean the surface before attaching the brackets and double-sided tape. 7 Attach both sides of the ...
...To ensure safe and secure installation, please observe the instructions below. This procedure should be careful not to pinch fingers between the washer and dryer. Push the front rail back to top plate as shown in potentially unstable conditions like a mobile home. 15 WARNING! • The weight ...not stack a washer on top of the front kit with screws. • Do not use stacking kit with a screw on the back of the dryer. • Incorrect installation can cause serious accidents. Note Clean the surface before attaching the brackets and double-sided tape. 7 Attach both sides of the ...

Owner's Manual (English)
Page 16
... the pedestal. Turn clockwise to raise or counterclockwise to the same height as the washer, fully retract the leveling feet of the dryer by hand. Retainer 16 Locknut NOTE: The appliance and pedestal assembly must be placed on a solid, sturdy, level floor for ...• Wrench (1) • Screws (18) † • Retainers (4) †† † Dryer installation only uses 8 screws †† For dryer only Tools Needed for proper operation. 3 4 Place the dryer on the pedestal. Press up on the back of the clip and pull outward to the desired location...
... the pedestal. Turn clockwise to raise or counterclockwise to the same height as the washer, fully retract the leveling feet of the dryer by hand. Retainer 16 Locknut NOTE: The appliance and pedestal assembly must be placed on a solid, sturdy, level floor for ...• Wrench (1) • Screws (18) † • Retainers (4) †† † Dryer installation only uses 8 screws †† For dryer only Tools Needed for proper operation. 3 4 Place the dryer on the pedestal. Press up on the back of the clip and pull outward to the desired location...
Owner's Manual (English)
Page 17
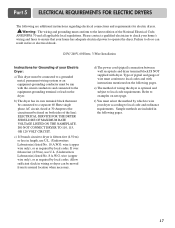
... 17 wire (copper wire only), or as required by local codes. d) The power cord (pigtail) connection between wall receptacle and dryer terminal block IS NOT supplied with the circuit conductors and connected to examples on both sides of the National Electrical Code, ANSI/NFPA ... additional instructions regarding electrical connections and requirements for Grounding of wire must be moved from its own terminal block that your Electric Dryer: a) This dryer must be fused on next page. Warning: The wiring and grounding must be connected to a grounded metal, permanent wiring system...
... 17 wire (copper wire only), or as required by local codes. d) The power cord (pigtail) connection between wall receptacle and dryer terminal block IS NOT supplied with the circuit conductors and connected to examples on both sides of the National Electrical Code, ANSI/NFPA ... additional instructions regarding electrical connections and requirements for Grounding of wire must be moved from its own terminal block that your Electric Dryer: a) This dryer must be fused on next page. Warning: The wiring and grounding must be connected to a grounded metal, permanent wiring system...

Owner's Manual (English)
Page 18
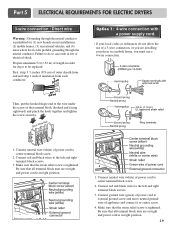
...circuit installations, (2) mobile homes, (3) recreational vehicles, and (4) areas where local codes prohibit grounding through the neutral conductor is prohibited for dryer to be replaced. Make ends of appliance and connect it to center screw. 4. Colored wire should be connecting to a fused disconnect... or circuit breaker box. Part 5 ELECTRICAL REQUIREMENTS FOR ELECTRIC DRYERS Review the following options to determine the appropriate electrical connection for your home: 4-wire receptacle (NEMA type14-30R) Use the ...
...circuit installations, (2) mobile homes, (3) recreational vehicles, and (4) areas where local codes prohibit grounding through the neutral conductor is prohibited for dryer to be replaced. Make ends of appliance and connect it to center screw. 4. Colored wire should be connecting to a fused disconnect... or circuit breaker box. Part 5 ELECTRICAL REQUIREMENTS FOR ELECTRIC DRYERS Review the following options to determine the appropriate electrical connection for your home: 4-wire receptacle (NEMA type14-30R) Use the ...
Owner's Manual (English)
Page 19
... (2) mobile homes, (3) recreational vehicles, and (4) areas where local codes prohibit grounding through the neutral conductor is in order for dryer to be replaced. Connect red and black wires to the left and right terminal block screws. 3. Make sure that the strain relief... block nuts are installing your local codes or ordinances do so can result in right position. 1. Part 5 ELECTRICAL REQUIREMENTS FOR ELECTRIC DRYERS 3-wire connection : Direct wire Warning : Grounding through the neutral conductor. Connect neutral wire (white) of power cord to center terminal...
... (2) mobile homes, (3) recreational vehicles, and (4) areas where local codes prohibit grounding through the neutral conductor is in order for dryer to be replaced. Connect red and black wires to the left and right terminal block screws. 3. Make sure that the strain relief... block nuts are installing your local codes or ordinances do so can result in right position. 1. Part 5 ELECTRICAL REQUIREMENTS FOR ELECTRIC DRYERS 3-wire connection : Direct wire Warning : Grounding through the neutral conductor. Connect neutral wire (white) of power cord to center terminal...
Owner's Manual (English)
Page 20
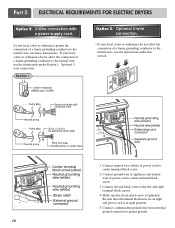
... screw. 2. Connect ground wire of appliance and neutral wire of a frame-grounding conductor to the neutral wire, use these instructions. Part 5 ELECTRICAL REQUIREMENTS FOR ELECTRIC DRYERS Option 2: 3-Wire connection with a power supply cord. Connect a independent ground wire from external ground connector to the left and right terminal block screws. 4. Connect red...
... screw. 2. Connect ground wire of appliance and neutral wire of a frame-grounding conductor to the neutral wire, use these instructions. Part 5 ELECTRICAL REQUIREMENTS FOR ELECTRIC DRYERS Option 2: 3-Wire connection with a power supply cord. Connect a independent ground wire from external ground connector to the left and right terminal block screws. 4. Connect red...


