Service Manual
Page 4
... 27 9-6. CHANGE GAS SETTING (NATURAL GAS, PROPANE GAS 30 11. DRUM & MOTOR ASSEMBLY: ELECTRIC MODEL 41 12-3-2. DISASSEMBLY INSTRUCTIONS 32 12. CONTENTS 1. FEATURES AND BENEFITS ...6 3. INSTALLATION INSTRUCTIONS 6 4. DRYER CYCLE PROCESS ...13 5. COMPONENT TESTING INFORMATION 14 6. MOTOR DIAGRAM AND SCHEMATIC 17 7. TEST 1 120V AC ELECTRICAL SUPPLY 21 9-2. TEST 4 MOISTURE SENSOR 26 9-5. GAS...
... 27 9-6. CHANGE GAS SETTING (NATURAL GAS, PROPANE GAS 30 11. DRUM & MOTOR ASSEMBLY: ELECTRIC MODEL 41 12-3-2. DISASSEMBLY INSTRUCTIONS 32 12. CONTENTS 1. FEATURES AND BENEFITS ...6 3. INSTALLATION INSTRUCTIONS 6 4. DRYER CYCLE PROCESS ...13 5. COMPONENT TESTING INFORMATION 14 6. MOTOR DIAGRAM AND SCHEMATIC 17 7. TEST 1 120V AC ELECTRICAL SUPPLY 21 9-2. TEST 4 MOISTURE SENSOR 26 9-5. GAS...
Service Manual
Page 7
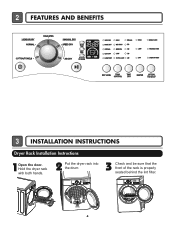
Hold the dryer rack with both hands. 2 Put the dryer rack into the drum 3 Check and be sure that the front of the rack is properly seated behind the lint filter. 6 2 FEATURES AND BENEFITS 3 INSTALLATION INSTRUCTIONS Dryer Rack Installation Instructions 1Open the door.
Hold the dryer rack with both hands. 2 Put the dryer rack into the drum 3 Check and be sure that the front of the rack is properly seated behind the lint filter. 6 2 FEATURES AND BENEFITS 3 INSTALLATION INSTRUCTIONS Dryer Rack Installation Instructions 1Open the door.
Service Manual
Page 8
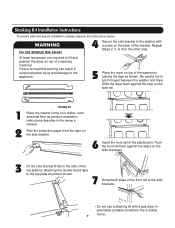
... the stop on the side rail. 1 2 Stacking kit Place the washer firmly on top of the stacking kit. Stacking Kit Installation Instructions To ensure safe and secure installation, please observe the instructions below. At least two people are required to the appliance. 5 Place the dryer on top of the... against the stops on the side brackets. 3 Fit the side bracket firmly to the side of the top plate by placing the legs as product installation instructions describe in the owner's manual. Be careful not to the side brackets. • Do not use a stacking kit with a screw on ...
... the stop on the side rail. 1 2 Stacking kit Place the washer firmly on top of the stacking kit. Stacking Kit Installation Instructions To ensure safe and secure installation, please observe the instructions below. At least two people are required to the appliance. 5 Place the dryer on top of the... against the stops on the side brackets. 3 Fit the side bracket firmly to the side of the top plate by placing the legs as product installation instructions describe in the owner's manual. Be careful not to the side brackets. • Do not use a stacking kit with a screw on ...
Service Manual
Page 9
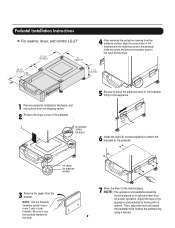
... dryer . Then, adjust the lock unt toward the pedestal while holding the pedestal leg using a wrench. 8 Be sure to the pedestal. Pedestal Installation Instructions For washer, dryer, and combo LG 27" 4 AAtftaecr hretmheovdinogubthle-pfarocteedcttivaepecoovfetrhinegbfroamcktehteto the dardyheersaivsesshuorfwacnes, oaltighne tbhenstcpreawrtshoolfetshien bthreackets ablriagcnkwetisthwtihthetheedgmeaatcnhdincgahnoblees aintttahcehpeeddteostahle pbeadseesatnadl wpritehssscarnedwpsr.ess the brackets against NthOe bTaEse:aAntdtatchhe tdhreyelro.wer...
... dryer . Then, adjust the lock unt toward the pedestal while holding the pedestal leg using a wrench. 8 Be sure to the pedestal. Pedestal Installation Instructions For washer, dryer, and combo LG 27" 4 AAtftaecr hretmheovdinogubthle-pfarocteedcttivaepecoovfetrhinegbfroamcktehteto the dardyheersaivsesshuorfwacnes, oaltighne tbhenstcpreawrtshoolfetshien bthreackets ablriagcnkwetisthwtihthetheedgmeaatcnhdincgahnoblees aintttahcehpeeddteostahle pbeadseesatnadl wpritehssscarnedwpsr.ess the brackets against NthOe bTaEse:aAntdtatchhe tdhreyelro.wer...
Service Manual
Page 10
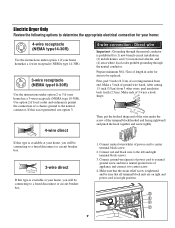
... your home. Connect neutral wire(white) of ground wire bared. you will be sure that the strain relief screw is prohibited for (1) new branch-circuit installations, (2) mobile homes, and (3) recreational vehicles, and (4) areas where local codes prohibit grounding through the neutral conductor. and be connecting box to a fused(21d.5"icsmc)onnect...
... your home. Connect neutral wire(white) of ground wire bared. you will be sure that the strain relief screw is prohibited for (1) new branch-circuit installations, (2) mobile homes, and (3) recreational vehicles, and (4) areas where local codes prohibit grounding through the neutral conductor. and be connecting box to a fused(21d.5"icsmc)onnect...
Service Manual
Page 11
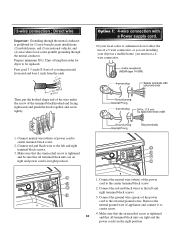
...) and pinch the hook together and screw tightly. Option 1: 4-wire connection with a Power supply cord. • lf your dryer in order for (1) new branch-circuit installations, (2) mobile homes, and (3) recreational vehicles, and (4) areas where local codes prohibit grounding through the neutral conductor. D E F a C b C 1. D 2. ...block screws. 3. Make sure that the strain relief screw is tightened 10 and that all terminal block nuts are installing your local codes or ordinances do not allow the use a 4wire connection. 1. Connect the red and black wires to the...
...) and pinch the hook together and screw tightly. Option 1: 4-wire connection with a Power supply cord. • lf your dryer in order for (1) new branch-circuit installations, (2) mobile homes, and (3) recreational vehicles, and (4) areas where local codes prohibit grounding through the neutral conductor. D E F a C b C 1. D 2. ...block screws. 3. Make sure that the strain relief screw is tightened 10 and that all terminal block nuts are installing your local codes or ordinances do not allow the use a 4wire connection. 1. Connect the red and black wires to the...

Service Manual
Page 13
... a non-corrosive leak detection fluid. 5. Remove the shipping cap from the gas connection at the factory for checking inlet gas pressure) 3 Equipment Shut-Off Valve-Installed within 6' (1.8 m) of the dryer. Connect Gas Supply Pipe (Gas Dryer ONLY) For further assistance, refer to section on gas and check all connections securely. Make...
... a non-corrosive leak detection fluid. 5. Remove the shipping cap from the gas connection at the factory for checking inlet gas pressure) 3 Equipment Shut-Off Valve-Installed within 6' (1.8 m) of the dryer. Connect Gas Supply Pipe (Gas Dryer ONLY) For further assistance, refer to section on gas and check all connections securely. Make...
Service Manual
Page 37
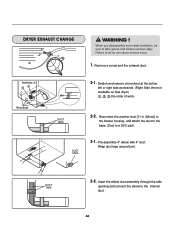
When you disassemble and install ventilation, be sure to the internal duct. 36 Insert the elbow duct assembly through the side opening and connect the elbow to take gloves and ...
When you disassemble and install ventilation, be sure to the internal duct. 36 Insert the elbow duct assembly through the side opening and connect the elbow to take gloves and ...


