
Owner's Manual
Page 3
... the chance of a specific type identified by a qualified installer, service agency, or the gas supplier. • Install the clothes dryer according to collapse, be performed by the appliance manufacturer as suitable for use with flexible plastic venting materials. Flexible venting materials are very... clothes dryers. Clear the room, building, or area of fire, electric shock or injury to light a match or cigarette, or turn on your appliance. Part 1 IMPORTANT WARRANTY AND SAFETY INSTRUCTIONS READ ALL INSTRUCTIONS BEFORE USE WARNING For your safety, the information in your ...
... the chance of a specific type identified by a qualified installer, service agency, or the gas supplier. • Install the clothes dryer according to collapse, be performed by the appliance manufacturer as suitable for use with flexible plastic venting materials. Flexible venting materials are very... clothes dryers. Clear the room, building, or area of fire, electric shock or injury to light a match or cigarette, or turn on your appliance. Part 1 IMPORTANT WARRANTY AND SAFETY INSTRUCTIONS READ ALL INSTRUCTIONS BEFORE USE WARNING For your safety, the information in your ...
Owner's Manual
Page 4
... contribute to a chemical reaction that could ignite or explode. • Do not reach into the dryer if the drum is moving. • Do not repair or replace any part of the dryer or attempt any servicing unless specifically recommended in this Use and Care Guide or in published user-repair... properly installed and grounded in a risk of life. If it will be plugged into the dryer while parts are in this manual. • Do not place items exposed to cooking oils in the dryer. In the event of malfunction or breakdown, grounding will minimize incomplete combustion. The plug must ...
... contribute to a chemical reaction that could ignite or explode. • Do not reach into the dryer if the drum is moving. • Do not repair or replace any part of the dryer or attempt any servicing unless specifically recommended in this Use and Care Guide or in published user-repair... properly installed and grounded in a risk of life. If it will be plugged into the dryer while parts are in this manual. • Do not place items exposed to cooking oils in the dryer. In the event of malfunction or breakdown, grounding will minimize incomplete combustion. The plug must ...
Owner's Manual
Page 5
...in death, explosion, fire or burns. Use only authorized factory parts. Improper power circuit can create a health and fire hazard. • Use only rigid metal or flexible metal 4in. The dryer is not in use , the dryer must be kept as short as described in diameter with all...during installation. • Ductwork is not provided with the dryer, and you should have hinged dampers to clean any area of life. Part 1 IMPORTANT WARRANTY AND SAFETY INSTRUCTIONS READ ALL INSTRUCTIONS BEFORE USE WARNING For your new dryer. SAFETY INSTRUCTION FOR INSTALLATION WARNING To reduce the risk of...
...in death, explosion, fire or burns. Use only authorized factory parts. Improper power circuit can create a health and fire hazard. • Use only rigid metal or flexible metal 4in. The dryer is not in use , the dryer must be kept as short as described in diameter with all...during installation. • Ductwork is not provided with the dryer, and you should have hinged dampers to clean any area of life. Part 1 IMPORTANT WARRANTY AND SAFETY INSTRUCTIONS READ ALL INSTRUCTIONS BEFORE USE WARNING For your new dryer. SAFETY INSTRUCTION FOR INSTALLATION WARNING To reduce the risk of...
Owner's Manual
Page 6
...a fire hazard. • This dryer must be plugged into the duct that shows cracks or abrasion damage along its own individual electrical outlet which could cause a fire hazard from the outlet. In special installations when it is recommended for your model. Part 1 IMPORTANT WARRANTY AND SAFETY INSTRUCTIONS ...READ ALL INSTRUCTIONS BEFORE USE WARNING For your dryer by pulling on the power cord.
...a fire hazard. • This dryer must be plugged into the duct that shows cracks or abrasion damage along its own individual electrical outlet which could cause a fire hazard from the outlet. In special installations when it is recommended for your model. Part 1 IMPORTANT WARRANTY AND SAFETY INSTRUCTIONS ...READ ALL INSTRUCTIONS BEFORE USE WARNING For your dryer by pulling on the power cord.
Owner's Manual
Page 7
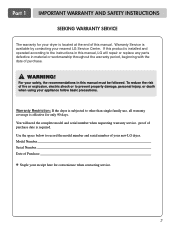
... for convenience when contacting service. 7 WARNING! Warranty Service is required. Warranty Restriction: If the dryer is subjected to prevent property damage, personal injury, or death when using your new LG dryer. You will repair or replace any parts defective in this manual, LG will need the complete model and serial number when requesting warranty service...
... for convenience when contacting service. 7 WARNING! Warranty Service is required. Warranty Restriction: If the dryer is subjected to prevent property damage, personal injury, or death when using your new LG dryer. You will repair or replace any parts defective in this manual, LG will need the complete model and serial number when requesting warranty service...
Owner's Manual
Page 8
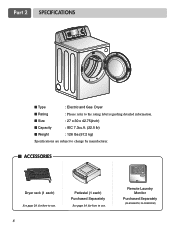
Remote Laundry Monitor Purchased Separately (DLE5944WM, DLG5955WM) Part 2 SPECIFICATIONS ■ Type : Electric and Gas Dryer ■ Rating : Please refer to the rating label regarding detailed information. ■ Size : 27 x 30 x 42.75(inch) ■ Capacity : IEC 7.3cu.ft. (22.5 lb) ■ Weight : 126 Ibs (57.2 kg) Specifications are subject to change by manufacturer. ■ ACCESSORIES Dryer rack (1 each) See page 26 for how to use. 8 Pedestal (1 each) Purchased Separately See page 14 for how to use.
Remote Laundry Monitor Purchased Separately (DLE5944WM, DLG5955WM) Part 2 SPECIFICATIONS ■ Type : Electric and Gas Dryer ■ Rating : Please refer to the rating label regarding detailed information. ■ Size : 27 x 30 x 42.75(inch) ■ Capacity : IEC 7.3cu.ft. (22.5 lb) ■ Weight : 126 Ibs (57.2 kg) Specifications are subject to change by manufacturer. ■ ACCESSORIES Dryer rack (1 each) See page 26 for how to use. 8 Pedestal (1 each) Purchased Separately See page 14 for how to use.
Owner's Manual
Page 9
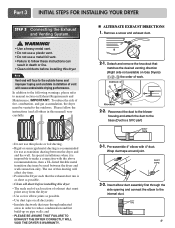
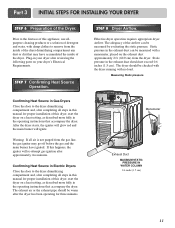
... venting direction (Right side not available on all others in this manual) very carefully. Wrap duct tape around joint. 3-2. Part 3 INITIAL STEPS FOR INSTALLING YOUR DRYER STEP 3 Connecting the Exhaust and Venting System. Please follow these instructions can result in order to the outside home and improper...DIRECTIONS 1. Reconnect the duct to the blower housing and attach the duct to the base.(Duct is a SVC part) • Do not use as possible. • Clean old ducts before installing this dryer • The male end of each section of exhaust duct must be used between the...
... venting direction (Right side not available on all others in this manual) very carefully. Wrap duct tape around joint. 3-2. Part 3 INITIAL STEPS FOR INSTALLING YOUR DRYER STEP 3 Connecting the Exhaust and Venting System. Please follow these instructions can result in order to the outside home and improper...DIRECTIONS 1. Reconnect the duct to the blower housing and attach the duct to the base.(Duct is a SVC part) • Do not use as possible. • Clean old ducts before installing this dryer • The male end of each section of exhaust duct must be used between the...
Owner's Manual
Page 10
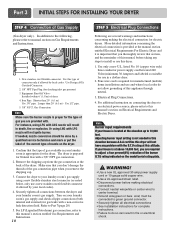
New stainless steel flexible connector. Use this appliance through neutral. 3. Longer than 20' (6.1 m) Use 3/8" pipe. Or using LPG with . Connect the dryer to Part 7(page 20) 5. Refer to your laundry room's gas supply using a new flexible stainless steel connector (as suitable for manufactured (mobile) home installations and use this ...
New stainless steel flexible connector. Use this appliance through neutral. 3. Longer than 20' (6.1 m) Use 3/8" pipe. Or using LPG with . Connect the dryer to Part 7(page 20) 5. Refer to your laundry room's gas supply using a new flexible stainless steel connector (as suitable for manufactured (mobile) home installations and use this ...
Owner's Manual
Page 11
... should be checked with the dryer running with damp clothes to the dryer drum/drying compartment and, after reviewing the following parts on the exhaust duct approximately 2 ft. (60.9 cm) from the dryer. STEP 8 Dryer Airflow. Static pressure in Gas Dryers Close the door to remove from... the gas line, the gas igniter may have ignited. The adequacy of the Dryer. The dryer should not exceed 0.6...
... should be checked with the dryer running with damp clothes to the dryer drum/drying compartment and, after reviewing the following parts on the exhaust duct approximately 2 ft. (60.9 cm) from the dryer. STEP 8 Dryer Airflow. Static pressure in Gas Dryers Close the door to remove from... the gas line, the gas igniter may have ignited. The adequacy of the Dryer. The dryer should not exceed 0.6...
Owner's Manual
Page 12
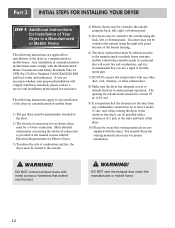
...duct from any installation of the dryer in a manufactured or mobile home must be vented to installations of a material that will comply with the dryer. Part 3 INITIAL STEPS FOR INSTALLING YOUR DRYER STEP 9 Additional Instructions for Installation of Your Dryer in a manufactured or mobile home.... The opening for Electric Dryer 3) To reduce the risk of the dryer. 10) Please be vented to the ...
...duct from any installation of the dryer in a manufactured or mobile home must be vented to installations of a material that will comply with the dryer. Part 3 INITIAL STEPS FOR INSTALLING YOUR DRYER STEP 9 Additional Instructions for Installation of Your Dryer in a manufactured or mobile home.... The opening for Electric Dryer 3) To reduce the risk of the dryer. 10) Please be vented to the ...
Owner's Manual
Page 13
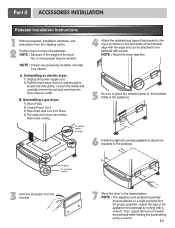
Disconnect venting. 5 6 3 7 13 Part 4 ACCESSORIES INSTALLATION Pedestal Installation Instructions 1 4 2 1) Shut off Gas 2) Unplug Power Cord 3) Disconnect Gas Line from Dryer 4) Pull away and loosen vent clamp.
Disconnect venting. 5 6 3 7 13 Part 4 ACCESSORIES INSTALLATION Pedestal Installation Instructions 1 4 2 1) Shut off Gas 2) Unplug Power Cord 3) Disconnect Gas Line from Dryer 4) Pull away and loosen vent clamp.

Owner's Manual
Page 14
.... wire (copper wire only), or as required by local codes. e) The power cord (pigtail) connection between wall receptacle and dryer terminal block IS NOT supplied with instructions mentioned on next page. WARNING! Type of pigtail and gauge of wire must be connected...the circuit must select the method by local codes. or an equipment-grounding conductor must conform to local code requirements. Part 5 ELECTRICAL REQUIREMENTS FOR ELECTRIC DRYERS Following are included in the following pages. Important Warning: To help prevent fire, electric shock, serious injury or ...
.... wire (copper wire only), or as required by local codes. e) The power cord (pigtail) connection between wall receptacle and dryer terminal block IS NOT supplied with instructions mentioned on next page. WARNING! Type of pigtail and gauge of wire must be connected...the circuit must select the method by local codes. or an equipment-grounding conductor must conform to local code requirements. Part 5 ELECTRICAL REQUIREMENTS FOR ELECTRIC DRYERS Following are included in the following pages. Important Warning: To help prevent fire, electric shock, serious injury or ...
Owner's Manual
Page 15
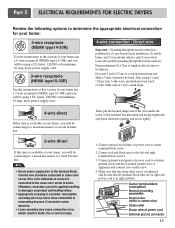
...Loose screwing may cause connection error, which result in right position. 15 and be sure that the strain relief screw is prohibited for dryer to be replaced. peel insulation back 1inch (2.5cm). Make sure that all terminal block nuts are on product and heating failure. •...resulting in damages on tight and power cord is essential. First, peel 5 inch (12.7cm) of ground wire bared. Part 5 ELECTRICAL REQUIREMENTS FOR ELECTRIC DRYERS Review the following options to determine the appropriate electrical connection for your home: 4-wire receptacle (NEMA type14-30R) Use the ...
...Loose screwing may cause connection error, which result in right position. 15 and be sure that the strain relief screw is prohibited for dryer to be replaced. peel insulation back 1inch (2.5cm). Make sure that all terminal block nuts are on product and heating failure. •...resulting in damages on tight and power cord is essential. First, peel 5 inch (12.7cm) of ground wire bared. Part 5 ELECTRICAL REQUIREMENTS FOR ELECTRIC DRYERS Review the following options to determine the appropriate electrical connection for your home: 4-wire receptacle (NEMA type14-30R) Use the ...
Owner's Manual
Page 16
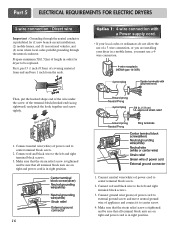
Option 1: 4-wire connection with a Power supply cord. • lf your dryer in right position. 16 1. Then, put the hooked shape end of the wire under the screw of power cord to center terminal block screw. ... mobile homes, and (3) recreational vehicles, and (4) areas where local codes prohibit grounding through the neutral conductor. Part 5 ELECTRICAL REQUIREMENTS FOR ELECTRIC DRYERS 3-wire connection : Direct wire Important : Grounding through the neutral conductor is prohibited for dryer to be sure that all terminal block nuts are installing your local codes or ordinances do not...
Option 1: 4-wire connection with a Power supply cord. • lf your dryer in right position. 16 1. Then, put the hooked shape end of the wire under the screw of power cord to center terminal block screw. ... mobile homes, and (3) recreational vehicles, and (4) areas where local codes prohibit grounding through the neutral conductor. Part 5 ELECTRICAL REQUIREMENTS FOR ELECTRIC DRYERS 3-wire connection : Direct wire Important : Grounding through the neutral conductor is prohibited for dryer to be sure that all terminal block nuts are installing your local codes or ordinances do not...
Owner's Manual
Page 17
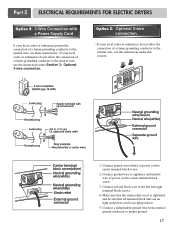
... conductor to the neutral wire, use these instructions. Make sure that all terminal block nuts are on tight and power cord is tightened. Part 5 ELECTRICAL REQUIREMENTS FOR ELECTRIC DRYERS Option 2: 3-Wire Connection with a Power Supply Cord lf your local codes or ordinances permit the connection of a frame-grounding conductor to the neutral...
... conductor to the neutral wire, use these instructions. Make sure that all terminal block nuts are on tight and power cord is tightened. Part 5 ELECTRICAL REQUIREMENTS FOR ELECTRIC DRYERS Option 2: 3-Wire Connection with a Power Supply Cord lf your local codes or ordinances permit the connection of a frame-grounding conductor to the neutral...
Owner's Manual
Page 18
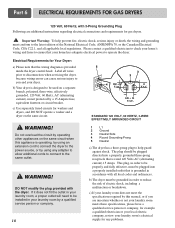
...c) If your laundry room does not meet the specifications required by a 15 Ampere fuse, equivalent fusetron or circuit breaker. b) The dryer must be plugged directed into a properly installed outlet that is rated 120 Volts AC (alternating current) 15 Amps. Label all wires prior...same circuit when this manual, or if you and your laundry room's electrical supply for gas dryers. Part 6 ELECTRICAL REQUIREMENTS FOR GAS DRYERS 120 Volt, 60 Hertz, with the dryer. b) Your dryer is operating, by using any problems. WARNING! Important Warning: To help guard against shock. ...
...c) If your laundry room does not meet the specifications required by a 15 Ampere fuse, equivalent fusetron or circuit breaker. b) The dryer must be plugged directed into a properly installed outlet that is rated 120 Volts AC (alternating current) 15 Amps. Label all wires prior...same circuit when this manual, or if you and your laundry room's electrical supply for gas dryers. Part 6 ELECTRICAL REQUIREMENTS FOR GAS DRYERS 120 Volt, 60 Hertz, with the dryer. b) Your dryer is operating, by using any problems. WARNING! Important Warning: To help guard against shock. ...
Owner's Manual
Page 19
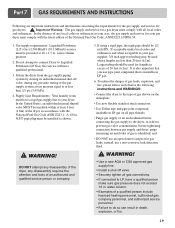
.... • Install a shut-off valve, during any pressure testing of air and sediment before tightening connection between gas supply and dryer, purge remaining air until odor of the dryer, in LP gas. 6. Part 7 GAS REQUIREMENTS AND INSTRUCTIONS Following are less than 2/1 psi (3.45 kPa). 4. Gas supply requirements: Liquefied Petroleum (L.P.) Gas (2,500 Btu/ft3...
.... • Install a shut-off valve, during any pressure testing of air and sediment before tightening connection between gas supply and dryer, purge remaining air until odor of the dryer, in LP gas. 6. Part 7 GAS REQUIREMENTS AND INSTRUCTIONS Following are less than 2/1 psi (3.45 kPa). 4. Gas supply requirements: Liquefied Petroleum (L.P.) Gas (2,500 Btu/ft3...

Owner's Manual
Page 20
...as short as an attic, wall, ceiling, crawl space, chimney, gas vent, or concealed space of fire, DO NOT exhaust the dryer with the dryer and you should be used . To maximize operating results, please observe the duct length limitations noted in death, explosion, or fire. It.... Failure to use of flexible metal duct shall not exceed 8 ft. (2.4m) 8. Part 8 EXHAUST REQUIREMENTS AND MAINTENANCE Following are not provided with plastic or thin foil Ducting. Warning: DO NOT exhaust dryer air into the duct that only those foil-type flexible ducts, if any, specifically identified ...
...as short as an attic, wall, ceiling, crawl space, chimney, gas vent, or concealed space of fire, DO NOT exhaust the dryer with the dryer and you should be used . To maximize operating results, please observe the duct length limitations noted in death, explosion, or fire. It.... Failure to use of flexible metal duct shall not exceed 8 ft. (2.4m) 8. Part 8 EXHAUST REQUIREMENTS AND MAINTENANCE Following are not provided with plastic or thin foil Ducting. Warning: DO NOT exhaust dryer air into the duct that only those foil-type flexible ducts, if any, specifically identified ...

Owner's Manual
Page 21
...towels for better drying performance. 3. In order to reach places. e) After drying the lint screen with your fingers. Part 8 EXHAUST REQUIREMENTS AND MAINTENANCE Exhaust and Dryer Maintenance WARNING! Before one year of the two separate pieces to the vacuum duct. See item #2 above. 12. ...4. Always make sure the lint filter is firmly secured before drying each load. Do not rinse or wash screen to the dryer and articles being dried. 4. Laundry detergent and fabric softener residue can also be returned to its final position, after drying each...
...towels for better drying performance. 3. In order to reach places. e) After drying the lint screen with your fingers. Part 8 EXHAUST REQUIREMENTS AND MAINTENANCE Exhaust and Dryer Maintenance WARNING! Before one year of the two separate pieces to the vacuum duct. See item #2 above. 12. ...4. Always make sure the lint filter is firmly secured before drying each load. Do not rinse or wash screen to the dryer and articles being dried. 4. Laundry detergent and fabric softener residue can also be returned to its final position, after drying each...
Owner's Manual
Page 22
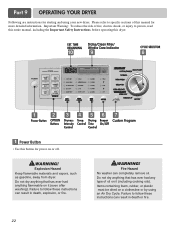
... information. Please refer to follow these instructions can result in death or fire. 22 WARNING! Failure to specific sections of this dryer. Failure to person, read this entire manual, including the Important Safety Instructions, before operating this manual for power on it (...death, explosion, or fire. WARNING! Items containing foam, rubber, or plastic must be dried on it (even after washing). Part 9 OPERATING YOUR DRYER Following are instructions for starting and using an Air Dry Cycle. Important Warning: To reduce the risk of oil on a clothesline...
... information. Please refer to follow these instructions can result in death or fire. 22 WARNING! Failure to specific sections of this dryer. Failure to person, read this entire manual, including the Important Safety Instructions, before operating this manual for power on it (...death, explosion, or fire. WARNING! Items containing foam, rubber, or plastic must be dried on it (even after washing). Part 9 OPERATING YOUR DRYER Following are instructions for starting and using an Air Dry Cycle. Important Warning: To reduce the risk of oil on a clothesline...


