
Owners Manual
Page 5
... Children might use of a specific type identified by qualified service personnel in accordance with local codes. ••Disconnect the power cord, house fuse or circuit breaker before installing or servicing the appliance. ••When moving the appliance, be properly installed as... materials are known to all installation instructions. ••The appliance must be careful not to pinch, crush, or damage the power cord. ••Do not install the appliance in a different location, call qualified service personnel for installation and service. ••...
... Children might use of a specific type identified by qualified service personnel in accordance with local codes. ••Disconnect the power cord, house fuse or circuit breaker before installing or servicing the appliance. ••When moving the appliance, be properly installed as... materials are known to all installation instructions. ••The appliance must be careful not to pinch, crush, or damage the power cord. ••Do not install the appliance in a different location, call qualified service personnel for installation and service. ••...
Owners Manual
Page 6
... touch the appliance controls with wet hands. ••Do not modify or extend the power cord. ••If the product has been submerged, contact an LG Electronics customer information center for use by persons (including children) with duct tape. ••Use only rigid...;Keep area around your new dryer. ••Rigid, semi-rigid or flexible metal ducting is regularly switched on the power cord. Secure all power cords that is recommended for exhausting to a circuit that have been given supervision or instruction concerning the use of experience and knowledge...
... touch the appliance controls with wet hands. ••Do not modify or extend the power cord. ••If the product has been submerged, contact an LG Electronics customer information center for use by persons (including children) with duct tape. ••Use only rigid...;Keep area around your new dryer. ••Rigid, semi-rigid or flexible metal ducting is regularly switched on the power cord. Secure all power cords that is recommended for exhausting to a circuit that have been given supervision or instruction concerning the use of experience and knowledge...
Owners Manual
Page 8
...Manual. Check with a qualified electrician or service personnel if you are in doubt whether the appliance is installed and grounded in accordance with a cord having an equipment-grounding conductor and a grounding plug. In the event of a malfunction or breakdown, grounding will not fit the outlet, have...lint filter before cleaning to follow these instructions may result if the dryer is properly grounded. The appliance is removed from the power supply. ••Remove the door before the appliance is equipped with all clothes dryers in this appliance from service or ...
...Manual. Check with a qualified electrician or service personnel if you are in doubt whether the appliance is installed and grounded in accordance with a cord having an equipment-grounding conductor and a grounding plug. In the event of a malfunction or breakdown, grounding will not fit the outlet, have...lint filter before cleaning to follow these instructions may result if the dryer is properly grounded. The appliance is removed from the power supply. ••Remove the door before the appliance is equipped with all clothes dryers in this appliance from service or ...
Owners Manual
Page 9
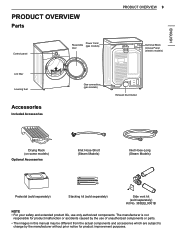
ENGLISH PRODUCT OVERVIEW Parts Control panel Power Cord Reversible (gas models) door PRODUCT OVERVIEW 9 Terminal Block Access Panel (electric models) Lint filter Leveling feet Accessories Included Accessories Gas connection (gas models) Exhaust Duct ...
ENGLISH PRODUCT OVERVIEW Parts Control panel Power Cord Reversible (gas models) door PRODUCT OVERVIEW 9 Terminal Block Access Panel (electric models) Lint filter Leveling feet Accessories Included Accessories Gas connection (gas models) Exhaust Duct ...
Owners Manual
Page 10
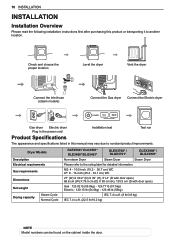
... dryer Vent the dryer Connect the inlet hose (steam models) Connect the Gas dryer Connect the Electric dryer Gas dryer Electric dryer Plug in the power cord Installation test Test run Product Specifications The appearance and specifications listed in this product or transporting it to constant product improvements. Dryer Models Description Electrical...
... dryer Vent the dryer Connect the inlet hose (steam models) Connect the Gas dryer Connect the Electric dryer Gas dryer Electric dryer Plug in the power cord Installation test Test run Product Specifications The appearance and specifications listed in this product or transporting it to constant product improvements. Dryer Models Description Electrical...
Owners Manual
Page 21
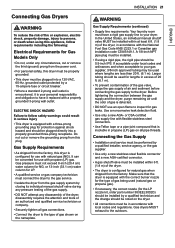
... manual shutoff valve during any pressure testing of the gas supply. • DO NOT attempt any circumstances, cut or remove the grounding prong from the power cord. • For personal safety, this plug. or CSA-certified gas supply line with propane (LP) gas. ELECTRIC SHOCK HAZARD Failure to the outdoors. ENGLISH...
... manual shutoff valve during any pressure testing of the gas supply. • DO NOT attempt any circumstances, cut or remove the grounding prong from the power cord. • For personal safety, this plug. or CSA-certified gas supply line with propane (LP) gas. ELECTRIC SHOCK HAZARD Failure to the outdoors. ENGLISH...
Owners Manual
Page 23
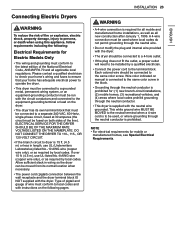
... terminal or lead on the dryer. • The dryer has its normal location when necessary. • The power cord (pigtail) connection between the wall receptacle and the dryer terminal block IS NOT supplied with instructions on both sides ...or less in wiring so the dryer can be moved from its own terminal block that your home has adequate electrical power to operate the dryer. • This dryer must be connected to a grounded metal, permanent wiring system, or..., a proper outlet will need to be installed by a qualified electrician. • Connect the power cord to the terminal block.
... terminal or lead on the dryer. • The dryer has its normal location when necessary. • The power cord (pigtail) connection between the wall receptacle and the dryer terminal block IS NOT supplied with instructions on both sides ...or less in wiring so the dryer can be moved from its own terminal block that your home has adequate electrical power to operate the dryer. • This dryer must be connected to a grounded metal, permanent wiring system, or..., a proper outlet will need to be installed by a qualified electrician. • Connect the power cord to the terminal block.

Owners Manual
Page 24
...) White Wire moved from behind the green ground screw to the center screw of the terminal block. 5 Attach the two hot leads of the power cord to the outer terminal block screws. 6 Attach the white neutral wire to the center screw of the dryer. 2 Install a UL-listed strain ...relief into the power cord through-hole. 3 Thread a 30-amp, 240-volt, 4-wire, UL-listed power cord with upturned ends. 8 Tighten all new construction after January 1, 1996. ••A UL-listed strain relief is required...
...) White Wire moved from behind the green ground screw to the center screw of the terminal block. 5 Attach the two hot leads of the power cord to the outer terminal block screws. 6 Attach the white neutral wire to the center screw of the dryer. 2 Install a UL-listed strain ...relief into the power cord through-hole. 3 Thread a 30-amp, 240-volt, 4-wire, UL-listed power cord with upturned ends. 8 Tighten all new construction after January 1, 1996. ••A UL-listed strain relief is required...

Owners Manual
Page 25
...required for removal and reinstallation of insulation from the wire. Remove 5-inch of the dryer. Terminal Block UL-Listed Strain Relief UL-Listed 4-Wire Power Cord 5 Transfer the dryer's ground wire from each wire. Cut off approximately 1.5-inch (3.8 cm) from the other three wires and strip 1 inch ..., as well as all screws securely. 1 Remove 5-inch (12.7 cm) of the three shorter wires into the power cord through-hole. 4 Thread the 4-wire #10 AWG-minimum copper power cable prepared in step 1 through the strain relief. Hot (Black) Neutral (White) Ground Screw Hot (Red) White...
...required for removal and reinstallation of insulation from the wire. Remove 5-inch of the dryer. Terminal Block UL-Listed Strain Relief UL-Listed 4-Wire Power Cord 5 Transfer the dryer's ground wire from each wire. Cut off approximately 1.5-inch (3.8 cm) from the other three wires and strip 1 inch ..., as well as all screws securely. 1 Remove 5-inch (12.7 cm) of the three shorter wires into the power cord through-hole. 4 Thread the 4-wire #10 AWG-minimum copper power cable prepared in step 1 through the strain relief. Hot (Black) Neutral (White) Ground Screw Hot (Red) White...

Owners Manual
Page 26
... after January 1, 1996. ••A UL-listed strain relief is required. ••Use a 30-amp, 240-volt, 3-wire, UL-listed power cord with #10 AWGminimum copper conductor and closed loop or forked terminals with #10 AWG-minimum copper conductor through -hole. 3 Thread a 30-amp, 240...-volt, 3-wire, UL-listed power cord with upturned ends. 8 Reinstall the terminal block access cover. Terminal Block UL-Listed Strain Relief UL-Listed 3-Wire Power Cord 4 Attach the two hot leads (black and red) of the dryer. 2 Install a UL...
... after January 1, 1996. ••A UL-listed strain relief is required. ••Use a 30-amp, 240-volt, 3-wire, UL-listed power cord with #10 AWGminimum copper conductor and closed loop or forked terminals with #10 AWG-minimum copper conductor through -hole. 3 Thread a 30-amp, 240...-volt, 3-wire, UL-listed power cord with upturned ends. 8 Reinstall the terminal block access cover. Terminal Block UL-Listed Strain Relief UL-Listed 3-Wire Power Cord 4 Attach the two hot leads (black and red) of the dryer. 2 Install a UL...

Owners Manual
Page 27
...) to the green ground screw. 8 Tighten all screws securely. 9 Reinstall the terminal block access cover. Terminal Block UL-Listed Strain Relief UL-Listed 3-Wire Power Cord 5 Attach the two hot leads (black and red) of the dryer. 3 Install a UL-listed strain relief into a hook shape. 1" (2.5 cm) ... cover on new construction after January 1, 1996. ••A UL-listed strain relief is NOT permitted on the upper back of the power cord to the outer terminal block screws. minimum copper conductor cable. ENGLISH Three-Wire Direct Wire ••A 3-wire connection is required. &#...
...) to the green ground screw. 8 Tighten all screws securely. 9 Reinstall the terminal block access cover. Terminal Block UL-Listed Strain Relief UL-Listed 3-Wire Power Cord 5 Attach the two hot leads (black and red) of the dryer. 3 Install a UL-listed strain relief into a hook shape. 1" (2.5 cm) ... cover on new construction after January 1, 1996. ••A UL-listed strain relief is NOT permitted on the upper back of the power cord to the outer terminal block screws. minimum copper conductor cable. ENGLISH Three-Wire Direct Wire ••A 3-wire connection is required. &#...
Owners Manual
Page 30
... • When the dryer is a circuit overload, have it corrected by a qualified electrician. Electric dryer power cord is not connected correctly, or house power supply is blown, circuit breaker has tripped, or power outage has occurred. Check the power supply or the connection of bars displayed during the two tests may still be the same...
... • When the dryer is a circuit overload, have it corrected by a qualified electrician. Electric dryer power cord is not connected correctly, or house power supply is blown, circuit breaker has tripped, or power outage has occurred. Check the power supply or the connection of bars displayed during the two tests may still be the same...
Owners Manual
Page 51
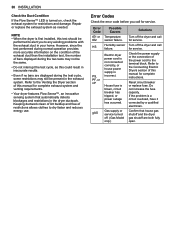
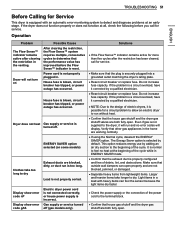
...for service. House fuse is not properly plugged in. Display show error code nP Display show error code gAS Electric dryer power cord is not connected correctly, or house power supply is not properly sorted. Do not increase fuse capacity. Dryer will display. Make sure that outside wall dampers can... fool the sensor because the light items dry faster. ••Check the power supply or the connection of the power cord to the terminal block. ••Confirm that the exhaust duct is properly configured and free of the cycle while in...
...for service. House fuse is not properly plugged in. Display show error code nP Display show error code gAS Electric dryer power cord is not connected correctly, or house power supply is not properly sorted. Do not increase fuse capacity. Dryer will display. Make sure that outside wall dampers can... fool the sensor because the light items dry faster. ••Check the power supply or the connection of the power cord to the terminal block. ••Confirm that the exhaust duct is properly configured and free of the cycle while in...
Owners Manual
Page 56
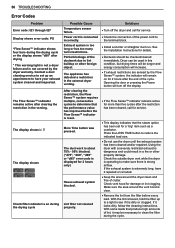
...;Turn off the display. ••If the Flow Sense™ indicator remains active for more than five cycles after the end of the power cord to reduce the indicated load size. ••Do not use the dryer until the exhaust system has been cleaned and/or repaired. Contact ...properly. With the lint removed, hold the filter up an appointment to clean the filter during the cycle. Opening the door or pressing the Power button will remain on during the drying cycle or the display shows "d80" after clearing the restriction in the external dryer venting. Exhaust system...
...;Turn off the display. ••If the Flow Sense™ indicator remains active for more than five cycles after the end of the power cord to reduce the indicated load size. ••Do not use the dryer until the exhaust system has been cleaned and/or repaired. Contact ...properly. With the lint removed, hold the filter up an appointment to clean the filter during the cycle. Opening the door or pressing the Power button will remain on during the drying cycle or the display shows "d80" after clearing the restriction in the external dryer venting. Exhaust system...
Owners Manual
Page 58
...recreational facilities) or contrary to schedule service, contact LG Electronics at http://www.lg.com For assistance using as few elbows and bends as possible. Not heating, long dry time Clean the lint filter. Reconnect power cord, replace house fuse or reset breaker. TO ...OBTAIN WARRANTY SERVICE AND ADDITIONAL INFORMATION For additional product information, visit the LG website at 1-800-243-0000. commercial use (e.g. Not heating, long...
...recreational facilities) or contrary to schedule service, contact LG Electronics at http://www.lg.com For assistance using as few elbows and bends as possible. Not heating, long dry time Clean the lint filter. Reconnect power cord, replace house fuse or reset breaker. TO ...OBTAIN WARRANTY SERVICE AND ADDITIONAL INFORMATION For additional product information, visit the LG website at 1-800-243-0000. commercial use (e.g. Not heating, long...
Specification
Page 2
... and measurements are trademarks or registered trademarks of each additional elbow. Content and services may require Internet access. IMPORTANT HOME APPLIANCES LG COOKING DLEX3700_/DLGX3701_ 7.4 cu. Some features may vary by the dryer warranty. • Ductwork is not provided with the ...after January 1, 1996. • A 3-wire connection is required. • Use a 30-amp, 240-volt, 4-wire, UL-listed power cord with #10 AWG-minimum copper conductor and closed loop or forked terminals with local codes and regulations. All other product and brand names are approximate...
... and measurements are trademarks or registered trademarks of each additional elbow. Content and services may require Internet access. IMPORTANT HOME APPLIANCES LG COOKING DLEX3700_/DLGX3701_ 7.4 cu. Some features may vary by the dryer warranty. • Ductwork is not provided with the ...after January 1, 1996. • A 3-wire connection is required. • Use a 30-amp, 240-volt, 4-wire, UL-listed power cord with #10 AWG-minimum copper conductor and closed loop or forked terminals with local codes and regulations. All other product and brand names are approximate...


