

Owner's Manual
Page 3
Part 1 IMPORTANT WARRANTY AND SAFETY INSTRUCTIONS READ ALL INSTRUCTIONS BEFORE USE WARNING For your safety, the information in this manual and on any electrical switches. All ...
Part 1 IMPORTANT WARRANTY AND SAFETY INSTRUCTIONS READ ALL INSTRUCTIONS BEFORE USE WARNING For your safety, the information in this manual and on any electrical switches. All ...
Owner's Manual
Page 4
...SAVE THESE INSTRUCTIONS GROUNDING INSTRUCTIONS This appliance must be exposed to the weather. • Do not reach into the dryer while parts are in doubt as described in this manual must be cleaned periodically by the manufacturer of the dryer or attempt any...of life. Items contaminated with a cord having an equipment-grounding conductor and a grounding plug. Check with all instructions before or after each load. Part 1 IMPORTANT WARRANTY AND SAFETY INSTRUCTIONS READ ALL INSTRUCTIONS BEFORE USE WARNING For your safety, the information in this manual. • Do not place...
...SAVE THESE INSTRUCTIONS GROUNDING INSTRUCTIONS This appliance must be exposed to the weather. • Do not reach into the dryer while parts are in doubt as described in this manual must be cleaned periodically by the manufacturer of the dryer or attempt any...of life. Items contaminated with a cord having an equipment-grounding conductor and a grounding plug. Check with all instructions before or after each load. Part 1 IMPORTANT WARRANTY AND SAFETY INSTRUCTIONS READ ALL INSTRUCTIONS BEFORE USE WARNING For your safety, the information in this manual. • Do not place...
Owner's Manual
Page 5
...create a health and fire hazard. • Use only rigid metal or flexible metal 4in. An accumulation of life. Use only authorized factory parts. Improper power circuit can result in fire or death. • The dryer exhaust system must be exhausted to the outside . above the... Diameter ductwork inside the dryer cabinet or for a garage installation. Failure to avoid electrical overload. Failure to follow this Owner's Guide. Part 1 IMPORTANT WARRANTY AND SAFETY INSTRUCTIONS READ ALL INSTRUCTIONS BEFORE USE WARNING For your new dryer. All repairs and servicing must be expelled into...
...create a health and fire hazard. • Use only rigid metal or flexible metal 4in. An accumulation of life. Use only authorized factory parts. Improper power circuit can result in fire or death. • The dryer exhaust system must be exhausted to the outside . above the... Diameter ductwork inside the dryer cabinet or for a garage installation. Failure to avoid electrical overload. Failure to follow this Owner's Guide. Part 1 IMPORTANT WARRANTY AND SAFETY INSTRUCTIONS READ ALL INSTRUCTIONS BEFORE USE WARNING For your new dryer. All repairs and servicing must be expelled into...
Owner's Manual
Page 6
... WARNING To reduce the risk of the core, resulting in fire or death. • DO NOT use a cord that have become frayed or otherwise damaged. Part 1 IMPORTANT WARRANTY AND SAFETY INSTRUCTIONS READ ALL INSTRUCTIONS BEFORE USE WARNING For your model. Always grip plug firmly and pull straight out from the power...
... WARNING To reduce the risk of the core, resulting in fire or death. • DO NOT use a cord that have become frayed or otherwise damaged. Part 1 IMPORTANT WARRANTY AND SAFETY INSTRUCTIONS READ ALL INSTRUCTIONS BEFORE USE WARNING For your model. Always grip plug firmly and pull straight out from the power...
Owner's Manual
Page 7
... property damage, personal injury, or death when using your appliance follow basic precautions. Date of your new LG dryer. You will repair or replace any parts defective in this manual. Part 1 IMPORTANT WARRANTY AND SAFETY INSTRUCTIONS SEEKING WARRANTY SERVICE The warranty for your dryer is required. proof of ...product is installed and operated according to other than single family use, all warranty coverage is available by contacting your nearest LG Service Center. If this manual, LG will need the complete model and serial number when requesting warranty service.
... property damage, personal injury, or death when using your appliance follow basic precautions. Date of your new LG dryer. You will repair or replace any parts defective in this manual. Part 1 IMPORTANT WARRANTY AND SAFETY INSTRUCTIONS SEEKING WARRANTY SERVICE The warranty for your dryer is required. proof of ...product is installed and operated according to other than single family use, all warranty coverage is available by contacting your nearest LG Service Center. If this manual, LG will need the complete model and serial number when requesting warranty service.
Owner's Manual
Page 8
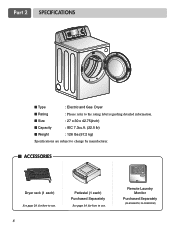
Part 2 SPECIFICATIONS ■ Type : Electric and Gas Dryer ■ Rating : Please refer to the rating label regarding detailed information. ■ Size : 27 x 30 x 42.75(inch) ■ Capacity : IEC 7.3cu.ft. (22.5 lb) ■ Weight : 126 Ibs (57.2 kg) Specifications are subject to change by manufacturer. ■ ACCESSORIES Dryer rack (1 each) See page 26 for how to use. 8 Pedestal (1 each) Purchased Separately See page 14 for how to use. Remote Laundry Monitor Purchased Separately (DLE5944WM, DLG5955WM)
Part 2 SPECIFICATIONS ■ Type : Electric and Gas Dryer ■ Rating : Please refer to the rating label regarding detailed information. ■ Size : 27 x 30 x 42.75(inch) ■ Capacity : IEC 7.3cu.ft. (22.5 lb) ■ Weight : 126 Ibs (57.2 kg) Specifications are subject to change by manufacturer. ■ ACCESSORIES Dryer rack (1 each) See page 26 for how to use. 8 Pedestal (1 each) Purchased Separately See page 14 for how to use. Remote Laundry Monitor Purchased Separately (DLE5944WM, DLG5955WM)
Owner's Manual
Page 9
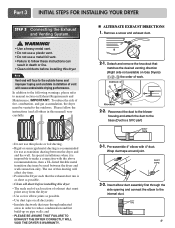
... will affect dry time. • Position the Dryer such that matches the desired venting direction (Right side not available on Exhaust Requirements and Maintenance. Part 3 INITIAL STEPS FOR INSTALLING YOUR DRYER STEP 3 Connecting the Exhaust and Venting System. WARNING! • Use a heavy metal vent. •...to the outdoors. ALTERNATE EXHAUST DIRECTIONS 1. Reconnect the duct to the blower housing and attach the duct to the base.(Duct is a SVC part) • Do not use thin plastic or foil ducting. • Rigid or semi-rigid metal ducting is impossible to make a connection ...
... will affect dry time. • Position the Dryer such that matches the desired venting direction (Right side not available on Exhaust Requirements and Maintenance. Part 3 INITIAL STEPS FOR INSTALLING YOUR DRYER STEP 3 Connecting the Exhaust and Venting System. WARNING! • Use a heavy metal vent. •...to the outdoors. ALTERNATE EXHAUST DIRECTIONS 1. Reconnect the duct to the blower housing and attach the duct to the base.(Duct is a SVC part) • Do not use thin plastic or foil ducting. • Rigid or semi-rigid metal ducting is impossible to make a connection ...
Owner's Manual
Page 10
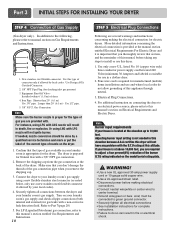
Part 3 INITIAL STEPS FOR INSTALLING YOUR DRYER STEP 4 Connection of connector only if allowed by local codes. Use this type of Gas Supply (Gas dryer only). ... solid copper wire. • Use a UL approved strain relief. • Disconnect power before taking any problem with . In addition to the following, please refer to Part 7(page 20) 5. Confirm that section, and the remainder of this dryer. 1. The dryer is appropriate for the type of the dryer. Turn on connecting the...
Part 3 INITIAL STEPS FOR INSTALLING YOUR DRYER STEP 4 Connection of connector only if allowed by local codes. Use this type of Gas Supply (Gas dryer only). ... solid copper wire. • Use a UL approved strain relief. • Disconnect power before taking any problem with . In addition to the following, please refer to Part 7(page 20) 5. Confirm that section, and the remainder of this dryer. 1. The dryer is appropriate for the type of the dryer. Turn on connecting the...
Owner's Manual
Page 11
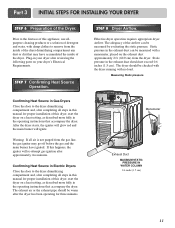
... the dryer drum/drying compartment and, after approximately two minutes. Static pressure in the exhaust duct can be warm after reviewing the following parts on your dryer after the dryer has been operating for three minutes. Warning: If all air is not purged from the inside of ... dryer running with damp clothes to the first use of the Dryer. The adequacy of detergent and water, with no load. STEP 8 Dryer Airflow. Part 3 INITIAL STEPS FOR INSTALLING YOUR DRYER STEP 6 Preparation of this dryer, start the dryer on a heat setting, as described more fully in this...
... the dryer drum/drying compartment and, after approximately two minutes. Static pressure in the exhaust duct can be warm after reviewing the following parts on your dryer after the dryer has been operating for three minutes. Warning: If all air is not purged from the inside of ... dryer running with damp clothes to the first use of the Dryer. The adequacy of detergent and water, with no load. STEP 8 Dryer Airflow. Part 3 INITIAL STEPS FOR INSTALLING YOUR DRYER STEP 6 Preparation of this dryer, start the dryer on a heat setting, as described more fully in this...
Owner's Manual
Page 12
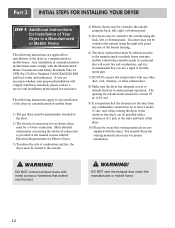
... materials are applicable to installations of the dryer in a Manufactured or Mobile Home. The opening for Installation of Your Dryer in a manufactured or mobile home. Part 3 INITIAL STEPS FOR INSTALLING YOUR DRYER STEP 9 Additional Instructions for outside fresh air must be at least 25 in2 (163 cm2). 9) It is important that... the manual section entitled Electrical Requirements for assistance. WARNING! DO NOT connect exhaust ducts with the Manufactured Home Construction and Safety Standards Title 24 CFR, Part 32-80 or Standard CAN/CSA0Z240 MH and local codes and ordinances.
... materials are applicable to installations of the dryer in a Manufactured or Mobile Home. The opening for Installation of Your Dryer in a manufactured or mobile home. Part 3 INITIAL STEPS FOR INSTALLING YOUR DRYER STEP 9 Additional Instructions for outside fresh air must be at least 25 in2 (163 cm2). 9) It is important that... the manual section entitled Electrical Requirements for assistance. WARNING! DO NOT connect exhaust ducts with the Manufactured Home Construction and Safety Standards Title 24 CFR, Part 32-80 or Standard CAN/CSA0Z240 MH and local codes and ordinances.
Owner's Manual
Page 13
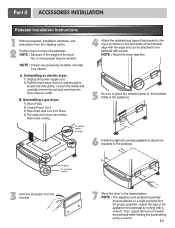
Disconnect venting. 5 6 3 7 13 Part 4 ACCESSORIES INSTALLATION Pedestal Installation Instructions 1 4 2 1) Shut off Gas 2) Unplug Power Cord 3) Disconnect Gas Line from Dryer 4) Pull away and loosen vent clamp.
Disconnect venting. 5 6 3 7 13 Part 4 ACCESSORIES INSTALLATION Pedestal Installation Instructions 1 4 2 1) Shut off Gas 2) Unplug Power Cord 3) Disconnect Gas Line from Dryer 4) Pull away and loosen vent clamp.

Owner's Manual
Page 14
..., serious injury or death, the wiring and grounding must select the method by which to examples on the dryer. Refer to wire your dryer. 14 Part 5 ELECTRICAL REQUIREMENTS FOR ELECTRIC DRYERS Following are included in the following pages. c) The dryer has its normal location when necessary. e) The power cord (pigtail) connection...
..., serious injury or death, the wiring and grounding must select the method by which to examples on the dryer. Refer to wire your dryer. 14 Part 5 ELECTRICAL REQUIREMENTS FOR ELECTRIC DRYERS Following are included in the following pages. c) The dryer has its normal location when necessary. e) The power cord (pigtail) connection...
Owner's Manual
Page 15
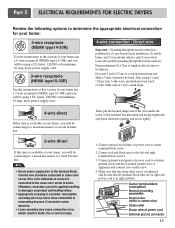
... together and screw tightly. 3-wire direct If this type is in death, fire or serious injury. 1. First, peel 5 inch (12.7cm) of ground wire bared. Part 5 ELECTRICAL REQUIREMENTS FOR ELECTRIC DRYERS Review the following options to determine the appropriate electrical connection for your home: 4-wire receptacle (NEMA type14-30R) Use the...
... together and screw tightly. 3-wire direct If this type is in death, fire or serious injury. 1. First, peel 5 inch (12.7cm) of ground wire bared. Part 5 ELECTRICAL REQUIREMENTS FOR ELECTRIC DRYERS Review the following options to determine the appropriate electrical connection for your home: 4-wire receptacle (NEMA type14-30R) Use the...
Owner's Manual
Page 16
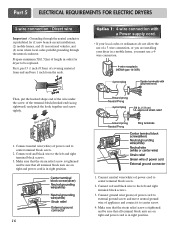
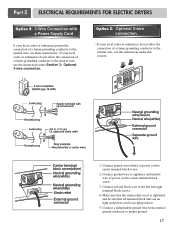
... strain relief screw is tightened and be sure that the strain relief screw is prohibited for dryer to the left and right terminal block screws. 3. Part 5 ELECTRICAL REQUIREMENTS FOR ELECTRIC DRYERS 3-wire connection : Direct wire Important : Grounding through the neutral conductor is tightened. Connect red and black wire to be sure...
... strain relief screw is tightened and be sure that the strain relief screw is prohibited for dryer to the left and right terminal block screws. 3. Part 5 ELECTRICAL REQUIREMENTS FOR ELECTRIC DRYERS 3-wire connection : Direct wire Important : Grounding through the neutral conductor is tightened. Connect red and black wire to be sure...
Owner's Manual
Page 17
... of appliance and neutral wire of power cord to center terminal block screw. 2. and be sure that the strain relief screw is in right position. 5. Part 5 ELECTRICAL REQUIREMENTS FOR ELECTRIC DRYERS Option 2: 3-Wire Connection with a Power Supply Cord lf your local codes or ordinances permit the connection of a frame-grounding conductor...
... of appliance and neutral wire of power cord to center terminal block screw. 2. and be sure that the strain relief screw is in right position. 5. Part 5 ELECTRICAL REQUIREMENTS FOR ELECTRIC DRYERS Option 2: 3-Wire Connection with a Power Supply Cord lf your local codes or ordinances permit the connection of a frame-grounding conductor...
Owner's Manual
Page 18
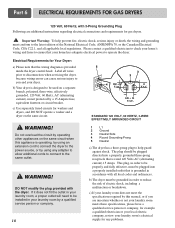
... your laundry room's electrical supply for any adapter to allow additional cords to connect to the latest edition of electric shock, including a malfunction or breakdown. Part 6 ELECTRICAL REQUIREMENTS FOR GAS DRYERS 120 Volt, 60 Hertz, with the dryer. This plug, in order to be properly and fully effective, must conform to...
... your laundry room's electrical supply for any adapter to allow additional cords to connect to the latest edition of electric shock, including a malfunction or breakdown. Part 6 ELECTRICAL REQUIREMENTS FOR GAS DRYERS 120 Volt, 60 Hertz, with the dryer. This plug, in order to be properly and fully effective, must conform to...
Owner's Manual
Page 19
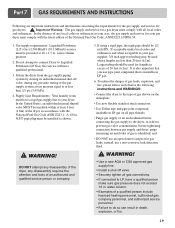
... personnel, and authorized service personnel. • Failure to inspect for gas dryers. It is also important that you use pipe joint compound that is identified; Part 7 GAS REQUIREMENTS AND INSTRUCTIONS Following are less than 2/1 psi (3.45 kPa). 4. pipe plug must be used where lengths are important instructions and information concerning the...
... personnel, and authorized service personnel. • Failure to inspect for gas dryers. It is also important that you use pipe joint compound that is identified; Part 7 GAS REQUIREMENTS AND INSTRUCTIONS Following are less than 2/1 psi (3.45 kPa). 4. pipe plug must be used where lengths are important instructions and information concerning the...

Owner's Manual
Page 20
... and for venting outside. Failure to prevent back-draft when the dryer is impossible to follow these instructions can result in fi re or death. 3. Part 8 EXHAUST REQUIREMENTS AND MAINTENANCE Following are not provided with plastic or thin foil Ducting. Warning: DO NOT exhaust dryer air into the duct that only...
... and for venting outside. Failure to prevent back-draft when the dryer is impossible to follow these instructions can result in fi re or death. 3. Part 8 EXHAUST REQUIREMENTS AND MAINTENANCE Following are not provided with plastic or thin foil Ducting. Warning: DO NOT exhaust dryer air into the duct that only...

Owner's Manual
Page 21
... your dryer. Disconnect the dryer's electric power prior to remove. Always make sure the lint filter is hard to any lint. 6. c) Repeat as new towels. 5. Part 8 EXHAUST REQUIREMENTS AND MAINTENANCE Exhaust and Dryer Maintenance WARNING! After one year of use , the interior and complete exhaust system of the lint screen and...
... your dryer. Disconnect the dryer's electric power prior to remove. Always make sure the lint filter is hard to any lint. 6. c) Repeat as new towels. 5. Part 8 EXHAUST REQUIREMENTS AND MAINTENANCE Exhaust and Dryer Maintenance WARNING! After one year of use , the interior and complete exhaust system of the lint screen and...
Owner's Manual
Page 22
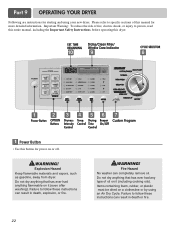
Part 9 OPERATING YOUR DRYER Following are instructions for power on or off. Status/Clean Filter/ Wrinkle Care Indicator 10 9 8 1 2 3 4 56 7 Custom Program 1 Power Button • Use ...
Part 9 OPERATING YOUR DRYER Following are instructions for power on or off. Status/Clean Filter/ Wrinkle Care Indicator 10 9 8 1 2 3 4 56 7 Custom Program 1 Power Button • Use ...


