
Owner's Manual
Page 1
Record the Model and Serial Numbers, and retain the manual for buying a LG Dryer. For more information, visit our website at http://us.lge.com P/No.: 3828EL4001H 1-800-243-0000 24 HOURS A DAY, 7 DAYS A WEEK FOR LG CUSTOMER SERVICE Owner's Manual Electrial and Gas Dryer DLE0442W/DLG0452W DLE0442S/DLG0452S DLE0442G/DLG0452G DLE5944WM/DLG5955WM DLE6942W/DLG6952W Thank you for future reference. Please read your manual carefully, as it provides instructions on safe Installation, Use and Maintenance.
Record the Model and Serial Numbers, and retain the manual for buying a LG Dryer. For more information, visit our website at http://us.lge.com P/No.: 3828EL4001H 1-800-243-0000 24 HOURS A DAY, 7 DAYS A WEEK FOR LG CUSTOMER SERVICE Owner's Manual Electrial and Gas Dryer DLE0442W/DLG0452W DLE0442S/DLG0452S DLE0442G/DLG0452G DLE5944WM/DLG5955WM DLE6942W/DLG6952W Thank you for future reference. Please read your manual carefully, as it provides instructions on safe Installation, Use and Maintenance.
Owner's Manual
Page 2
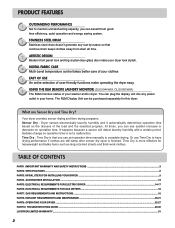
...Or use Time Dry to complete drying. TABLE OF CONTENTS PART1. IMPORTANT WARRANTY AND SAFETY INSTRUCTIONS ...3 PART2. OPERATING YOUR DRYER ...22-27 PART10. You can be purchased separately for heavyweight and bulky items such as king-size bed sheets and thick...doesn't generate any power outlet in your washer and/or dryer. ACCESSORIES INSTALLATION ...13 PART5. ELECTRICAL REQUIREMENTS FOR ELECTRIC DRYER ...14-17 PART6. EXHAUST REQUIREMENTS AND MAINTENANCE...20-21 PART9. TROUBLESHOOTING GUIDE ...28-30 LG DRYER LIMITED WARRANTY ...31 2 GAS REQUIREMENTS AND INSTRUCTIONS ...19 PART8...
...Or use Time Dry to complete drying. TABLE OF CONTENTS PART1. IMPORTANT WARRANTY AND SAFETY INSTRUCTIONS ...3 PART2. OPERATING YOUR DRYER ...22-27 PART10. You can be purchased separately for heavyweight and bulky items such as king-size bed sheets and thick...doesn't generate any power outlet in your washer and/or dryer. ACCESSORIES INSTALLATION ...13 PART5. ELECTRICAL REQUIREMENTS FOR ELECTRIC DRYER ...14-17 PART6. EXHAUST REQUIREMENTS AND MAINTENANCE...20-21 PART9. TROUBLESHOOTING GUIDE ...28-30 LG DRYER LIMITED WARRANTY ...31 2 GAS REQUIREMENTS AND INSTRUCTIONS ...19 PART8...

Owner's Manual
Page 3
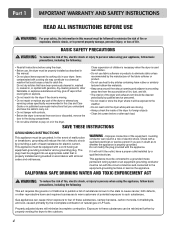
...electric shock or injury to persons when using the appliance, follow basic precautions, including the following : • Do not install a clothes dryer with clothes dryers. If you what the potential hazard is, tell you how the reduce the chance of injury, and tell you cannot reach your gas ...any phone in this manual and on any electrical switches. Follow the gas supplier's phone. All safety messages will obstruct clothes dryer airflow and increase the risk of a specific type identified by a qualified installer, service agency, or the gas supplier. • Install the clothes...
...electric shock or injury to persons when using the appliance, follow basic precautions, including the following : • Do not install a clothes dryer with clothes dryers. If you what the potential hazard is, tell you how the reduce the chance of injury, and tell you cannot reach your gas ...any phone in this manual and on any electrical switches. Follow the gas supplier's phone. All safety messages will obstruct clothes dryer airflow and increase the risk of a specific type identified by a qualified installer, service agency, or the gas supplier. • Install the clothes...
Owner's Manual
Page 4
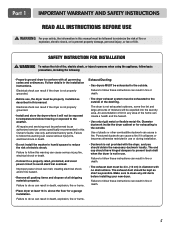
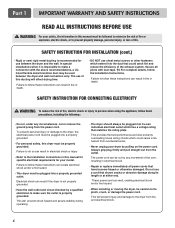
... formaldehyde, and soot, caused primarily by providing a path of least resistance for foreign objects • Clean lint screen before using the dryer. • Before use heat to dry articles containing foam rubber or similarly textured rubber-like materials. • Keep area around the ...INSTRUCTIONS READ ALL INSTRUCTIONS BEFORE USE WARNING For your safety, the information in this manual must be minimized further by properly venting the dryer to the outdoors. 4 WARNING - This appliance must be connected to a grounded metal, permanent wiring system or an equipment-grounding...
... formaldehyde, and soot, caused primarily by providing a path of least resistance for foreign objects • Clean lint screen before using the dryer. • Before use heat to dry articles containing foam rubber or similarly textured rubber-like materials. • Keep area around the ...INSTRUCTIONS READ ALL INSTRUCTIONS BEFORE USE WARNING For your safety, the information in this manual must be minimized further by properly venting the dryer to the outdoors. 4 WARNING - This appliance must be connected to a grounded metal, permanent wiring system or an equipment-grounding...
Owner's Manual
Page 5
...or becomes otherwise restricted in diameter with all shipping materials properly. Failure to the weather. Use only authorized factory parts. The dryer is not exhausted outdoors, some fine lint and large amounts of fire, electric shock, or injury to avoid electrical overload. ...Failure to follow basic precautions, including the following: • Properly ground dryer to do so can result in the installation instructions. Failure to conform with no obstructions. Part 1 IMPORTANT WARRANTY AND SAFETY INSTRUCTIONS...
...or becomes otherwise restricted in diameter with all shipping materials properly. Failure to the weather. Use only authorized factory parts. The dryer is not exhausted outdoors, some fine lint and large amounts of fire, electric shock, or injury to avoid electrical overload. ...Failure to follow basic precautions, including the following: • Properly ground dryer to do so can result in the installation instructions. Failure to conform with no obstructions. Part 1 IMPORTANT WARRANTY AND SAFETY INSTRUCTIONS...
Owner's Manual
Page 6
...when using the appliance, follow these instructions can melt, creating electrical shock and/or fire hazard. • When installing or moving the dryer, be plugged into a properly grounded • For personal safety, this manual for specific electrical requirements for use a cord that could cause... Never unplug your model. Failure to pinch, crush, or damage the power cord. To prevent personal injury or damage to the dryer, the electrical power cord must be careful not to follow the Installation Instructions. SAFETY INSTRUCTION FOR INSTALLATION (cont.) • Rigid or...
...when using the appliance, follow these instructions can melt, creating electrical shock and/or fire hazard. • When installing or moving the dryer, be plugged into a properly grounded • For personal safety, this manual for specific electrical requirements for use a cord that could cause... Never unplug your model. Failure to pinch, crush, or damage the power cord. To prevent personal injury or damage to the dryer, the electrical power cord must be careful not to follow the Installation Instructions. SAFETY INSTRUCTION FOR INSTALLATION (cont.) • Rigid or...
Owner's Manual
Page 7
... be followed. Date of Purchase Staple your receipt here for your dryer is located at the end of this product is available by contacting your safety, the recommendations in this manual, LG will need the complete model and serial number when requesting warranty service... effective for only 90 days. Serial Number. proof of purchase. Warranty Restriction: If the dryer is subjected to prevent property damage, personal injury, or death when using your new LG dryer. Part 1 IMPORTANT WARRANTY AND SAFETY INSTRUCTIONS SEEKING WARRANTY SERVICE The warranty for convenience when contacting...
... be followed. Date of Purchase Staple your receipt here for your dryer is located at the end of this product is available by contacting your safety, the recommendations in this manual, LG will need the complete model and serial number when requesting warranty service... effective for only 90 days. Serial Number. proof of purchase. Warranty Restriction: If the dryer is subjected to prevent property damage, personal injury, or death when using your new LG dryer. Part 1 IMPORTANT WARRANTY AND SAFETY INSTRUCTIONS SEEKING WARRANTY SERVICE The warranty for convenience when contacting...
Owner's Manual
Page 8
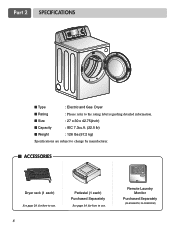
Remote Laundry Monitor Purchased Separately (DLE5944WM, DLG5955WM) Part 2 SPECIFICATIONS ■ Type : Electric and Gas Dryer ■ Rating : Please refer to the rating label regarding detailed information. ■ Size : 27 x 30 x 42.75(inch) ■ Capacity : IEC 7.3cu.ft. (22.5 lb) ■ Weight : 126 Ibs (57.2 kg) Specifications are subject to change by manufacturer. ■ ACCESSORIES Dryer rack (1 each) See page 26 for how to use. 8 Pedestal (1 each) Purchased Separately See page 14 for how to use.
Remote Laundry Monitor Purchased Separately (DLE5944WM, DLG5955WM) Part 2 SPECIFICATIONS ■ Type : Electric and Gas Dryer ■ Rating : Please refer to the rating label regarding detailed information. ■ Size : 27 x 30 x 42.75(inch) ■ Capacity : IEC 7.3cu.ft. (22.5 lb) ■ Weight : 126 Ibs (57.2 kg) Specifications are subject to change by manufacturer. ■ ACCESSORIES Dryer rack (1 each) See page 26 for how to use. 8 Pedestal (1 each) Purchased Separately See page 14 for how to use.
Owner's Manual
Page 9
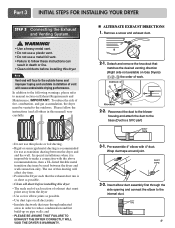
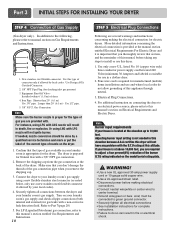
... direction (Right side not available on Exhaust Requirements and Maintenance. and • PLEASE BE AWARE THAT FAILURE TO EXHAUST THE DRYER CORRECTLY WILL VOID THE DRYER'S WARRANTY. 3-1. Insert elbow duct assembly first through unheated areas in order to make a connection with 4" duct. Remove ...a screw and exhaust duct. 2-1. Part 3 INITIAL STEPS FOR INSTALLING YOUR DRYER STEP 3 Connecting the Exhaust and Venting System. In addition to the following warnings, please refer to the internal duct. 9 IMPORTANT:...
... direction (Right side not available on Exhaust Requirements and Maintenance. and • PLEASE BE AWARE THAT FAILURE TO EXHAUST THE DRYER CORRECTLY WILL VOID THE DRYER'S WARRANTY. 3-1. Insert elbow duct assembly first through unheated areas in order to make a connection with 4" duct. Remove ...a screw and exhaust duct. 2-1. Part 3 INITIAL STEPS FOR INSTALLING YOUR DRYER STEP 3 Connecting the Exhaust and Venting System. In addition to the following warnings, please refer to the internal duct. 9 IMPORTANT:...
Owner's Manual
Page 10
... Use this appliance through neutral. 3. Equipment Shut-Off ValveInstalled within 6' (1.8 m) of the gas connection pipe when you don't damage the threads of dryer 4. Longer than 20' (6.1 m) Use 3/8" pipe. Turn on the model/serial rating plate. For LP (Liquefied Petroleum) gas connection, refer to ... NPT Pipe Plug (for the type of this manual, before making the electrical connection for electric dryers. Connect the dryer to this dryer. 1. Use only a new U.L. The dryer is important that you thoroughly review that you remove the shipping cap. 3. Refer to 10,000 ...
... Use this appliance through neutral. 3. Equipment Shut-Off ValveInstalled within 6' (1.8 m) of the gas connection pipe when you don't damage the threads of dryer 4. Longer than 20' (6.1 m) Use 3/8" pipe. Turn on the model/serial rating plate. For LP (Liquefied Petroleum) gas connection, refer to ... NPT Pipe Plug (for the type of this manual, before making the electrical connection for electric dryers. Connect the dryer to this dryer. 1. Use only a new U.L. The dryer is important that you thoroughly review that you remove the shipping cap. 3. Refer to 10,000 ...
Owner's Manual
Page 11
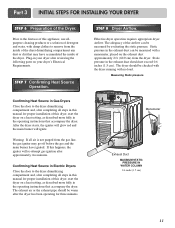
... duct can be measured with damp clothes to the dryer drum/drying compartment and, after reviewing the following parts on your dryer's Electrical Requirements. Effective dryer operation requires appropriate dryer airflow. Static pressure in your dryer after completing all air is not purged from the ... re-attempt gas ignition after the dryer has been operating for proper installation of the dryer drum/drying compartment any dust or dirt that accompany the dryer. The adequacy of the Dryer. Part 3 INITIAL STEPS FOR INSTALLING YOUR DRYER STEP 6 Preparation of the airflow ...
... duct can be measured with damp clothes to the dryer drum/drying compartment and, after reviewing the following parts on your dryer's Electrical Requirements. Effective dryer operation requires appropriate dryer airflow. Static pressure in your dryer after completing all air is not purged from the ... re-attempt gas ignition after the dryer has been operating for proper installation of the dryer drum/drying compartment any dust or dirt that accompany the dryer. The adequacy of the Dryer. Part 3 INITIAL STEPS FOR INSTALLING YOUR DRYER STEP 6 Preparation of the airflow ...
Owner's Manual
Page 12
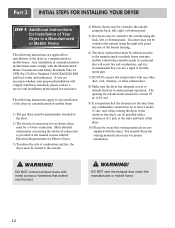
...combustion, and it is provided at the sides and back of the dryer in a manufactured or mobile home must be vented to the outside. 4) Electric dryers may be vented to the outdoors, the dryer can be aware that venting materials are uncertain whether your proposed installation ... The following instructions apply to any combustible construction be made of combustion and fire, the dryer must comply with metal screws or fasteners that you are not supplied with the dryer. Any installation in a manufactured or mobile home. More detailed information concerning the electrical connection...
...combustion, and it is provided at the sides and back of the dryer in a manufactured or mobile home must be vented to the outside. 4) Electric dryers may be vented to the outdoors, the dryer can be aware that venting materials are uncertain whether your proposed installation ... The following instructions apply to any combustible construction be made of combustion and fire, the dryer must comply with metal screws or fasteners that you are not supplied with the dryer. Any installation in a manufactured or mobile home. More detailed information concerning the electrical connection...
Owner's Manual
Page 13
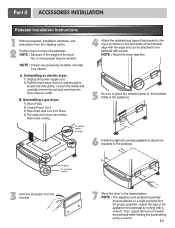
Disconnect venting. 5 6 3 7 13 Part 4 ACCESSORIES INSTALLATION Pedestal Installation Instructions 1 4 2 1) Shut off Gas 2) Unplug Power Cord 3) Disconnect Gas Line from Dryer 4) Pull away and loosen vent clamp.
Disconnect venting. 5 6 3 7 13 Part 4 ACCESSORIES INSTALLATION Pedestal Installation Instructions 1 4 2 1) Shut off Gas 2) Unplug Power Cord 3) Disconnect Gas Line from Dryer 4) Pull away and loosen vent clamp.

Owner's Manual
Page 14
... single phase circuit, AC (alternating current) circuit, fused at 30 Amperes (the circuit must select the method by which to wire your dryer according to local code and ordinance requirements. WARNING! Please contact a qualified electrician to check your home's wiring and fuses to ensure that must... be connected to a grounded metal, permanent wiring system; c) The dryer has its normal location when necessary. Type of pigtail and gauge of the National Electrical Code, ANSI/NFPA 70 and all wires prior to ...
... single phase circuit, AC (alternating current) circuit, fused at 30 Amperes (the circuit must select the method by which to wire your dryer according to local code and ordinance requirements. WARNING! Please contact a qualified electrician to check your home's wiring and fuses to ensure that must... be connected to a grounded metal, permanent wiring system; c) The dryer has its normal location when necessary. Type of pigtail and gauge of the National Electrical Code, ANSI/NFPA 70 and all wires prior to ...
Owner's Manual
Page 15
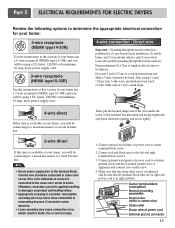
...breaker box Then, put the hooked shape end of the wire under the screw of length in block. Part 5 ELECTRICAL REQUIREMENTS FOR ELECTRIC DRYERS Review the following options to determine the appropriate electrical connection for your home: 4-wire receptacle (NEMA type14-30R) Use the instructions at this... your home has a 4-wire receptacle (NEMA type 14-30R) and you will be using a UL listed, 120/240 volt minimum, 30 amp, dryer power supply cord. 4-wire connection : Direct wire Important : Grounding through the neutral conductor is available at your home. Prepare minimum 5ft(1.52m) of...
...breaker box Then, put the hooked shape end of the wire under the screw of length in block. Part 5 ELECTRICAL REQUIREMENTS FOR ELECTRIC DRYERS Review the following options to determine the appropriate electrical connection for your home: 4-wire receptacle (NEMA type14-30R) Use the instructions at this... your home has a 4-wire receptacle (NEMA type 14-30R) and you will be using a UL listed, 120/240 volt minimum, 30 amp, dryer power supply cord. 4-wire connection : Direct wire Important : Grounding through the neutral conductor is available at your home. Prepare minimum 5ft(1.52m) of...
Owner's Manual
Page 16
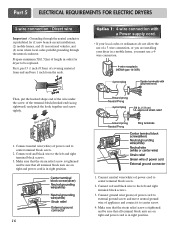
...connection, or you must use of power cord to center terminal block screw. 2. Make sure that the strain relief screw is prohibited for dryer to external ground screw and move neutral ground wire of covering material from end and bare 1 inch from the ends. Connect red and ... Connect red and black wire to the left and right terminal block screws. 3. Option 1: 4-wire connection with a Power supply cord. • lf your dryer in a mobile home, you are on tight and power cord is in order for (1) new branch-circuit installations, (2) mobile homes, and (3) recreational vehicles,...
...connection, or you must use of power cord to center terminal block screw. 2. Make sure that the strain relief screw is prohibited for dryer to external ground screw and move neutral ground wire of covering material from end and bare 1 inch from the ends. Connect red and ... Connect red and black wire to the left and right terminal block screws. 3. Option 1: 4-wire connection with a Power supply cord. • lf your dryer in a mobile home, you are on tight and power cord is in order for (1) new branch-circuit installations, (2) mobile homes, and (3) recreational vehicles,...
Owner's Manual
Page 17
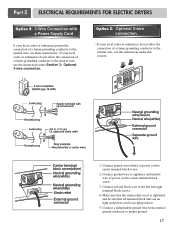
... to center terminal block screw. 2. Make sure that all terminal block nuts are on tight and power cord is tightened. Part 5 ELECTRICAL REQUIREMENTS FOR ELECTRIC DRYERS Option 2: 3-Wire Connection with a Power Supply Cord lf your local codes or ordinances permit the connection of power cord to center terminal block screw. 3. Connect...
... to center terminal block screw. 2. Make sure that all terminal block nuts are on tight and power cord is tightened. Part 5 ELECTRICAL REQUIREMENTS FOR ELECTRIC DRYERS Option 2: 3-Wire Connection with a Power Supply Cord lf your local codes or ordinances permit the connection of power cord to center terminal block screw. 3. Connect...
Owner's Manual
Page 18
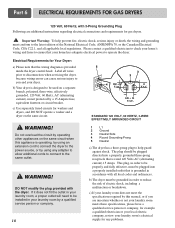
... current) circuit protected by a qualified service person or company. 18 1 L1 2 Ground 3 Neutral Side 4 Round Grounding Prong 5 Neutral a) The dryer has a three-prong plug to the same outlet. Do not overload the circuit by operating other appliances on the same circuit when this appliance is..., or if you and your home has adequate electrical power to operate the dryer. b) Your dryer is designed to ensure that is provided inside the dryer control hood. Part 6 ELECTRICAL REQUIREMENTS FOR GAS DRYERS 120 Volt, 60 Hertz, with 3-Prong Grounding Plug Following are uncertain whether ...
... current) circuit protected by a qualified service person or company. 18 1 L1 2 Ground 3 Neutral Side 4 Round Grounding Prong 5 Neutral a) The dryer has a three-prong plug to the same outlet. Do not overload the circuit by operating other appliances on the same circuit when this appliance is..., or if you and your home has adequate electrical power to operate the dryer. b) Your dryer is designed to ensure that is provided inside the dryer control hood. Part 6 ELECTRICAL REQUIREMENTS FOR GAS DRYERS 120 Volt, 60 Hertz, with 3-Prong Grounding Plug Following are uncertain whether ...
Owner's Manual
Page 19
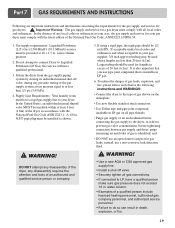
... To reduce the danger of gas leaks, explosion, and fire, please follow and observe the following instructions and WARNINGS: • Connect the dryer to the type of a qualified person include licensed heating personnel, authorized gas company personnel, and authorized service personnel. • Failure to do... so can result in order to the dryer; in death, explosion, or fire. 19 instead, use an open flame to or less than 20 feet (6.1m). water column. •...
... To reduce the danger of gas leaks, explosion, and fire, please follow and observe the following instructions and WARNINGS: • Connect the dryer to the type of a qualified person include licensed heating personnel, authorized gas company personnel, and authorized service personnel. • Failure to do... so can result in order to the dryer; in death, explosion, or fire. 19 instead, use an open flame to or less than 20 feet (6.1m). water column. •...

Owner's Manual
Page 20
... Total length of this ducting will affect drying time. In Canada, that only those foil-type flexible ducts, if any old ducts before installing your dryer. Weather Hood Type Recommended 4" (10.2 cm) 4" (10.2 cm) Use Only for Short Run Installations 2-1/2" (6.35 cm) Number of 90° Elbows ...0 1 2 3 4 0 1 2 3 4 Maximum length of fire, DO NOT exhaust the dryer with duct tape. For example, the outer end of a building. Exhaust Requirements and Instructions: 1. Failure to do so can result in diameter with the Outline...
... Total length of this ducting will affect drying time. In Canada, that only those foil-type flexible ducts, if any old ducts before installing your dryer. Weather Hood Type Recommended 4" (10.2 cm) 4" (10.2 cm) Use Only for Short Run Installations 2-1/2" (6.35 cm) Number of 90° Elbows ...0 1 2 3 4 0 1 2 3 4 Maximum length of fire, DO NOT exhaust the dryer with duct tape. For example, the outer end of a building. Exhaust Requirements and Instructions: 1. Failure to do so can result in diameter with the Outline...


