
Service Manual
Page 2
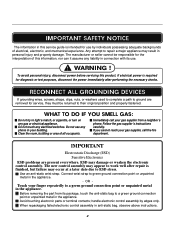
... 2 To avoid personal injury, disconnect power before servicing this information, nor can it assume any electrical switches. Do not use . ! Before removing the part from a neighbor's phone. WHAT TO DO IF YOU SMELL GAS: Do not try to a green ground connection point or unpainted metal in the appliance.... its package, touch the anti-static bag to a green ground connection point or unpainted metal in the appliance. Avoid touching electronic parts or terminal contacts; handle electronic control assembly by individuals possessing adequate backgrounds of this product. WARNING !
... 2 To avoid personal injury, disconnect power before servicing this information, nor can it assume any electrical switches. Do not use . ! Before removing the part from a neighbor's phone. WHAT TO DO IF YOU SMELL GAS: Do not try to a green ground connection point or unpainted metal in the appliance.... its package, touch the anti-static bag to a green ground connection point or unpainted metal in the appliance. Avoid touching electronic parts or terminal contacts; handle electronic control assembly by individuals possessing adequate backgrounds of this product. WARNING !

Service Manual
Page 3
... PANEL & PLATE ASSEMBLY 37 12-2. DISASSEMBLY INSTRUCTIONS 30 12. MEASURE WITH POWER OFF 22 9-3. CONTENTS 1. FEATURES AND BENEFITS ...6 3. TEST 3 MOTOR TEST 23 9-4. OUT ...18 8. REPLACEMENT PARTS LIST 41 3 WIRING DIAGRAM ...19 9. MOTOR DIAGRAM AND SCHEMATIC 17 7. TEST 6 HEATER SWITCH TEST -
... PANEL & PLATE ASSEMBLY 37 12-2. DISASSEMBLY INSTRUCTIONS 30 12. MEASURE WITH POWER OFF 22 9-3. CONTENTS 1. FEATURES AND BENEFITS ...6 3. TEST 3 MOTOR TEST 23 9-4. OUT ...18 8. REPLACEMENT PARTS LIST 41 3 WIRING DIAGRAM ...19 9. MOTOR DIAGRAM AND SCHEMATIC 17 7. TEST 6 HEATER SWITCH TEST -
Service Manual
Page 8
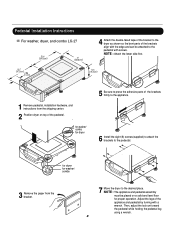
... on a solid and level floor for proper operation. Pedestal Installation Instructions For washer, dryer, and combo LG 27 4 Attach the double-faced tape of the bracket to the dryer as shown so the bent parts of the brackets align with the edge and can be placed on top of the pedestal. , for... washer/ combo for dryer 5 Be sure to press the adhesive parts of the appliance and pedestal by turning with screws.
... on a solid and level floor for proper operation. Pedestal Installation Instructions For washer, dryer, and combo LG 27 4 Attach the double-faced tape of the bracket to the dryer as shown so the bent parts of the brackets align with the edge and can be placed on top of the pedestal. , for... washer/ combo for dryer 5 Be sure to press the adhesive parts of the appliance and pedestal by turning with screws.
Service Manual
Page 28
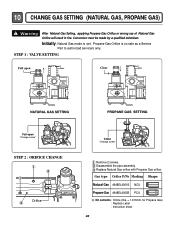
... Label : Instruction sheet 28 Replace Natural Gas orifice with Propane Gas orifice. Disassemble the pipe assembly. Initially, Natural Gas mode is on sale as a Service Part to authorized servicers only. STEP 1 : VALVE SETTING Full open "Change screw" STEP 2 : ORIFICE CHANGE Orifice Close "Change screw" Remove 2 screws. Warning After Natural Gas Setting...
... Label : Instruction sheet 28 Replace Natural Gas orifice with Propane Gas orifice. Disassemble the pipe assembly. Initially, Natural Gas mode is on sale as a Service Part to authorized servicers only. STEP 1 : VALVE SETTING Full open "Change screw" STEP 2 : ORIFICE CHANGE Orifice Close "Change screw" Remove 2 screws. Warning After Natural Gas Setting...

Service Manual
Page 34
Reconnect the another duct[11 in(28cm)] to the blower housing, and attach the duct to the internal duct. 34 Wrap duct tape around joint. DUCT TAPE 2-2. DUCT TAPE 3-2. Remove a screw and exhaust duct. 2-1. Insert elbow duct assembly first through the side opening and connect the elbow to the base. ( Duct is a SVC part) DUCT TAPE 3-1. Pre-assemble 4" elbow with 4" duct. 1. Detach and remove a knockout at the botton, left or right side as desired. (Right Side Vent not available on Gas dryer) , , the order of work.
Reconnect the another duct[11 in(28cm)] to the blower housing, and attach the duct to the internal duct. 34 Wrap duct tape around joint. DUCT TAPE 2-2. DUCT TAPE 3-2. Remove a screw and exhaust duct. 2-1. Insert elbow duct assembly first through the side opening and connect the elbow to the base. ( Duct is a SVC part) DUCT TAPE 3-1. Pre-assemble 4" elbow with 4" duct. 1. Detach and remove a knockout at the botton, left or right side as desired. (Right Side Vent not available on Gas dryer) , , the order of work.


