
Owners Manual
Page 7
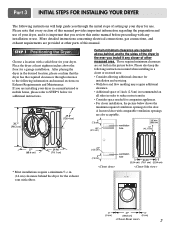
....6 cm) 29.96" (76.1 cm) * Most installations require a minimum 5 1/2 in. (14 cm) clearance behind , and to the sides of the dryer in the ever you review this entire manual before proceeding with any closer of other parts of this manual provides important information regarding the preparation and use . Place the dryer...
....6 cm) 29.96" (76.1 cm) * Most installations require a minimum 5 1/2 in. (14 cm) clearance behind , and to the sides of the dryer in the ever you review this entire manual before proceeding with any closer of other parts of this manual provides important information regarding the preparation and use . Place the dryer...
Owners Manual
Page 8
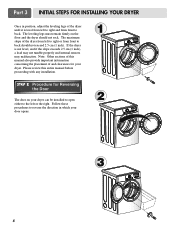
... of the dryer from left to right and from front to back. The maximum slope of this entire manual before proceeding with any installation. Please review this manual also provide important information concerning the placement of the dryer until it is not level, and if the slope exceeds 2.5 cm (1 inch), a load...
... of the dryer from left to right and from front to back. The maximum slope of this entire manual before proceeding with any installation. Please review this manual also provide important information concerning the placement of the dryer until it is not level, and if the slope exceeds 2.5 cm (1 inch), a load...

Owners Manual
Page 10
... a 3/8" NPT gas connection. 2. Equipment Shut-Off Valve- Iron Pipe. Make sure that you don't damage the threads of the gas connection pipe when you thoroughly review that section, and the remainder of gas available in your laundry room is important that the type of this manual's section entitled Gas Requirements and...
... a 3/8" NPT gas connection. 2. Equipment Shut-Off Valve- Iron Pipe. Make sure that you don't damage the threads of the gas connection pipe when you thoroughly review that section, and the remainder of gas available in your laundry room is important that the type of this manual's section entitled Gas Requirements and...
Owners Manual
Page 11
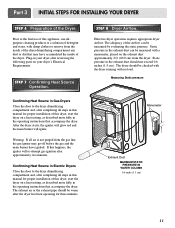
... the exhaust pipe should not exceed 0.6 inches (1.5 cm). Static pressure in the exhaust duct should be measured with no load. Plug-in your dryer after reviewing the following parts on a heat setting, as described more fully in Gas Dryers Close the door to the dryer drum/drying compartment and, after approximately...
... the exhaust pipe should not exceed 0.6 inches (1.5 cm). Static pressure in the exhaust duct should be measured with no load. Plug-in your dryer after reviewing the following parts on a heat setting, as described more fully in Gas Dryers Close the door to the dryer drum/drying compartment and, after approximately...
Owners Manual
Page 16
... rightward) and pinch the hook together and screw tightly. Connect red and black wire to center terminal block screw. 2. Part 5 ELECTRICAL REQUIREMENTS FOR ELECTRIC DRYERS Review the following options to determine the appropriate electrical connection for dryer to center screw. 4. Make a 5 inch of 3 wires a hook shape. peel insulation back 1inch (2.5cm...
... rightward) and pinch the hook together and screw tightly. Connect red and black wire to center terminal block screw. 2. Part 5 ELECTRICAL REQUIREMENTS FOR ELECTRIC DRYERS Review the following options to determine the appropriate electrical connection for dryer to center screw. 4. Make a 5 inch of 3 wires a hook shape. peel insulation back 1inch (2.5cm...

Owners Manual
Page 19
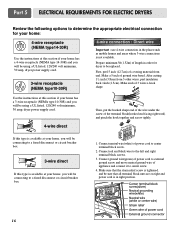
... whether or not your laundry room meets these specifications, please have a qualified service person or company, for example a qualified electrician or your local electric company, review your laundry room does not meet the specifications required by a qualified service person or company. STANDARD 120 VOLT, 60 HERTZ, 3-WIRE EFFECTIVELY GROUNDED CIRCUIT 1 L1...
... whether or not your laundry room meets these specifications, please have a qualified service person or company, for example a qualified electrician or your local electric company, review your laundry room does not meet the specifications required by a qualified service person or company. STANDARD 120 VOLT, 60 HERTZ, 3-WIRE EFFECTIVELY GROUNDED CIRCUIT 1 L1...
Owners Manual
Page 29
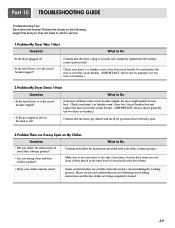
... plugged in? • Is the fuse blown, or is the circuit breaker tripped? Part 10 TROUBLESHOOTING GUIDE Troubleshooting Tips Save time and money! Review the charts on your fabric softener product? Confirm that the house gas shutoff and the dryer gas shutoff are both fully open. 3.Problem:There are... for service. 1.Problem:My Dryer Won 't Start Question What to Do • Is the fuse blown, or is the circuit breaker tripped? Please review and confirm that the clothes are actually stains that the dryer's plug is blown or the circuit breaker tripped, the dryer might tumble but not...
... plugged in? • Is the fuse blown, or is the circuit breaker tripped? Part 10 TROUBLESHOOTING GUIDE Troubleshooting Tips Save time and money! Review the charts on your fabric softener product? Confirm that the house gas shutoff and the dryer gas shutoff are both fully open. 3.Problem:There are... for service. 1.Problem:My Dryer Won 't Start Question What to Do • Is the fuse blown, or is the circuit breaker tripped? Please review and confirm that the clothes are actually stains that the dryer's plug is blown or the circuit breaker tripped, the dryer might tumble but not...
Owners Manual
Page 31
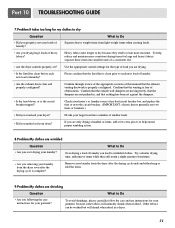
... laundry from light weight items when creating loads. • Are you drying large loads of smaller loads. • Did you overload your dryer? Confirm through review of the appropriate sections of this manual that the lint filter is properly configured. Divide your garment, because some fabrics will shrink when dried in...
... laundry from light weight items when creating loads. • Are you drying large loads of smaller loads. • Did you overload your dryer? Confirm through review of the appropriate sections of this manual that the lint filter is properly configured. Divide your garment, because some fabrics will shrink when dried in...

Service Manual
Page 9
... receptacle (NEMA type14-30R) Use the instructions at this type is tightened. and be sure that the strain relief screw is available at your home. Review the following options to determine the appropriate electrical connection for dryer to be connecting to the left and right terminal block screws. 3. Connect ground wire...
... receptacle (NEMA type14-30R) Use the instructions at this type is tightened. and be sure that the strain relief screw is available at your home. Review the following options to determine the appropriate electrical connection for dryer to be connecting to the left and right terminal block screws. 3. Connect ground wire...
