
Owners Manual
Page 4
... printed the end of purchase, if this dryer is needed to the instructions in this manual, LG will need the complete model and serial numbers when requesting information. For your nearest LG Service Center and, for only 90 days. Warranty service is available by contacting your safety, the recommendations in material or workmanship. ! We...
... printed the end of purchase, if this dryer is needed to the instructions in this manual, LG will need the complete model and serial numbers when requesting information. For your nearest LG Service Center and, for only 90 days. Warranty service is available by contacting your safety, the recommendations in material or workmanship. ! We...
Owners Manual
Page 6
...Failure to such substances. Exposure to these substances, namely benzene, carbon monoxide, formaldehyde and soot, caused primarily by properly venting the dryer to light a match or cigarette, or turn on a clothesline or by using this appliance, please follow these instructions can result...Articles containing foam, rubber, rubber-like materials, plastic or similar materials should be minimized further by the incomplete combustion of this manual and instructions and information provided by your building. • Clear the room, building or area of these substances can completely ...
...Failure to such substances. Exposure to these substances, namely benzene, carbon monoxide, formaldehyde and soot, caused primarily by properly venting the dryer to light a match or cigarette, or turn on a clothesline or by using this appliance, please follow these instructions can result...Articles containing foam, rubber, rubber-like materials, plastic or similar materials should be minimized further by the incomplete combustion of this manual and instructions and information provided by your building. • Clear the room, building or area of these substances can completely ...
Owners Manual
Page 7
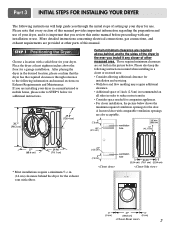
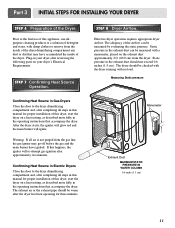
...other parts of this manual. ventilation hole 7 Please note that every section of this entire manual before proceeding with comparable ventilation openings are also acceptable. After placing the dryer in the desired location, please confirm that you are installing your dryer in a closet or... at least eighteen inches above ,behind the dryer for the door. Please also keep the following instructions in mind when installing in a manufactured or mobile home, please refer to the following information and manual sections on Exhaust Requirements and Maintenance. ventilation hole...
...other parts of this manual. ventilation hole 7 Please note that every section of this entire manual before proceeding with comparable ventilation openings are also acceptable. After placing the dryer in the desired location, please confirm that you are installing your dryer in a closet or... at least eighteen inches above ,behind the dryer for the door. Please also keep the following instructions in mind when installing in a manufactured or mobile home, please refer to the following information and manual sections on Exhaust Requirements and Maintenance. ventilation hole...
Owners Manual
Page 8
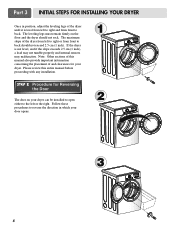
... for Reversing the Door The door on the floor and the dryer should not exceed 2.5 cm (1 inch). Follow these procedures to back. Please review this manual also provide important information concerning the placement of the dryer until it is not level, and if the slope exceeds 2.5... Note: Other sections of the dryer from left or the right. The leveling legs must remain firmly on your dryer. SSTTEEPP 22: Procedure for your dryer can be installed to open either to back should not rock. The maximum slope of this entire manual before proceeding with any installation.
... for Reversing the Door The door on the floor and the dryer should not exceed 2.5 cm (1 inch). Follow these procedures to back. Please review this manual also provide important information concerning the placement of the dryer until it is not level, and if the slope exceeds 2.5... Note: Other sections of the dryer from left or the right. The leveling legs must remain firmly on your dryer. SSTTEEPP 22: Procedure for your dryer can be installed to open either to back should not rock. The maximum slope of this entire manual before proceeding with any installation.
Owners Manual
Page 9
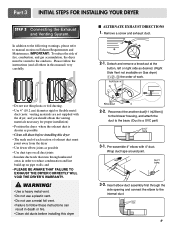
...in death or fire. • Clean old ducts before installing this dryer 2-2. and • PLEASE BE AWARE THAT FAILURE TO EXHAUST THE DRYER CORRECTLY WILL VOID THE DRYER'S WARRANTY. ! Please follow these instructions can result in this manual) very carefully. Wrap duct tape around joint. 3-2. WARNING! •... Failure to follow the instructions (and all duct joints • Insulate ductwork that runs through the side opening and connect the elbow to manual section on Gas dryer) , , the order of work. • Do not use thin plastic or foil ducting. • Use 4" (10.2 cm)...
...in death or fire. • Clean old ducts before installing this dryer 2-2. and • PLEASE BE AWARE THAT FAILURE TO EXHAUST THE DRYER CORRECTLY WILL VOID THE DRYER'S WARRANTY. ! Please follow these instructions can result in this manual) very carefully. Wrap duct tape around joint. 3-2. WARNING! •... Failure to follow the instructions (and all duct joints • Insulate ductwork that runs through the side opening and connect the elbow to manual section on Gas dryer) , , the order of work. • Do not use thin plastic or foil ducting. • Use 4" (10.2 cm)...

Owners Manual
Page 10
... 3. Longer than 20' (6.1 m) Use 3/8" pipe. Remove the shipping cap from the gas connection at the manual section entitled Electrical Requirements For Electric Dryer and it is required for manufactured (mobile) home installations and use a new stainless steel flexible connector if allowed ...Natural Gas with a non-corrosive leak detection fluid. 5. Iron Pipe. Connect the dryer to do not allow grounding of this type of this manual, before making the electrical connection for Electric Dryer Only. Shorter than 20' (6.1 m) - Securely tighten all pipe connections (both ...
... 3. Longer than 20' (6.1 m) Use 3/8" pipe. Remove the shipping cap from the gas connection at the manual section entitled Electrical Requirements For Electric Dryer and it is required for manufactured (mobile) home installations and use a new stainless steel flexible connector if allowed ...Natural Gas with a non-corrosive leak detection fluid. 5. Iron Pipe. Connect the dryer to do not allow grounding of this type of this manual, before making the electrical connection for Electric Dryer Only. Shorter than 20' (6.1 m) - Securely tighten all pipe connections (both ...
Owners Manual
Page 11
...-in this manual for proper installation of the dryer. Confirming Heat Source in Electric Dryers Close the door to the dryer drum/drying compartment and, after the dryer has been operating for proper installation of the Dryer. Confirming Heat Source in Gas Dryers Close the door to the dryer drum/drying ...duct approximately 2 ft. (60.9 cm) from the inside of this manual for three minutes. Static pressure in the exhaust duct should be warm after completing all steps in this dryer, start the dryer on a heat setting, as described more fully in the operating instructions that...
...-in this manual for proper installation of the dryer. Confirming Heat Source in Electric Dryers Close the door to the dryer drum/drying compartment and, after the dryer has been operating for proper installation of the Dryer. Confirming Heat Source in Gas Dryers Close the door to the dryer drum/drying ...duct approximately 2 ft. (60.9 cm) from the inside of this manual for three minutes. Static pressure in the exhaust duct should be warm after completing all steps in this dryer, start the dryer on a heat setting, as described more fully in the operating instructions that...
Owners Manual
Page 12
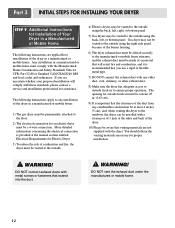
... fresh air must be vented to the outside. 4) Electric dryers may be vented to the outdoors, the dryer can be installed with a clearances of 1 inch at the manual section entitled Electrical Requirements for an electric dryer must be at least 2 inches (5 cm), and, when venting the dryer to the outside using the back, left , or...
... fresh air must be vented to the outside. 4) Electric dryers may be vented to the outdoors, the dryer can be installed with a clearances of 1 inch at the manual section entitled Electrical Requirements for an electric dryer must be at least 2 inches (5 cm), and, when venting the dryer to the outside using the back, left , or...

Owners Manual
Page 13
... kit back to the stoppers of side stacking kit. 3 Fit the stacking kit side bracket firmly to the washer with a gas dryer in owner's manual. 2 Peel protective paper off the tape from the stacking kit side bracket. 6 Insert the front stacking kit. Avoid finger injuries ..., even and solid floor as product installation instructions describes in potentially unstable conditions like a mobile home. 13 The weight of the dryer and the height of bracket. Incorrect installation procedure can cause serious accidents and physical Injuries. Part 4 ACESSORIES INSTALLATION Stacking Kit Installation...
... kit back to the stoppers of side stacking kit. 3 Fit the stacking kit side bracket firmly to the washer with a gas dryer in owner's manual. 2 Peel protective paper off the tape from the stacking kit side bracket. 6 Insert the front stacking kit. Avoid finger injuries ..., even and solid floor as product installation instructions describes in potentially unstable conditions like a mobile home. 13 The weight of the dryer and the height of bracket. Incorrect installation procedure can cause serious accidents and physical Injuries. Part 4 ACESSORIES INSTALLATION Stacking Kit Installation...

Owners Manual
Page 19
... requirements for any adapter to allow additional cords to connect to the same outlet. ! Electrical Requirements for washers and dryers, and DO NOT operate a washer and a dryer on the same circuit when this manual, or if you and your laundry room by a qualified service person or company. STANDARD 120 VOLT, 60 HERTZ, 3-WIRE...
... requirements for any adapter to allow additional cords to connect to the same outlet. ! Electrical Requirements for washers and dryers, and DO NOT operate a washer and a dryer on the same circuit when this manual, or if you and your laundry room by a qualified service person or company. STANDARD 120 VOLT, 60 HERTZ, 3-WIRE...
Owners Manual
Page 20
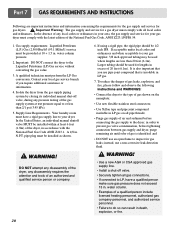
... comply with the latest edition of the National Fuel Gas Code, ANSI Z223.1/NFPA 54. 1. Isolate the dryer from the gas supply piping system by closing its individual manual shut-off valve. • Securely tighten all pipe threads; • Purge gas supply of air and sediment... before tightening connection between gas supply and dryer, purge remaining air until odor of gas is identified; A 1/8 in . N.P.T. WARNING! •...
... comply with the latest edition of the National Fuel Gas Code, ANSI Z223.1/NFPA 54. 1. Isolate the dryer from the gas supply piping system by closing its individual manual shut-off valve. • Securely tighten all pipe threads; • Purge gas supply of air and sediment... before tightening connection between gas supply and dryer, purge remaining air until odor of gas is identified; A 1/8 in . N.P.T. WARNING! •...
Owners Manual
Page 23
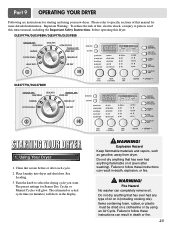
Using Your Dryer 1. Failure to follow these instructions can completely remove oil. See Loading. 3. WARNING! The preset settings for Sensor Dry Cycles or Manual Cycles will show in death or fire. 23 Failure to follow these instructions can result in the display. ...risk of this dryer. Please refer to specific sections of fire, electric shock, or injury to select the drying cycle you want. Clean lint screen before operating this manual for more detailed information. Place laundry into dryer and shut door. Part 9 OPERATING YOUR DRYER Following are instructions...
Using Your Dryer 1. Failure to follow these instructions can completely remove oil. See Loading. 3. WARNING! The preset settings for Sensor Dry Cycles or Manual Cycles will show in death or fire. 23 Failure to follow these instructions can result in the display. ...risk of this dryer. Please refer to specific sections of fire, electric shock, or injury to select the drying cycle you want. Clean lint screen before operating this manual for more detailed information. Place laundry into dryer and shut door. Part 9 OPERATING YOUR DRYER Following are instructions...
Owners Manual
Page 24
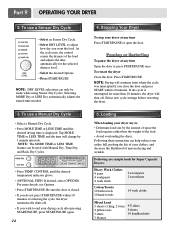
...continue from where the cycle was interrupted if you do not press START/PAUSE within 10 minutes. To restart the dryer Close the door. To use a Manual Dry Cycle • Select a Manual Dry Cycle. • Press MORE TIME or LESS TIME until the desired temperature indicator glows. • (OPTIONAL... Select the desired Options. • Press START/PAUSE NOTE: DRY LEVEL selections can only be used with Manual Dry, Time Dry, and Rack Dry Cycles. • Press TEMP. Stopping Your Dryer To stop your drying cycle after pressing START/PAUSE, press START/PAUSE again. 24 4. Following are sample ...
...continue from where the cycle was interrupted if you do not press START/PAUSE within 10 minutes. To restart the dryer Close the door. To use a Manual Dry Cycle • Select a Manual Dry Cycle. • Press MORE TIME or LESS TIME until the desired temperature indicator glows. • (OPTIONAL... Select the desired Options. • Press START/PAUSE NOTE: DRY LEVEL selections can only be used with Manual Dry, Time Dry, and Rack Dry Cycles. • Press TEMP. Stopping Your Dryer To stop your drying cycle after pressing START/PAUSE, press START/PAUSE again. 24 4. Following are sample ...

Owners Manual
Page 25
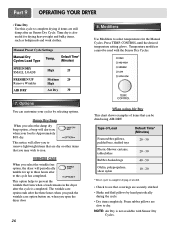
...high heat) • Normal Use for drying sturdy fabrics such as clothes packed in a suitcase or items wrinkled from being left in the dryer too long. • Air Dry Use the Air Dry Modifier for drying synthetic fabrics, washable knit fabrics, and no-iron finishes (low ...and hold RACK DRY for 3 seconds. Each cycle dries certain fabrics at the recommended temperature. When a Manual Cycle is displayed. Manual Cycles Use Manual Cycles to prevent unintended cycle or option changes during dryer operation. To enable the Child Lock feature: Press and hold RACK DRY for 3 seconds. Time* ...
...high heat) • Normal Use for drying sturdy fabrics such as clothes packed in a suitcase or items wrinkled from being left in the dryer too long. • Air Dry Use the Air Dry Modifier for drying synthetic fabrics, washable knit fabrics, and no-iron finishes (low ...and hold RACK DRY for 3 seconds. Each cycle dries certain fabrics at the recommended temperature. When a Manual Cycle is displayed. Manual Cycles Use Manual Cycles to prevent unintended cycle or option changes during dryer operation. To enable the Child Lock feature: Press and hold RACK DRY for 3 seconds. Time* ...
Owners Manual
Page 26
...; Dry item completely. Damp Dry Beep When you select the damp dry beep option, a beep will periodically tumble for the Manual Cycles. WRINKLE CARE When you open the dryer door 26 When using AIR DRY. NOTE: Air Dry is also useful for drying heavyweight and bulky items, such as bedspreads .... 7. The wrinkle care option ends after an Sensor Dry Cycle. Part 9 OPERATING YOUR DRYER • Time Dry Use this cycle to complete drying if items are slow to dry. Manual Preset Cycle Settings Manual Dry Temp. Foam rubber pillows are still damp after the three hours when you push the...
...; Dry item completely. Damp Dry Beep When you select the damp dry beep option, a beep will periodically tumble for the Manual Cycles. WRINKLE CARE When you open the dryer door 26 When using AIR DRY. NOTE: Air Dry is also useful for drying heavyweight and bulky items, such as bedspreads .... 7. The wrinkle care option ends after an Sensor Dry Cycle. Part 9 OPERATING YOUR DRYER • Time Dry Use this cycle to complete drying if items are slow to dry. Manual Preset Cycle Settings Manual Dry Temp. Foam rubber pillows are still damp after the three hours when you push the...
Owners Manual
Page 30
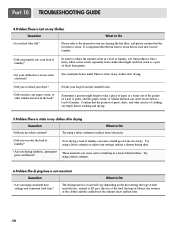
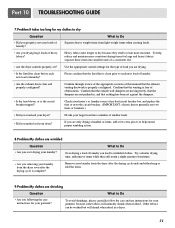
Please refer to the manual section on my Clothes Question What to reduce static electricity. • Did you properly sort your clothes have excess static electricity? Sometimes a person might catch ... dried clothes. Divide your settings and use fabric softener? These materials can cause excess lint in my clothes after drying. • Did you overload your dryer? • Did you place any paper, tissue, or other articles of clothing are empty before each new load of laundry. • Did you over dry...
Please refer to the manual section on my Clothes Question What to reduce static electricity. • Did you properly sort your clothes have excess static electricity? Sometimes a person might catch ... dried clothes. Divide your settings and use fabric softener? These materials can cause excess lint in my clothes after drying. • Did you overload your dryer? • Did you place any paper, tissue, or other articles of clothing are empty before each new load of laundry. • Did you over dry...
Owners Manual
Page 31
... settings for the type of load you following the care instructions for your laundry from the dryer after the drying cycle is complete? Confirm through review of the appropriate sections of this manual that the venting is properly configured. Remove your garment? Heavy fabrics take longer to dry...? Please confirm that nothing has been set ? Confirm that the outside wall dampers are moving freely, that the dampers are not pushed in a dryer. 31 If you are only drying a handful of items, add a few extra pieces to help reduce and maintain more moisture. To avoid shrinkage...
... settings for the type of load you following the care instructions for your laundry from the dryer after the drying cycle is complete? Confirm through review of the appropriate sections of this manual that the venting is properly configured. Remove your garment? Heavy fabrics take longer to dry...? Please confirm that nothing has been set ? Confirm that the outside wall dampers are moving freely, that the dampers are not pushed in a dryer. 31 If you are only drying a handful of items, add a few extra pieces to help reduce and maintain more moisture. To avoid shrinkage...

Service Manual
Page 1
Website:http://www.LGservice.com [For U.S.A] www.lg.ca [For Canada] ELECTRIC & GAS DRYER SERVICE MANUAL CAUTION READ THIS MANUAL CAREFULLY TO DIAGNOSE TROUBLES CORRECTLY BEFORE OFFERING SERVICE. MODEL : DLE5977W/DLG5988W DLE5977B/DLG5988B DLE3777W/DLG3788W
Website:http://www.LGservice.com [For U.S.A] www.lg.ca [For Canada] ELECTRIC & GAS DRYER SERVICE MANUAL CAUTION READ THIS MANUAL CAREFULLY TO DIAGNOSE TROUBLES CORRECTLY BEFORE OFFERING SERVICE. MODEL : DLE5977W/DLG5988W DLE5977B/DLG5988B DLE3777W/DLG3788W

Service Manual
Page 7
... mobile home. 7 Repeat Steps 2, 3, 4 for one person. The weight of the dryer and the height of installation makes the stacking procedure too risky for the other side. be performed by fitting legs as shown in owner's manual. 2 Peel protective paper off the tape from the stacking kit side bracket. 6 Insert... should be careful not to the washer with a screw on the back of the washer by 2 or more experienced service personnel. 5 Place the dryer on a stable, even and solid floor as picture shows. 7 Screw both sides of top plate by attaching the doublefaced tape to the side of...
... mobile home. 7 Repeat Steps 2, 3, 4 for one person. The weight of the dryer and the height of installation makes the stacking procedure too risky for the other side. be performed by fitting legs as shown in owner's manual. 2 Peel protective paper off the tape from the stacking kit side bracket. 6 Insert... should be careful not to the washer with a screw on the back of the washer by 2 or more experienced service personnel. 5 Place the dryer on a stable, even and solid floor as picture shows. 7 Screw both sides of top plate by attaching the doublefaced tape to the side of...

Service Manual
Page 13
... 34min Saturation 45±3°C (5min) 38±5°C SPEED DRY (HIGH) - 25min Saturation (70±5°C) (5min) (47±5°C) Manual FRESHEN UP Dry ** (MID HIGH) - 20min Saturation (66±5°C) (5min) (47±5°C) 3Hr AIR DRY - - 30min Saturation No ... 10sec Temperature Control for each cycle * Sensor dry : "Dry Level" is set by users. ** Manual dry : "Temperature control" is set by users. 13 Dry Display erature Level time Electro- 4 DRYER CYCLE PROCESS Cycle Default Conditions of operation and termination Drying Cooling Wrinkle care Temp-
... 34min Saturation 45±3°C (5min) 38±5°C SPEED DRY (HIGH) - 25min Saturation (70±5°C) (5min) (47±5°C) Manual FRESHEN UP Dry ** (MID HIGH) - 20min Saturation (66±5°C) (5min) (47±5°C) 3Hr AIR DRY - - 30min Saturation No ... 10sec Temperature Control for each cycle * Sensor dry : "Dry Level" is set by users. ** Manual dry : "Temperature control" is set by users. 13 Dry Display erature Level time Electro- 4 DRYER CYCLE PROCESS Cycle Default Conditions of operation and termination Drying Cooling Wrinkle care Temp-


