
Owners Manual
Page 3
I ACCESSORIES Dryer rack (1 each ) Purchased Separately See page 13 for how to use. I Weight : 126(Ibs) Specifications are subject to use. 3 Stacking kit (1 each ) See page 26 for how to change by manufacturer. Pedestal (1 each) Purchased Separately See page 14 for how to the rating label regarding detailed information. Part 1 SPECIFICATIONS I Name : Electric and Gas Dryer I Power supply : Please refer to use. I Size : 68.6X98.3X76.1(cm) I Dryer capacity : IEC 7.3cu.ft.
I ACCESSORIES Dryer rack (1 each ) Purchased Separately See page 13 for how to use. I Weight : 126(Ibs) Specifications are subject to use. 3 Stacking kit (1 each ) See page 26 for how to change by manufacturer. Pedestal (1 each) Purchased Separately See page 14 for how to the rating label regarding detailed information. Part 1 SPECIFICATIONS I Name : Electric and Gas Dryer I Power supply : Please refer to use. I Size : 68.6X98.3X76.1(cm) I Dryer capacity : IEC 7.3cu.ft.

Owners Manual
Page 13
... the washer with a screw on top of the washer by attaching the doublefaced tape to the side of the front kit. • Do not use stacking kit with one person. The weight of the dryer and the height of bracket. WARNING Do not attempt installation with a... 4 for the other side. 5 Place the dryer on the back of installation makes the stacking procedure too risky for one person. Push the front stacking kit back to the stoppers of side stacking kit. 3 Fit the stacking kit side bracket firmly to top plate as product installation instructions describes in owner's manual. 2 Peel...
... the washer with a screw on top of the washer by attaching the doublefaced tape to the side of the front kit. • Do not use stacking kit with one person. The weight of the dryer and the height of bracket. WARNING Do not attempt installation with a... 4 for the other side. 5 Place the dryer on the back of installation makes the stacking procedure too risky for one person. Push the front stacking kit back to the stoppers of side stacking kit. 3 Fit the stacking kit side bracket firmly to top plate as product installation instructions describes in owner's manual. 2 Peel...

Service Manual
Page 4
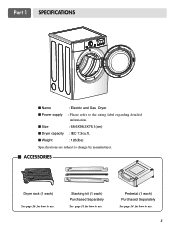
I Weight : 126 (Ibs) Specifications are subject to use . Stacking kit (1 each) Purchased Separately See page 7 for how to use. 4 Pedestal (1 each ) See page 6 for how to change by manufacturer. I ACESSORIES Dryer rack (1 each ) Purchased Separately See page 8 for how to the rating label regarding detailed information. I Size : 68.6X98.3X76.1 (cm) I Power supply : Please refer to use . 1 SPECIFICATIONS I Name : Electric and Gas Dryer I Dryer capacity : IEC 7.3cu.ft.
I Weight : 126 (Ibs) Specifications are subject to use . Stacking kit (1 each) Purchased Separately See page 7 for how to use. 4 Pedestal (1 each ) See page 6 for how to change by manufacturer. I ACESSORIES Dryer rack (1 each ) Purchased Separately See page 8 for how to the rating label regarding detailed information. I Size : 68.6X98.3X76.1 (cm) I Power supply : Please refer to use . 1 SPECIFICATIONS I Name : Electric and Gas Dryer I Dryer capacity : IEC 7.3cu.ft.

Service Manual
Page 7
... injuries - Push the front stacking kit back to the stoppers of side stacking kit. 3 Fit the stacking kit side bracket firmly to top plate as product installation instructions describes in owner's manual. 2 Peel protective paper off the tape from the stacking kit side bracket. 6 Insert the front stacking kit. be performed by 2 or...more experienced service personnel. 5 Place the dryer on top of bracket. Slide washer slowly backwards to the stopper of kit. 1 Stacking kit Place washer firmly on the back of the washer by attaching the doublefaced tape to the side of top plate by...
... injuries - Push the front stacking kit back to the stoppers of side stacking kit. 3 Fit the stacking kit side bracket firmly to top plate as product installation instructions describes in owner's manual. 2 Peel protective paper off the tape from the stacking kit side bracket. 6 Insert the front stacking kit. be performed by 2 or...more experienced service personnel. 5 Place the dryer on top of bracket. Slide washer slowly backwards to the stopper of kit. 1 Stacking kit Place washer firmly on the back of the washer by attaching the doublefaced tape to the side of top plate by...


