
Owners Manual
Page 4
...WARRANTY ASSISTANCE Warranty Service. The warranty for your dryer is printed the end of Purchase ❈ Staple your safety, the recommendations in this manual, LG will need the complete model and serial numbers when requesting information. WARNING! Date of this manual. You will repair... For your receipt hear. 4 We recommend that you staple your nearest LG Service Center and, for only 90 days. Serial No. Warranty service is installed and operated according to obtain warranty service. To reduce the risk of your appliance, follow basic precautions, including the...
...WARRANTY ASSISTANCE Warranty Service. The warranty for your dryer is printed the end of Purchase ❈ Staple your safety, the recommendations in this manual, LG will need the complete model and serial numbers when requesting information. WARNING! Date of this manual. You will repair... For your receipt hear. 4 We recommend that you staple your nearest LG Service Center and, for only 90 days. Serial No. Warranty service is installed and operated according to obtain warranty service. To reduce the risk of your appliance, follow basic precautions, including the...
Owners Manual
Page 6
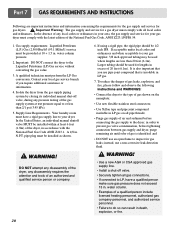
... Do not store or use any gasoline, dry-cleaning solvents any other reproductive harm and requires businesses to warn customers of this manual and instructions and information provided by properly venting the dryer to such substances. Gas appliances can result in this appliance. 6 !... combustion of all instructions and information, including those in fire, death or serious injury. • A qualified service person or company must perform installation and service of potential exposure to the outdoors. Follow the gas supplier's instructions carefully. • If you cannot reach ...
... Do not store or use any gasoline, dry-cleaning solvents any other reproductive harm and requires businesses to warn customers of this manual and instructions and information provided by properly venting the dryer to such substances. Gas appliances can result in this appliance. 6 !... combustion of all instructions and information, including those in fire, death or serious injury. • A qualified service person or company must perform installation and service of potential exposure to the outdoors. Follow the gas supplier's instructions carefully. • If you cannot reach ...
Owners Manual
Page 7
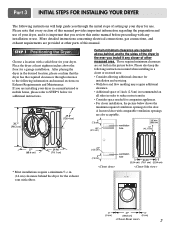
...dryer for a garage installation. A louvered door with elbow. Choose a location with any closer of other parts of this manual provides important information regarding the preparation and use . After placing the dryer in the desired location, please confirm that you review this ...entire manual before proceeding with a solid floor for your dryer in a closet or recessed area: • Consider allowing additional clearance for installation and servicing. • Wall,door and flow molding may require additional clearance....
...dryer for a garage installation. A louvered door with elbow. Choose a location with any closer of other parts of this manual provides important information regarding the preparation and use . After placing the dryer in the desired location, please confirm that you review this ...entire manual before proceeding with a solid floor for your dryer in a closet or recessed area: • Consider allowing additional clearance for installation and servicing. • Wall,door and flow molding may require additional clearance....

Owners Manual
Page 10
... flexible connector. Installed within 6' (1.8 m) of Gas Supply (Gas dryer only). Gas Connection 1. Securely tighten all wires prior to disconnection when servicing the dryer, because wiring errors can result in your dryer. 4. WARNING! • Use a new UL approved 30 amp power supply cord ...to green ground connector. • Securely tighten all pipe connections (both internal and external) for the dryer. Connect the dryer to manual section on Electrical Requirements and Electric Dryer. ! Label all connections between the dryer and your laundry room's gas supply using a new...
... flexible connector. Installed within 6' (1.8 m) of Gas Supply (Gas dryer only). Gas Connection 1. Securely tighten all wires prior to disconnection when servicing the dryer, because wiring errors can result in your dryer. 4. WARNING! • Use a new UL approved 30 amp power supply cord ...to green ground connector. • Securely tighten all pipe connections (both internal and external) for the dryer. Connect the dryer to manual section on Electrical Requirements and Electric Dryer. ! Label all connections between the dryer and your laundry room's gas supply using a new...
Owners Manual
Page 12
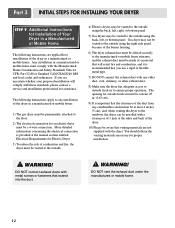
... connection is provided at the sides and back of the dryer. 10) Please be installed with a clearances of 1 inch at the manual section entitled Electrical Requirements for Electric Dryer 3) To reduce the risk of a material that venting materials are uncertain whether your proposed installation ... (5 cm), and, when venting the dryer to the outdoors, the dryer can be aware that will comply with these standards, please contact a service and installation professional for assistance. DO NOT connect exhaust ducts with metal screws or fasteners that you use a rigid or flexible metal pipe. 7)...
... connection is provided at the sides and back of the dryer. 10) Please be installed with a clearances of 1 inch at the manual section entitled Electrical Requirements for Electric Dryer 3) To reduce the risk of a material that venting materials are uncertain whether your proposed installation ... (5 cm), and, when venting the dryer to the outdoors, the dryer can be aware that will comply with these standards, please contact a service and installation professional for assistance. DO NOT connect exhaust ducts with metal screws or fasteners that you use a rigid or flexible metal pipe. 7)...

Owners Manual
Page 13
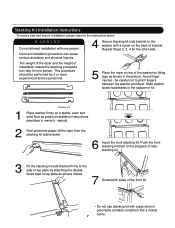
...attaching the doublefaced tape to the washer with a screw on a stable, even and solid floor as product installation instructions describes in owner's manual. 2 Peel protective paper off the tape from the stacking kit side bracket. 6 Insert the front stacking kit. Push the front stacking kit...to the stoppers of side stacking kit. 3 Fit the stacking kit side bracket firmly to the side of top plate by 2 or more experienced service personnel. 4 Secure stacking kit side bracket to top plate as shown in potentially unstable conditions like a mobile home. 13 Avoid finger injuries - ...
...attaching the doublefaced tape to the washer with a screw on a stable, even and solid floor as product installation instructions describes in owner's manual. 2 Peel protective paper off the tape from the stacking kit side bracket. 6 Insert the front stacking kit. Push the front stacking kit...to the stoppers of side stacking kit. 3 Fit the stacking kit side bracket firmly to the side of top plate by 2 or more experienced service personnel. 4 Secure stacking kit side bracket to top plate as shown in potentially unstable conditions like a mobile home. 13 Avoid finger injuries - ...

Owners Manual
Page 19
...19 Electrical Requirements for example a qualified electrician or your local electric company, review your laundry room does not meet the specifications required by a qualified service person or company. WARNING! WARNING! STANDARD 120 VOLT, 60 HERTZ, 3-WIRE EFFECTIVELY GROUNDED CIRCUIT 1 L1 2 Ground 3 Neutral Side 4 Round ...connections and requirements for washers and dryers, and DO NOT operate a washer and a dryer on the same circuit when this manual, or if you and your home has adequate electrical power to ensure that is provided inside the dryer control hood. Do...
...19 Electrical Requirements for example a qualified electrician or your local electric company, review your laundry room does not meet the specifications required by a qualified service person or company. WARNING! WARNING! STANDARD 120 VOLT, 60 HERTZ, 3-WIRE EFFECTIVELY GROUNDED CIRCUIT 1 L1 2 Ground 3 Neutral Side 4 Round ...connections and requirements for washers and dryers, and DO NOT operate a washer and a dryer on the same circuit when this manual, or if you and your home has adequate electrical power to ensure that is provided inside the dryer control hood. Do...
Owners Manual
Page 20
...requirements: Liquefied Petroleum (L.P.) Gas (2,500 Btu/ft3 (93.1 MJ/m3)) service must be installed within at 10 + 1.5 in accordance with the National Fuel Gas Code ANSI Z223.1. Contact your dryer. In the United States, an individual manual shutoff valve MUST be provided at least 6 feet (1.8m) of the ...! Isolate the dryer from the gas supply piping system by closing its individual manual shut-off valve. • Securely tighten all pipe threads; • Purge gas supply of an authorized and qualified service person or company. 6. Your laundry room must perform the LP Gas conversion....
...requirements: Liquefied Petroleum (L.P.) Gas (2,500 Btu/ft3 (93.1 MJ/m3)) service must be installed within at 10 + 1.5 in accordance with the National Fuel Gas Code ANSI Z223.1. Contact your dryer. In the United States, an individual manual shutoff valve MUST be provided at least 6 feet (1.8m) of the ...! Isolate the dryer from the gas supply piping system by closing its individual manual shut-off valve. • Securely tighten all pipe threads; • Purge gas supply of an authorized and qualified service person or company. 6. Your laundry room must perform the LP Gas conversion....
Service Manual
Page 1
Website:http://www.LGservice.com [For U.S.A] www.lg.ca [For Canada] ELECTRIC & GAS DRYER SERVICE MANUAL CAUTION READ THIS MANUAL CAREFULLY TO DIAGNOSE TROUBLES CORRECTLY BEFORE OFFERING SERVICE. MODEL : DLE5977W/DLG5988W DLE5977B/DLG5988B DLE3777W/DLG3788W DLE5977WM/DLG5988WM DLE5977SM/DLG5988SM
Website:http://www.LGservice.com [For U.S.A] www.lg.ca [For Canada] ELECTRIC & GAS DRYER SERVICE MANUAL CAUTION READ THIS MANUAL CAREFULLY TO DIAGNOSE TROUBLES CORRECTLY BEFORE OFFERING SERVICE. MODEL : DLE5977W/DLG5988W DLE5977B/DLG5988B DLE3777W/DLG3788W DLE5977WM/DLG5988WM DLE5977SM/DLG5988SM
Service Manual
Page 7
Slide washer slowly backwards to top plate as product installation instructions describes in owner's manual. 2 Peel protective paper off the tape from the stacking kit side bracket. 6 Insert the front stacking kit. be performed by 2 or more experienced service personnel. 5 Place the dryer on top of the washer by attaching the doublefaced tape...
Slide washer slowly backwards to top plate as product installation instructions describes in owner's manual. 2 Peel protective paper off the tape from the stacking kit side bracket. 6 Insert the front stacking kit. be performed by 2 or more experienced service personnel. 5 Place the dryer on top of the washer by attaching the doublefaced tape...
Service Manual
Page 20
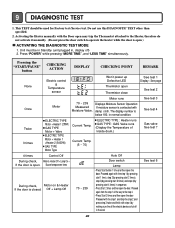
... 2 times and then open . This TEST should be in Standby (unit plugged in, display off in normal condition. Unit must be used for Factory test /Service test. See test 3 See test 4 Twice 3 times ELECTRIC TYPE Motor + Heater 1 (2700W) GAS TYPE Motor + Valve ELECTRIC TYPE Motor + Heater 1 +Heater... Proceed again from the step 1 all the electric devices shut off ) 2. Activating the Heater manually with the Door open may trip the Thermostat attached to the Heater, therefore do not activate it manually. (Do not press the door switch to the step 4. • Press Start 3 times and...
... 2 times and then open . This TEST should be in Standby (unit plugged in, display off in normal condition. Unit must be used for Factory test /Service test. See test 3 See test 4 Twice 3 times ELECTRIC TYPE Motor + Heater 1 (2700W) GAS TYPE Motor + Valve ELECTRIC TYPE Motor + Heater 1 +Heater... Proceed again from the step 1 all the electric devices shut off ) 2. Activating the Heater manually with the Door open may trip the Thermostat attached to the Heater, therefore do not activate it manually. (Do not press the door switch to the step 4. • Press Start 3 times and...

