
Owners Manual
Page 4
...days. Warranty Restriction: If the dryer is subjected to obtain warranty service. Your dryer's model and serial numbers are defective in this manual, LG will need the complete model and serial numbers when requesting information. Model No. We recommend that you staple your appliance, follow basic ...or explosion, electric shock, or to the instructions in this manual must be followed. WARNING! To reduce the risk of this manual. You will repair or replace any of your dryer is effective for your new LG dryer. Use the space below to record the model number...
...days. Warranty Restriction: If the dryer is subjected to obtain warranty service. Your dryer's model and serial numbers are defective in this manual, LG will need the complete model and serial numbers when requesting information. Model No. We recommend that you staple your appliance, follow basic ...or explosion, electric shock, or to the instructions in this manual must be followed. WARNING! To reduce the risk of this manual. You will repair or replace any of your dryer is effective for your new LG dryer. Use the space below to record the model number...
Owners Manual
Page 6
... the state to cause cancer, birth defects or other flammable vapors or liquids in your building. • Clear the room, building or area of this manual and instructions and information provided by using this appliance. • Do not dry anything that have ever had anything flammable on any gas or electrical...
... the state to cause cancer, birth defects or other flammable vapors or liquids in your building. • Clear the room, building or area of this manual and instructions and information provided by using this appliance. • Do not dry anything that have ever had anything flammable on any gas or electrical...
Owners Manual
Page 7
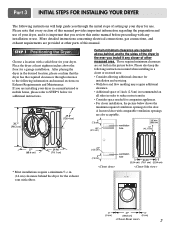
....7" (98.3 cm) 49.8" (126.4 cm) Certain minimum clearance are also acceptable. Please also keep the following information and manual sections on Exhaust Requirements and Maintenance. Choose a location with a solid floor for the exhaust vent with comparable ventilation openings are required...note that the dryer has the required clearances through the initial steps of 1inch (2.5cm) is important that you review this manual. More detailed instructions concerning electrical connections, gas connections, and exhaust requirements are installing your dryer, and it any installation or ...
....7" (98.3 cm) 49.8" (126.4 cm) Certain minimum clearance are also acceptable. Please also keep the following information and manual sections on Exhaust Requirements and Maintenance. Choose a location with a solid floor for the exhaust vent with comparable ventilation openings are required...note that the dryer has the required clearances through the initial steps of 1inch (2.5cm) is important that you review this manual. More detailed instructions concerning electrical connections, gas connections, and exhaust requirements are installing your dryer, and it any installation or ...
Owners Manual
Page 8
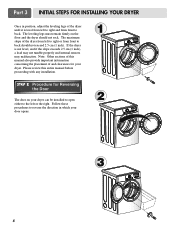
...sensors may malfunction. If the dryer is level from front to right and from left or the right. Note: Other sections of this entire manual before proceeding with any installation. Follow these procedures to reverse the direction in position, adjust the leveling legs of the dryer from left to ...right or from front to back should not rock. Please review this manual also provide important information concerning the placement of and clearances for Reversing the Door The door on the floor and the dryer should not ...
...sensors may malfunction. If the dryer is level from front to right and from left or the right. Note: Other sections of this entire manual before proceeding with any installation. Follow these procedures to reverse the direction in position, adjust the leveling legs of the dryer from left to ...right or from front to back should not rock. Please review this manual also provide important information concerning the placement of and clearances for Reversing the Door The door on the floor and the dryer should not ...
Owners Manual
Page 9
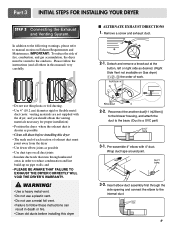
...-up on Exhaust Requirements and Maintenance. I ALTERNATE EXHAUST DIRECTIONS 1. IMPORTANT: To reduce the risk of exhaust duct must be vented to manual section on pipe walls; Reconnect the another duct[11 in order to the base. (Duct is shorter as possible • Use duct... gas accumulation, the dryer must point away from the dryer • Use fewer elbow joints as possible • Clean old ducts before installing this manual) very carefully. Wrap duct tape around joint. 3-2. In addition to the following warnings, please refer to the outdoors. Remove a screw and exhaust ...
...-up on Exhaust Requirements and Maintenance. I ALTERNATE EXHAUST DIRECTIONS 1. IMPORTANT: To reduce the risk of exhaust duct must be vented to manual section on pipe walls; Reconnect the another duct[11 in order to the base. (Duct is shorter as possible • Use duct... gas accumulation, the dryer must point away from the dryer • Use fewer elbow joints as possible • Clean old ducts before installing this manual) very carefully. Wrap duct tape around joint. 3-2. In addition to the following warnings, please refer to the outdoors. Remove a screw and exhaust ...

Owners Manual
Page 10
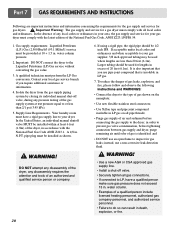
...the dryer and your laundry room is appropriate for the dryer. The dryer is required for complete instructions. • Failure to manual section on Electrical Requirements and Electric Dryer. ! Iron Pipe. Shorter than 20' (6.1 m) - Securely tighten all electrical connections... See installation instructions for manufactured (mobile) home installations and use a new stainless steel flexible connector if allowed by local codes. Use this manual's section on Gas Requirements and Instructions. 1 2 5 3 4 1. For LP (Liquefied Petroleum) gas connection, refer to this type ...
...the dryer and your laundry room is appropriate for the dryer. The dryer is required for complete instructions. • Failure to manual section on Electrical Requirements and Electric Dryer. ! Iron Pipe. Shorter than 20' (6.1 m) - Securely tighten all electrical connections... See installation instructions for manufactured (mobile) home installations and use a new stainless steel flexible connector if allowed by local codes. Use this manual's section on Gas Requirements and Instructions. 1 2 5 3 4 1. For LP (Liquefied Petroleum) gas connection, refer to this type ...
Owners Manual
Page 11
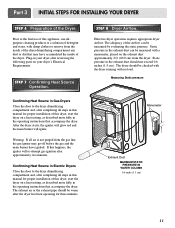
...has been operating for proper installation of the airflow can be warm after completing all steps in your dryer's Electrical Requirements. If this manual for three minutes. STEP 8 Dryer Airflow. Effective dryer operation requires appropriate dryer airflow. The dryer should not exceed 0.6 inches (1.5...minutes. Confirming Heat Source in the exhaust duct should be measured by evaluating the static pressure. The adequacy of this manual for proper installation of the dryer drum/drying compartment any dust or dirt that accompany the dryer. Measuring Static pressure ...
...has been operating for proper installation of the airflow can be warm after completing all steps in your dryer's Electrical Requirements. If this manual for three minutes. STEP 8 Dryer Airflow. Effective dryer operation requires appropriate dryer airflow. The dryer should not exceed 0.6 inches (1.5...minutes. Confirming Heat Source in the exhaust duct should be measured by evaluating the static pressure. The adequacy of this manual for proper installation of the dryer drum/drying compartment any dust or dirt that accompany the dryer. Measuring Static pressure ...
Owners Manual
Page 12
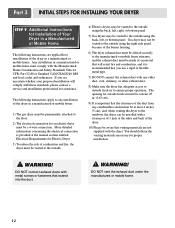
... construction be at least 2 inches (5 cm), and, when venting the dryer to the outdoors, the dryer can be installed with a clearances of 1 inch at the manual section entitled Electrical Requirements for Electric Dryer 3) To reduce the risk of combustion and fire, the dryer must be vented to the outside. 4) Electric dryers...
... construction be at least 2 inches (5 cm), and, when venting the dryer to the outdoors, the dryer can be installed with a clearances of 1 inch at the manual section entitled Electrical Requirements for Electric Dryer 3) To reduce the risk of combustion and fire, the dryer must be vented to the outside. 4) Electric dryers...

Owners Manual
Page 13
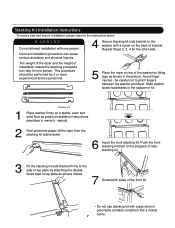
.... 5 Place the dryer on a stable, even and solid floor as picture shows. 7 Screw both sides of top plate by fitting legs as shown in owner's manual. 2 Peel protective paper off the tape from the stacking kit side bracket. 6 Insert the front stacking kit.
.... 5 Place the dryer on a stable, even and solid floor as picture shows. 7 Screw both sides of top plate by fitting legs as shown in owner's manual. 2 Peel protective paper off the tape from the stacking kit side bracket. 6 Insert the front stacking kit.

Owners Manual
Page 19
... grounded in order to ensure that is grounded in order to be properly and fully effective, must be used on the same circuit when this manual, or if you and your home has adequate electrical power to be plugged into a properly grounded three-prong receptacle that your dryer. This plug, in...
... grounded in order to ensure that is grounded in order to be properly and fully effective, must be used on the same circuit when this manual, or if you and your home has adequate electrical power to be plugged into a properly grounded three-prong receptacle that your dryer. This plug, in...
Owners Manual
Page 20
...Contact your gas dryer must perform the LP Gas conversion. Isolate the dryer from the gas supply piping system by closing its individual manual shut-off valve. • Securely tighten all pipe threads; • Purge gas supply of a qualified person include licensed heating ...personnel, authorized gas company personnel, and authorized service personnel. • Failure to your dryer. In the United States, an individual manual shutoff valve MUST be used where lengths are important instructions and information concerning the requirements for the gas supply and service for a ...
...Contact your gas dryer must perform the LP Gas conversion. Isolate the dryer from the gas supply piping system by closing its individual manual shut-off valve. • Securely tighten all pipe threads; • Purge gas supply of a qualified person include licensed heating ...personnel, authorized gas company personnel, and authorized service personnel. • Failure to your dryer. In the United States, an individual manual shutoff valve MUST be used where lengths are important instructions and information concerning the requirements for the gas supply and service for a ...
Owners Manual
Page 23
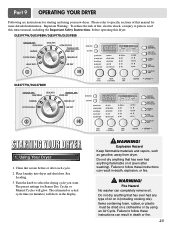
... and using an Air Cycle. Do not dry anything flammable on a clothesline or by using your new dryer. DLE5977W/DLG5988W/DLE5977B/DLG5988B DLE3777W/DLG3788W STARTING YOUR DRYER 1. WARNING! Do not dry anything that has ever had anything that has ever had any type of fire, ... Warning: To reduce the risk of oil on it (even after each cycle. 2. Using Your Dryer 1. Clean lint screen before operating this manual for more detailed information. The estimated or actual cycle time (in death, explosion, or fire. ! WARNING! Failure to follow these instructions can...
... and using an Air Cycle. Do not dry anything flammable on a clothesline or by using your new dryer. DLE5977W/DLG5988W/DLE5977B/DLG5988B DLE3777W/DLG3788W STARTING YOUR DRYER 1. WARNING! Do not dry anything that has ever had anything that has ever had any type of fire, ... Warning: To reduce the risk of oil on it (even after each cycle. 2. Using Your Dryer 1. Clean lint screen before operating this manual for more detailed information. The estimated or actual cycle time (in death, explosion, or fire. ! WARNING! Failure to follow these instructions can...
Owners Manual
Page 24
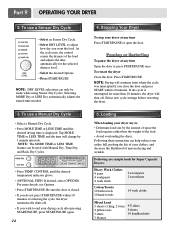
...for the selected dryness level. • Select the desired Options. • Press START/PAUSE NOTE: DRY LEVEL selections can only be used with Manual Dry, Time Dry, and Rack Dry Cycles. • Press TEMP. NOTE: Drying will change by the amount of space the load requires rather...door. If the cycle is displayed. For more than the weight of selecting the cycle, the dryer automatically shuts off . To use a Manual Dry Cycle • Select a Manual Dry Cycle. • Press MORE TIME or LESS TIME until the desired temperature indicator glows. • (OPTIONAL STEP) If desired, select...
...for the selected dryness level. • Select the desired Options. • Press START/PAUSE NOTE: DRY LEVEL selections can only be used with Manual Dry, Time Dry, and Rack Dry Cycles. • Press TEMP. NOTE: Drying will change by the amount of space the load requires rather...door. If the cycle is displayed. For more than the weight of selecting the cycle, the dryer automatically shuts off . To use a Manual Dry Cycle • Select a Manual Dry Cycle. • Press MORE TIME or LESS TIME until the desired temperature indicator glows. • (OPTIONAL STEP) If desired, select...

Owners Manual
Page 25
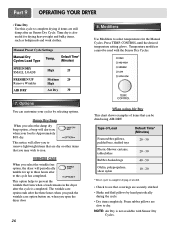
When a Manual Cycle is displayed. To unlock, press and hold RACK DRY for items that require drying without heat such as rubber, plastic and heat-sensitive fabrics. ... the moisture in the dryer too long. • Air Dry Use the Air Dry Modifier for 3 seconds. Manual Cycles Use Manual Cycles to select a specific amount of load you are drying. (See Sensor Dry or Manual Preset Cycle Settings charts.) Sensor Dry Cycles allow you to match the cycle to the load you...
When a Manual Cycle is displayed. To unlock, press and hold RACK DRY for items that require drying without heat such as rubber, plastic and heat-sensitive fabrics. ... the moisture in the dryer too long. • Air Dry Use the Air Dry Modifier for 3 seconds. Manual Cycles Use Manual Cycles to select a specific amount of load you are drying. (See Sensor Dry or Manual Preset Cycle Settings charts.) Sensor Dry Cycles allow you to match the cycle to the load you...
Owners Manual
Page 26
... the desired temperature setting glows. WRINKLE CARE When you to iron. The wrinkle care option ends after the cycle is also useful for the Manual Cycles. Part 9 OPERATING YOUR DRYER • Time Dry Use this cycle to complete drying if items are slow to dry. MMooddiiffiieerrss Use...allow you select the wrinkle free option, the dryer will periodically tumble for up to three hours after an Sensor Dry Cycle. Manual Preset Cycle Settings Manual Dry Temp. Temperature modifiers cannot be dried using Air Dry This chart shows examples of Load Foam rubber-pillows, padded bras, ...
... the desired temperature setting glows. WRINKLE CARE When you to iron. The wrinkle care option ends after the cycle is also useful for the Manual Cycles. Part 9 OPERATING YOUR DRYER • Time Dry Use this cycle to complete drying if items are slow to dry. MMooddiiffiieerrss Use...allow you select the wrinkle free option, the dryer will periodically tumble for up to three hours after an Sensor Dry Cycle. Manual Preset Cycle Settings Manual Dry Temp. Temperature modifiers cannot be dried using Air Dry This chart shows examples of Load Foam rubber-pillows, padded bras, ...
Owners Manual
Page 30
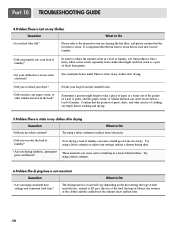
... What to Do • Are you using consistent heat settings and consistent load sizes? See comments below under There is clean. Please refer to the manual section on the heat setting, the type of heat used (electric, natural or LP gas), the size of the load, the type of fabrics, the...
... What to Do • Are you using consistent heat settings and consistent load sizes? See comments below under There is clean. Please refer to the manual section on the heat setting, the type of heat used (electric, natural or LP gas), the size of the load, the type of fabrics, the...
Owners Manual
Page 31
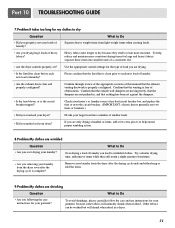
... the items. 9.Problem:My clothes are wrinkled Question • Are you drying large loads of laundry? Confirm through review of the appropriate sections of this manual that the dampers are drying. • Is the lint filter clean before each new load of obstructions. Confirm that the outside wall dampers are moving...
... the items. 9.Problem:My clothes are wrinkled Question • Are you drying large loads of laundry? Confirm through review of the appropriate sections of this manual that the dampers are drying. • Is the lint filter clean before each new load of obstructions. Confirm that the outside wall dampers are moving...
Service Manual
Page 1
MODEL : DLE5977W/DLG5988W DLE5977B/DLG5988B DLE3777W/DLG3788W DLE5977WM/DLG5988WM DLE5977SM/DLG5988SM Website:http://www.LGservice.com [For U.S.A] www.lg.ca [For Canada] ELECTRIC & GAS DRYER SERVICE MANUAL CAUTION READ THIS MANUAL CAREFULLY TO DIAGNOSE TROUBLES CORRECTLY BEFORE OFFERING SERVICE.
MODEL : DLE5977W/DLG5988W DLE5977B/DLG5988B DLE3777W/DLG3788W DLE5977WM/DLG5988WM DLE5977SM/DLG5988SM Website:http://www.LGservice.com [For U.S.A] www.lg.ca [For Canada] ELECTRIC & GAS DRYER SERVICE MANUAL CAUTION READ THIS MANUAL CAREFULLY TO DIAGNOSE TROUBLES CORRECTLY BEFORE OFFERING SERVICE.
Service Manual
Page 7
... installation makes the stacking procedure too risky for the other side. This procedure should be careful not to the washer with a gas dryer in owner's manual. 2 Peel protective paper off the tape from the stacking kit side bracket. 6 Insert the front stacking kit. Slide washer slowly backwards to top plate as...
... installation makes the stacking procedure too risky for the other side. This procedure should be careful not to the washer with a gas dryer in owner's manual. 2 Peel protective paper off the tape from the stacking kit side bracket. 6 Insert the front stacking kit. Slide washer slowly backwards to top plate as...
Service Manual
Page 13
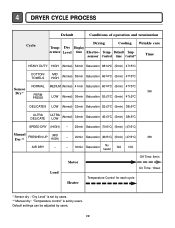
... (Normal) 34min Saturation 45±3°C (5min) 38±5°C SPEED DRY (HIGH) - 25min Saturation (70±5°C) (5min) (47±5°C) Manual FRESHEN UP Dry ** (MID HIGH) - 20min Saturation (66±5°C) (5min) (47±5°C) 3Hr AIR DRY - - 30min Saturation No heater N/A... Motor Heater Off Time: 6min On Time: 10sec Temperature Control for each cycle * Sensor dry : "Dry Level" is set by users. ** Manual dry : "Temperature control" is set by users. 13 Default settings can be adjusted by users. Dry Display erature Level time Electro- 4 DRYER ...
... (Normal) 34min Saturation 45±3°C (5min) 38±5°C SPEED DRY (HIGH) - 25min Saturation (70±5°C) (5min) (47±5°C) Manual FRESHEN UP Dry ** (MID HIGH) - 20min Saturation (66±5°C) (5min) (47±5°C) 3Hr AIR DRY - - 30min Saturation No heater N/A... Motor Heater Off Time: 6min On Time: 10sec Temperature Control for each cycle * Sensor dry : "Dry Level" is set by users. ** Manual dry : "Temperature control" is set by users. 13 Default settings can be adjusted by users. Dry Display erature Level time Electro- 4 DRYER ...


