
Owners Manual
Page 2
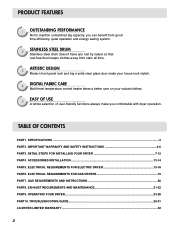
...INSTRUCTIONS 20 PART8. TROUBLESHOOTING GUIDE ...29-31 LG DRYER LIMITED WARRANTY ...32 2 EXHAUST REQUIREMENTS AND MAINTENANCE 21-22 PART9. TABLE OF CONTENTS PART1. ACCESSORIES INSTALLATION ...13-14 PART5. IMPORTANT WARRANTY AND SAFETY INSTRUCTIONS 4-6 PART3. ELECTRICAL REQUIREMENTS FOR ELECTRIC DRYER 15-18 PART6. PRODUCT FEATURES 1 OUTSTANDING ...valued clothes. 5 EASY OF USE A whole selection of user-friendly functions always make you comfortable with dryer operation. ELECTRICAL REQUIREMENTS FOR GAS DRYERS 19 PART7. OPERATING YOUR DRYER...23-28 PART10. SPECIFICATIONS ...3 PART2.
...INSTRUCTIONS 20 PART8. TROUBLESHOOTING GUIDE ...29-31 LG DRYER LIMITED WARRANTY ...32 2 EXHAUST REQUIREMENTS AND MAINTENANCE 21-22 PART9. TABLE OF CONTENTS PART1. ACCESSORIES INSTALLATION ...13-14 PART5. IMPORTANT WARRANTY AND SAFETY INSTRUCTIONS 4-6 PART3. ELECTRICAL REQUIREMENTS FOR ELECTRIC DRYER 15-18 PART6. PRODUCT FEATURES 1 OUTSTANDING ...valued clothes. 5 EASY OF USE A whole selection of user-friendly functions always make you comfortable with dryer operation. ELECTRICAL REQUIREMENTS FOR GAS DRYERS 19 PART7. OPERATING YOUR DRYER...23-28 PART10. SPECIFICATIONS ...3 PART2.
Owners Manual
Page 3
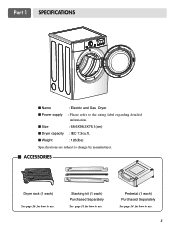
Part 1 SPECIFICATIONS I Name : Electric and Gas Dryer I Dryer capacity : IEC 7.3cu.ft. Stacking kit (1 each ) Purchased Separately See page 14 for how to use. 3 I Size : 68.6X98.3X76.1(cm) I Power supply : Please refer to change by manufacturer. I Weight : 126(Ibs) Specifications are subject to the rating label regarding detailed information. Pedestal (1 each ) Purchased Separately See page 13 for how to use . I ACCESSORIES Dryer rack (1 each) See page 26 for how to use .
Part 1 SPECIFICATIONS I Name : Electric and Gas Dryer I Dryer capacity : IEC 7.3cu.ft. Stacking kit (1 each ) Purchased Separately See page 14 for how to use. 3 I Size : 68.6X98.3X76.1(cm) I Power supply : Please refer to change by manufacturer. I Weight : 126(Ibs) Specifications are subject to the rating label regarding detailed information. Pedestal (1 each ) Purchased Separately See page 13 for how to use . I ACCESSORIES Dryer rack (1 each) See page 26 for how to use .
Owners Manual
Page 4
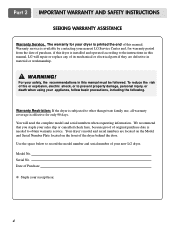
...date is effective for only 90 days. Your dryer's model and serial numbers are defective in material or workmanship. ! To reduce the risk of fire or explosion, electric shock, or to record the model number and serial number of this manual, LG will need the complete model and serial numbers ...when requesting information. The warranty for warranty period from the date of purchase, if this dryer is printed the end of your...
...date is effective for only 90 days. Your dryer's model and serial numbers are defective in material or workmanship. ! To reduce the risk of fire or explosion, electric shock, or to record the model number and serial number of this manual, LG will need the complete model and serial numbers ...when requesting information. The warranty for warranty period from the date of purchase, if this dryer is printed the end of your...
Owners Manual
Page 5
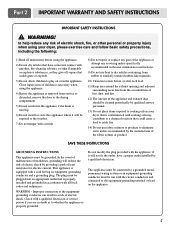
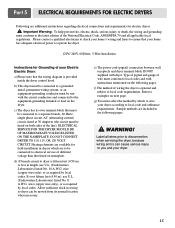
...appliance: if it will reduce the risk of electric shock by qualified service personnel. 13) Do not place items exposed to dry articles containing foam rubber or similarly textured rubber-like materials. 10) Clean lint screen before using your dryer. This appliance is properly grounded. Improper connection...or other personal or property injury when using the appliance. 2) Do not dry articles that have a proper outlet installed by the manufacturer of electric shock. The plug must be exposed to the weather. 7) Do not tamper with a qualified electrician or service person if you are in...
...appliance: if it will reduce the risk of electric shock by qualified service personnel. 13) Do not place items exposed to dry articles containing foam rubber or similarly textured rubber-like materials. 10) Clean lint screen before using your dryer. This appliance is properly grounded. Improper connection...or other personal or property injury when using the appliance. 2) Do not dry articles that have a proper outlet installed by the manufacturer of electric shock. The plug must be exposed to the weather. 7) Do not tamper with a qualified electrician or service person if you are in...
Owners Manual
Page 6
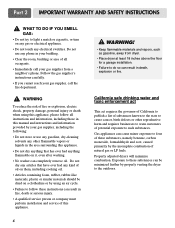
... A qualified service person or company must perform installation and service of this appliance. • Do not dry anything flammable on any gas or electrical appliance. • Do not touch any phone in your building. • Clear the room, building or area of all instructions and information,...known to the state to cause cancer, birth defects or other flammable vapors or liquids in death, explosion or fire. Properly adjusted dryers will minimize combustion. California safe drinking water and toxic enforcement act This act requires the governor of California to publish a list ...
... A qualified service person or company must perform installation and service of this appliance. • Do not dry anything flammable on any gas or electrical appliance. • Do not touch any phone in your building. • Clear the room, building or area of all instructions and information,...known to the state to cause cancer, birth defects or other flammable vapors or liquids in death, explosion or fire. Properly adjusted dryers will minimize combustion. California safe drinking water and toxic enforcement act This act requires the governor of California to publish a list ...
Owners Manual
Page 7
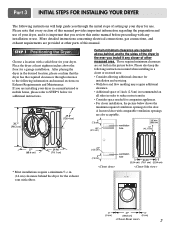
... detailed instructions concerning electrical connections, gas connections, and exhaust requirements are also acceptable. Choose a location with comparable ventilation openings are provided at least eighteen inches above ,behind the dryer for the exhaust vent with any closer of other parts of your dryer for use . ... additional instructions. 38.7" (98.3 cm) 49.8" (126.4 cm) Certain minimum clearance are set forth in the ever you are installing your dryer. ventilation hole 27" (68.6 cm) 29.96" (76.1 cm) * Most installations require a minimum 5 1/2 in. (14 cm) clearance behind ,...
... detailed instructions concerning electrical connections, gas connections, and exhaust requirements are also acceptable. Choose a location with comparable ventilation openings are provided at least eighteen inches above ,behind the dryer for the exhaust vent with any closer of other parts of your dryer for use . ... additional instructions. 38.7" (98.3 cm) 49.8" (126.4 cm) Certain minimum clearance are set forth in the ever you are installing your dryer. ventilation hole 27" (68.6 cm) 29.96" (76.1 cm) * Most installations require a minimum 5 1/2 in. (14 cm) clearance behind ,...

Owners Manual
Page 10
... For LP (Liquefied Petroleum) gas connection, refer to manual section on Electrical Requirements and Electric Dryer. ! Following are several warnings and instructions concerning making electrical connections. • Connect neutral wire(white or center wire) to center...NPT gas connection. 2. Iron Pipe. Securely tighten all pipe connections (both internal and external) for Electric Dryer Only. Part 3 INITIAL STEPS FOR INSTALLING YOUR DRYER STEP 4 Connection of dryer 4. In addition to the following, please refer to this manual's section on Gas Requirements and Instructions...
... For LP (Liquefied Petroleum) gas connection, refer to manual section on Electrical Requirements and Electric Dryer. ! Following are several warnings and instructions concerning making electrical connections. • Connect neutral wire(white or center wire) to center...NPT gas connection. 2. Iron Pipe. Securely tighten all pipe connections (both internal and external) for Electric Dryer Only. Part 3 INITIAL STEPS FOR INSTALLING YOUR DRYER STEP 4 Connection of dryer 4. In addition to the following, please refer to this manual's section on Gas Requirements and Instructions...
Owners Manual
Page 11
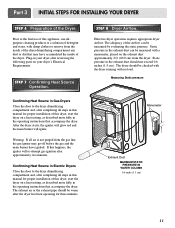
...) 11 Warning: If all air is not purged from the gas line, the gas igniter may have ignited. Confirming Heat Source in Electric Dryers Close the door to the dryer drum/drying compartment and, after completing all steps in this manual for three minutes. Static pressure in the exhaust duct can be measured...
...) 11 Warning: If all air is not purged from the gas line, the gas igniter may have ignited. Confirming Heat Source in Electric Dryers Close the door to the dryer drum/drying compartment and, after completing all steps in this manual for three minutes. Static pressure in the exhaust duct can be measured...
Owners Manual
Page 12
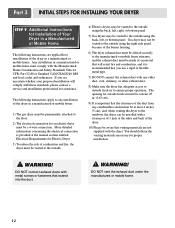
...DO NOT connect exhaust ducts with metal screws or fasteners that you are applicable to installations of the dryer in a manufactured or mobile home must be vented to the outside. 4) Electric dryers may be vented to ensure proper operation. WARNING! If you use a rigid or flexible metal pipe.... 7) DO NOT connect the exhaust duct with a clearances of 1 inch at the manual section entitled Electrical Requirements for an electric dryer must be at least 25 in2 (163 cm2). 9) It is important that the clearance of the duct from any combustible construction ...
...DO NOT connect exhaust ducts with metal screws or fasteners that you are applicable to installations of the dryer in a manufactured or mobile home must be vented to the outside. 4) Electric dryers may be vented to ensure proper operation. WARNING! If you use a rigid or flexible metal pipe.... 7) DO NOT connect the exhaust duct with a clearances of 1 inch at the manual section entitled Electrical Requirements for an electric dryer must be at least 25 in2 (163 cm2). 9) It is important that the clearance of the duct from any combustible construction ...
Owners Manual
Page 15
...VOLT CIRCUIT. wire (copper wire only), or as required by local codes. Allow sufficient slack in the following pages. Part 5 ELECTRICAL REQUIREMENTS FOR ELECTRIC DRYERS Following are available for field installation in length, use U.L. (Underwriters Laboratories) listed No. 8 A.W.G. wire (copper wire only), or... to check your home's wiring and fuses to ensure that your home has adequate electrical power to operate the dryer. 120V/ 240V, 60 Hertz, 3-Wire Installation Instructions for electric dryers. ! Type of pigtail and gauge of wire must be run with the circuit ...
...VOLT CIRCUIT. wire (copper wire only), or as required by local codes. Allow sufficient slack in the following pages. Part 5 ELECTRICAL REQUIREMENTS FOR ELECTRIC DRYERS Following are available for field installation in length, use U.L. (Underwriters Laboratories) listed No. 8 A.W.G. wire (copper wire only), or... to check your home's wiring and fuses to ensure that your home has adequate electrical power to operate the dryer. 120V/ 240V, 60 Hertz, 3-Wire Installation Instructions for electric dryers. ! Type of pigtail and gauge of wire must be run with the circuit ...
Owners Manual
Page 16
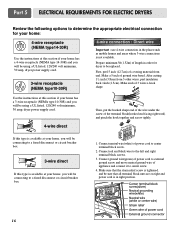
... cord. 3-wire receptacle (NEMA type10-30R) 4-wire connection : Direct wire Important : use 4-wire connection in right position. 16 Part 5 ELECTRICAL REQUIREMENTS FOR ELECTRIC DRYERS Review the following options to determine the appropriate electrical connection for dryer to be replaced. Use the instructions at your home has a 4-wire receptacle (NEMA type 14-30R) and you will...
... cord. 3-wire receptacle (NEMA type10-30R) 4-wire connection : Direct wire Important : use 4-wire connection in right position. 16 Part 5 ELECTRICAL REQUIREMENTS FOR ELECTRIC DRYERS Review the following options to determine the appropriate electrical connection for dryer to be replaced. Use the instructions at your home has a 4-wire receptacle (NEMA type 14-30R) and you will...
Owners Manual
Page 17
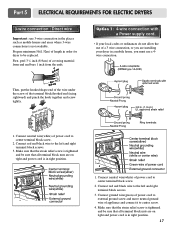
Part 5 ELECTRICAL REQUIREMENTS FOR ELECTRIC DRYERS 3-wire connection : Direct wire Important : use of power cord to center terminal... home, you must use a 4wire connection. Option 1: 4-wire connection with a Power supply cord. • lf your dryer in right position. 17 Connect neutral wire(white) of a 3 wire connection, or you are installing your local codes or... use 3-wire connection in the places such as mobile homes and areas where 3-wire connections is in order for dryer to external ground screw and move neutral ground wire of covering material from end and bare 1 inch from the...
Part 5 ELECTRICAL REQUIREMENTS FOR ELECTRIC DRYERS 3-wire connection : Direct wire Important : use of power cord to center terminal... home, you must use a 4wire connection. Option 1: 4-wire connection with a Power supply cord. • lf your dryer in right position. 17 Connect neutral wire(white) of a 3 wire connection, or you are installing your local codes or... use 3-wire connection in the places such as mobile homes and areas where 3-wire connections is in order for dryer to external ground screw and move neutral ground wire of covering material from end and bare 1 inch from the...
Owners Manual
Page 18
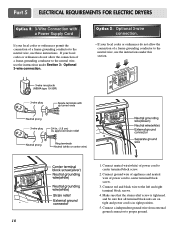
... or ordinances do not allow the connection of a frame-grounding conductor to the neutral wire, use the instructions under Section 3: Optional 3-wire connection. Part 5 ELECTRICAL REQUIREMENTS FOR ELECTRIC DRYERS Option 2: 3-Wire Connection with a Power Supply Cord lf your local codes or ordinances permit the connection of power cord to center terminal block screw...
... or ordinances do not allow the connection of a frame-grounding conductor to the neutral wire, use the instructions under Section 3: Optional 3-wire connection. Part 5 ELECTRICAL REQUIREMENTS FOR ELECTRIC DRYERS Option 2: 3-Wire Connection with a Power Supply Cord lf your local codes or ordinances permit the connection of power cord to center terminal block screw...

Owners Manual
Page 19
...must be grounded in accordance with all applicable local regulations. c) Use separately fused circuits for Your Dryer: a) Please note that your laundry room's electrical supply for gas dryers. ! c) If your laundry room does not meet the specifications required by operating other appliances on ... by using any problems. 19 The plug should be used on the same circuit. ! b) The dryer must conform to you are additional instructions regarding electrical connections and requirements for any adapter to allow additional cords to connect to be plugged directed into a ...
...must be grounded in accordance with all applicable local regulations. c) Use separately fused circuits for Your Dryer: a) Please note that your laundry room's electrical supply for gas dryers. ! c) If your laundry room does not meet the specifications required by operating other appliances on ... by using any problems. 19 The plug should be used on the same circuit. ! b) The dryer must conform to you are additional instructions regarding electrical connections and requirements for any adapter to allow additional cords to connect to be plugged directed into a ...
Owners Manual
Page 22
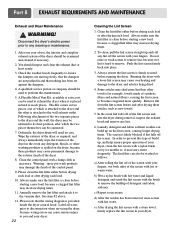
... if necessary. 2. e) After drying the lint screen with a nylon brush every six months or, if necessary, more quickly. Disconnect the dryer's electric power prior to the vacuum duct. You should be washed as follows: a) After rolling the lint off of the screen with a loose...screen straight up and roll any cleaning or maintenance. 1. Following attachment of your fingers. Always ensure the lint screen is attached to the dryer and articles being dried. 4. In order to prevent this maintenance. 5. Warning: spray pre-wash products may cause permanent damage to remove....
... if necessary. 2. e) After drying the lint screen with a nylon brush every six months or, if necessary, more quickly. Disconnect the dryer's electric power prior to the vacuum duct. You should be washed as follows: a) After rolling the lint off of the screen with a loose...screen straight up and roll any cleaning or maintenance. 1. Following attachment of your fingers. Always ensure the lint screen is attached to the dryer and articles being dried. 4. In order to prevent this maintenance. 5. Warning: spray pre-wash products may cause permanent damage to remove....
Owners Manual
Page 23
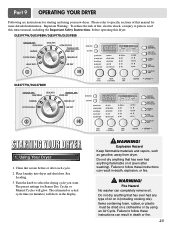
...) will glow. Important Warning: To reduce the risk of fire, electric shock, or injury to person, read this entire manual, including the Important Safety Instructions, before or after washing). Place laundry into dryer and shut door. Explosion Hazard Keep flammable materials and vapors, such ...detailed information. Do not dry anything that has ever had anything that has ever had any type of this dryer. DLE5977W/DLG5988W/DLE5977B/DLG5988B DLE3777W/DLG3788W STARTING YOUR DRYER 1. Fire Hazard No washer can result in death or fire. 23 Items containing foam, rubber, or ...
...) will glow. Important Warning: To reduce the risk of fire, electric shock, or injury to person, read this entire manual, including the Important Safety Instructions, before or after washing). Place laundry into dryer and shut door. Explosion Hazard Keep flammable materials and vapors, such ...detailed information. Do not dry anything that has ever had anything that has ever had any type of this dryer. DLE5977W/DLG5988W/DLE5977B/DLG5988B DLE3777W/DLG3788W STARTING YOUR DRYER 1. Fire Hazard No washer can result in death or fire. 23 Items containing foam, rubber, or ...
Owners Manual
Page 29
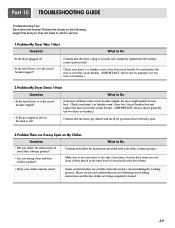
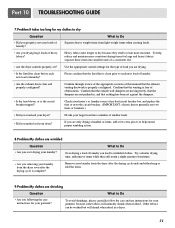
...or laundry room's fuse box/circuit breaker box and replace the fuse or reset the circuit breaker. (IMPORTANT: electric dryers generally use two fuses or breakers.) 2.Problem:My Dryer Doesn 't Heat Question What to dry only clean items, because dirty items can soil clean clothes placed in the...Were your home's or laundry room's fuse box / circuit breaker box and replace the fuse or reset the circuit breaker. (IMPORTANT: electric dryers generally use your dryer to Do • Is the fuse blown, or is securely and completely pushed into the laundry room's power outlet Check your fabric ...
...or laundry room's fuse box/circuit breaker box and replace the fuse or reset the circuit breaker. (IMPORTANT: electric dryers generally use two fuses or breakers.) 2.Problem:My Dryer Doesn 't Heat Question What to dry only clean items, because dirty items can soil clean clothes placed in the...Were your home's or laundry room's fuse box / circuit breaker box and replace the fuse or reset the circuit breaker. (IMPORTANT: electric dryers generally use your dryer to Do • Is the fuse blown, or is securely and completely pushed into the laundry room's power outlet Check your fabric ...
Owners Manual
Page 30
... static in a load of dried clothes. See comments below under There is clean before each new load of laundry. • Did you properly sort your dryer? • Did you place any paper, tissue, or other articles of clothing are empty before washing and drying. 5.Problem:There is clean. Try using... can cause excess lint in the load? In order to take a piece of paper or a tissue out of the pocket of a pair of static electricity. Confirm that might forget to reduce the amount of lint in a load of laundry, sort lint producers (like a fuzzy white cotton towel) separately from...
... static in a load of dried clothes. See comments below under There is clean before each new load of laundry. • Did you properly sort your dryer? • Did you place any paper, tissue, or other articles of clothing are empty before washing and drying. 5.Problem:There is clean. Try using... can cause excess lint in the load? In order to take a piece of paper or a tissue out of the pocket of a pair of static electricity. Confirm that might forget to reduce the amount of lint in a load of laundry, sort lint producers (like a fuzzy white cotton towel) separately from...
Owners Manual
Page 31
...more moisture. Check your home's or laundry room's fuse box/circuit breaker box and replace the fuse or reset the circuit breaker. (IMPORTANT: electric dryers generally use instructions for your loads of obstructions. What to Do Over drying a load of a consistent size. • Are the... fabrics? Heavy fabrics take longer to dry because they still retain a slight amount of moisture. • Are you removing your laundry from the dryer after the drying cycle is complete? Separate heavy weight items from light weight items when creating loads. • Are you under load your laundry ...
...more moisture. Check your home's or laundry room's fuse box/circuit breaker box and replace the fuse or reset the circuit breaker. (IMPORTANT: electric dryers generally use instructions for your loads of obstructions. What to Do Over drying a load of a consistent size. • Are the... fabrics? Heavy fabrics take longer to dry because they still retain a slight amount of moisture. • Are you removing your laundry from the dryer after the drying cycle is complete? Separate heavy weight items from light weight items when creating loads. • Are you under load your laundry ...

Service Manual
Page 19
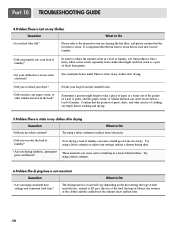
LIMIT THERMOSTAT ELECTRIC DRYER WIRING DIAGRAM RLM GAS DRYER WIRING DIAGRAM POWER CORD L1 BLACK RD3 3 2 N WHITE 1 ELECTRONIC CONTROL RED PINK PINK BLUE ORANGE RED BROWN YELLOW BROWN PLC MODEM WHITE BLACK... WHITE DC VALVE1 DC VALVE2 MOISTURE THERMISTOR FLAME SENSOR DETECTOR CENTRIFUGAL SWITCH RED WHITE NC NO GRAY SAFETY THERMOSTAT GAS DRYER WIRING DIAGRAM PLC MODEM RED WHITE BLACK 8 WIRING DIAGRAM 19 RLM ELECTRIC DRYER WIRING DIAGRAM RD3 L1 BLACK 3 2 1 N WHITE 1 2 L2 3 WH3 12 34 BL2 1 2 ELECTRONIC CONTROL RD3 3 2 1 1 2 3 WH3 1 3 56 BROWN BROWN 8 7 6 5...
LIMIT THERMOSTAT ELECTRIC DRYER WIRING DIAGRAM RLM GAS DRYER WIRING DIAGRAM POWER CORD L1 BLACK RD3 3 2 N WHITE 1 ELECTRONIC CONTROL RED PINK PINK BLUE ORANGE RED BROWN YELLOW BROWN PLC MODEM WHITE BLACK... WHITE DC VALVE1 DC VALVE2 MOISTURE THERMISTOR FLAME SENSOR DETECTOR CENTRIFUGAL SWITCH RED WHITE NC NO GRAY SAFETY THERMOSTAT GAS DRYER WIRING DIAGRAM PLC MODEM RED WHITE BLACK 8 WIRING DIAGRAM 19 RLM ELECTRIC DRYER WIRING DIAGRAM RD3 L1 BLACK 3 2 1 N WHITE 1 2 L2 3 WH3 12 34 BL2 1 2 ELECTRONIC CONTROL RD3 3 2 1 1 2 3 WH3 1 3 56 BROWN BROWN 8 7 6 5...


