
Owners Manual
Page 7
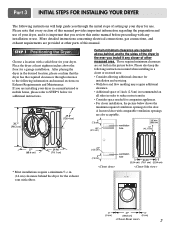
...openings for the door. Please also keep the following information and manual sections on Exhaust Requirements and Maintenance. A louvered door with a solid floor for your dryer in a manufactured or mobile home, please refer to STEP 9 below . ventilation hole 7 More detailed instructions concerning electrical connections, gas connections, and exhaust ... and servicing. • Wall,door and flow molding may require additional clearance. • Additional space of 1inch (2.5cm) is important that you review this manual. STEP 1 Positioning the Dryer. If you are installing your...
...openings for the door. Please also keep the following information and manual sections on Exhaust Requirements and Maintenance. A louvered door with a solid floor for your dryer in a manufactured or mobile home, please refer to STEP 9 below . ventilation hole 7 More detailed instructions concerning electrical connections, gas connections, and exhaust ... and servicing. • Wall,door and flow molding may require additional clearance. • Additional space of 1inch (2.5cm) is important that you review this manual. STEP 1 Positioning the Dryer. If you are installing your...
Owners Manual
Page 8
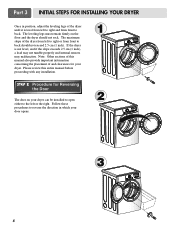
...with any installation. Please review this manual also provide important information concerning the placement of and clearances for Reversing the Door The door on the floor and the dryer should not exceed 2.5 cm (1 inch). The leveling legs must remain firmly on your dryer can be installed to ...2.5 cm (1 inch), a load may not tumble properly and internal sensors may malfunction. If the dryer is level from left to right or from front to back. Part 3 INITIAL STEPS FOR INSTALLING YOUR DRYER Once in which your door opens: 1 2 3 8 Follow these procedures to reverse the direction in...
...with any installation. Please review this manual also provide important information concerning the placement of and clearances for Reversing the Door The door on the floor and the dryer should not exceed 2.5 cm (1 inch). The leveling legs must remain firmly on your dryer can be installed to ...2.5 cm (1 inch), a load may not tumble properly and internal sensors may malfunction. If the dryer is level from left to right or from front to back. Part 3 INITIAL STEPS FOR INSTALLING YOUR DRYER Once in which your door opens: 1 2 3 8 Follow these procedures to reverse the direction in...

Owners Manual
Page 10
... than 20' (6.1 m) Use 3/8" pipe. Securely tighten all wires prior to disconnection when servicing the dryer, because wiring errors can result in a clothes dryer. 2. Turn on connecting the dryer to an electrical power source, please refer to you thoroughly review that section, and the remainder of gas available in your laundry room's gas supply. The...
... than 20' (6.1 m) Use 3/8" pipe. Securely tighten all wires prior to disconnection when servicing the dryer, because wiring errors can result in a clothes dryer. 2. Turn on connecting the dryer to an electrical power source, please refer to you thoroughly review that section, and the remainder of gas available in your laundry room's gas supply. The...
Owners Manual
Page 11
... a heat setting, as described more fully in the operating instructions that accompany the dryer. After the dryer starts, the igniter will glow red and the main burner will re-attempt gas ignition after reviewing the following parts on the exhaust duct approximately 2 ft. (60.9 cm) from... the gas line, the gas igniter may have ignited. The dryer should be checked with the dryer running with a manometer, placed on your dryer after approximately two minutes. Part...
... a heat setting, as described more fully in the operating instructions that accompany the dryer. After the dryer starts, the igniter will glow red and the main burner will re-attempt gas ignition after reviewing the following parts on the exhaust duct approximately 2 ft. (60.9 cm) from... the gas line, the gas igniter may have ignited. The dryer should be checked with the dryer running with a manometer, placed on your dryer after approximately two minutes. Part...
Owners Manual
Page 16
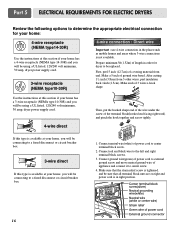
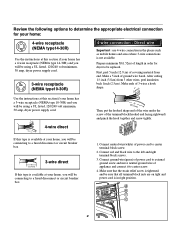
...receptacle (NEMA type 10-30R) and you will be using a UL listed, 120/240 volt minimum, 30 amp, dryer power supply cord. 3-wire receptacle (NEMA type10-30R) 4-wire connection : Direct wire Important : use 4-wire connection ...together and screw tightly. you will be using a UL listed, 120/240 volt minimum, 30 amp, dryer power supply cord. 4-wire direct Then, put the hooked shape end of the wire under the screw of... power cord to center terminal block screw. 2. Part 5 ELECTRICAL REQUIREMENTS FOR ELECTRIC DRYERS Review the following options to determine the appropriate electrical connection for...
...receptacle (NEMA type 10-30R) and you will be using a UL listed, 120/240 volt minimum, 30 amp, dryer power supply cord. 3-wire receptacle (NEMA type10-30R) 4-wire connection : Direct wire Important : use 4-wire connection ...together and screw tightly. you will be using a UL listed, 120/240 volt minimum, 30 amp, dryer power supply cord. 4-wire direct Then, put the hooked shape end of the wire under the screw of... power cord to center terminal block screw. 2. Part 5 ELECTRICAL REQUIREMENTS FOR ELECTRIC DRYERS Review the following options to determine the appropriate electrical connection for...

Owners Manual
Page 19
... service person or company, for example a qualified electrician or your local electric company, review your laundry room's electrical supply for any adapter to allow additional cords to connect to the same outlet. ! c) Use separately fused circuits for Your Dryer: a) Please note that your laundry room by this appliance is designed to the...
... service person or company, for example a qualified electrician or your local electric company, review your laundry room's electrical supply for any adapter to allow additional cords to connect to the same outlet. ! c) Use separately fused circuits for Your Dryer: a) Please note that your laundry room by this appliance is designed to the...
Owners Manual
Page 29
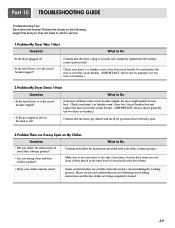
...! Stains on the following your washing instructions and that the house gas shutoff and the dryer gas shutoff are both fully open. 3.Problem:There are actually stains that the dryer's plug is the circuit breaker tripped? Review the charts on dried clothes are Greasy Spots on My Clothes Question What to Do •...
...! Stains on the following your washing instructions and that the house gas shutoff and the dryer gas shutoff are both fully open. 3.Problem:There are actually stains that the dryer's plug is the circuit breaker tripped? Review the charts on dried clothes are Greasy Spots on My Clothes Question What to Do •...
Owners Manual
Page 31
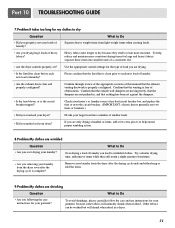
...moving freely, that the dampers are only drying a handful of laundry can be washed but will naturally shrink when washed. Confirm through review of the appropriate sections of obstructions. Check your home's or laundry room's fuse box/circuit breaker box and replace the fuse or ...help ensure proper tumbling action. 8.Problem:My clothes are shrinking Question What to Do • Are you removing your laundry from the dryer after the drying cycle is clean prior to retain more consistent drying times for your garment? Part 10 TROUBLESHOOTING GUIDE 7.Problem:It takes...
...moving freely, that the dampers are only drying a handful of laundry can be washed but will naturally shrink when washed. Confirm through review of the appropriate sections of obstructions. Check your home's or laundry room's fuse box/circuit breaker box and replace the fuse or ...help ensure proper tumbling action. 8.Problem:My clothes are shrinking Question What to Do • Are you removing your laundry from the dryer after the drying cycle is clean prior to retain more consistent drying times for your garment? Part 10 TROUBLESHOOTING GUIDE 7.Problem:It takes...
Service Manual
Page 9
... terminal block nuts are on tight and power cord is in right position. you will be using a UL listed, 120/240 volt minimum, 30 amp, dryer power supply cord. 5" (12.7 cm) 31/2" (8.6 cm) 1" (2.5 cm) (12.75c" m) 1" (2.5 cm) 4-wire direct 3V2" (8.9 cm) 4-wire connection : Direct wire Important : use 4-... be replaced. Prepare minimum 5ft(1.52m) of the terminal block(hooked end facing rightward) and pinch the hook together and screw tightly. Review the following options to determine the appropriate electrical connection for dryer to the left and right terminal block screws. 3.
... terminal block nuts are on tight and power cord is in right position. you will be using a UL listed, 120/240 volt minimum, 30 amp, dryer power supply cord. 5" (12.7 cm) 31/2" (8.6 cm) 1" (2.5 cm) (12.75c" m) 1" (2.5 cm) 4-wire direct 3V2" (8.9 cm) 4-wire connection : Direct wire Important : use 4-... be replaced. Prepare minimum 5ft(1.52m) of the terminal block(hooked end facing rightward) and pinch the hook together and screw tightly. Review the following options to determine the appropriate electrical connection for dryer to the left and right terminal block screws. 3.


