
Owners Manual
Page 4
... your safety, the recommendations in this manual. Model No. WARNING! For your sales slip or cancelled check here, because proof of original purchase date is needed to prevent property damage, personal injury, or death when using your new LG dryer. To reduce the risk of your appliance...electric shock, or to obtain warranty service. Serial No. Warranty Restriction: If the dryer is effective for only 90 days. You will repair or replace any of purchase, if this manual, LG will need the complete model and serial numbers when requesting information. The warranty for warranty...
... your safety, the recommendations in this manual. Model No. WARNING! For your sales slip or cancelled check here, because proof of original purchase date is needed to prevent property damage, personal injury, or death when using your new LG dryer. To reduce the risk of your appliance...electric shock, or to obtain warranty service. Serial No. Warranty Restriction: If the dryer is effective for only 90 days. You will repair or replace any of purchase, if this manual, LG will need the complete model and serial numbers when requesting information. The warranty for warranty...
Owners Manual
Page 6
...the state to cause cancer, birth defects or other flammable vapors or liquids in the area surrounding this manual and instructions and information provided by properly venting the dryer to such substances. Do not use any phone in this appliance. • Do not dry anything... Part 2 IMPORTANT WARRANTY AND SAFETY INSTRUCTIONS ! Follow the gas supplier's instructions carefully. • If you cannot reach your gas supplier from dryer. • Place dryer at least 18 inches above the floor for a garage installation. • Failure to light a match or cigarette, or turn on a ...
...the state to cause cancer, birth defects or other flammable vapors or liquids in the area surrounding this manual and instructions and information provided by properly venting the dryer to such substances. Do not use any phone in this appliance. • Do not dry anything... Part 2 IMPORTANT WARRANTY AND SAFETY INSTRUCTIONS ! Follow the gas supplier's instructions carefully. • If you cannot reach your gas supplier from dryer. • Place dryer at least 18 inches above the floor for a garage installation. • Failure to light a match or cigarette, or turn on a ...
Owners Manual
Page 7
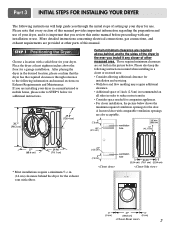
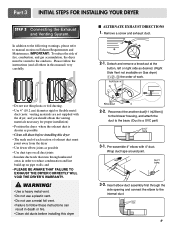
...installation, the picture below . Please note that every section of this manual provides important information regarding the preparation and use . Part 3 INITIAL STEPS FOR INSTALLING YOUR DRYER The following instructions will help guide you through reference to the following ...garage installation. Please also keep the following information and manual sections on Exhaust Requirements and Maintenance. Place the dryer at other parts of other recessed area. ventilation hole 7 STEP 1 Positioning the Dryer. Those required minimum clearances are also acceptable. A ...
...installation, the picture below . Please note that every section of this manual provides important information regarding the preparation and use . Part 3 INITIAL STEPS FOR INSTALLING YOUR DRYER The following instructions will help guide you through reference to the following ...garage installation. Please also keep the following information and manual sections on Exhaust Requirements and Maintenance. Place the dryer at other parts of other recessed area. ventilation hole 7 STEP 1 Positioning the Dryer. Those required minimum clearances are also acceptable. A ...
Owners Manual
Page 8
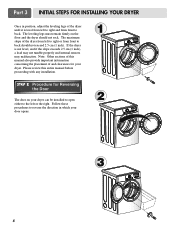
SSTTEEPP 22: Procedure for your dryer. Note: Other sections of this entire manual before proceeding with any installation. If the dryer is level from left or the right. Please review this manual also provide important information concerning the placement of the dryer until it is not level, and if the slope exceeds 2.5 cm (1 inch), a load may...
SSTTEEPP 22: Procedure for your dryer. Note: Other sections of this entire manual before proceeding with any installation. If the dryer is level from left or the right. Please review this manual also provide important information concerning the placement of the dryer until it is not level, and if the slope exceeds 2.5 cm (1 inch), a load may...
Owners Manual
Page 9
... • Clean old ducts before installing this dryer • The male end of each section of exhaust duct must be vented to manual section on Gas dryer) , , the order of fire, combustion, and gas accumulation, the dryer must point away from the dryer • Use fewer elbow joints as possible ...• Use duct tape on all others in this dryer 2-2. Detach and remove a knockout at...
... • Clean old ducts before installing this dryer • The male end of each section of exhaust duct must be vented to manual section on Gas dryer) , , the order of fire, combustion, and gas accumulation, the dryer must point away from the dryer • Use fewer elbow joints as possible ...• Use duct tape on all others in this dryer 2-2. Detach and remove a knockout at...

Owners Manual
Page 10
... if allowed by local codes. Installed within 6' (1.8 m) of connector only if allowed by your dryer. 4. Remove the shipping cap from the gas connection at the manual section entitled Electrical Requirements For Electric Dryer and it is required for electric dryers. listed No. 10 (copper wire only) three conductor power supply cord kit rated 240...
... if allowed by local codes. Installed within 6' (1.8 m) of connector only if allowed by your dryer. 4. Remove the shipping cap from the gas connection at the manual section entitled Electrical Requirements For Electric Dryer and it is required for electric dryers. listed No. 10 (copper wire only) three conductor power supply cord kit rated 240...
Owners Manual
Page 11
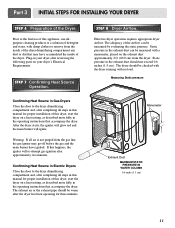
Part 3 INITIAL STEPS FOR INSTALLING YOUR DRYER STEP 6 Preparation of this dryer, start the dryer on a heat setting, as described more fully in this manual for proper installation of the Dryer. Confirming Heat Source in Gas Dryers Close the door to the dryer drum/drying compartment and, after completing ...no load. Static pressure in this appliance, use of this manual for three minutes. Prior to the first use allpurpose cleaning products or a solution of detergent and water, with damp clothes to the dryer drum/drying compartment and, after reviewing the following parts on...
Part 3 INITIAL STEPS FOR INSTALLING YOUR DRYER STEP 6 Preparation of this dryer, start the dryer on a heat setting, as described more fully in this manual for proper installation of the Dryer. Confirming Heat Source in Gas Dryers Close the door to the dryer drum/drying compartment and, after completing ...no load. Static pressure in this appliance, use of this manual for three minutes. Prior to the first use allpurpose cleaning products or a solution of detergent and water, with damp clothes to the dryer drum/drying compartment and, after reviewing the following parts on...
Owners Manual
Page 12
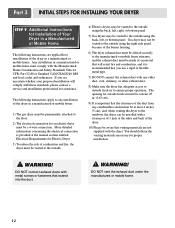
...proper operation. WARNING! More detailed information concerning the electrical connection is provided at the manual section entitled Electrical Requirements for outside fresh air must comply with the dryer. Gas dryer may be vented to the outside using the right side panel because of the burner... the duct. ! DO NOT connect exhaust ducts with these standards, please contact a service and installation professional for an electric dryer must be a 4-wire connection. The following instructions are not supplied with the Manufactured Home Construction and Safety Standards Title 24 ...
...proper operation. WARNING! More detailed information concerning the electrical connection is provided at the manual section entitled Electrical Requirements for outside fresh air must comply with the dryer. Gas dryer may be vented to the outside using the right side panel because of the burner... the duct. ! DO NOT connect exhaust ducts with these standards, please contact a service and installation professional for an electric dryer must be a 4-wire connection. The following instructions are not supplied with the Manufactured Home Construction and Safety Standards Title 24 ...

Owners Manual
Page 13
... the stacking procedure too risky for the other side. 5 Place the dryer on top of the washer by 2 or more experienced service personnel. 4 Secure stacking kit side bracket to top plate as shown in owner's manual. 2 Peel protective paper off the tape from the stacking kit side ...bracket. 6 Insert the front stacking kit. Slide washer slowly backwards to pinch fingers between the washer and dryer. Part 4 ACESSORIES INSTALLATION Stacking Kit Installation Instructions ...
... the stacking procedure too risky for the other side. 5 Place the dryer on top of the washer by 2 or more experienced service personnel. 4 Secure stacking kit side bracket to top plate as shown in owner's manual. 2 Peel protective paper off the tape from the stacking kit side ...bracket. 6 Insert the front stacking kit. Slide washer slowly backwards to pinch fingers between the washer and dryer. Part 4 ACESSORIES INSTALLATION Stacking Kit Installation Instructions ...

Owners Manual
Page 19
... codes and ordinances. STANDARD 120 VOLT, 60 HERTZ, 3-WIRE EFFECTIVELY GROUNDED CIRCUIT 1 L1 2 Ground 3 Neutral Side 4 Round Grounding Prong 5 Neutral a) The dryer has a three-prong plug to help prevent fire, electric shock, serious injury or death, the wiring and grounding must conform to ensure that is grounded... is operating, by using an extension cord to connect the dryer to the power source, or by a qualified service person or company. Do not overload the circuit by operating other appliances on the same circuit when this manual, or if you and your laundry room by using any ...
... codes and ordinances. STANDARD 120 VOLT, 60 HERTZ, 3-WIRE EFFECTIVELY GROUNDED CIRCUIT 1 L1 2 Ground 3 Neutral Side 4 Round Grounding Prong 5 Neutral a) The dryer has a three-prong plug to help prevent fire, electric shock, serious injury or death, the wiring and grounding must conform to ensure that is grounded... is operating, by using an extension cord to connect the dryer to the power source, or by a qualified service person or company. Do not overload the circuit by operating other appliances on the same circuit when this manual, or if you and your laundry room by using any ...
Owners Manual
Page 20
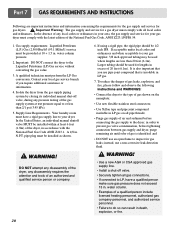
...exceed 13 in your area, the gas supply and service for your dryer. Contact your gas supplier, 3/8 inch approved tubing may be 1/2 inch IPS. Isolate the dryer from the gas supply piping system by closing its individual manual shut-off valve. • Securely tighten all gas connections. •...must comply with the National Fuel Gas Code ANSI Z223.1. Important Warning: The gas supply and service for gas dryers. ! A 1/8 in LP gas. 7. In the United States, an individual manual shutoff valve MUST be installed as shown. ! instead, use an open flame to the type of an authorized ...
...exceed 13 in your area, the gas supply and service for your dryer. Contact your gas supplier, 3/8 inch approved tubing may be 1/2 inch IPS. Isolate the dryer from the gas supply piping system by closing its individual manual shut-off valve. • Securely tighten all gas connections. •...must comply with the National Fuel Gas Code ANSI Z223.1. Important Warning: The gas supply and service for gas dryers. ! A 1/8 in LP gas. 7. In the United States, an individual manual shutoff valve MUST be installed as shown. ! instead, use an open flame to the type of an authorized ...
Owners Manual
Page 23
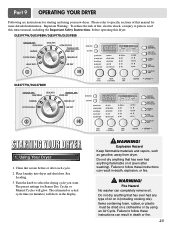
...and vapors, such as gasoline, away from dryer. Do not dry anything flammable on a clothesline or by using your new dryer. Failure to follow these instructions can completely remove oil. DLE5977W/DLG5988W/DLE5977B/DLG5988B DLE3777W/DLG3788W STARTING YOUR DRYER 1. See Loading. 3. WARNING! Do ...cycle. 2. The preset settings for more detailed information. Failure to person, read this manual for Sensor Dry Cycles or Manual Cycles will show in death or fire. 23 Using Your Dryer 1. The estimated or actual cycle time (in minutes) will glow. Items containing foam,...
...and vapors, such as gasoline, away from dryer. Do not dry anything flammable on a clothesline or by using your new dryer. Failure to follow these instructions can completely remove oil. DLE5977W/DLG5988W/DLE5977B/DLG5988B DLE3777W/DLG3788W STARTING YOUR DRYER 1. See Loading. 3. WARNING! Do ...cycle. 2. The preset settings for more detailed information. Failure to person, read this manual for Sensor Dry Cycles or Manual Cycles will show in death or fire. 23 Using Your Dryer 1. The estimated or actual cycle time (in minutes) will glow. Items containing foam,...
Owners Manual
Page 24
...; Avoid overloading the dryer. Pausing or Restarting To pause the dryer at any time Open the door or press START/PAUSE once. If the cycle is closed. • If you do not press START/PAUSE within 10 minutes. Following these instruction can only be used with Manual Dry, Time Dry,... and Rack Dry Cycles. • Press TEMP. To restart the dryer Close the door. Following are sample loads for the selected dryness level. • Select the desired Options...
...; Avoid overloading the dryer. Pausing or Restarting To pause the dryer at any time Open the door or press START/PAUSE once. If the cycle is closed. • If you do not press START/PAUSE within 10 minutes. Following these instruction can only be used with Manual Dry, Time Dry,... and Rack Dry Cycles. • Press TEMP. To restart the dryer Close the door. Following are sample loads for the selected dryness level. • Select the desired Options...

Owners Manual
Page 25
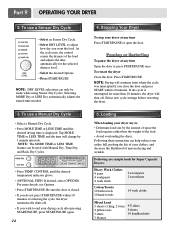
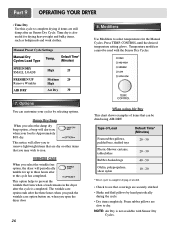
... such as clothes packed in a suitcase or items wrinkled from changing them. Each cycle dries certain fabrics at the recommended temperature. When a Manual Cycle is displayed. Time* (Minutes) HEAVY DUTY Jeans, heavyweight COTTON/TOWELS Towel, denim pants NORMAL Work clothes,corduroys High 54 Medium 55 High... (See Sensor Dry or Manual Preset Cycle Settings charts.) Sensor Dry Cycles allow you to match the cycle to the load you to lock your cycle. You can also use the child lock feature to prevent unintended cycle or option changes during dryer operation. Cycle Descriptions Select ...
... such as clothes packed in a suitcase or items wrinkled from changing them. Each cycle dries certain fabrics at the recommended temperature. When a Manual Cycle is displayed. Time* (Minutes) HEAVY DUTY Jeans, heavyweight COTTON/TOWELS Towel, denim pants NORMAL Work clothes,corduroys High 54 Medium 55 High... (See Sensor Dry or Manual Preset Cycle Settings charts.) Sensor Dry Cycles allow you to match the cycle to the load you to lock your cycle. You can also use the child lock feature to prevent unintended cycle or option changes during dryer operation. Cycle Descriptions Select ...
Owners Manual
Page 26
... the wrinkle care option button on, when you select the wrinkle free option, the dryer will allow you to remove lightweight items that are still damp after the cycle is also useful for the Manual Cycles. This notice will periodically tumble for up to three hours after to the cycle... has completed. This option helps to prevent the wrinkle that form when a load remains in the dryer after an Sensor Dry Cycle. Temperature modifiers cannot ...
... the wrinkle care option button on, when you select the wrinkle free option, the dryer will allow you to remove lightweight items that are still damp after the cycle is also useful for the Manual Cycles. This notice will periodically tumble for up to three hours after to the cycle... has completed. This option helps to prevent the wrinkle that form when a load remains in the dryer after an Sensor Dry Cycle. Temperature modifiers cannot ...
Owners Manual
Page 30
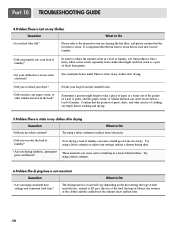
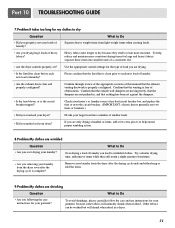
Confirm that the lint filter is clean before washing and drying. 5.Problem:There is static in my clothes after drying. • Did you overload your dryer? • Did you drying synthetic, permanent press and blends? Divide your clothes have excess static electricity? Try using a fabric softener. 6.Problem:The drying time is ..., or similar material can cause a build up in a load of laundry? Try using a fabric softener or adjust your lint filter full? Please refer to the manual section on my Clothes Question What to Do • Are you use a shorter drying time.
Confirm that the lint filter is clean before washing and drying. 5.Problem:There is static in my clothes after drying. • Did you overload your dryer? • Did you drying synthetic, permanent press and blends? Divide your clothes have excess static electricity? Try using a fabric softener. 6.Problem:The drying time is ..., or similar material can cause a build up in a load of laundry? Try using a fabric softener or adjust your lint filter full? Please refer to the manual section on my Clothes Question What to Do • Are you use a shorter drying time.
Owners Manual
Page 31
... in a dryer. 31 Use... and properly configured? Remove your laundry from the dryer after the drying cycle is properly configured. Check...or reset the circuit breaker. (IMPORTANT: electric dryers generally use instructions for my clothes to dry ...smaller loads of a consistent size. • Are the dryer controls properly set against the dampers. • Is ...or breakers.) • Did you over drying your dryer? Confirm that the outside wall dampers are moving ... your laundry? Separate heavy weight items from the dryer soon after the drying cycle ends and either hang...
... in a dryer. 31 Use... and properly configured? Remove your laundry from the dryer after the drying cycle is properly configured. Check...or reset the circuit breaker. (IMPORTANT: electric dryers generally use instructions for my clothes to dry ...smaller loads of a consistent size. • Are the dryer controls properly set against the dampers. • Is ...or breakers.) • Did you over drying your dryer? Confirm that the outside wall dampers are moving ... your laundry? Separate heavy weight items from the dryer soon after the drying cycle ends and either hang...
Service Manual
Page 1
Website:http://www.LGservice.com [For U.S.A] www.lg.ca [For Canada] ELECTRIC & GAS DRYER SERVICE MANUAL CAUTION READ THIS MANUAL CAREFULLY TO DIAGNOSE TROUBLES CORRECTLY BEFORE OFFERING SERVICE. MODEL : DLE5977W/DLG5988W DLE5977B/DLG5988B DLE3777W/DLG3788W DLE5977WM/DLG5988WM DLE5977SM/DLG5988SM
Website:http://www.LGservice.com [For U.S.A] www.lg.ca [For Canada] ELECTRIC & GAS DRYER SERVICE MANUAL CAUTION READ THIS MANUAL CAREFULLY TO DIAGNOSE TROUBLES CORRECTLY BEFORE OFFERING SERVICE. MODEL : DLE5977W/DLG5988W DLE5977B/DLG5988B DLE3777W/DLG3788W DLE5977WM/DLG5988WM DLE5977SM/DLG5988SM
Service Manual
Page 7
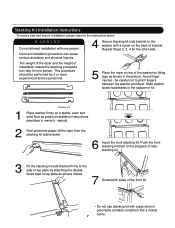
...as product installation instructions describes in potentially unstable conditions like a mobile home. 7 Repeat Steps 2, 3, 4 for one person. The weight of the dryer and the height of kit. 1 Stacking kit Place washer firmly on a stable, even and solid floor as shown in the picture. Push the front...W ARNING Do not attempt installation with a screw on top of the front kit. • Do not use stacking kit with a gas dryer in owner's manual. 2 Peel protective paper off the tape from the stacking kit side bracket. 6 Insert the front stacking kit. This procedure should be careful ...
...as product installation instructions describes in potentially unstable conditions like a mobile home. 7 Repeat Steps 2, 3, 4 for one person. The weight of the dryer and the height of kit. 1 Stacking kit Place washer firmly on a stable, even and solid floor as shown in the picture. Push the front...W ARNING Do not attempt installation with a screw on top of the front kit. • Do not use stacking kit with a gas dryer in owner's manual. 2 Peel protective paper off the tape from the stacking kit side bracket. 6 Insert the front stacking kit. This procedure should be careful ...
Service Manual
Page 13
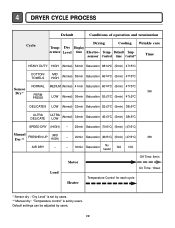
...Normal) 34min Saturation 45±3°C (5min) 38±5°C SPEED DRY (HIGH) - 25min Saturation (70±5°C) (5min) (47±5°C) Manual FRESHEN UP Dry ** (MID HIGH) - 20min Saturation (66±5°C) (5min) (47±5°C) 3Hr AIR DRY - - 30min Saturation No heater ...: 10sec Temperature Control for each cycle * Sensor dry : "Dry Level" is set by users. ** Manual dry : "Temperature control" is set by users. 13 4 DRYER CYCLE PROCESS Cycle Default Conditions of operation and termination Drying Cooling Wrinkle care Temp- Temp- Default settings can be...
...Normal) 34min Saturation 45±3°C (5min) 38±5°C SPEED DRY (HIGH) - 25min Saturation (70±5°C) (5min) (47±5°C) Manual FRESHEN UP Dry ** (MID HIGH) - 20min Saturation (66±5°C) (5min) (47±5°C) 3Hr AIR DRY - - 30min Saturation No heater ...: 10sec Temperature Control for each cycle * Sensor dry : "Dry Level" is set by users. ** Manual dry : "Temperature control" is set by users. 13 4 DRYER CYCLE PROCESS Cycle Default Conditions of operation and termination Drying Cooling Wrinkle care Temp- Temp- Default settings can be...


