Specification
Page 2
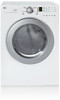
...15/16" (49 3/4"D with door open) Carton (WxHxD) 29 1/2" x 43" x 31 1/4" Weight (lbs): Net / Shipping 126 / 144 WA R R A N T Y 1 Year Labor and Parts UPC CODE DLE2516W 048231 009096 DLG2526W 048231 009102 WDP3W 048231 008556 WSTK1 048231 008327 Design and specifications are periodically tumbled without notice. ©2008... for optimal fabric care. Wrinkle Care Cycle Dry clothes are subject to change without heat to "set it and go". LG ELECTRONICS INC. 1000 Sylvan Ave., Englewood Cliffs, NJ 07632 800.243.0000 LGusa.com ELECTRIC/GAS DRYERS DLE2516 DLG2526 TYPE ...
...15/16" (49 3/4"D with door open) Carton (WxHxD) 29 1/2" x 43" x 31 1/4" Weight (lbs): Net / Shipping 126 / 144 WA R R A N T Y 1 Year Labor and Parts UPC CODE DLE2516W 048231 009096 DLG2526W 048231 009102 WDP3W 048231 008556 WSTK1 048231 008327 Design and specifications are periodically tumbled without notice. ©2008... for optimal fabric care. Wrinkle Care Cycle Dry clothes are subject to change without heat to "set it and go". LG ELECTRONICS INC. 1000 Sylvan Ave., Englewood Cliffs, NJ 07632 800.243.0000 LGusa.com ELECTRIC/GAS DRYERS DLE2516 DLG2526 TYPE ...
Service Manual
Page 3
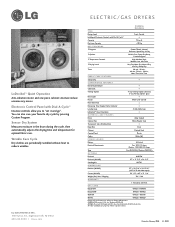
...present everywhere. Do not use any gas or electrical appliance. Touch your gas supplier from its use. ! Before removing the part from a neighbor's phone. handle electronic control assembly by individuals possessing skill and experience in electrical, electronic, and mechanical appliance ...repair. Follow the gas supplier's instructions carefully. Use an anti-static wrist strap. Avoid touching electronic parts or terminal contacts; To avoid personal injury, disconnect power before servicing this information, nor can it assume any electrical ...
...present everywhere. Do not use any gas or electrical appliance. Touch your gas supplier from its use. ! Before removing the part from a neighbor's phone. handle electronic control assembly by individuals possessing skill and experience in electrical, electronic, and mechanical appliance ...repair. Follow the gas supplier's instructions carefully. Use an anti-static wrist strap. Avoid touching electronic parts or terminal contacts; To avoid personal injury, disconnect power before servicing this information, nor can it assume any electrical ...
Service Manual
Page 4
... 5. CONTROL LAYOUT ...18 8. WIRING DIAGRAM ...19 9. DIAGNOSTIC TEST ...20 9-1. TEST 3 MOTOR TEST 25 9-4. TEST 5 DOOR SWITCH TEST 27 9-6. CONTROL PANEL & PLATE ASSEMBLY 39 12-2. REPLACEMENT PARTS LIST 43 3 MOTOR DIAGRAM AND SCHEMATIC 17 7. TEST 4 MOISTURE SENSOR 26 9-5. DRUM & MOTOR ASSEMBLY: GAS MODEL 42 13. CONTENTS 1. TEST 6 HEATER SWITCH TEST - TEST 7 GAS...
... 5. CONTROL LAYOUT ...18 8. WIRING DIAGRAM ...19 9. DIAGNOSTIC TEST ...20 9-1. TEST 3 MOTOR TEST 25 9-4. TEST 5 DOOR SWITCH TEST 27 9-6. CONTROL PANEL & PLATE ASSEMBLY 39 12-2. REPLACEMENT PARTS LIST 43 3 MOTOR DIAGRAM AND SCHEMATIC 17 7. TEST 4 MOISTURE SENSOR 26 9-5. DRUM & MOTOR ASSEMBLY: GAS MODEL 42 13. CONTENTS 1. TEST 6 HEATER SWITCH TEST - TEST 7 GAS...
Service Manual
Page 9
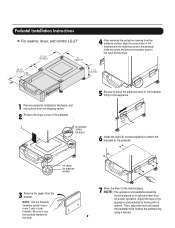
...to use the brackets marked for dryer 5 Be sure to press the adhesive parts of the brackets firmly to the appliance. 6 Install the eight (8) screws(...the pedestal while holding the pedestal leg using a wrench. 8 Pedestal Installation Instructions For washer, dryer, and combo LG 27" 4 AAtftaecr hretmheovdinogubthle-pfarocteedcttivaepecoovfetrhinegbfroamcktehteto the dardyheersaivsesshuorfwacnes, oaltighne tbhenstcpreawrtshoolfetshien bthreackets ablriagcnkwetisthwtihthetheedgmeaatcnhdincgahnoblees aintttahcehpeeddteostahle pbeadseesatnadl wpritehssscarnedwpsr.ess the brackets against NthOe ...
...to use the brackets marked for dryer 5 Be sure to press the adhesive parts of the brackets firmly to the appliance. 6 Install the eight (8) screws(...the pedestal while holding the pedestal leg using a wrench. 8 Pedestal Installation Instructions For washer, dryer, and combo LG 27" 4 AAtftaecr hretmheovdinogubthle-pfarocteedcttivaepecoovfetrhinegbfroamcktehteto the dardyheersaivsesshuorfwacnes, oaltighne tbhenstcpreawrtshoolfetshien bthreackets ablriagcnkwetisthwtihthetheedgmeaatcnhdincgahnoblees aintttahcehpeeddteostahle pbeadseesatnadl wpritehssscarnedwpsr.ess the brackets against NthOe ...
Service Manual
Page 31
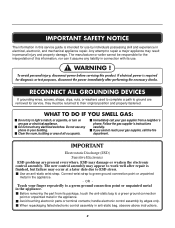
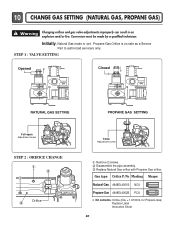
... the pipe assembly. Propane Gas Orifice is set. 10 CHANGE GAS SETTING (NATURAL GAS, PROPANE GAS) ! Initially, Natural Gas mode is on sale as a Service Part to authorized servicers only. Gas type Orifice P/No Marking Shape Natural Gas 4948EL4001B NCU Propane Gas 4948EL4002B PCU Kit contents: Orifice (Dia. = 1.613mm, for Propane...
... the pipe assembly. Propane Gas Orifice is set. 10 CHANGE GAS SETTING (NATURAL GAS, PROPANE GAS) ! Initially, Natural Gas mode is on sale as a Service Part to authorized servicers only. Gas type Orifice P/No Marking Shape Natural Gas 4948EL4001B NCU Propane Gas 4948EL4002B PCU Kit contents: Orifice (Dia. = 1.613mm, for Propane...
Service Manual
Page 37
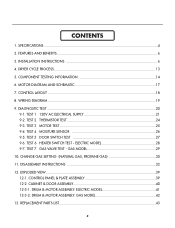
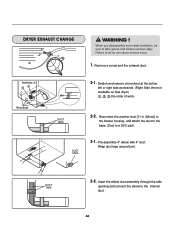
When you disassemble and install ventilation, be sure to the base. (Duct is a SVC part) DUCT TAPE 3-1. Detach and remove a knockout at the botton, left or right side as desired. (Right Side Vent not available on Gas dryer the order ...
When you disassemble and install ventilation, be sure to the base. (Duct is a SVC part) DUCT TAPE 3-1. Detach and remove a knockout at the botton, left or right side as desired. (Right Side Vent not available on Gas dryer the order ...
Service Manual
Page 44
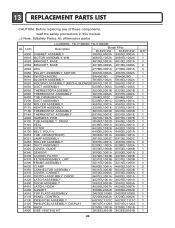
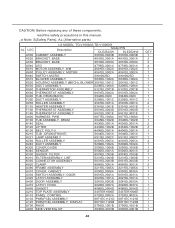
... A800 SIDE VENTING KIT 6871EC1120A 6871EC1120A 3750EL1001B 3750EL1001B 383EEL9001B 383EEL9001B 43 QTY 1 1 2 2 4 1 1 1 1 1 1 1 1 1 2 1 1 1 1 1 2 3 1 1 1 2 1 1 2 1 1 1 2 1 1 1 1 1 1 1 1 1 1 1 1 1 13 REPLACEMENT PARTS LIST CAUTION: Before replacing any of these components, read the safety precautions in this manual. ¡Æ Note: S(Safety Parts), AL (Alternative parts) LG MODEL: TD-V10062E, TD-V10060E AL LOC Description Model P/No DLE2512W DLE2514W A500 CABINET ASSEMBLY...
... A800 SIDE VENTING KIT 6871EC1120A 6871EC1120A 3750EL1001B 3750EL1001B 383EEL9001B 383EEL9001B 43 QTY 1 1 2 2 4 1 1 1 1 1 1 1 1 1 2 1 1 1 1 1 2 3 1 1 1 2 1 1 2 1 1 1 2 1 1 1 1 1 1 1 1 1 1 1 1 1 13 REPLACEMENT PARTS LIST CAUTION: Before replacing any of these components, read the safety precautions in this manual. ¡Æ Note: S(Safety Parts), AL (Alternative parts) LG MODEL: TD-V10062E, TD-V10060E AL LOC Description Model P/No DLE2512W DLE2514W A500 CABINET ASSEMBLY...
Service Manual
Page 45
... VENTING KIT 383EEL9001B 383EEL9001B 44 QTY 1 2 2 4 1 1 1 1 1 1 1 1 1 1 2 1 1 1 1 1 2 3 1 1 1 2 1 1 2 1 1 1 2 1 1 1 1 1 1 1 1 1 1 1 1 1 CAUTION: Before replacing any of these components, read the safety precautions in this manual. ¡Æ Note: S(Safety Parts), AL (Alternative parts) LG MODEL: TD-V10062G,TD-V10060G AL LOC Description Model P/N DLE2522W DLE2524W A500 CABINET ASSEMBLY 3091EL0003B 3091EL0003B A520 BRACKET, BASE 4810EL3001A 4810EL3001A A530 BRACKET, BASE...
... VENTING KIT 383EEL9001B 383EEL9001B 44 QTY 1 2 2 4 1 1 1 1 1 1 1 1 1 1 2 1 1 1 1 1 2 3 1 1 1 2 1 1 2 1 1 1 2 1 1 1 1 1 1 1 1 1 1 1 1 1 CAUTION: Before replacing any of these components, read the safety precautions in this manual. ¡Æ Note: S(Safety Parts), AL (Alternative parts) LG MODEL: TD-V10062G,TD-V10060G AL LOC Description Model P/N DLE2522W DLE2524W A500 CABINET ASSEMBLY 3091EL0003B 3091EL0003B A520 BRACKET, BASE 4810EL3001A 4810EL3001A A530 BRACKET, BASE...
Owners Manual
Page 2
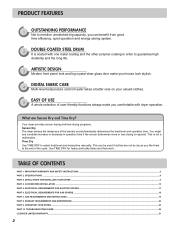
...sudden increase or decrease in order to select heat level and drying time manually. TABLE OF CONTENTS PART 1. INITIAL STEPS FOR INSTALLING YOUR DRYER ...9 PART 4. TROUBLESHOOTING GUIDE...28 LG DRYER LIMITED WARRANTY...31 2 Your dryer provides sensor drying and time drying programs. Sensor Dry The... in operation time if the sensor determines more or less drying is not a malfunction. ACCESSORIES INSTALLATION ...15 PART 5. ELECTRICAL REQUIREMENTS FOR GAS DRYERS...18 PART 7. Use TIME DRY for heavy and bulky items and thick work. PRODUCT FEATURES 1 OUTSTANDING PERFORMANCE Not to...
...sudden increase or decrease in order to select heat level and drying time manually. TABLE OF CONTENTS PART 1. INITIAL STEPS FOR INSTALLING YOUR DRYER ...9 PART 4. TROUBLESHOOTING GUIDE...28 LG DRYER LIMITED WARRANTY...31 2 Your dryer provides sensor drying and time drying programs. Sensor Dry The... in operation time if the sensor determines more or less drying is not a malfunction. ACCESSORIES INSTALLATION ...15 PART 5. ELECTRICAL REQUIREMENTS FOR GAS DRYERS...18 PART 7. Use TIME DRY for heavy and bulky items and thick work. PRODUCT FEATURES 1 OUTSTANDING PERFORMANCE Not to...

Owners Manual
Page 3
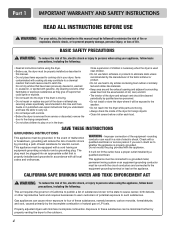
SAVE THESE INSTRUCTIONS 3 Part 1 IMPORTANT WARRANTY AND SAFETY INSTRUCTIONS READ ALL INSTRUCTIONS BEFORE USE WARNING For your safety, the information in this manual and on any phone in the ...
SAVE THESE INSTRUCTIONS 3 Part 1 IMPORTANT WARRANTY AND SAFETY INSTRUCTIONS READ ALL INSTRUCTIONS BEFORE USE WARNING For your safety, the information in this manual and on any phone in the ...
Owners Manual
Page 4
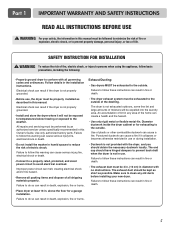
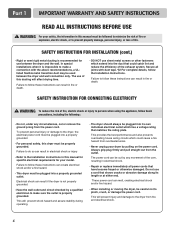
... should be exposed to the weather. • Do not reach into an appropriate outlet that could cause a load to such substances. Part 1 IMPORTANT WARRANTY AND SAFETY INSTRUCTIONS READ ALL INSTRUCTIONS BEFORE USE WARNING For your safety, the information in this manual must be grounded.... incomplete combustion of potential exposure to catch fire. Exposure to the outdoors. 4 This appliance must be plugged into the dryer while parts are in the dryer. Properly adjusted dryers will reduce the risk of electric shock by properly venting the dryer to these substances, namely...
... should be exposed to the weather. • Do not reach into an appropriate outlet that could cause a load to such substances. Part 1 IMPORTANT WARRANTY AND SAFETY INSTRUCTIONS READ ALL INSTRUCTIONS BEFORE USE WARNING For your safety, the information in this manual must be grounded.... incomplete combustion of potential exposure to catch fire. Exposure to the outdoors. 4 This appliance must be plugged into the dryer while parts are in the dryer. Properly adjusted dryers will reduce the risk of electric shock by properly venting the dryer to these substances, namely...
Owners Manual
Page 5
Part 1 IMPORTANT WARRANTY AND SAFETY INSTRUCTIONS READ ALL INSTRUCTIONS BEFORE USE WARNING For your new dryer. Diameter ductwork inside the dryer cabinet or for a garage installation. ... exposed to temperatures below freezing or exposed to the weather. The exhaust duct should have hinged dampers to avoid electrical overload. Use only authorized factory parts. All repairs and servicing must be exhausted to clean any area of all shipping materials properly. Follow details in humid spaces to follow basic precautions...
Part 1 IMPORTANT WARRANTY AND SAFETY INSTRUCTIONS READ ALL INSTRUCTIONS BEFORE USE WARNING For your new dryer. Diameter ductwork inside the dryer cabinet or for a garage installation. ... exposed to temperatures below freezing or exposed to the weather. The exhaust duct should have hinged dampers to avoid electrical overload. Use only authorized factory parts. All repairs and servicing must be exhausted to clean any area of all shipping materials properly. Follow details in humid spaces to follow basic precautions...
Owners Manual
Page 6
... can melt, creating electrical shock and/or fire hazard. • When installing or moving the dryer, be properly grounded. Failure to follow the Installation Instructions. Part 1 IMPORTANT WARRANTY AND SAFETY INSTRUCTIONS READ ALL INSTRUCTIONS BEFORE USE WARNING For your model. In special installations when it is properly grounded. SAFETY INSTRUCTION FOR...
... can melt, creating electrical shock and/or fire hazard. • When installing or moving the dryer, be properly grounded. Failure to follow the Installation Instructions. Part 1 IMPORTANT WARRANTY AND SAFETY INSTRUCTIONS READ ALL INSTRUCTIONS BEFORE USE WARNING For your model. In special installations when it is properly grounded. SAFETY INSTRUCTION FOR...
Owners Manual
Page 7
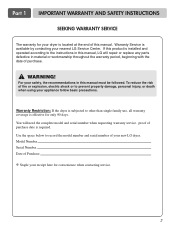
... all warranty coverage is required. To reduce the risk of this manual. Part 1 IMPORTANT WARRANTY AND SAFETY INSTRUCTIONS SEEKING WARRANTY SERVICE The warranty for your dryer is available by contacting your nearest LG Service Center. Warranty Restriction: If the dryer is subjected to prevent property ...damage, personal injury, or death when using your new LG dryer. Use the space below to the instructions in this manual, LG will need the complete model and serial number when requesting warranty service. proof of your appliance follow...
... all warranty coverage is required. To reduce the risk of this manual. Part 1 IMPORTANT WARRANTY AND SAFETY INSTRUCTIONS SEEKING WARRANTY SERVICE The warranty for your dryer is available by contacting your nearest LG Service Center. Warranty Restriction: If the dryer is subjected to prevent property ...damage, personal injury, or death when using your new LG dryer. Use the space below to the instructions in this manual, LG will need the complete model and serial number when requesting warranty service. proof of your appliance follow...

Owners Manual
Page 8
Pedestal Purchased Separately Weight : 126 Ibs (57.2 kg) Specifications are subject to the rating label regarding detailed information. Part 2 SPECIFICATIONS Type : Electric and Gas Dryer Rating : Please refer to change without manafaturers notice. ACCESSORIES Stacking Kit Purchased Separately 8 Design of pedestals is subject to change by manufacturer. Size : 27 x 29.9 x 38.7(inch) Capacity : IEC 7.0 cu.ft.
Pedestal Purchased Separately Weight : 126 Ibs (57.2 kg) Specifications are subject to the rating label regarding detailed information. Part 2 SPECIFICATIONS Type : Electric and Gas Dryer Rating : Please refer to change without manafaturers notice. ACCESSORIES Stacking Kit Purchased Separately 8 Design of pedestals is subject to change by manufacturer. Size : 27 x 29.9 x 38.7(inch) Capacity : IEC 7.0 cu.ft.
Owners Manual
Page 9
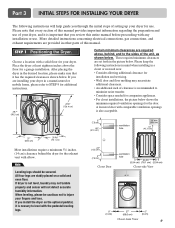
...minimum clearances are required above the floor for use . ventilation hole ventilation hole Closet Door Closet-side View Closet-front View 9 Part 3 INITIAL STEPS FOR INSTALLING YOUR DRYER The following instructions in mind when installing in the picture below shows the minimum required ventilation.... STEP 1 Positioning the Dryer. Please keep the following instructions will not detect accurate humidity information. All four legs are provided in other parts of clearance is important that it is also acceptable. 27" (68.6 cm) 29.96" (76.1 cm) Most installations require a ...
...minimum clearances are required above the floor for use . ventilation hole ventilation hole Closet Door Closet-side View Closet-front View 9 Part 3 INITIAL STEPS FOR INSTALLING YOUR DRYER The following instructions in mind when installing in the picture below shows the minimum required ventilation.... STEP 1 Positioning the Dryer. Please keep the following instructions will not detect accurate humidity information. All four legs are provided in other parts of clearance is important that it is also acceptable. 27" (68.6 cm) 29.96" (76.1 cm) Most installations require a ...
Owners Manual
Page 10
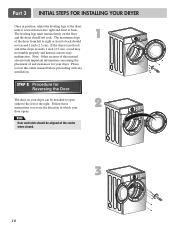
... of the dryer until it is not level, and if the slope exceeds 1 inch (2.5 cm), a load may not tumble properly and internal sensors may malfunction. Part 3 INITIAL STEPS FOR INSTALLING YOUR DRYER Once in which your dryer.
... of the dryer until it is not level, and if the slope exceeds 1 inch (2.5 cm), a load may not tumble properly and internal sensors may malfunction. Part 3 INITIAL STEPS FOR INSTALLING YOUR DRYER Once in which your dryer.
Owners Manual
Page 11
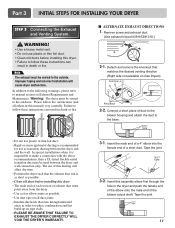
... old ducts before installing this dryer. • Failure to follow these instructions can result in this ducting will cause dryer malfunction. Tape the joint. 11 Part 3 INITIAL STEPS FOR INSTALLING YOUR DRYER STEP 3 Connecting the Exhaust and Venting System. Note The exhaust must be used between the dryer and and the... walls. • PLEASE BE AWARE THAT FAILURE TO EXHAUST THE DRYER CORRECTLY WILL VOID THE DRYER'S WARRANTY. 3-1. Remove screw and exhaust duct. (Use exhaust kit part #3911EZ9131X.) 2-1.
... old ducts before installing this dryer. • Failure to follow these instructions can result in this ducting will cause dryer malfunction. Tape the joint. 11 Part 3 INITIAL STEPS FOR INSTALLING YOUR DRYER STEP 3 Connecting the Exhaust and Venting System. Note The exhaust must be used between the dryer and and the... walls. • PLEASE BE AWARE THAT FAILURE TO EXHAUST THE DRYER CORRECTLY WILL VOID THE DRYER'S WARRANTY. 3-1. Remove screw and exhaust duct. (Use exhaust kit part #3911EZ9131X.) 2-1.
Owners Manual
Page 12
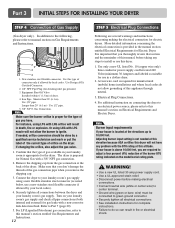
... dryer. 2. Securely tighten all pipe connections (both internal and external) for gas leaks with the BTU rating at the elevations up to Part 7 (page 20) 5. More detailed information concerning the electrical connection is provided in death, fire or explosion. Use only a new UL...using LPG with a 3/8" NPT gas connection. 2. Refer to 10,000 feet. Connect the dryer to your house is required for electric dryers. Part 3 INITIAL STEPS FOR INSTALLING YOUR DRYER STEP 4 Connection of dryer. 4. New stainless steel flexible connector. Equipment Shut-Off Valve Installed within 6' ...
... dryer. 2. Securely tighten all pipe connections (both internal and external) for gas leaks with the BTU rating at the elevations up to Part 7 (page 20) 5. More detailed information concerning the electrical connection is provided in death, fire or explosion. Use only a new UL...using LPG with a 3/8" NPT gas connection. 2. Refer to 10,000 feet. Connect the dryer to your house is required for electric dryers. Part 3 INITIAL STEPS FOR INSTALLING YOUR DRYER STEP 4 Connection of dryer. 4. New stainless steel flexible connector. Equipment Shut-Off Valve Installed within 6' ...
Owners Manual
Page 13
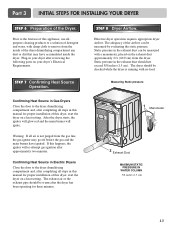
...dryer on the exhaust duct approximately 2 ft. (60.9 cm) from the gas line, the gas igniter may have ignited. STEP 8 Dryer Airflow. Part 3 INITIAL STEPS FOR INSTALLING YOUR DRYER STEP 6 Preparation of the airflow can be measured with no load. The adequacy of the Dryer. Measuring Static ... door to the dryer drum/drying compartment and, after completing all steps in the exhaust duct should be warm after reviewing the following parts on a heat setting. Confirming Heat Source in Electric Dryers Close the door to the dryer drum/drying compartment and, after completing all...
...dryer on the exhaust duct approximately 2 ft. (60.9 cm) from the gas line, the gas igniter may have ignited. STEP 8 Dryer Airflow. Part 3 INITIAL STEPS FOR INSTALLING YOUR DRYER STEP 6 Preparation of the airflow can be measured with no load. The adequacy of the Dryer. Measuring Static ... door to the dryer drum/drying compartment and, after completing all steps in the exhaust duct should be warm after reviewing the following parts on a heat setting. Confirming Heat Source in Electric Dryers Close the door to the dryer drum/drying compartment and, after completing all...


