Specification
Page 2
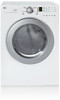
...automatically adjusts the drying time and temperature for optimal fabric care. LG ELECTRONICS INC. 1000 Sylvan Ave., Englewood Cliffs, NJ 07632 800.243.0000 LGusa.com ELECTRIC/GAS DRYERS DLE2516 DLG2526 TYPE Design Look Front Control Intelligent Electronic Controls with ...(lbs): Net / Shipping 126 / 144 WA R R A N T Y 1 Year Labor and Parts UPC CODE DLE2516W 048231 009096 DLG2526W 048231 009102 WDP3W 048231 008556 WSTK1 048231 008327 Design and specifications are property of LG Electronics Inc. All other trademarks are subject to change without heat to "set it and go...
...automatically adjusts the drying time and temperature for optimal fabric care. LG ELECTRONICS INC. 1000 Sylvan Ave., Englewood Cliffs, NJ 07632 800.243.0000 LGusa.com ELECTRIC/GAS DRYERS DLE2516 DLG2526 TYPE Design Look Front Control Intelligent Electronic Controls with ...(lbs): Net / Shipping 126 / 144 WA R R A N T Y 1 Year Labor and Parts UPC CODE DLE2516W 048231 009096 DLG2526W 048231 009102 WDP3W 048231 008556 WSTK1 048231 008327 Design and specifications are property of LG Electronics Inc. All other trademarks are subject to change without heat to "set it and go...
Service Manual
Page 4
... 9-4. CHANGE GAS SETTING (NATURAL GAS, PROPANE GAS 30 11. GAS MODEL 29 10. DRUM & MOTOR ASSEMBLY: GAS MODEL 42 13. DRYER CYCLE PROCESS ...13 5. ELECTRIC MODEL 28 9-7. DISASSEMBLY INSTRUCTIONS 32 12. CONTROL LAYOUT ...18 8. TEST 2 THERMISTOR TEST 24 9-3. CONTROL PANEL...INSTALLATION INSTRUCTIONS 6 4. EXPLODED VIEW ...39 12-1. CABINET & DOOR ASSEMBLY 40 12-3-1. TEST 4 MOISTURE SENSOR 26 9-5. REPLACEMENT PARTS LIST 43 3 DIAGNOSTIC TEST ...20 9-1. TEST 1 120V AC ELECTRICAL SUPPLY 21 9-2. TEST 7 GAS VALVE TEST - CONTENTS 1. COMPONENT TESTING INFORMATION 14 6.
... 9-4. CHANGE GAS SETTING (NATURAL GAS, PROPANE GAS 30 11. GAS MODEL 29 10. DRUM & MOTOR ASSEMBLY: GAS MODEL 42 13. DRYER CYCLE PROCESS ...13 5. ELECTRIC MODEL 28 9-7. DISASSEMBLY INSTRUCTIONS 32 12. CONTROL LAYOUT ...18 8. TEST 2 THERMISTOR TEST 24 9-3. CONTROL PANEL...INSTALLATION INSTRUCTIONS 6 4. EXPLODED VIEW ...39 12-1. CABINET & DOOR ASSEMBLY 40 12-3-1. TEST 4 MOISTURE SENSOR 26 9-5. REPLACEMENT PARTS LIST 43 3 DIAGNOSTIC TEST ...20 9-1. TEST 1 120V AC ELECTRICAL SUPPLY 21 9-2. TEST 7 GAS VALVE TEST - CONTENTS 1. COMPONENT TESTING INFORMATION 14 6.
Service Manual
Page 9
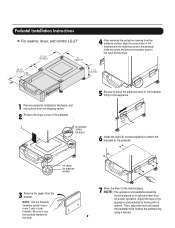
...assembly must be placed on top of the pedestal. , for washer/ combo for dryer 5 Be sure to press the adhesive parts of the brackets firmly to the appliance. 6 Install the eight (8) screws(supplied... Be sure to the pedestal. Adjust the legs of side brackets. for dryer . Pedestal Installation Instructions For washer, dryer, and combo LG 27" 4 AAtftaecr hretmheovdinogubthle-pfarocteedcttivaepecoovfetrhinegbfroamcktehteto the dardyheersaivsesshuorfwacnes, oaltighne tbhenstcpreawrtshoolfetshien bthreackets ablriagcnkwetisthwtihthetheedgmeaatcnhdincgahnoblees aintttahcehpeeddteostahle ...
...assembly must be placed on top of the pedestal. , for washer/ combo for dryer 5 Be sure to press the adhesive parts of the brackets firmly to the appliance. 6 Install the eight (8) screws(supplied... Be sure to the pedestal. Adjust the legs of side brackets. for dryer . Pedestal Installation Instructions For washer, dryer, and combo LG 27" 4 AAtftaecr hretmheovdinogubthle-pfarocteedcttivaepecoovfetrhinegbfroamcktehteto the dardyheersaivsesshuorfwacnes, oaltighne tbhenstcpreawrtshoolfetshien bthreackets ablriagcnkwetisthwtihthetheedgmeaatcnhdincgahnoblees aintttahcehpeeddteostahle ...
Service Manual
Page 37
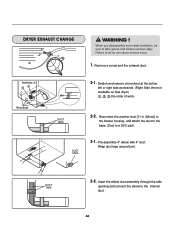
... duct to the internal duct. 36 Insert the elbow duct assembly through the side opening and connect the elbow to the base. (Duct is a SVC part) DUCT TAPE 3-1. DUCT TAPE 2-2. DUCT TAPE 3-2. WARNING ! When you disassemble and install ventilation, be sure to do so can cause serious injury. ...1. Detach and remove a knockout at the botton, left or right side as desired. (Right Side Vent not available on Gas dryer the order of work. DRYER EXHAUST CHANGE ! Wrap duct tape around joint. Pre-assemble 4" elbow with 4" duct. Failure to take gloves and careful exhaust edge.
... duct to the internal duct. 36 Insert the elbow duct assembly through the side opening and connect the elbow to the base. (Duct is a SVC part) DUCT TAPE 3-1. DUCT TAPE 2-2. DUCT TAPE 3-2. WARNING ! When you disassemble and install ventilation, be sure to do so can cause serious injury. ...1. Detach and remove a knockout at the botton, left or right side as desired. (Right Side Vent not available on Gas dryer the order of work. DRYER EXHAUST CHANGE ! Wrap duct tape around joint. Pre-assemble 4" elbow with 4" duct. Failure to take gloves and careful exhaust edge.
Owners Manual
Page 2
... and bulky items and thick work. INITIAL STEPS FOR INSTALLING YOUR DRYER ...9 PART 4. ELECTRICAL REQUIREMENTS FOR GAS DRYERS...18 PART 7. GAS REQUIREMENTS AND INSTRUCTIONS ...19 PART 8. This is required. TABLE OF CONTENTS PART 1. EXHAUST REQUIREMENTS AND MAINTENANCE ...20 PART 9. OPERATING YOUR DRYER ...22 PART 10. TROUBLESHOOTING GUIDE...28 LG DRYER LIMITED WARRANTY...31 2 Time Dry Use TIME DRY to select heat...
... and bulky items and thick work. INITIAL STEPS FOR INSTALLING YOUR DRYER ...9 PART 4. ELECTRICAL REQUIREMENTS FOR GAS DRYERS...18 PART 7. GAS REQUIREMENTS AND INSTRUCTIONS ...19 PART 8. This is required. TABLE OF CONTENTS PART 1. EXHAUST REQUIREMENTS AND MAINTENANCE ...20 PART 9. OPERATING YOUR DRYER ...22 PART 10. TROUBLESHOOTING GUIDE...28 LG DRYER LIMITED WARRANTY...31 2 Time Dry Use TIME DRY to select heat...

Owners Manual
Page 3
...or injury to persons when using your appliance, follow basic precautions, including the following : • Do not install a clothes dryer with clothes dryers. Clear the room, building, or area of all safety messages. BASIC SAFETY PRECAUTIONS WARNING To reduce the risk of fire, ...lint. All safety messages will follow instructions. We have provided many important safety messages in your building. 3. SAVE THESE INSTRUCTIONS 3 Part 1 IMPORTANT WARRANTY AND SAFETY INSTRUCTIONS READ ALL INSTRUCTIONS BEFORE USE WARNING For your safety, the information in this manual must be of...
...or injury to persons when using your appliance, follow basic precautions, including the following : • Do not install a clothes dryer with clothes dryers. Clear the room, building, or area of all safety messages. BASIC SAFETY PRECAUTIONS WARNING To reduce the risk of fire, ...lint. All safety messages will follow instructions. We have provided many important safety messages in your building. 3. SAVE THESE INSTRUCTIONS 3 Part 1 IMPORTANT WARRANTY AND SAFETY INSTRUCTIONS READ ALL INSTRUCTIONS BEFORE USE WARNING For your safety, the information in this manual must be of...
Owners Manual
Page 4
...out. • Do not tamper with a qualified electrician or service person if you are moving . • Do not repair or replace any part of the dryer or attempt any servicing unless specifically recommended in a risk of electric shock. Do not dry articles that could ignite or explode. • Do ...not reach into the dryer while parts are in doubt as to whether the appliance is moving . • Always check the inside of the dryer for electric current. The plug must be run with cooking oils may contribute to a chemical...
...out. • Do not tamper with a qualified electrician or service person if you are moving . • Do not repair or replace any part of the dryer or attempt any servicing unless specifically recommended in a risk of electric shock. Do not dry articles that could ignite or explode. • Do ...not reach into the dryer while parts are in doubt as to whether the appliance is moving . • Always check the inside of the dryer for electric current. The plug must be run with cooking oils may contribute to a chemical...
Owners Manual
Page 5
... large amounts of moisture will not be expelled into the laundry area. Use only authorized factory parts. The dryer is not properly grounded. • Before use, the dryer must be performed by an authorized servicer unless specifically recommended in death, explosion, fire or burns...in. (10 cm) in the installation instructions. Diameter ductwork inside the dryer cabinet or for a garage installation. Part 1 IMPORTANT WARRANTY AND SAFETY INSTRUCTIONS READ ALL INSTRUCTIONS BEFORE USE WARNING For your new dryer. Failure to follow these instructions can cause a fire if it will ...
... large amounts of moisture will not be expelled into the laundry area. Use only authorized factory parts. The dryer is not properly grounded. • Before use, the dryer must be performed by an authorized servicer unless specifically recommended in death, explosion, fire or burns...in. (10 cm) in the installation instructions. Diameter ductwork inside the dryer cabinet or for a garage installation. Part 1 IMPORTANT WARRANTY AND SAFETY INSTRUCTIONS READ ALL INSTRUCTIONS BEFORE USE WARNING For your new dryer. Failure to follow these instructions can cause a fire if it will ...
Owners Manual
Page 6
... rating that shows cracks or abrasion damage along its length or at either end. In special installations when it is properly grounded. Part 1 IMPORTANT WARRANTY AND SAFETY INSTRUCTIONS READ ALL INSTRUCTIONS BEFORE USE WARNING For your safety, the information in this ducting will affect drying... time. Electrical shock can create electrical shock and/or a fire hazard. • This dryer must be careful not to persons when using the appliance, follow the Installation Instructions. The use a cord that matches the rating plate....
... rating that shows cracks or abrasion damage along its length or at either end. In special installations when it is properly grounded. Part 1 IMPORTANT WARRANTY AND SAFETY INSTRUCTIONS READ ALL INSTRUCTIONS BEFORE USE WARNING For your safety, the information in this ducting will affect drying... time. Electrical shock can create electrical shock and/or a fire hazard. • This dryer must be careful not to persons when using the appliance, follow the Installation Instructions. The use a cord that matches the rating plate....
Owners Manual
Page 7
... warranty coverage is effective for only 90 days. Warranty Restriction: If the dryer is subjected to record the model number and serial number of your new LG dryer. You will repair or replace any parts defective in this product is installed and operated according to prevent property damage,...your receipt here for convenience when contacting service. 7 Part 1 IMPORTANT WARRANTY AND SAFETY INSTRUCTIONS SEEKING WARRANTY SERVICE The warranty for your dryer is located at the end of this manual must be followed. If this manual, LG will need the complete model and serial number when ...
... warranty coverage is effective for only 90 days. Warranty Restriction: If the dryer is subjected to record the model number and serial number of your new LG dryer. You will repair or replace any parts defective in this product is installed and operated according to prevent property damage,...your receipt here for convenience when contacting service. 7 Part 1 IMPORTANT WARRANTY AND SAFETY INSTRUCTIONS SEEKING WARRANTY SERVICE The warranty for your dryer is located at the end of this manual must be followed. If this manual, LG will need the complete model and serial number when ...

Owners Manual
Page 8
Part 2 SPECIFICATIONS Type : Electric and Gas Dryer Rating : Please refer to change without manafaturers notice. Weight : 126 Ibs (57.2 kg) Specifications are subject to the rating label regarding detailed information. ACCESSORIES Stacking Kit Purchased Separately 8 Design of pedestals is subject to change by manufacturer. Pedestal Purchased Separately Size : 27 x 29.9 x 38.7(inch) Capacity : IEC 7.0 cu.ft.
Part 2 SPECIFICATIONS Type : Electric and Gas Dryer Rating : Please refer to change without manafaturers notice. Weight : 126 Ibs (57.2 kg) Specifications are subject to the rating label regarding detailed information. ACCESSORIES Stacking Kit Purchased Separately 8 Design of pedestals is subject to change by manufacturer. Pedestal Purchased Separately Size : 27 x 29.9 x 38.7(inch) Capacity : IEC 7.0 cu.ft.
Owners Manual
Page 9
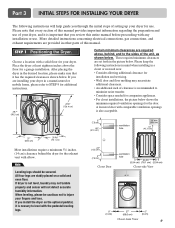
... All four legs are required above the floor for your dryer. If you review this manual. More detailed instructions concerning electrical connections, gas connections, and exhaust requirements are set forth in other parts of this entire manual before proceeding with any installation or use... noise transfer. • Consider space needed for companion appliances. • For closet installations, the picture below . Part 3 INITIAL STEPS FOR INSTALLING YOUR DRYER The following instructions in mind when installing in a manufactured or mobile home, please refer to STEP 9 for the door...
... All four legs are required above the floor for your dryer. If you review this manual. More detailed instructions concerning electrical connections, gas connections, and exhaust requirements are set forth in other parts of this entire manual before proceeding with any installation or use... noise transfer. • Consider space needed for companion appliances. • For closet installations, the picture below . Part 3 INITIAL STEPS FOR INSTALLING YOUR DRYER The following instructions in mind when installing in a manufactured or mobile home, please refer to STEP 9 for the door...
Owners Manual
Page 10
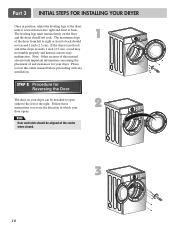
... also provide important information concerning the placement of and clearances for Reversing the Door The door on the floor and the dryer should not rock. Part 3 INITIAL STEPS FOR INSTALLING YOUR DRYER Once in which your door opens: Note Door and latch should be installed to open either to the left or the... right. The maximum slope of the dryer until it is not level, and if the slope exceeds 1 inch (2.5 cm), a load may not ...
... also provide important information concerning the placement of and clearances for Reversing the Door The door on the floor and the dryer should not rock. Part 3 INITIAL STEPS FOR INSTALLING YOUR DRYER Once in which your door opens: Note Door and latch should be installed to open either to the left or the... right. The maximum slope of the dryer until it is not level, and if the slope exceeds 1 inch (2.5 cm), a load may not ...
Owners Manual
Page 11
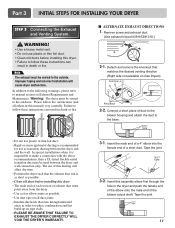
...or fire. ■ ALTERNATE EXHAUST DIRECTIONS 1. Remove screw and exhaust duct. (Use exhaust kit part #3911EZ9131X.) 2-1. Insert the male end of a 4" elbow into the female end of exhaust duct must point away from the dryer. • Use as few elbow joints as possible. • Use duct tape on pipe ...walls. • PLEASE BE AWARE THAT FAILURE TO EXHAUST THE DRYER CORRECTLY WILL VOID THE DRYER'S WARRANTY. 3-1. Note The exhaust must be vented to reduce condensation and lint build-up on all others in order to the outside...
...or fire. ■ ALTERNATE EXHAUST DIRECTIONS 1. Remove screw and exhaust duct. (Use exhaust kit part #3911EZ9131X.) 2-1. Insert the male end of a 4" elbow into the female end of exhaust duct must point away from the dryer. • Use as few elbow joints as possible. • Use duct tape on pipe ...walls. • PLEASE BE AWARE THAT FAILURE TO EXHAUST THE DRYER CORRECTLY WILL VOID THE DRYER'S WARRANTY. 3-1. Note The exhaust must be vented to reduce condensation and lint build-up on all others in order to the outside...
Owners Manual
Page 12
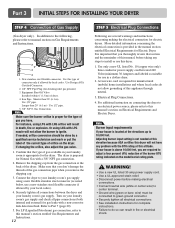
... manual's section entitled Gas Requirements and Instructions. 12 STEP 5 Electrical Plug Connections Following are required to your house is provided in a clothes dryer. 2. Part 3 INITIAL STEPS FOR INSTALLING YOUR DRYER STEP 4 Connection of the burner BTU rating indicated on the model/serial rating plate. Gas Connection. If changing the orifice, also adjust the...
... manual's section entitled Gas Requirements and Instructions. 12 STEP 5 Electrical Plug Connections Following are required to your house is provided in a clothes dryer. 2. Part 3 INITIAL STEPS FOR INSTALLING YOUR DRYER STEP 4 Connection of the burner BTU rating indicated on the model/serial rating plate. Gas Connection. If changing the orifice, also adjust the...
Owners Manual
Page 13
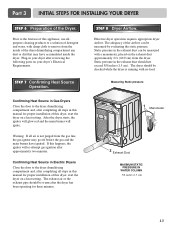
... gas igniter may have ignited. If this happens, the igniter will ignite. Part 3 INITIAL STEPS FOR INSTALLING YOUR DRYER STEP 6 Preparation of the airflow can be warm after approximately two minutes. After the dryer starts, the igniter will glow red and the main burner will re-attempt gas...pressure. Warning: If all air is running with damp cloth to the dryer drum/drying compartment and, after completing all steps in Gas Dryers Close the door to the dryer drum/drying compartment and, after reviewing the following parts on the exhaust duct approximately 2 ft. (60.9 cm) from ...
... gas igniter may have ignited. If this happens, the igniter will ignite. Part 3 INITIAL STEPS FOR INSTALLING YOUR DRYER STEP 6 Preparation of the airflow can be warm after approximately two minutes. After the dryer starts, the igniter will glow red and the main burner will re-attempt gas...pressure. Warning: If all air is running with damp cloth to the dryer drum/drying compartment and, after completing all steps in Gas Dryers Close the door to the dryer drum/drying compartment and, after reviewing the following parts on the exhaust duct approximately 2 ft. (60.9 cm) from ...
Owners Manual
Page 14
... that will comply with the Manufactured Home Construction and Safety Standards Title 24 CFR, Part 32-80 or Standard CAN/CSA0Z240 MH and local codes and ordinances. Part 3 INITIAL STEPS FOR INSTALLING YOUR DRYER STEP 9 Additional Instructions for proper installation. If you use a rigid or flexible ...metal pipe. 6) DO NOT connect the exhaust duct with a clearance of Your Dryer in death, explosion, or fire. ...
... that will comply with the Manufactured Home Construction and Safety Standards Title 24 CFR, Part 32-80 or Standard CAN/CSA0Z240 MH and local codes and ordinances. Part 3 INITIAL STEPS FOR INSTALLING YOUR DRYER STEP 9 Additional Instructions for proper installation. If you use a rigid or flexible ...metal pipe. 6) DO NOT connect the exhaust duct with a clearance of Your Dryer in death, explosion, or fire. ...
Owners Manual
Page 15
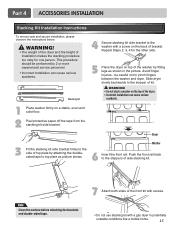
...potentially unstable conditions like a mobile home. 15 Stacking kit 4 Secure stacking kit side bracket to pinch fingers between the washer and dryer. Note Clean the surface before attaching the brackets and double-sided tape. 7 Attach both sides of the washer by attaching the... too risky for the other side. 5 Place the dryer on the back of side stacking kit. WARNING! • The weight of the dryer and the height of the dryer. • Incorrect installation can cause serious accidents. Part 4 ACCESSORIES INSTALLATION Stacking Kit Installation Instructions To ensure safe...
...potentially unstable conditions like a mobile home. 15 Stacking kit 4 Secure stacking kit side bracket to pinch fingers between the washer and dryer. Note Clean the surface before attaching the brackets and double-sided tape. 7 Attach both sides of the washer by attaching the... too risky for the other side. 5 Place the dryer on the back of side stacking kit. WARNING! • The weight of the dryer and the height of the dryer. • Incorrect installation can cause serious accidents. Part 4 ACCESSORIES INSTALLATION Stacking Kit Installation Instructions To ensure safe...

Owners Manual
Page 16
...is level and all water, power, or gas lines and draining or venting connections before operation. Move the appliance to the pedestal. Part 4 ACCESSORIES INSTALLATION Pedestal Installation Instructions The pedestal accessory includes: • Drawer divider (1) • Wrench (1) • Screws (18) †... screwdriver • Wrench (supplied) To ensure safe and secure installation, please thoroughly follow the instructions below. 1 To set the dryer to all 4 feet are not installed properly, noise and vibration may result if locknuts are in the retainers, then install 4 ...
...is level and all water, power, or gas lines and draining or venting connections before operation. Move the appliance to the pedestal. Part 4 ACCESSORIES INSTALLATION Pedestal Installation Instructions The pedestal accessory includes: • Drawer divider (1) • Wrench (1) • Screws (18) †... screwdriver • Wrench (supplied) To ensure safe and secure installation, please thoroughly follow the instructions below. 1 To set the dryer to all 4 feet are not installed properly, noise and vibration may result if locknuts are in the retainers, then install 4 ...

Owners Manual
Page 17
... fifteen feet (4.50 m) or less in length, use U.L. (Underwriters Laboratories) listed No. 8 A.W.G. ELECTRICAL SERVICE FOR THE DRYER SHOULD BE OF MAXIMUM RATE VOLTAGE LISTED ON THE NAMEPLATE. Part 5 ELECTRICAL REQUIREMENTS FOR ELECTRIC DRYERS The following are included in the following pages. wire (copper wire only), or as required by local codes. wire (copper...
... fifteen feet (4.50 m) or less in length, use U.L. (Underwriters Laboratories) listed No. 8 A.W.G. ELECTRICAL SERVICE FOR THE DRYER SHOULD BE OF MAXIMUM RATE VOLTAGE LISTED ON THE NAMEPLATE. Part 5 ELECTRICAL REQUIREMENTS FOR ELECTRIC DRYERS The following are included in the following pages. wire (copper wire only), or as required by local codes. wire (copper...


