
Specification
Page 1
D L E 2 516 D L G 2 5 2 6 L A U N D RY ELECTRIC/GAS DRYERS D L E 2516 DLG2526 Performance • Super Capacity (7.0 cu.ft.) • LoDecibel™ Quiet System Intelligent Fabric Care • Sensor Dry System for intelligent fabric care and energy efficiency • 5 Drying Programs • 5 Temperature Levels • Wrinkle Care Option • Delicates Cycle Style and Design • Upfront Electronic Control Panel with Dial-A-Cycle™ • Silver Rimmed Door with Clear Glass • Stackable with Matching Washer • Optional Drawer Pedestals White LGusa.com
D L E 2 516 D L G 2 5 2 6 L A U N D RY ELECTRIC/GAS DRYERS D L E 2516 DLG2526 Performance • Super Capacity (7.0 cu.ft.) • LoDecibel™ Quiet System Intelligent Fabric Care • Sensor Dry System for intelligent fabric care and energy efficiency • 5 Drying Programs • 5 Temperature Levels • Wrinkle Care Option • Delicates Cycle Style and Design • Upfront Electronic Control Panel with Dial-A-Cycle™ • Silver Rimmed Door with Clear Glass • Stackable with Matching Washer • Optional Drawer Pedestals White LGusa.com
Service Manual
Page 3
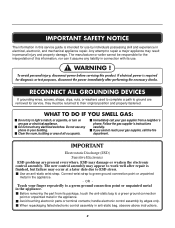
... manufacturer or seller cannot be returned to their original position and properly fastened. RECONNECT ALL GROUNDING DEVICES If grounding wires, screws, straps, clips, nuts, or washers used to complete a path to ground are present everywhere. Clear the room, building or area of this product. Avoid touching electronic parts or terminal contacts...
... manufacturer or seller cannot be returned to their original position and properly fastened. RECONNECT ALL GROUNDING DEVICES If grounding wires, screws, straps, clips, nuts, or washers used to complete a path to ground are present everywhere. Clear the room, building or area of this product. Avoid touching electronic parts or terminal contacts...
Service Manual
Page 8
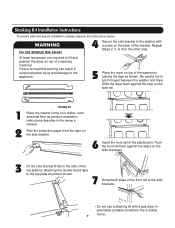
...please observe the instructions below. Repeat Steps 2, 3, & 4 for the other side. Failure to heed this alone! 4 Secure the side bracket to the washer with a screw on the side brackets. 3 Fit the side bracket firmly to the side of the top plate by placing the legs as shown. Peel... potentially unstable conditions like a mobile home. 7 Push the front rail back against the stop on the side rail. 1 2 Stacking kit Place the washer firmly on top of a washing machine! WARNING Do not attempt this warning can result in serious physical injury and damage to the appliance. 5 Place...
...please observe the instructions below. Repeat Steps 2, 3, & 4 for the other side. Failure to heed this alone! 4 Secure the side bracket to the washer with a screw on the side brackets. 3 Fit the side bracket firmly to the side of the top plate by placing the legs as shown. Peel... potentially unstable conditions like a mobile home. 7 Push the front rail back against the stop on the side rail. 1 2 Stacking kit Place the washer firmly on top of a washing machine! WARNING Do not attempt this warning can result in serious physical injury and damage to the appliance. 5 Place...
Service Manual
Page 9
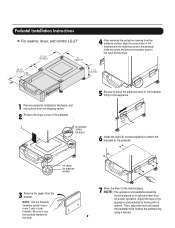
... while holding the pedestal leg using a wrench. 8 Adjust the legs of side brackets. for washer/ combo 3 Remove the paper from the shipping carton. 2 Position the dryer on a solid and... level floor for dryer . for proper operation. Pedestal Installation Instructions For washer, dryer, and combo LG 27" 4 AAtftaecr hretmheovdinogubthle-pfarocteedcttivaepecoovfetrhinegbfroamcktehteto the dardyheersaivsesshuorfwacnes, oaltighne tbhenstcpreawrtshoolfetshien bthreackets ablriagcnkwetisthwtihthetheedgmeaatcnhdincgahnoblees aintttahcehpeeddteostahle pbeadseesatnadl ...
... while holding the pedestal leg using a wrench. 8 Adjust the legs of side brackets. for washer/ combo 3 Remove the paper from the shipping carton. 2 Position the dryer on a solid and... level floor for dryer . for proper operation. Pedestal Installation Instructions For washer, dryer, and combo LG 27" 4 AAtftaecr hretmheovdinogubthle-pfarocteedcttivaepecoovfetrhinegbfroamcktehteto the dardyheersaivsesshuorfwacnes, oaltighne tbhenstcpreawrtshoolfetshien bthreackets ablriagcnkwetisthwtihthetheedgmeaatcnhdincgahnoblees aintttahcehpeeddteostahle pbeadseesatnadl ...
Service Manual
Page 38
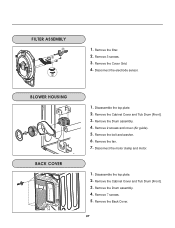
Remove 3 screws. 3. Remove the Cover Grid. 4. Remove the Cabinet Cover and Tub Drum [Front]. 3. Remove the Cabinet Cover and Tub Drum [Front]. 3. Disassemble the top plate. 2. Remove the Drum assembly. 4. Disconnect the electrode sensor. 1. Remove the bolt and washer. 6. Remove 7 screws. 5. Disassemble the top plate. 2. Remove the fan. 7. Remove the Drum assembly. 4. Remove the Back Cover. 37 1. Remove the filter. 2. Remove 2 screws and cover (Air guide). 5. Disconnect the motor clamp and motor. 1.
Remove 3 screws. 3. Remove the Cover Grid. 4. Remove the Cabinet Cover and Tub Drum [Front]. 3. Remove the Cabinet Cover and Tub Drum [Front]. 3. Disassemble the top plate. 2. Remove the Drum assembly. 4. Disconnect the electrode sensor. 1. Remove the bolt and washer. 6. Remove 7 screws. 5. Disassemble the top plate. 2. Remove the fan. 7. Remove the Drum assembly. 4. Remove the Back Cover. 37 1. Remove the filter. 2. Remove 2 screws and cover (Air guide). 5. Disconnect the motor clamp and motor. 1.
Owners Manual
Page 5
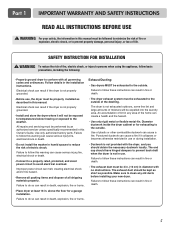
... electrical overload. Make sure to clean any area of the home can cause serious injury,fire, electrical shock or death. • Do not install the washer in this manual. Part 1 IMPORTANT WARRANTY AND SAFETY INSTRUCTIONS READ ALL INSTRUCTIONS BEFORE USE WARNING For your new dryer. The dryer is not properly grounded...
... electrical overload. Make sure to clean any area of the home can cause serious injury,fire, electrical shock or death. • Do not install the washer in this manual. Part 1 IMPORTANT WARRANTY AND SAFETY INSTRUCTIONS READ ALL INSTRUCTIONS BEFORE USE WARNING For your new dryer. The dryer is not properly grounded...
Owners Manual
Page 15
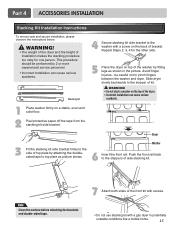
...like a mobile home. 15 Push the front rail back to the stopper of side stacking kit. WARNING! • Do not stack a washer on a stable, even and solid floor. 2 Peel protective paper off the tape from the stacking kit side bracket. Note Clean the ... legs as picture shows. be performed by 2 or more experienced service personnel. • Incorrect installation can cause serious accidents. 1 Place washer firmly on the top of bracket. Part 4 ACCESSORIES INSTALLATION Stacking Kit Installation Instructions To ensure safe and secure installation, please observe the instructions...
...like a mobile home. 15 Push the front rail back to the stopper of side stacking kit. WARNING! • Do not stack a washer on a stable, even and solid floor. 2 Peel protective paper off the tape from the stacking kit side bracket. Note Clean the ... legs as picture shows. be performed by 2 or more experienced service personnel. • Incorrect installation can cause serious accidents. 1 Place washer firmly on the top of bracket. Part 4 ACCESSORIES INSTALLATION Stacking Kit Installation Instructions To ensure safe and secure installation, please observe the instructions...

Owners Manual
Page 16
... 4 screws at each corner to securely attach the appliance to lock into the innermost positions as the washer, fully retract the leveling feet of the clip and pull outward to the pedestal. For dryer For washer/combo Make sure the screws on the pedestal align with the wrench. Press up on the...
... 4 screws at each corner to securely attach the appliance to lock into the innermost positions as the washer, fully retract the leveling feet of the clip and pull outward to the pedestal. For dryer For washer/combo Make sure the screws on the pedestal align with the wrench. Press up on the...
Owners Manual
Page 18
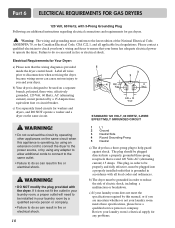
... edition of electric shock, including a malfunction or breakdown. If it does not fit the outlet in your laundry room's electrical supply for washers and dryers, and DO NOT operate a washer and a dryer on the same circuit when this manual, or if you and your laundry room meets these specifications, please have a qualified...
... edition of electric shock, including a malfunction or breakdown. If it does not fit the outlet in your laundry room's electrical supply for washers and dryers, and DO NOT operate a washer and a dryer on the same circuit when this manual, or if you and your laundry room meets these specifications, please have a qualified...
Owners Manual
Page 22
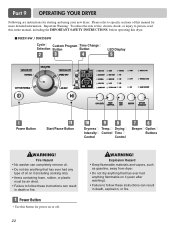
DLE2516W / DLG2526W Cycle Custom Program Time Change Selection Button Button LED Display Power Button Start/Pause Button Dryness Intensity Control Temp. Explosion Hazard • Keep flammable ... INSTRUCTIONS, before operating this manual for starting and using your new dryer. Important Warning: To reduce the risk of this dryer. Fire Hazard • No washer can completely remove oil. • Do not dry anything flammable on or off. 22 WARNING! Please refer to follow these instructions can result in death...
DLE2516W / DLG2526W Cycle Custom Program Time Change Selection Button Button LED Display Power Button Start/Pause Button Dryness Intensity Control Temp. Explosion Hazard • Keep flammable ... INSTRUCTIONS, before operating this manual for starting and using your new dryer. Important Warning: To reduce the risk of this dryer. Fire Hazard • No washer can completely remove oil. • Do not dry anything flammable on or off. 22 WARNING! Please refer to follow these instructions can result in death...


