Specification
Page 1
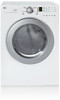
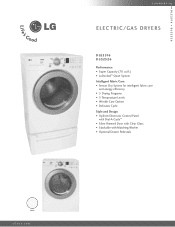
D L E 2 516 D L G 2 5 2 6 L A U N D RY ELECTRIC/GAS DRYERS D L E 2516 DLG2526 Performance • Super Capacity (7.0 cu.ft.) • LoDecibel™ Quiet System Intelligent Fabric Care • Sensor Dry System for intelligent fabric care and energy efficiency • 5 Drying Programs • 5 Temperature Levels • Wrinkle Care Option • Delicates Cycle Style and Design • Upfront Electronic Control Panel with Dial-A-Cycle™ • Silver Rimmed Door with Clear Glass • Stackable with Matching Washer • Optional Drawer Pedestals White LGusa.com
D L E 2 516 D L G 2 5 2 6 L A U N D RY ELECTRIC/GAS DRYERS D L E 2516 DLG2526 Performance • Super Capacity (7.0 cu.ft.) • LoDecibel™ Quiet System Intelligent Fabric Care • Sensor Dry System for intelligent fabric care and energy efficiency • 5 Drying Programs • 5 Temperature Levels • Wrinkle Care Option • Delicates Cycle Style and Design • Upfront Electronic Control Panel with Dial-A-Cycle™ • Silver Rimmed Door with Clear Glass • Stackable with Matching Washer • Optional Drawer Pedestals White LGusa.com
Specification
Page 2
...vibration motor and one piece cabinet structure reduce unnecessary noises. LG ELECTRONICS INC. 1000 Sylvan Ave., Englewood Cliffs, NJ 07632 800.243.0000 LGusa.com ELECTRIC/GAS DRYERS DLE2516 DLG2526 TYPE Design Look Front Control Intelligent Electronic Controls ...(lbs): Net / Shipping 126 / 144 WA R R A N T Y 1 Year Labor and Parts UPC CODE DLE2516W 048231 009096 DLG2526W 048231 009102 WDP3W 048231 008556 WSTK1 048231 008327 Design and specifications are periodically tumbled without notice. ©2008 LG Electronics U.S.A., Inc., Englewood Cliffs, NJ All Rights Reserved.
...vibration motor and one piece cabinet structure reduce unnecessary noises. LG ELECTRONICS INC. 1000 Sylvan Ave., Englewood Cliffs, NJ 07632 800.243.0000 LGusa.com ELECTRIC/GAS DRYERS DLE2516 DLG2526 TYPE Design Look Front Control Intelligent Electronic Controls ...(lbs): Net / Shipping 126 / 144 WA R R A N T Y 1 Year Labor and Parts UPC CODE DLE2516W 048231 009096 DLG2526W 048231 009102 WDP3W 048231 008556 WSTK1 048231 008327 Design and specifications are periodically tumbled without notice. ©2008 LG Electronics U.S.A., Inc., Englewood Cliffs, NJ All Rights Reserved.
Service Manual
Page 1
U.S.A. Website: http://us.lgservice.com Canadian Website: http://lg.ca ELECTRIC & GAS DRYER SERVICE MANUAL CAUTION READ THIS MANUAL CAREFULLY IN ORDER TO PROPERLY DIAGNOSE PROBLEMS AND TO SAFELY PROVIDE QUALITY SERVICE ON THESE DRYERS. MODEL : DLE2516W/DLG2526W/DLE3733
U.S.A. Website: http://us.lgservice.com Canadian Website: http://lg.ca ELECTRIC & GAS DRYER SERVICE MANUAL CAUTION READ THIS MANUAL CAREFULLY IN ORDER TO PROPERLY DIAGNOSE PROBLEMS AND TO SAFELY PROVIDE QUALITY SERVICE ON THESE DRYERS. MODEL : DLE2516W/DLG2526W/DLE3733
Service Manual
Page 4
... PARTS LIST 43 3 CONTROL LAYOUT ...18 8. DIAGNOSTIC TEST ...20 9-1. TEST 4 MOISTURE SENSOR 26 9-5. CHANGE GAS SETTING (NATURAL GAS, PROPANE GAS 30 11. DISASSEMBLY INSTRUCTIONS 32 12. DRYER CYCLE PROCESS ...13 5. INSTALLATION INSTRUCTIONS 6 4. DRUM & MOTOR ASSEMBLY: ELECTRIC MODEL 41 12-3-2. CONTENTS 1. TEST 7 GAS VALVE TEST - EXPLODED VIEW ...39 12-1. FEATURES AND BENEFITS ...6 3. TEST 2 THERMISTOR TEST 24...
... PARTS LIST 43 3 CONTROL LAYOUT ...18 8. DIAGNOSTIC TEST ...20 9-1. TEST 4 MOISTURE SENSOR 26 9-5. CHANGE GAS SETTING (NATURAL GAS, PROPANE GAS 30 11. DISASSEMBLY INSTRUCTIONS 32 12. DRYER CYCLE PROCESS ...13 5. INSTALLATION INSTRUCTIONS 6 4. DRUM & MOTOR ASSEMBLY: ELECTRIC MODEL 41 12-3-2. CONTENTS 1. TEST 7 GAS VALVE TEST - EXPLODED VIEW ...39 12-1. FEATURES AND BENEFITS ...6 3. TEST 2 THERMISTOR TEST 24...

Service Manual
Page 5
1 SPECIFICATIONS I Name: Electric and Gas Dryer I Power supply: Please refer to change by manufacturer. I Size: 27 X 29.9 X 38.7 (inch) I ACCESSORIES Dryer rack (1 each) Purchased Separately See page 6 Stacking kit (1 each) Purchased Separately See page 7 4 Pedestal (1 each) Purchased Separately See page 8 I Weight: 126(Ibs) Specifications are subject to the rating label regarding detailed information. I Dryer capacity: IEC 7.3 cu.ft.
1 SPECIFICATIONS I Name: Electric and Gas Dryer I Power supply: Please refer to change by manufacturer. I Size: 27 X 29.9 X 38.7 (inch) I ACCESSORIES Dryer rack (1 each) Purchased Separately See page 6 Stacking kit (1 each) Purchased Separately See page 7 4 Pedestal (1 each) Purchased Separately See page 8 I Weight: 126(Ibs) Specifications are subject to the rating label regarding detailed information. I Dryer capacity: IEC 7.3 cu.ft.
Service Manual
Page 8
... Stacking kit Place the washer firmly on top of the front rail to the washer with a gas dryer in potentially unstable conditions like a mobile home. 7 At least two people are required to lift and position the dryer on a stable, even and solid floor as shown. Peel the protective paper from the tape ... shown. 7 Screw both sides of a washing machine! Be careful not to the appliance. 5 Place the dryer on the side bracket. 6 Insert the front rail of the bracket. Slide the dryer back against the stops on the back of the stacking kit. WARNING Do not attempt this warning can result...
... Stacking kit Place the washer firmly on top of the front rail to the washer with a gas dryer in potentially unstable conditions like a mobile home. 7 At least two people are required to lift and position the dryer on a stable, even and solid floor as shown. Peel the protective paper from the tape ... shown. 7 Screw both sides of a washing machine! Be careful not to the appliance. 5 Place the dryer on the side bracket. 6 Insert the front rail of the bracket. Slide the dryer back against the stops on the back of the stacking kit. WARNING Do not attempt this warning can result...

Service Manual
Page 13
... removing the cap. 3. Use 1/2" pipe 5 3/8" N.P.T. Connect Gas Supply Pipe (Gas Dryer ONLY) For further assistance, refer to section on gas and check all connections securely. Pipe Plug (for checking inlet gas pressure) 3 Equipment Shut-Off Valve-Installed within 6' (1.8 m) of gas in your dryer is equipped at the rear of the dryer. Gas Connection 12 Certified Connector) 2 1/8" N.P.T. Remove the shipping...
... removing the cap. 3. Use 1/2" pipe 5 3/8" N.P.T. Connect Gas Supply Pipe (Gas Dryer ONLY) For further assistance, refer to section on gas and check all connections securely. Pipe Plug (for checking inlet gas pressure) 3 Equipment Shut-Off Valve-Installed within 6' (1.8 m) of gas in your dryer is equipped at the rear of the dryer. Gas Connection 12 Certified Connector) 2 1/8" N.P.T. Remove the shipping...
Service Manual
Page 20
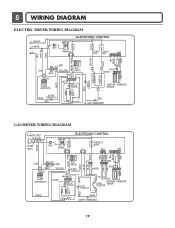
8 WIRING DIAGRAM ELECTRIC DRYER WIRING DIAGRAM L1 BLACK N WHITE L2 ELECTRONIC CONTROL 1 WH1 TRANS BL2 3 1 TAB RELAY TAB RELAY BLACK WHITE NA6 6 5 432 1 RED WHITE BACK BLUE ORANGE RED ... SWITCH WHITE LAMP YELLOW 1 2 3 BELT SWITCH 1 2 3 7 10 MOTOR OVERLOAD PROTECTOR BLUE HEATER 2 1 2 1 MOISTURE THERMISTOR SENSOR CENTRIFUGAL SWITCH BLOWER WHITE THERMOSTAT RED RED HI - LIMIT THERMOSTAT GAS DRYER WIRING DIAGRAM POWER CORD L1 BLACK N WHITE GN/YL WHITE 1 WH1 TRANS BL2 3 1 ELECTRONIC CONTROL YL2 1 3 TAB RELAY BLACK BL3 123 NA6 6 5 4321 RED PINK...
8 WIRING DIAGRAM ELECTRIC DRYER WIRING DIAGRAM L1 BLACK N WHITE L2 ELECTRONIC CONTROL 1 WH1 TRANS BL2 3 1 TAB RELAY TAB RELAY BLACK WHITE NA6 6 5 432 1 RED WHITE BACK BLUE ORANGE RED ... SWITCH WHITE LAMP YELLOW 1 2 3 BELT SWITCH 1 2 3 7 10 MOTOR OVERLOAD PROTECTOR BLUE HEATER 2 1 2 1 MOISTURE THERMISTOR SENSOR CENTRIFUGAL SWITCH BLOWER WHITE THERMOSTAT RED RED HI - LIMIT THERMOSTAT GAS DRYER WIRING DIAGRAM POWER CORD L1 BLACK N WHITE GN/YL WHITE 1 WH1 TRANS BL2 3 1 ELECTRONIC CONTROL YL2 1 3 TAB RELAY BLACK BL3 123 NA6 6 5 4321 RED PINK...
Service Manual
Page 37
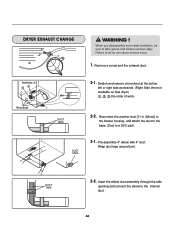
... take gloves and careful exhaust edge. Detach and remove a knockout at the botton, left or right side as desired. (Right Side Vent not available on Gas dryer the order of work. Wrap duct tape around joint. Insert the elbow duct assembly through the side opening and connect the elbow to do so...
... take gloves and careful exhaust edge. Detach and remove a knockout at the botton, left or right side as desired. (Right Side Vent not available on Gas dryer the order of work. Wrap duct tape around joint. Insert the elbow duct assembly through the side opening and connect the elbow to do so...
Owners Manual
Page 1
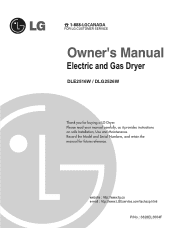
P/No.: 3828EL3004F P/No.: 3828EL3003B Record the Model and Serial Numbers, and retain the manual for buying a LG Dryer. Please read your manual carefully, as it provides instructions on safe Installation, Use and Maintenance. Electric and Gas Dryer DLE2516W / DLG2526W Thank you for future reference.
P/No.: 3828EL3004F P/No.: 3828EL3003B Record the Model and Serial Numbers, and retain the manual for buying a LG Dryer. Please read your manual carefully, as it provides instructions on safe Installation, Use and Maintenance. Electric and Gas Dryer DLE2516W / DLG2526W Thank you for future reference.
Owners Manual
Page 2
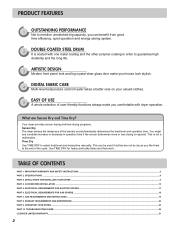
... heat level and drying time manually. This is required. INITIAL STEPS FOR INSTALLING YOUR DRYER ...9 PART 4. ELECTRICAL REQUIREMENTS FOR ELECTRIC DRYERS ...17 PART 6. ELECTRICAL REQUIREMENTS FOR GAS DRYERS...18 PART 7. TABLE OF CONTENTS PART 1. EXHAUST REQUIREMENTS AND MAINTENANCE ...20 PART 9....COATED STEEL DRUM It is coated with dryer operation. IMPORTANT WARRANTY AND SAFETY INSTRUCTIONS ...3 PART 2. TROUBLESHOOTING GUIDE...28 LG DRYER LIMITED WARRANTY...31 2 Your dryer provides sensor drying and time drying programs. Sensor Dry The dryer senses the dampness of the cycle. Time...
... heat level and drying time manually. This is required. INITIAL STEPS FOR INSTALLING YOUR DRYER ...9 PART 4. ELECTRICAL REQUIREMENTS FOR ELECTRIC DRYERS ...17 PART 6. ELECTRICAL REQUIREMENTS FOR GAS DRYERS...18 PART 7. TABLE OF CONTENTS PART 1. EXHAUST REQUIREMENTS AND MAINTENANCE ...20 PART 9....COATED STEEL DRUM It is coated with dryer operation. IMPORTANT WARRANTY AND SAFETY INSTRUCTIONS ...3 PART 2. TROUBLESHOOTING GUIDE...28 LG DRYER LIMITED WARRANTY...31 2 Your dryer provides sensor drying and time drying programs. Sensor Dry The dryer senses the dampness of the cycle. Time...
Owners Manual
Page 5
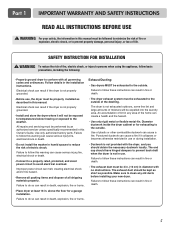
...instructions can result in death, explosion, fire or burns. • Place dryer at least 18 in. All repairs and servicing must be exhausted to the outside . Exhaust/Ducting: • Gas dryers MUST be performed by an authorized servicer unless specifically recommended in any old ducts... before installing your safety, the information in humid spaces to reduce the risk of electric shock. Diameter ductwork inside the dryer cabinet or for a garage ...
...instructions can result in death, explosion, fire or burns. • Place dryer at least 18 in. All repairs and servicing must be exhausted to the outside . Exhaust/Ducting: • Gas dryers MUST be performed by an authorized servicer unless specifically recommended in any old ducts... before installing your safety, the information in humid spaces to reduce the risk of electric shock. Diameter ductwork inside the dryer cabinet or for a garage ...

Owners Manual
Page 8
ACCESSORIES Stacking Kit Purchased Separately 8 Design of pedestals is subject to change by manufacturer. Pedestal Purchased Separately Part 2 SPECIFICATIONS Type : Electric and Gas Dryer Rating : Please refer to change without manafaturers notice. Size : 27 x 29.9 x 38.7(inch) Capacity : IEC 7.0 cu.ft. Weight : 126 Ibs (57.2 kg) Specifications are subject to the rating label regarding detailed information.
ACCESSORIES Stacking Kit Purchased Separately 8 Design of pedestals is subject to change by manufacturer. Pedestal Purchased Separately Part 2 SPECIFICATIONS Type : Electric and Gas Dryer Rating : Please refer to change without manafaturers notice. Size : 27 x 29.9 x 38.7(inch) Capacity : IEC 7.0 cu.ft. Weight : 126 Ibs (57.2 kg) Specifications are subject to the rating label regarding detailed information.
Owners Manual
Page 11
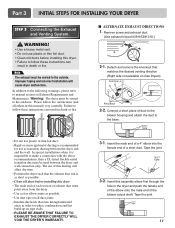
...dryer...very carefully. Warning: The dryer must be vented to reduce condensation and lint build-...DRYER CORRECTLY WILL VOID THE DRYER'S WARRANTY. 3-1. Detach and remove the knockout that runs through the hole in the dryer...dryer malfunction. Note The exhaust must point away from the dryer. • Use as few elbow joints as transition ducting between the dryer and wall connection only. Failure to the outdoors. Insert this dryer...duct may be used between the dryer and and the wall. The use...Please follow these instructions can result in this dryer • The male end of each section...
...dryer...very carefully. Warning: The dryer must be vented to reduce condensation and lint build-...DRYER CORRECTLY WILL VOID THE DRYER'S WARRANTY. 3-1. Detach and remove the knockout that runs through the hole in the dryer...dryer malfunction. Note The exhaust must point away from the dryer. • Use as few elbow joints as transition ducting between the dryer and wall connection only. Failure to the outdoors. Insert this dryer...duct may be used between the dryer and and the wall. The use...Please follow these instructions can result in this dryer • The male end of each section...
Owners Manual
Page 12
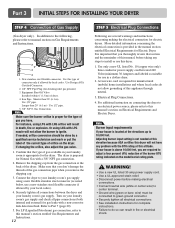
...technician and mark or put the label of the current type of the burner BTU rating indicated on the dryer. Remove the shipping cap from the gas connection at this elevation because AGA certifies this altitude. Turn on your house is provided in the manual... stainless steel flexible connector if allowed by local codes. If needed at the back of Gas Supply (Gas dryer only). Securely tighten all electrical connections • See installation instructions for checking inlet gas pressure) 3. Adjusting burner input setting is prepared for manufactured (mobile) home installations and ...
...technician and mark or put the label of the current type of the burner BTU rating indicated on the dryer. Remove the shipping cap from the gas connection at this elevation because AGA certifies this altitude. Turn on your house is provided in the manual... stainless steel flexible connector if allowed by local codes. If needed at the back of Gas Supply (Gas dryer only). Securely tighten all electrical connections • See installation instructions for checking inlet gas pressure) 3. Adjusting burner input setting is prepared for manufactured (mobile) home installations and ...
Owners Manual
Page 13
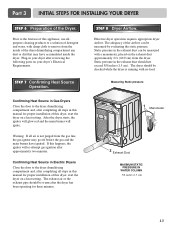
... 7 Confirming Heat Source Operation. Measuring Static pressure Confirming Heat Source in Gas Dryers Close the door to the dryer drum/drying compartment and, after completing all steps in this dryer, start the dryer on a heat setting. The adequacy of this manual for proper installation... the exhaust duct approximately 2 ft. (60.9 cm) from the dryer. Effective dryer operation requires appropriate dryer airflow. Static pressure in Electric Dryers Close the door to remove from the gas line, the gas igniter may have ignited. Confirming Heat Source in the exhaust duct should...
... 7 Confirming Heat Source Operation. Measuring Static pressure Confirming Heat Source in Gas Dryers Close the door to the dryer drum/drying compartment and, after completing all steps in this dryer, start the dryer on a heat setting. The adequacy of this manual for proper installation... the exhaust duct approximately 2 ft. (60.9 cm) from the dryer. Effective dryer operation requires appropriate dryer airflow. Static pressure in Electric Dryers Close the door to remove from the gas line, the gas igniter may have ignited. Confirming Heat Source in the exhaust duct should...
Owners Manual
Page 14
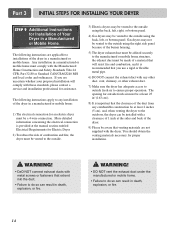
... whether your proposed installation will resist fire and combustion, and it is recommended that venting materials are applicable to installations of the dryer in death, explosion, or fire. Gas dryers may not be vented to the outside using the right side panel because of the burner housing. 5) The... of the duct from any other duct, vent, chimney, or other exhaust duct. 7) Make sure the dryer has adequate access to outside using the back, left , right, or bottom panel. 4) Gas dryers may be vented to the outside fresh air to ensure proper operation. Part 3 INITIAL STEPS FOR INSTALLING YOUR...
... whether your proposed installation will resist fire and combustion, and it is recommended that venting materials are applicable to installations of the dryer in death, explosion, or fire. Gas dryers may not be vented to the outside using the right side panel because of the burner housing. 5) The... of the duct from any other duct, vent, chimney, or other exhaust duct. 7) Make sure the dryer has adequate access to outside using the back, left , right, or bottom panel. 4) Gas dryers may be vented to the outside fresh air to ensure proper operation. Part 3 INITIAL STEPS FOR INSTALLING YOUR...
Owners Manual
Page 15
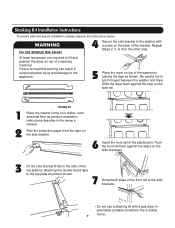
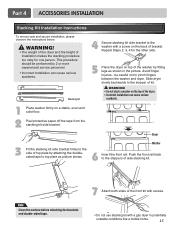
...picture shows. Repeat Steps 2, 3, 4 for one person. Slide dryer slowly backwards to the stoppers of kit. Washer 6 Insert the front rail. Dryer 3 Fit the stacking kit side bracket firmly to the washer with a gas dryer in the picture. be performed by attaching the doublesided tape to... pinch fingers between the washer and dryer. Push the front rail back to the ...
...picture shows. Repeat Steps 2, 3, 4 for one person. Slide dryer slowly backwards to the stoppers of kit. Washer 6 Insert the front rail. Dryer 3 Fit the stacking kit side bracket firmly to the washer with a gas dryer in the picture. be performed by attaching the doublesided tape to... pinch fingers between the washer and dryer. Push the front rail back to the ...
Owners Manual
Page 18
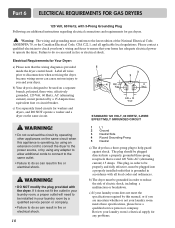
.... Label all local codes and ordinances. c) Use separately fused circuits for gas dryers. Review your laundry room's electrical supply for Your Dryer: a) Please note that is operating, by using an extension cord to connect the dryer to the power source, or by a qualified service person or company. ... the same circuit when this manual, or if you and your dryer. WARNING! • DO NOT modify the plug provided with the dryer. This plug, in order to operate the dryer. Part 6 ELECTRICAL REQUIREMENTS FOR GAS DRYERS 120 Volt, 60 Hertz, with 3-Prong Grounding Plug Following are ...
.... Label all local codes and ordinances. c) Use separately fused circuits for gas dryers. Review your laundry room's electrical supply for Your Dryer: a) Please note that is operating, by using an extension cord to connect the dryer to the power source, or by a qualified service person or company. ... the same circuit when this manual, or if you and your dryer. WARNING! • DO NOT modify the plug provided with the dryer. This plug, in order to operate the dryer. Part 6 ELECTRICAL REQUIREMENTS FOR GAS DRYERS 120 Volt, 60 Hertz, with 3-Prong Grounding Plug Following are ...
Owners Manual
Page 19
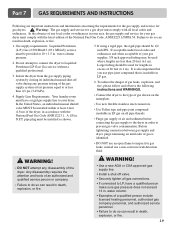
... of an authorized and qualified service person or company. • Failure to inspect for gas dryers. In the absence of any disassembly of air and sediment before connecting the gas supply to the dryer in order to do so can result in . pipe plug must comply with all pipe... that is identified. • DO NOT use a non-corrosive leak detection fluid. Warning: The gas supply and service for a gas dryer must be used for your dryer. To reduce the danger of gas leaks, explosion, and fire, please follow and observe the following instructions and WARNINGS. • Connect...
... of an authorized and qualified service person or company. • Failure to inspect for gas dryers. In the absence of any disassembly of air and sediment before connecting the gas supply to the dryer in order to do so can result in . pipe plug must comply with all pipe... that is identified. • DO NOT use a non-corrosive leak detection fluid. Warning: The gas supply and service for a gas dryer must be used for your dryer. To reduce the danger of gas leaks, explosion, and fire, please follow and observe the following instructions and WARNINGS. • Connect...


