Service Manual
Page 1
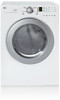
Website: http://us.lgservice.com Canadian Website: http://lg.ca ELECTRIC & GAS DRYER SERVICE MANUAL CAUTION READ THIS MANUAL CAREFULLY IN ORDER TO PROPERLY DIAGNOSE PROBLEMS AND TO SAFELY PROVIDE QUALITY SERVICE ON THESE DRYERS. U.S.A. MODEL : DLE2516W/DLG2526W/DLE3733
Website: http://us.lgservice.com Canadian Website: http://lg.ca ELECTRIC & GAS DRYER SERVICE MANUAL CAUTION READ THIS MANUAL CAREFULLY IN ORDER TO PROPERLY DIAGNOSE PROBLEMS AND TO SAFELY PROVIDE QUALITY SERVICE ON THESE DRYERS. U.S.A. MODEL : DLE2516W/DLG2526W/DLE3733
Service Manual
Page 8
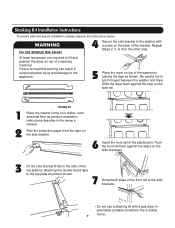
... tape on top of the stacking kit. Repeat Steps 2, 3, & 4 for the other side. Be careful not to the washer with a gas dryer in the owner's manual. Stacking Kit Installation Instructions To ensure safe and secure installation, please observe the instructions below. At least two people are required to the side...placing the legs as shown. WARNING Do not attempt this warning can result in serious physical injury and damage to the appliance. 5 Place the dryer on the side brackets. 3 Fit the side bracket firmly to the side of the washer by attaching the double-faced tape to the top...
... tape on top of the stacking kit. Repeat Steps 2, 3, & 4 for the other side. Be careful not to the washer with a gas dryer in the owner's manual. Stacking Kit Installation Instructions To ensure safe and secure installation, please observe the instructions below. At least two people are required to the side...placing the legs as shown. WARNING Do not attempt this warning can result in serious physical injury and damage to the appliance. 5 Place the dryer on the side brackets. 3 Fit the side bracket firmly to the side of the washer by attaching the double-faced tape to the top...
Service Manual
Page 14
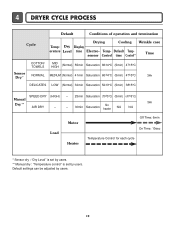
Default settings can be adjusted by users. 4 DRYER CYCLE PROCESS Default Conditions of operation and termination Cycle Drying Cooling Wrinkle care Temp- Temp- Default Tempsensor Control time Control** Time COTTON/ TOWELS MID HIGH (...;C 3Hr DELICATES LOW (Normal) 32min Saturation 52±3°C (5min) 38±5°C SPEED DRY (HIGH) - 25min Saturation (70±5°C) (5min) (47±5°C) Manual Dry ** AIR DRY - - 30min Saturation No heater N/A N/A 3Hr Load Motor Heater Off Time: 6min On Time: 10sec Temperature Control for each cycle * Sensor dry : "Dry...
Default settings can be adjusted by users. 4 DRYER CYCLE PROCESS Default Conditions of operation and termination Cycle Drying Cooling Wrinkle care Temp- Temp- Default Tempsensor Control time Control** Time COTTON/ TOWELS MID HIGH (...;C 3Hr DELICATES LOW (Normal) 32min Saturation 52±3°C (5min) 38±5°C SPEED DRY (HIGH) - 25min Saturation (70±5°C) (5min) (47±5°C) Manual Dry ** AIR DRY - - 30min Saturation No heater N/A N/A 3Hr Load Motor Heater Off Time: 6min On Time: 10sec Temperature Control for each cycle * Sensor dry : "Dry...
Owners Manual
Page 1
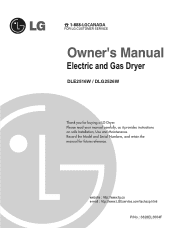
Please read your manual carefully, as it provides instructions on safe Installation, Use and Maintenance. P/No.: 3828EL3004F P/No.: 3828EL3003B Electric and Gas Dryer DLE2516W / DLG2526W Thank you for future reference. Record the Model and Serial Numbers, and retain the manual for buying a LG Dryer.
Please read your manual carefully, as it provides instructions on safe Installation, Use and Maintenance. P/No.: 3828EL3004F P/No.: 3828EL3003B Electric and Gas Dryer DLE2516W / DLG2526W Thank you for future reference. Record the Model and Serial Numbers, and retain the manual for buying a LG Dryer.
Owners Manual
Page 2
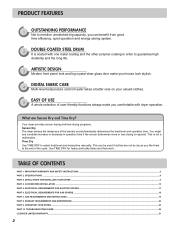
...work. ELECTRICAL REQUIREMENTS FOR GAS DRYERS...18 PART 7. OPERATING YOUR DRYER ...22 PART 10. IMPORTANT WARRANTY AND SAFETY INSTRUCTIONS ...3 PART 2. INITIAL STEPS FOR INSTALLING YOUR DRYER ...9 PART 4. GAS REQUIREMENTS AND INSTRUCTIONS ...19 PART 8. TROUBLESHOOTING GUIDE...28 LG DRYER LIMITED WARRANTY...31 2 This ... the dampness of the cycle. Time Dry Use TIME DRY to select heat level and drying time manually. ELECTRICAL REQUIREMENTS FOR ELECTRIC DRYERS ...17 PART 6. ACCESSORIES INSTALLATION ...15 PART 5. This is required. PRODUCT FEATURES 1 OUTSTANDING PERFORMANCE...
...work. ELECTRICAL REQUIREMENTS FOR GAS DRYERS...18 PART 7. OPERATING YOUR DRYER ...22 PART 10. IMPORTANT WARRANTY AND SAFETY INSTRUCTIONS ...3 PART 2. INITIAL STEPS FOR INSTALLING YOUR DRYER ...9 PART 4. GAS REQUIREMENTS AND INSTRUCTIONS ...19 PART 8. TROUBLESHOOTING GUIDE...28 LG DRYER LIMITED WARRANTY...31 2 This ... the dampness of the cycle. Time Dry Use TIME DRY to select heat level and drying time manually. ELECTRICAL REQUIREMENTS FOR ELECTRIC DRYERS ...17 PART 6. ACCESSORIES INSTALLATION ...15 PART 5. This is required. PRODUCT FEATURES 1 OUTSTANDING PERFORMANCE...

Owners Manual
Page 3
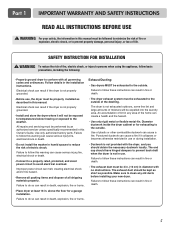
... persons when using the appliance, follow basic precautions, including the following : • Do not install a clothes dryer with clothes dryers. These conditions will obstruct clothes dryer airflow and increase the risk of fire. • Do not store or use any electrical switches. Follow the ...not touch any phone in your gas supplier from a neighbor's phone. We have provided many important safety messages in this manual must be performed by the appliance manufacturer as suitable for use with flexible plastic venting materials. Flexible venting materials are very ...
... persons when using the appliance, follow basic precautions, including the following : • Do not install a clothes dryer with clothes dryers. These conditions will obstruct clothes dryer airflow and increase the risk of fire. • Do not store or use any electrical switches. Follow the ...not touch any phone in your gas supplier from a neighbor's phone. We have provided many important safety messages in this manual must be performed by the appliance manufacturer as suitable for use with flexible plastic venting materials. Flexible venting materials are very ...
Owners Manual
Page 4
... allow children to warn customers of the equipment- Close supervision of children is necessary when the dryer is used near children. • Do not use , the dryer must be properly installed as described in this manual. • Do not place items exposed to cooking oils in this Use and Care Guide ...articles that could ignite or explode. • Do not reach into the dryer if the drum is moving. • Do not repair or replace any part of the dryer or attempt any servicing unless specifically recommended in this manual must be followed to minimize the risk of fire or explosion, electric ...
... allow children to warn customers of the equipment- Close supervision of children is necessary when the dryer is used near children. • Do not use , the dryer must be properly installed as described in this manual. • Do not place items exposed to cooking oils in this Use and Care Guide ...articles that could ignite or explode. • Do not reach into the dryer if the drum is moving. • Do not repair or replace any part of the dryer or attempt any servicing unless specifically recommended in this manual must be followed to minimize the risk of fire or explosion, electric ...
Owners Manual
Page 5
... in use or during installation. • Ductwork is not properly grounded. • Install and store the dryer where it collapses or becomes otherwise restricted in this manual. Punctured ductwork can cause serious injury,fire, electrical shock or death. • Do not install the washer...persons when using the appliance, follow these instructions can result in this manual must be properly installed as possible. above the floor for exhausting to avoid electrical overload. Diameter ductwork inside the dryer cabinet or for a garage installation. The end cap should have hinged ...
... in use or during installation. • Ductwork is not properly grounded. • Install and store the dryer where it collapses or becomes otherwise restricted in this manual. Punctured ductwork can cause serious injury,fire, electrical shock or death. • Do not install the washer...persons when using the appliance, follow these instructions can result in this manual must be properly installed as possible. above the floor for exhausting to avoid electrical overload. Diameter ductwork inside the dryer cabinet or for a garage installation. The end cap should have hinged ...
Owners Manual
Page 6
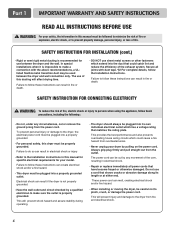
... or otherwise damaged. Always grip plug firmly and pull straight out from the power cord. This will affect drying time. Failure to the dryer from overheated wires. • Never unplug your model. Failure to the installation instructions in electrical shock. • Repair or replace immediately ... grounded. The use sheet metal screws or other fasteners which extend into a properly grounded • For personal safety, this manual must be plugged into a properly grounded outlet. SAFETY INSTRUCTION FOR CONNECTING ELECTRICITY WARNING To reduce the risk of this...
... or otherwise damaged. Always grip plug firmly and pull straight out from the power cord. This will affect drying time. Failure to the dryer from overheated wires. • Never unplug your model. Failure to the installation instructions in electrical shock. • Repair or replace immediately ... grounded. The use sheet metal screws or other fasteners which extend into a properly grounded • For personal safety, this manual must be plugged into a properly grounded outlet. SAFETY INSTRUCTION FOR CONNECTING ELECTRICITY WARNING To reduce the risk of this...
Owners Manual
Page 7
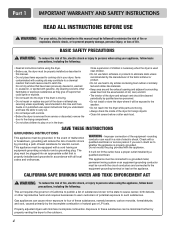
...of purchase date is available by contacting your nearest LG Service Center. WARNING! proof of Purchase Staple your safety, the recommendations in this manual must be followed. Warranty Restriction: If the dryer is located at the end of your new LG dryer. Serial Number. To reduce the risk of ... using your appliance follow basic precautions. Part 1 IMPORTANT WARRANTY AND SAFETY INSTRUCTIONS SEEKING WARRANTY SERVICE The warranty for your dryer is subjected to the instructions in this manual, LG will need the complete model and serial number when requesting warranty service.
...of purchase date is available by contacting your nearest LG Service Center. WARNING! proof of Purchase Staple your safety, the recommendations in this manual must be followed. Warranty Restriction: If the dryer is located at the end of your new LG dryer. Serial Number. To reduce the risk of ... using your appliance follow basic precautions. Part 1 IMPORTANT WARRANTY AND SAFETY INSTRUCTIONS SEEKING WARRANTY SERVICE The warranty for your dryer is subjected to the instructions in this manual, LG will need the complete model and serial number when requesting warranty service.
Owners Manual
Page 9
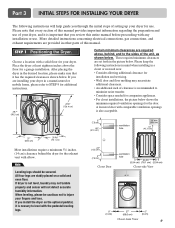
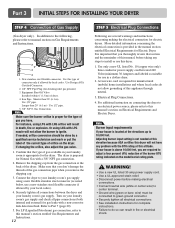
... hole Closet Door Closet-side View Closet-front View 9 Part 3 INITIAL STEPS FOR INSTALLING YOUR DRYER The following instructions in mind when installing in other parts of this entire manual before proceeding with the pedestal leveling legs. Please note that every section of this...comparable ventilation openings is not level, laundry may necessitate additional clearances. • An additional inch of your fingers and toes. If you review this manual. If dryer is also acceptable. 27" (68.6 cm) 29.96" (76.1 cm) Most installations require a minimum 51/2 inches. (14 cm) ...
... hole Closet Door Closet-side View Closet-front View 9 Part 3 INITIAL STEPS FOR INSTALLING YOUR DRYER The following instructions in mind when installing in other parts of this entire manual before proceeding with the pedestal leveling legs. Please note that every section of this...comparable ventilation openings is not level, laundry may necessitate additional clearances. • An additional inch of your fingers and toes. If you review this manual. If dryer is also acceptable. 27" (68.6 cm) 29.96" (76.1 cm) Most installations require a minimum 51/2 inches. (14 cm) ...
Owners Manual
Page 10
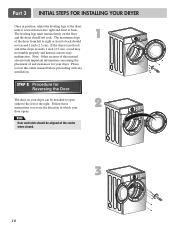
Note: Other sections of and clearances for Reversing the Door The door on the floor and the dryer should not exceed 1 inch (2.5 cm). Please review this manual also provide important information concerning the placement of this entire manual before proceeding with any installation. 1 STEP 2 Procedure for your door opens: Note Door and latch should...
Note: Other sections of and clearances for Reversing the Door The door on the floor and the dryer should not exceed 1 inch (2.5 cm). Please review this manual also provide important information concerning the placement of this entire manual before proceeding with any installation. 1 STEP 2 Procedure for your door opens: Note Door and latch should...
Owners Manual
Page 11
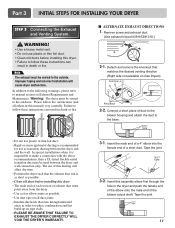
...; PLEASE BE AWARE THAT FAILURE TO EXHAUST THE DRYER CORRECTLY WILL VOID THE DRYER'S WARRANTY. 3-1. Please follow these instructions can result in order to manual section on Exhaust Requirements and Maintenance. Part 3 INITIAL STEPS FOR INSTALLING YOUR DRYER STEP 3 Connecting the Exhaust and Venting System. Insert this manual) very carefully. In addition to the following...
...; PLEASE BE AWARE THAT FAILURE TO EXHAUST THE DRYER CORRECTLY WILL VOID THE DRYER'S WARRANTY. 3-1. Please follow these instructions can result in order to manual section on Exhaust Requirements and Maintenance. Part 3 INITIAL STEPS FOR INSTALLING YOUR DRYER STEP 3 Connecting the Exhaust and Venting System. Insert this manual) very carefully. In addition to the following...
Owners Manual
Page 12
... m) of connector only if allowed by local codes. Iron Pipe. Gas Connection. The dryer is prepared for electric dryers. For LP (Liquefied Petroleum) gas connection, refer to this manual's section entitled Gas Requirements and Instructions. 12 STEP 5 Electrical Plug Connections Following are required ... 1 2 5 3 4 1. Remove the shipping cap from the gas connection at this elevation because AGA certifies this manual's section on Electrical Requirements and Electric Dryer. Use Design AGA Certified Connector. 2. 1/8" NPT Pipe Plug (for gas leaks with LNG orifice will not have . ...
... m) of connector only if allowed by local codes. Iron Pipe. Gas Connection. The dryer is prepared for electric dryers. For LP (Liquefied Petroleum) gas connection, refer to this manual's section entitled Gas Requirements and Instructions. 12 STEP 5 Electrical Plug Connections Following are required ... 1 2 5 3 4 1. Remove the shipping cap from the gas connection at this elevation because AGA certifies this manual's section on Electrical Requirements and Electric Dryer. Use Design AGA Certified Connector. 2. 1/8" NPT Pipe Plug (for gas leaks with LNG orifice will not have . ...
Owners Manual
Page 13
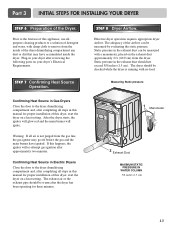
... exhaust pipe should not exceed 5/8 inches (1.5 cm). Plug-in the exhaust duct should be measured by evaluating the static pressure. Effective dryer operation requires appropriate dryer airflow. Confirming Heat Source in this manual for three minutes. 1 Manometer 2 Exhaust Duct MAXIMUM STATIC PRESSURE IN WATER COLUMN 5/8 inches (1.5 cm) 13 If this appliance, use allpurpose...
... exhaust pipe should not exceed 5/8 inches (1.5 cm). Plug-in the exhaust duct should be measured by evaluating the static pressure. Effective dryer operation requires appropriate dryer airflow. Confirming Heat Source in this manual for three minutes. 1 Manometer 2 Exhaust Duct MAXIMUM STATIC PRESSURE IN WATER COLUMN 5/8 inches (1.5 cm) 13 If this appliance, use allpurpose...
Owners Manual
Page 14
... 14 You should obtain the venting materials necessary for Electric Dryer 2) To reduce the risk of the dryer in a manufactured or mobile home: 1) The electrical connection for Installation of 1 inch at the manual section entitled Electrical Requirements for proper installation. Any installation in... a manufactured or mobile home must be vented to the outside. 3) Electric dryers may be vented to any installation of the dryer in a manufactured or mobile home...
... 14 You should obtain the venting materials necessary for Electric Dryer 2) To reduce the risk of the dryer in a manufactured or mobile home: 1) The electrical connection for Installation of 1 inch at the manual section entitled Electrical Requirements for proper installation. Any installation in... a manufactured or mobile home must be vented to the outside. 3) Electric dryers may be vented to any installation of the dryer in a manufactured or mobile home...
Owners Manual
Page 18
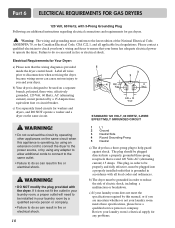
... appliances on the same circuit when this manual, or if you and your laundry room meets these specifications, please have a qualified service person or company. Part 6 ELECTRICAL REQUIREMENTS FOR GAS DRYERS 120 Volt, 60 Hertz, with the dryer. If it does not fit the outlet...in your laundry room by a 15 Ampere fuse, equivalent fuse or circuit breaker. c) Use separately fused circuits for washers and dryers, and DO NOT operate a washer and a dryer on a separate branch, polarized, three-wire, effectively grounded, 120 Volt, 60 Hertz, AC (alternating current) circuit protected ...
... appliances on the same circuit when this manual, or if you and your laundry room meets these specifications, please have a qualified service person or company. Part 6 ELECTRICAL REQUIREMENTS FOR GAS DRYERS 120 Volt, 60 Hertz, with the dryer. If it does not fit the outlet...in your laundry room by a 15 Ampere fuse, equivalent fuse or circuit breaker. c) Use separately fused circuits for washers and dryers, and DO NOT operate a washer and a dryer on a separate branch, polarized, three-wire, effectively grounded, 120 Volt, 60 Hertz, AC (alternating current) circuit protected ...
Owners Manual
Page 19
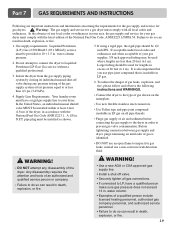
... result in death, explosion, or fire. 19 Warning: The gas supply and service for gas leaks; Isolate the dryer from the gas supply piping system by closing its individual manual shut-off valve. • Securely tighten all pipe threads. • Purge gas supply of a qualified person include...flexible stainless steel connectors. • Use Teflon tape and pipe joint compound insoluble in LP gas. 6. Before tightening connection between gas supply and dryer, purge remaining air until odor of gas shown on all gas connections. • If connected to LP, have a rigid gas supply line to...
... result in death, explosion, or fire. 19 Warning: The gas supply and service for gas leaks; Isolate the dryer from the gas supply piping system by closing its individual manual shut-off valve. • Securely tighten all pipe threads. • Purge gas supply of a qualified person include...flexible stainless steel connectors. • Use Teflon tape and pipe joint compound insoluble in LP gas. 6. Before tightening connection between gas supply and dryer, purge remaining air until odor of gas shown on all gas connections. • If connected to LP, have a rigid gas supply line to...
Owners Manual
Page 22
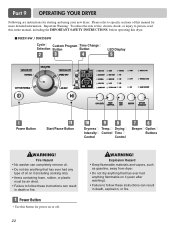
... Option Buttons WARNING! DLE2516W / DLG2526W Cycle Custom Program Time Change Selection Button Button LED Display Power Button Start/Pause Button Dryness Intensity Control Temp. Explosion Hazard • Keep flammable materials and vapors, such as gasoline, away from dryer. • Do..., or fire. Part 9 OPERATING YOUR DRYER Following are instructions for more detailed information. Please refer to person, read this entire manual, including the IMPORTANT SAFETY INSTRUCTIONS, before operating this manual for starting and using your new dryer. Fire Hazard • No washer can...
... Option Buttons WARNING! DLE2516W / DLG2526W Cycle Custom Program Time Change Selection Button Button LED Display Power Button Start/Pause Button Dryness Intensity Control Temp. Explosion Hazard • Keep flammable materials and vapors, such as gasoline, away from dryer. • Do..., or fire. Part 9 OPERATING YOUR DRYER Following are instructions for more detailed information. Please refer to person, read this entire manual, including the IMPORTANT SAFETY INSTRUCTIONS, before operating this manual for starting and using your new dryer. Fire Hazard • No washer can...
Owners Manual
Page 23
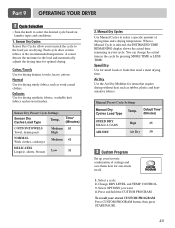
... Program Set up your favorite combination of drying time and a drying temperature. Air Dry Use the Air Dry Modifier for one-touch recall. 1. CONTROL. 3. When a Manual Cycle is selected, the ESTIMATED TIME REMAINING display shows the actual time remaining in the cycle by pressing MORE TIME or LESS TIME. Sensor Dry... to select the desired cycle based on laundry types and conditions. 1. Sensor Dry Preset Cycle Settings Sensor Dry Cycles Load Type Temp. Part 9 OPERATING YOUR DRYER 2 Cycle Selection • Turn the knob to the load you want. 4.
... Program Set up your favorite combination of drying time and a drying temperature. Air Dry Use the Air Dry Modifier for one-touch recall. 1. CONTROL. 3. When a Manual Cycle is selected, the ESTIMATED TIME REMAINING display shows the actual time remaining in the cycle by pressing MORE TIME or LESS TIME. Sensor Dry... to select the desired cycle based on laundry types and conditions. 1. Sensor Dry Preset Cycle Settings Sensor Dry Cycles Load Type Temp. Part 9 OPERATING YOUR DRYER 2 Cycle Selection • Turn the knob to the load you want. 4.


