Owners Manual
Page 1
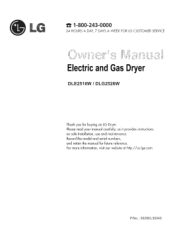
For more information, visit our website at http:i/us.lge.com P/No.: 3828EL3004E Record the model and serial numbers, and retain the manual for buying an LG Dryer. Please read your manual carefully, as it provides instructions on safe Installation, use and maintenance. 1-800-243-0000 24 HOURS A DAY, 7 DAYS A WEEK FOR LG CUSTOMER SERVICE il .....t.".... ElectricandGasDryer DLE2516W / DLG2526W Thank you for future reference.
For more information, visit our website at http:i/us.lge.com P/No.: 3828EL3004E Record the model and serial numbers, and retain the manual for buying an LG Dryer. Please read your manual carefully, as it provides instructions on safe Installation, use and maintenance. 1-800-243-0000 24 HOURS A DAY, 7 DAYS A WEEK FOR LG CUSTOMER SERVICE il .....t.".... ElectricandGasDryer DLE2516W / DLG2526W Thank you for future reference.
Owners Manual
Page 2
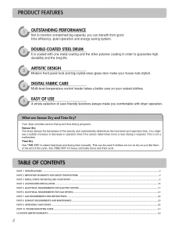
... USE A whole selection of user-friendly functions always make your valued clothes. Your dryer provides sensor drying and time drying programs. Sensor Dry The dryer senses the dampness of the cycle. This is coated with dryer operation. ELECTRICAL REQUIREMENTS FOR GAS DRYERS ... 21 PART 7. iMPORTANT WARRANTY AND SAFETY iNSTRUCTiONS ... 4 PART 3 INITLAL STEPS FOR INSTALLING...-clear glass door make you like them at the end of the laundry and automatically determines the heat level and operation time. TROUBLESHOOTING GUIDE ... 31 LG DRYER LIMITED WARRANTY ... 34 2
... USE A whole selection of user-friendly functions always make your valued clothes. Your dryer provides sensor drying and time drying programs. Sensor Dry The dryer senses the dampness of the cycle. This is coated with dryer operation. ELECTRICAL REQUIREMENTS FOR GAS DRYERS ... 21 PART 7. iMPORTANT WARRANTY AND SAFETY iNSTRUCTiONS ... 4 PART 3 INITLAL STEPS FOR INSTALLING...-clear glass door make you like them at the end of the laundry and automatically determines the heat level and operation time. TROUBLESHOOTING GUIDE ... 31 LG DRYER LIMITED WARRANTY ... 34 2
Owners Manual
Page 3
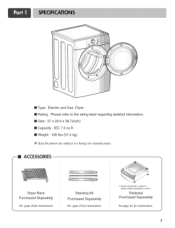
Stacking Kit Purchased Separately See page 15Jor instructions. :_ Desigu of pede,stals is suhject to change without ntauaflttttrer_ notice. Pedestal Purchased Separately See page 16 for instructions. 3 ACCESSORIES Dryer Rack Purchased Separately See page 28 Jor instructions. m Type : Electric and Gas Dryer [] Rating : Please refer to the rating label regarding detailed information. [] Size : 27 x 29.9 x 38.7(inch) [] Capacity : IEC 7.0 cu.ft. [] Weight : 126 Ibs (57,2 kg) ÷ Specifications are subject to change by manufacturer.
Stacking Kit Purchased Separately See page 15Jor instructions. :_ Desigu of pede,stals is suhject to change without ntauaflttttrer_ notice. Pedestal Purchased Separately See page 16 for instructions. 3 ACCESSORIES Dryer Rack Purchased Separately See page 28 Jor instructions. m Type : Electric and Gas Dryer [] Rating : Please refer to the rating label regarding detailed information. [] Size : 27 x 29.9 x 38.7(inch) [] Capacity : IEC 7.0 cu.ft. [] Weight : 126 Ibs (57,2 kg) ÷ Specifications are subject to change by manufacturer.
Owners Manual
Page 4
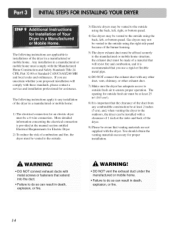
..., personal injury, or death when using your new LG dryer. For your safety, the recom mendations in material or workmanship throughout the warranty period, beginning with the date of Purchase -_ Staple your receipt here for your nearest LG Service Center. You will repair or replace any parts... is installed and operated according to other than single family use, all warranty coverage is located at the end of this manual, LG will need the complete model and serial number when requesting warranty service, proof of your appliance follow basic precautions. Warranty Service is...
..., personal injury, or death when using your new LG dryer. For your safety, the recom mendations in material or workmanship throughout the warranty period, beginning with the date of Purchase -_ Staple your receipt here for your nearest LG Service Center. You will repair or replace any parts... is installed and operated according to other than single family use, all warranty coverage is located at the end of this manual, LG will need the complete model and serial number when requesting warranty service, proof of your appliance follow basic precautions. Warranty Service is...
Owners Manual
Page 5
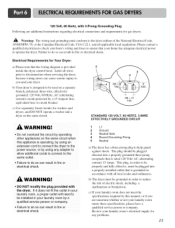
...GROUNDING INSTRUCTIONS This appliance must be grounded. Close supervision of least resistance for foreign objects • Clean lint screen before using the dryer. • Before use fabric softeners or products to eliminate static unless recommended by qualified service personnel. WARNING You can kill or ... service person if you are very important, We have a proper outlet installed by providing a path of children is necessary when the dryer is used near children. • Do not place items exposed to cooking oils in accordance with gasoline, dry-cleaning solvents, other ...
...GROUNDING INSTRUCTIONS This appliance must be grounded. Close supervision of least resistance for foreign objects • Clean lint screen before using the dryer. • Before use fabric softeners or products to eliminate static unless recommended by qualified service personnel. WARNING You can kill or ... service person if you are very important, We have a proper outlet installed by providing a path of children is necessary when the dryer is used near children. • Do not place items exposed to cooking oils in accordance with gasoline, dry-cleaning solvents, other ...
Owners Manual
Page 6
READALL INSTRUCTIONSBEFOREUSE WARNINGFor Yousrafetylthe informationin thismanual must be minimized further by properly venting the dryer to the outdoors. 6 WHATTO DOIF YOUSMELLGAS !recautions, includingthe following : This act requires the governor of California ...not touch any gas or electrical appliance. 2. Follow the gas supplier's instructions carefully. 5. Follow the gas supplier's phone. Properly adjusted dryers will minimize incomplete combustion. Immediately call your gas supplier, call the fire department. Clear the room, building, or area of potential exposure ...
READALL INSTRUCTIONSBEFOREUSE WARNINGFor Yousrafetylthe informationin thismanual must be minimized further by properly venting the dryer to the outdoors. 6 WHATTO DOIF YOUSMELLGAS !recautions, includingthe following : This act requires the governor of California ...not touch any gas or electrical appliance. 2. Follow the gas supplier's instructions carefully. 5. Follow the gas supplier's phone. Properly adjusted dryers will minimize incomplete combustion. Immediately call your gas supplier, call the fire department. Clear the room, building, or area of potential exposure ...
Owners Manual
Page 7
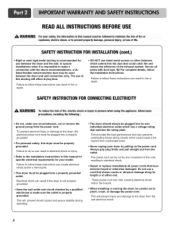
... lectricshock,or to preventpropertydamage,personalinjury,or lossof life. Failure to follow basic precautions, including the following: • Properly ground dryer to conform with no obstructions. READALLINSTRUCTIONSBEFOREUSE WARNING ForYoursafety, the informationin this warning can cause serious injury,fire, electrical shock or death...materials properly. The exhaust duct must be 4 in. (10 cm) in any old ducts before installing your new dryer. The dryer exhaust system must be exhausted to persons when using the appliance, follow these instructions can result in fire or death...
... lectricshock,or to preventpropertydamage,personalinjury,or lossof life. Failure to follow basic precautions, including the following: • Properly ground dryer to conform with no obstructions. READALLINSTRUCTIONSBEFOREUSE WARNING ForYoursafety, the informationin this warning can cause serious injury,fire, electrical shock or death...materials properly. The exhaust duct must be 4 in. (10 cm) in any old ducts before installing your new dryer. The dryer exhaust system must be exhausted to persons when using the appliance, follow these instructions can result in fire or death...
Owners Manual
Page 8
...damaged. Failure to follow these instructions can melt, creating electrical shock and/or fire hazard. • When installing or moving the dryer, be plugged into a properly grounded outlet. Failure to follow these instructions can be properly grounded. This will affect drying time. ... preventpropertydamage,personalinjury,or loss of life, SAFETYINSTRUCTIONFOR INSTALLATION(cont.) • Rigid or semi rigid metal ducting is recommended for your dryer by pulling on the power cord. follow the Installation Instructions. The use a cord that shows cracks or abrasion damage along ...
...damaged. Failure to follow these instructions can melt, creating electrical shock and/or fire hazard. • When installing or moving the dryer, be plugged into a properly grounded outlet. Failure to follow these instructions can be properly grounded. This will affect drying time. ... preventpropertydamage,personalinjury,or loss of life, SAFETYINSTRUCTIONFOR INSTALLATION(cont.) • Rigid or semi rigid metal ducting is recommended for your dryer by pulling on the power cord. follow the Installation Instructions. The use a cord that shows cracks or abrasion damage along ...
Owners Manual
Page 9
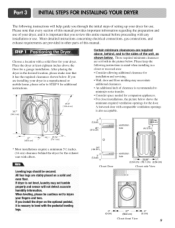
... or mobile home, please refer to STEP 9 tk_r additional instructions. 38.7" (98.3 cm) / 49.8" (126.4 cm) Certain minimum clearances are installing your dryer in other parts of this entire manual before proceeding with the pedestal leveling legs. 24*'2 (155 cm _).. (7.6 cm) Closet Door ventilation hole 1' 29.96"... the desired location, please make sure that you review this manual. When leveling, please be secured. If you install the dryer on a solid and even floor. If you are required above the floor for a garage installation. A louvered door with a solid floor for ...
... or mobile home, please refer to STEP 9 tk_r additional instructions. 38.7" (98.3 cm) / 49.8" (126.4 cm) Certain minimum clearances are installing your dryer in other parts of this entire manual before proceeding with the pedestal leveling legs. 24*'2 (155 cm _).. (7.6 cm) Closet Door ventilation hole 1' 29.96"... the desired location, please make sure that you review this manual. When leveling, please be secured. If you install the dryer on a solid and even floor. If you are required above the floor for a garage installation. A louvered door with a solid floor for ...

Owners Manual
Page 10
... proceeding with any installation. The leveling legs must remain firmly on your dryer can be aligned at the center when closed. The door on the floor and the dryer should not exceed 2.5 cm (1 inch). ii "\ .\_ I0 If the dryer is level from left or the right. iiiiiiiiiiiiiii . The maximum slope ... should be installed to open either to the left to right or front to reverse the direction in position, adjust the leveling legs of the dryer until it is not level, and if the slope exceeds 2.5 cm (1 inch), a load may not tumble properly and internal sensors may malfunction. Once...
... proceeding with any installation. The leveling legs must remain firmly on your dryer can be aligned at the center when closed. The door on the floor and the dryer should not exceed 2.5 cm (1 inch). ii "\ .\_ I0 If the dryer is level from left or the right. iiiiiiiiiiiiiii . The maximum slope ... should be installed to open either to the left to right or front to reverse the direction in position, adjust the leveling legs of the dryer until it is not level, and if the slope exceeds 2.5 cm (1 inch), a load may not tumble properly and internal sensors may malfunction. Once...
Owners Manual
Page 11
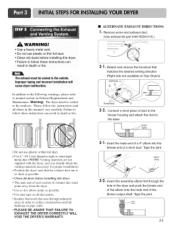
... unheated areas in order to reduce condensation and lint build-up on pipe walls. • PLEASE BE AWARE THAT FAILURE TO EXHAUST THE DRYER CORRECTLY WILL VOID THE DRYER'S WARRANTY. • ALTERNATE EXHAUST DIRECTIONS ] • Remove screw and exhaust duct. (Use exhaust kit part #3911 EZ9131X.) \ 2- |. ...; Insulate ductwork that matches the desired venting direction (Right side not available on Gas Dryers) f PORTION A Knockout Q \ 2-2. Detach and remove the knockout that runs through the hole in the dryer and push the female end of the elbow onto the male end of the blower output...
... unheated areas in order to reduce condensation and lint build-up on pipe walls. • PLEASE BE AWARE THAT FAILURE TO EXHAUST THE DRYER CORRECTLY WILL VOID THE DRYER'S WARRANTY. • ALTERNATE EXHAUST DIRECTIONS ] • Remove screw and exhaust duct. (Use exhaust kit part #3911 EZ9131X.) \ 2- |. ...; Insulate ductwork that matches the desired venting direction (Right side not available on Gas Dryers) f PORTION A Knockout Q \ 2-2. Detach and remove the knockout that runs through the hole in the dryer and push the female end of the elbow onto the male end of the blower output...

Owners Manual
Page 12
... IBr Natural Gas with LNG orifice will not have any steps to this type of orifice onthe dryer. Electrical Plug Connections. 4. (Gas dryer only). Shorter than 20' (6.1 m) - The dryer is required Ibr manufactured (mobile) home installations and where local codes do so can result in...section on Gas Requirements and Instructions. For LP (Liquefied Petroleum) gas connection, refer m this dryer will result in a clothes dryer. 2. Make sure that you don't damage the threads of the dryer. In addition to the following, please refer to center terminal • Ground wire (green or...
... IBr Natural Gas with LNG orifice will not have any steps to this type of orifice onthe dryer. Electrical Plug Connections. 4. (Gas dryer only). Shorter than 20' (6.1 m) - The dryer is required Ibr manufactured (mobile) home installations and where local codes do so can result in...section on Gas Requirements and Instructions. For LP (Liquefied Petroleum) gas connection, refer m this dryer will result in a clothes dryer. 2. Make sure that you don't damage the threads of the dryer. In addition to the following, please refer to center terminal • Ground wire (green or...
Owners Manual
Page 13
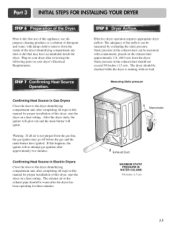
...use allpurpose cleaning products or a solution of detergent and water, with damp cloth to remove from the inside the dryer. If this dryer, start the dryer on your dryer after approximately two minutes. Manometer Exhaust Duct MAXIMUM STATIC PRESSURE IN WATER COLUMN 518 inches (1.5 cm) 13 Static ... will re-attempt gas ignition after reviewing the fonowing parts on a heat setting. Confirming Heat Source in Electric Dryers Close the door to the dryer drum/drying compartment and, alter completing all steps in the exhaust duct should be measured by evaluating the static pressure...
...use allpurpose cleaning products or a solution of detergent and water, with damp cloth to remove from the inside the dryer. If this dryer, start the dryer on your dryer after approximately two minutes. Manometer Exhaust Duct MAXIMUM STATIC PRESSURE IN WATER COLUMN 518 inches (1.5 cm) 13 Static ... will re-attempt gas ignition after reviewing the fonowing parts on a heat setting. Confirming Heat Source in Electric Dryers Close the door to the dryer drum/drying compartment and, alter completing all steps in the exhaust duct should be measured by evaluating the static pressure...
Owners Manual
Page 14
...duct must be affixed securely to the manufactured or mobile home structure, the exhaust duct must be vented to the outside. 3) Electric dryers may be vented to the outside using the back, left, or bottom panel. More detailed information concerning the electrical connection is provided.... The opening for outside fresh air must be at least 2 inches (5 cm), and, when venting the dryer to the outside using the back, left, right, or bottom panel. 4) Gas dryers may be made of a material that will comply with these standards, please contact a service and installation professional ...
...duct must be affixed securely to the manufactured or mobile home structure, the exhaust duct must be vented to the outside. 3) Electric dryers may be vented to the outside using the back, left, or bottom panel. More detailed information concerning the electrical connection is provided.... The opening for outside fresh air must be at least 2 inches (5 cm), and, when venting the dryer to the outside using the back, left, right, or bottom panel. 4) Gas dryers may be made of a material that will comply with these standards, please contact a service and installation professional ...
Owners Manual
Page 15
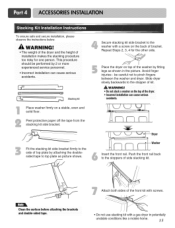
... the doublesided tape to the stopper of side stacking kit. Peel protective paper off the tape from the stacking kit side bracket. Slide dryer slowly backwards to top plate as shown in potentially unstable conditions like a mobile home. Clean the surface before attaching the brackets •... legs as picture shows. Avoid finger i t injuries - Fit the stacking kit side bracket firmly to pinch fingers between the washer and dryer. Insert the front rail. This procedure should be careful not to the side of installation makes the stacking procedure too risky for the other...
... the doublesided tape to the stopper of side stacking kit. Peel protective paper off the tape from the stacking kit side bracket. Slide dryer slowly backwards to top plate as shown in potentially unstable conditions like a mobile home. Clean the surface before attaching the brackets •... legs as picture shows. Avoid finger i t injuries - Fit the stacking kit side bracket firmly to pinch fingers between the washer and dryer. Insert the front rail. This procedure should be careful not to the side of installation makes the stacking procedure too risky for the other...

Owners Manual
Page 16
...for washer/ combe Attach the double-faced tape of the appliance and pedestal by turning with a wrench. B. Remove the paper from the dryer exhaust outlet. Then, adjust the Iocknut toward the pedestal while holding the pedestal leg using a wrench. Removepedestali,nstallatiohnardwarea,nd instructionfsromtheshippingcarton. Loosen ... sure to the pedestal with the edge and can be attached to press the adhesive parts of the dryer two or more people may be needed. NOTE : If dryer was previously installed, uninstall it as shown so the bent parts of the pedestal. Adjust the legs ...
...for washer/ combe Attach the double-faced tape of the appliance and pedestal by turning with a wrench. B. Remove the paper from the dryer exhaust outlet. Then, adjust the Iocknut toward the pedestal while holding the pedestal leg using a wrench. Removepedestali,nstallatiohnardwarea,nd instructionfsromtheshippingcarton. Loosen ... sure to the pedestal with the edge and can be attached to press the adhesive parts of the dryer two or more people may be needed. NOTE : If dryer was previously installed, uninstall it as shown so the bent parts of the pedestal. Adjust the legs ...
Owners Manual
Page 17
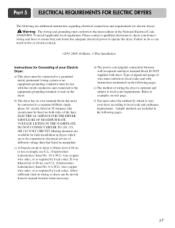
...Please contact a qualified electrician to check your home has adequate electrical power to operate the dryer. DO NOT CONNECT DRYER TO 110, 115, OR 120 VOLT CIRCUIT. e) The method of wiring the dryer is fifteen feet (4.50 m) or less in length, use U.L. (Underwriters Laboratories) ...location when necessary. The fonowing are additional instructions regarding electrical connections and requirements for field installation in dryers which to wire your Electric Dryer: a) This dryer must be connected to a grounded metal, permanent wiring system or an equipment-grounding conductor must be...
...Please contact a qualified electrician to check your home has adequate electrical power to operate the dryer. DO NOT CONNECT DRYER TO 110, 115, OR 120 VOLT CIRCUIT. e) The method of wiring the dryer is fifteen feet (4.50 m) or less in length, use U.L. (Underwriters Laboratories) ...location when necessary. The fonowing are additional instructions regarding electrical connections and requirements for field installation in dryers which to wire your Electric Dryer: a) This dryer must be connected to a grounded metal, permanent wiring system or an equipment-grounding conductor must be...
Owners Manual
Page 18
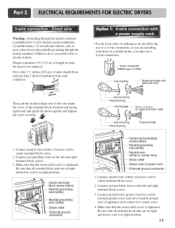
...section if your home has a 4-wire receptacle (NEMA type 14-30R) and you will be using a UL listed, 1201240 volt minimum, 30 amp, dryer power supply cord. r_.; Center terminal block screw (silver) Neutral 9rounding wire (white) Neutral wire (white or center wire) Strain relief Green wire of...wires peel insulation back 1 inch (2.5 cm). Alter cutting 1% inch (3.8 cm) from end. you will be using a UL listed, 1201240 volt minimum, 30 amp, dryer power supply cord. Wire color indicated on tight and power cord is available at your home has a 3-wire receptacle (NEMA type 10-30R) and you...
...section if your home has a 4-wire receptacle (NEMA type 14-30R) and you will be using a UL listed, 1201240 volt minimum, 30 amp, dryer power supply cord. r_.; Center terminal block screw (silver) Neutral 9rounding wire (white) Neutral wire (white or center wire) Strain relief Green wire of...wires peel insulation back 1 inch (2.5 cm). Alter cutting 1% inch (3.8 cm) from end. you will be using a UL listed, 1201240 volt minimum, 30 amp, dryer power supply cord. Wire color indicated on tight and power cord is available at your home has a 3-wire receptacle (NEMA type 10-30R) and you...
Owners Manual
Page 19
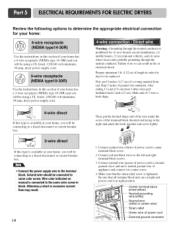
... 19 Center terminal block screw (silver) Neutral grounding wire (white) Neutral grounding wire (white) Strain relief ground connector • If your dryer in a mobile home, you must use of a 3-wire connection, or you are on tight and power cord is in order for ... branch-circuit installations, (2) mobile homes, (3) recreational vehicles, and (4) areas where local codes prohibit grounding through the neutral conductor is prohibited for dryer to be replaced. Failure to the left and right terminal block screws. 3. Connect neutral wire (white) of power cord External ground connector 1....
... 19 Center terminal block screw (silver) Neutral grounding wire (white) Neutral grounding wire (white) Strain relief ground connector • If your dryer in a mobile home, you must use of a 3-wire connection, or you are on tight and power cord is in order for ... branch-circuit installations, (2) mobile homes, (3) recreational vehicles, and (4) areas where local codes prohibit grounding through the neutral conductor is prohibited for dryer to be replaced. Failure to the left and right terminal block screws. 3. Connect neutral wire (white) of power cord External ground connector 1....
Owners Manual
Page 21
...-prong receptacle that is designed to be grounded in your laundry room by this appliance is grounded in fire or electrical shock. b) The dryer must be used on the same circuit. This plug, in order to be properly and tully effective, must conform to the latest edition ... a properly installed outlet that is operating, by using any problems. 21 Warning: The wiring and grounding must be installed in order to operate the dryer. c) If your laundry room does not meet the specifications required by a qualified service person or company. • Failure to do so can result...
...-prong receptacle that is designed to be grounded in your laundry room by this appliance is grounded in fire or electrical shock. b) The dryer must be used on the same circuit. This plug, in order to be properly and tully effective, must conform to the latest edition ... a properly installed outlet that is operating, by using any problems. 21 Warning: The wiring and grounding must be installed in order to operate the dryer. c) If your laundry room does not meet the specifications required by a qualified service person or company. • Failure to do so can result...


