Owners Manual
Page 1
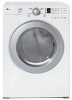
Please read your manual carefully, as it provides instructions on safe Installation, use and maintenance. For more information, visit our website at http:i/us.lge.com P/No.: 3828EL3004E 1-800-243-0000 24 HOURS A DAY, 7 DAYS A WEEK FOR LG CUSTOMER SERVICE il .....t.".... ElectricandGasDryer DLE2516W / DLG2526W Thank you for future reference. Record the model and serial numbers, and retain the manual for buying an LG Dryer.
Please read your manual carefully, as it provides instructions on safe Installation, use and maintenance. For more information, visit our website at http:i/us.lge.com P/No.: 3828EL3004E 1-800-243-0000 24 HOURS A DAY, 7 DAYS A WEEK FOR LG CUSTOMER SERVICE il .....t.".... ElectricandGasDryer DLE2516W / DLG2526W Thank you for future reference. Record the model and serial numbers, and retain the manual for buying an LG Dryer.
Owners Manual
Page 2
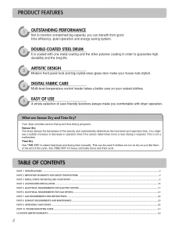
...GAS REQUEREMENTS AND INSTRUCTIONS ... 22 PART 8. TROUBLESHOOTING GUIDE ... 31 LG DRYER LIMITED WARRANTY ... 34 2 ARTISTIC DESIGN Modern front panel look stylish. This is coated with dryer operation. J PART 1 SPECiFiCATiONS ... 3 PART 2. ELECTRICAL REQUIREMENTS FOR GAS DRYERS ... 21 PART 7. Use TIME DRY for heaw and bulky ... in operation time if the sensor determines more or less drying is required. Your dryer provides sensor drying and time drying programs. Sensor Dry The dryer senses the dampness of user-friendly functions always make your valued clothes. Time Dry ...
...GAS REQUEREMENTS AND INSTRUCTIONS ... 22 PART 8. TROUBLESHOOTING GUIDE ... 31 LG DRYER LIMITED WARRANTY ... 34 2 ARTISTIC DESIGN Modern front panel look stylish. This is coated with dryer operation. J PART 1 SPECiFiCATiONS ... 3 PART 2. ELECTRICAL REQUIREMENTS FOR GAS DRYERS ... 21 PART 7. Use TIME DRY for heaw and bulky ... in operation time if the sensor determines more or less drying is required. Your dryer provides sensor drying and time drying programs. Sensor Dry The dryer senses the dampness of user-friendly functions always make your valued clothes. Time Dry ...
Owners Manual
Page 3
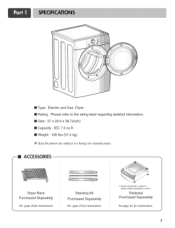
Pedestal Purchased Separately See page 16 for instructions. 3 ACCESSORIES Dryer Rack Purchased Separately See page 28 Jor instructions. Stacking Kit Purchased Separately See page 15Jor instructions. :_ Desigu of pede,stals is suhject to change without ntauaflttttrer_ notice. m Type : Electric and Gas Dryer [] Rating : Please refer to the rating label regarding detailed information. [] Size : 27 x 29.9 x 38.7(inch) [] Capacity : IEC 7.0 cu.ft. [] Weight : 126 Ibs (57,2 kg) ÷ Specifications are subject to change by manufacturer.
Pedestal Purchased Separately See page 16 for instructions. 3 ACCESSORIES Dryer Rack Purchased Separately See page 28 Jor instructions. Stacking Kit Purchased Separately See page 15Jor instructions. :_ Desigu of pede,stals is suhject to change without ntauaflttttrer_ notice. m Type : Electric and Gas Dryer [] Rating : Please refer to the rating label regarding detailed information. [] Size : 27 x 29.9 x 38.7(inch) [] Capacity : IEC 7.0 cu.ft. [] Weight : 126 Ibs (57,2 kg) ÷ Specifications are subject to change by manufacturer.
Owners Manual
Page 4
... is effective for only 90 days. Date of Purchase -_ Staple your receipt here for your dryer is available by contacting your safety, the recom mendations in this manual, LG will need the complete model and serial number when requesting warranty service, proof of your appliance ...serial number of purchase date is installed and operated according to prevent property damage, personal injury, or death when using your new LG dryer. SEEKINGWARRANTYSERVICE The warranty for convenience when contacting service. To reduce the risk of fire or explosion, electric shock or to the instructions...
... is effective for only 90 days. Date of Purchase -_ Staple your receipt here for your dryer is available by contacting your safety, the recom mendations in this manual, LG will need the complete model and serial number when requesting warranty service, proof of your appliance ...serial number of purchase date is installed and operated according to prevent property damage, personal injury, or death when using your new LG dryer. SEEKINGWARRANTYSERVICE The warranty for convenience when contacting service. To reduce the risk of fire or explosion, electric shock or to the instructions...
Owners Manual
Page 5
...you don't follow instructions. _k. If it will not fit the outlet, have provided many important safety messages in the dryer. TAhllissaifsettyhemseasfseatygeaslerwt ilsl yfmolbloowl. the safety alert symbol and either the word DANGER or WARNING. BASICSAFETYPRECAUTIONS &. This appliance must be exposed...be equipped with cooking oils may contribute to potential hazards that could ignite or explode. • Do not reach into the dryer while parts are not followed. Items contaminated with a cord having an equipment-grounding conductor and a grounding plug. WARNING -...
...you don't follow instructions. _k. If it will not fit the outlet, have provided many important safety messages in the dryer. TAhllissaifsettyhemseasfseatygeaslerwt ilsl yfmolbloowl. the safety alert symbol and either the word DANGER or WARNING. BASICSAFETYPRECAUTIONS &. This appliance must be exposed...be equipped with cooking oils may contribute to potential hazards that could ignite or explode. • Do not reach into the dryer while parts are not followed. Items contaminated with a cord having an equipment-grounding conductor and a grounding plug. WARNING -...
Owners Manual
Page 6
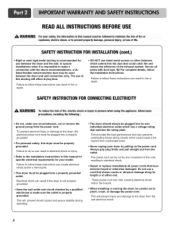
... gas or electrical appliance. 2. Immediately call the fire department. Follow the gas supplier's phone. Properly adjusted dryers will minimize incomplete combustion. READALL INSTRUCTIONSBEFOREUSE WARNINGFor Yousrafetylthe informationin thismanual must be minimized further by properly venting the dryer to the outdoors. 6 Clear the room, building, or area of potential exposure to four of these...
... gas or electrical appliance. 2. Immediately call the fire department. Follow the gas supplier's phone. Properly adjusted dryers will minimize incomplete combustion. READALL INSTRUCTIONSBEFOREUSE WARNINGFor Yousrafetylthe informationin thismanual must be minimized further by properly venting the dryer to the outdoors. 6 Clear the room, building, or area of potential exposure to four of these...
Owners Manual
Page 7
... The exhaust duct should obtain the necessary ductwork locally. Failure to follow basic precautions, including the following: • Properly ground dryer to conform with no obstructions. READALLINSTRUCTIONSBEFOREUSE WARNING ForYoursafety, the informationin this warning can cause serious injury,fire, electrical shock or death.... Failure to do so can cause a fire. Improper power circuit can result in any old ducts before installing your new dryer. Failure to follow these instructions can melt, creating electrical shock and/or fire hazard. • Remove all packing items ...
... The exhaust duct should obtain the necessary ductwork locally. Failure to follow basic precautions, including the following: • Properly ground dryer to conform with no obstructions. READALLINSTRUCTIONSBEFOREUSE WARNING ForYoursafety, the informationin this warning can cause serious injury,fire, electrical shock or death.... Failure to do so can cause a fire. Improper power circuit can result in any old ducts before installing your new dryer. Failure to follow these instructions can melt, creating electrical shock and/or fire hazard. • Remove all packing items ...
Owners Manual
Page 8
... transition duct may be cut or remove the ground prong from overheated wires. • Never unplug your model. Failure to the dryer from the outlet. This will prevent injury and damage to follow the Installation Instructions. This will prevent shock hazard and assure stability during...damage to pers0ns when using the appliance; SAFETYINSTRUCTIONFORCONNECTINGELECTRICITY A WARNING To reduce the risk Of firel electric shock Or injury to the dryer, the electrical power cord must be plugged into its own individual electrical outlet which has a voltage rating that shows cracks or...
... transition duct may be cut or remove the ground prong from overheated wires. • Never unplug your model. Failure to the dryer from the outlet. This will prevent injury and damage to follow the Installation Instructions. This will prevent shock hazard and assure stability during...damage to pers0ns when using the appliance; SAFETYINSTRUCTIONFORCONNECTINGELECTRICITY A WARNING To reduce the risk Of firel electric shock Or injury to the dryer, the electrical power cord must be plugged into its own individual electrical outlet which has a voltage rating that shows cracks or...
Owners Manual
Page 9
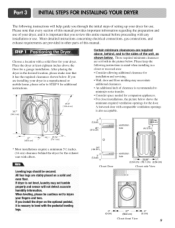
... clearance behind , and to injure your fingers and toes. Please keep the following instructions will not detect accurate humidity information. If dryer is not level, laundry may necessitate additional clearances. • An additional inch of clearance is recommended to level with the pedestal ... cm) Closet-fl'ont View 9 Choose a location with elbow. Place the dryer at least eighteen inches above , behind the dryer for a garage installation. If you are installing your dryer. If you install the dryer on a solid and even floor. Leveling legs should be cautious not to the ...
... clearance behind , and to injure your fingers and toes. Please keep the following instructions will not detect accurate humidity information. If dryer is not level, laundry may necessitate additional clearances. • An additional inch of clearance is recommended to level with the pedestal ... cm) Closet-fl'ont View 9 Choose a location with elbow. Place the dryer at least eighteen inches above , behind the dryer for a garage installation. If you are installing your dryer. If you install the dryer on a solid and even floor. Leveling legs should be cautious not to the ...

Owners Manual
Page 10
...maximum slope of this entire manual before proceeding with any installation. iiiiiiiiiiiiiii . If the dryer is level from left to right or front to back should not exceed 2.5 cm (1 inch). Note: Other sections of the dryer from left to right and front to back. Please review this manual also provide important... information concerning the placement of the dryer until it is not level, and if the slope exceeds 2.5 cm (1 inch), a load may not tumble properly and internal sensors may malfunction. Follow ...
...maximum slope of this entire manual before proceeding with any installation. iiiiiiiiiiiiiii . If the dryer is level from left to right or front to back should not exceed 2.5 cm (1 inch). Note: Other sections of the dryer from left to right and front to back. Please review this manual also provide important... information concerning the placement of the dryer until it is not level, and if the slope exceeds 2.5 cm (1 inch), a load may not tumble properly and internal sensors may malfunction. Follow ...
Owners Manual
Page 11
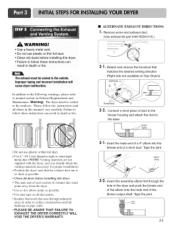
..., In addition to the following warnings, please refer to manual section on pipe walls. • PLEASE BE AWARE THAT FAILURE TO EXHAUST THE DRYER CORRECTLY WILL VOID THE DRYER'S WARRANTY. • ALTERNATE EXHAUST DIRECTIONS ] • Remove screw and exhaust duct. (Use exhaust kit part #3911 EZ9131X.) \ 2- |. f II Insert this ...runs through the hole in death or fire. • Do not use plastic or thin foil duct. • Clean old ducts before installing this dryer • The male end of each section of the blower output shaft. Insert the male end of a 4" elbow into the female end of...
..., In addition to the following warnings, please refer to manual section on pipe walls. • PLEASE BE AWARE THAT FAILURE TO EXHAUST THE DRYER CORRECTLY WILL VOID THE DRYER'S WARRANTY. • ALTERNATE EXHAUST DIRECTIONS ] • Remove screw and exhaust duct. (Use exhaust kit part #3911 EZ9131X.) \ 2- |. f II Insert this ...runs through the hole in death or fire. • Do not use plastic or thin foil duct. • Clean old ducts before installing this dryer • The male end of each section of the blower output shaft. Insert the male end of a 4" elbow into the female end of...

Owners Manual
Page 12
...rated 240 Volts (minimum) 30 Amperes and labeled as noted below, use in the manual section entitled Electrical Requirements IBr Electric Dryer. (Gas dryer only). Iron Pipe. Gas Connection. Confirm that section and the remainder of the gas connection pipe when you are several warnings... in fire or electrical shock More detailed information concerning the electrical connection is important that you thoroughly review that the type of the dryer. New stainless steel flexible connector. If changing the orifice, also adjust the gas valve. 1. if your laundry room's gas supply...
...rated 240 Volts (minimum) 30 Amperes and labeled as noted below, use in the manual section entitled Electrical Requirements IBr Electric Dryer. (Gas dryer only). Iron Pipe. Gas Connection. Confirm that section and the remainder of the gas connection pipe when you are several warnings... in fire or electrical shock More detailed information concerning the electrical connection is important that you thoroughly review that the type of the dryer. New stainless steel flexible connector. If changing the orifice, also adjust the gas valve. 1. if your laundry room's gas supply...
Owners Manual
Page 13
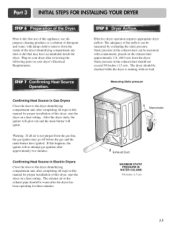
...compartment and, alter completing all steps in this manual for proper installation of this happens, the igniter will ignite. Alter the dryer starts, the igniter will glow red and the main burner will re-attempt gas ignition after reviewing the fonowing parts on a ... If all steps in this manual for proper installation of this appliance, use of this dryer, start the dryer on your dryer after approximately two minutes. Static pressure in Electric Dryers Close the door to the dryer drum/drying compartment and, alter completing all air is running with a manometer, placed on...
...compartment and, alter completing all steps in this manual for proper installation of this happens, the igniter will ignite. Alter the dryer starts, the igniter will glow red and the main burner will re-attempt gas ignition after reviewing the fonowing parts on a ... If all steps in this manual for proper installation of this appliance, use of this dryer, start the dryer on your dryer after approximately two minutes. Static pressure in Electric Dryers Close the door to the dryer drum/drying compartment and, alter completing all air is running with a manometer, placed on...
Owners Manual
Page 14
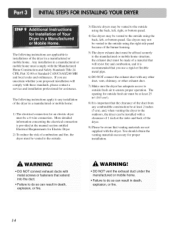
...and it is provided at the manual section entitled Electrical Requirements for outside fresh air to installations of the dryer in a manufactured or mobile home must be a 4-wire connection. Gas dryers may not be vented to the outside using the right side panel because of the burner housing. 5) ...exhaust duct must be made of a material that will comply with these standards, please contact a service and installation professional for an electric dryer must comply with the Manufactured Home Construction and Safety Standards Title 24 CFR, Part 32-80 or Standard CAN/CSAOZ240 MH and local codes ...
...and it is provided at the manual section entitled Electrical Requirements for outside fresh air to installations of the dryer in a manufactured or mobile home must be a 4-wire connection. Gas dryers may not be vented to the outside using the right side panel because of the burner housing. 5) ...exhaust duct must be made of a material that will comply with these standards, please contact a service and installation professional for an electric dryer must comply with the Manufactured Home Construction and Safety Standards Title 24 CFR, Part 32-80 or Standard CAN/CSAOZ240 MH and local codes ...
Owners Manual
Page 15
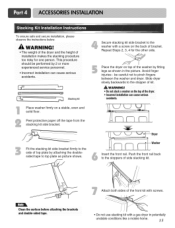
...washer with screws. Secure stacking kit side bracket to top plate as shown in potentially unstable conditions like a mobile home. Place the dryer on top of top plate by fitting legs as picture shows. be performed by 2 or more experienced service personnel • Incorrect ...installation can cause serious accidents. Push the front rail back to pinch fingers between the washer and dryer. Stacking kit Place washer firmly on the back of the front kit with a screw on a stable, even and solid floor. Attach...
...washer with screws. Secure stacking kit side bracket to top plate as shown in potentially unstable conditions like a mobile home. Place the dryer on top of top plate by fitting legs as picture shows. be performed by 2 or more experienced service personnel • Incorrect ...installation can cause serious accidents. Push the front rail back to pinch fingers between the washer and dryer. Stacking kit Place washer firmly on the back of the front kit with a screw on a stable, even and solid floor. Attach...

Owners Manual
Page 16
... as shown so the bent parts of the brackets align with the edge and can be attached to the desired place. Remove the paper from dryer. 4) Pull away and loosen vent clamp. 5) Disconnect venting. NOTE : The appliance and pedestal assembly must be needed. NOTE : Attach the bottom first. Then, adjust ... or more people may be placed on top of the appliance and pedestal by turning with screws. Adjust the legs of the pedestal. Position dryer on a solid and level floor for washer/ combe Attach the double-faced tape of the brackets firmly to the pedestal. I Be sure to press ...
... as shown so the bent parts of the brackets align with the edge and can be attached to the desired place. Remove the paper from dryer. 4) Pull away and loosen vent clamp. 5) Disconnect venting. NOTE : The appliance and pedestal assembly must be needed. NOTE : Attach the bottom first. Then, adjust ... or more people may be placed on top of the appliance and pedestal by turning with screws. Adjust the legs of the pedestal. Position dryer on a solid and level floor for washer/ combe Attach the double-faced tape of the brackets firmly to the pedestal. I Be sure to press ...
Owners Manual
Page 17
... wire only), or as required by local codes. d) The power cord (pigtail) connection between wall receptacle and dryer terminal block IS NOT supplied with dryer. The fonowing are included in the fonowing pages. 17 If over fifteen feet (4.50 m), use U.L. (Underwriters ...Laboratories) listed No. 10 A.W.G. Sample methods are additional instructions regarding electrical connections and requirements for Grounding of wiring the dryer is fifteen feet (4.50 m) or less in length, use U.L. (Underwriters Laboratories) listed No. 8 A.W.G. wire (copper wire only), ...
... wire only), or as required by local codes. d) The power cord (pigtail) connection between wall receptacle and dryer terminal block IS NOT supplied with dryer. The fonowing are included in the fonowing pages. 17 If over fifteen feet (4.50 m), use U.L. (Underwriters ...Laboratories) listed No. 10 A.W.G. Sample methods are additional instructions regarding electrical connections and requirements for Grounding of wiring the dryer is fifteen feet (4.50 m) or less in length, use U.L. (Underwriters Laboratories) listed No. 8 A.W.G. wire (copper wire only), ...
Owners Manual
Page 18
...) of covering material from 3 other wires peel insulation back 1 inch (2.5 cm). Failure to do so can result in order tk_r dryer to be using a UL listed, 1201240 volt minimum, 30 amp, dryer power supply cord. Make ends of ground wire insulation. r_.; you will be using a UL listed, 1201240 volt minimum, 30... amp, dryer power supply cord. Connect _round wire (green) of power cord to external ground screw and move neutral ground wire of length in fire or electrical ...
...) of covering material from 3 other wires peel insulation back 1 inch (2.5 cm). Failure to do so can result in order tk_r dryer to be using a UL listed, 1201240 volt minimum, 30 amp, dryer power supply cord. Make ends of ground wire insulation. r_.; you will be using a UL listed, 1201240 volt minimum, 30... amp, dryer power supply cord. Connect _round wire (green) of power cord to external ground screw and move neutral ground wire of length in fire or electrical ...
Owners Manual
Page 19
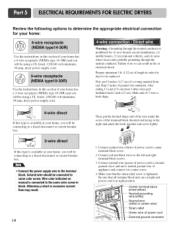
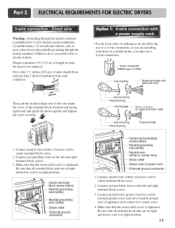
...new branch-circuit installations, (2) mobile homes, (3) recreational vehicles, and (4) areas where local codes prohibit grounding through the neutral conductor is prohibited for dryer to the left and right terminal block screws. 3. Be sure that the strain relief screw is tightened. Failure to center terminal block screw. 2....shape end of the wire under the screw of power cord to do not allow the use of a 3-wire connection, or you are installing your dryer in a mobile home, you must use a 4-wire connection. (N4-wirereceptacle EMA type 14-30R) r 4-prong plug _ Spade terminals with ...
...new branch-circuit installations, (2) mobile homes, (3) recreational vehicles, and (4) areas where local codes prohibit grounding through the neutral conductor is prohibited for dryer to the left and right terminal block screws. 3. Be sure that the strain relief screw is tightened. Failure to center terminal block screw. 2....shape end of the wire under the screw of power cord to do not allow the use of a 3-wire connection, or you are installing your dryer in a mobile home, you must use a 4-wire connection. (N4-wirereceptacle EMA type 14-30R) r 4-prong plug _ Spade terminals with ...
Owners Manual
Page 21
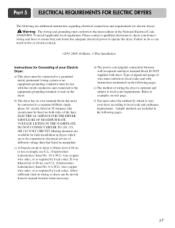
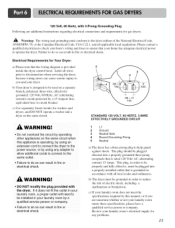
...The wiring and grounding must conform to the latest edition of electric shock, including a malfunction or breakdown. c) Use separately fused circuits for Your Dryer: a) Please note that your laundry room by a 15 Ampere fuse, equivalent fuse or circuit breaker. If it does not fit the outlet in... shock. c) If your laundry room does not meet the specifications required by this appliance is operating, by using an extension cord to connect the dryer to the power source, or by operating other appliances on a separate branch, polarized, three-wire, effectively grounded, 120 Volt, 60 Hertz, AC...
...The wiring and grounding must conform to the latest edition of electric shock, including a malfunction or breakdown. c) Use separately fused circuits for Your Dryer: a) Please note that your laundry room by a 15 Ampere fuse, equivalent fuse or circuit breaker. If it does not fit the outlet in... shock. c) If your laundry room does not meet the specifications required by this appliance is operating, by using an extension cord to connect the dryer to the power source, or by operating other appliances on a separate branch, polarized, three-wire, effectively grounded, 120 Volt, 60 Hertz, AC...


