Owners Manual
Page 9
...-side View 0" _ (0 cm) 27" _1_0" (68.6 cm) (0 cm) Closet-fl'ont View 9 Please keep the following instructions will not detect accurate humidity information. If you review this entire manual before proceeding with a solid floor for a garage installation. If dryer is not level, laundry may necessitate additional clearances. • An additional inch...
...-side View 0" _ (0 cm) 27" _1_0" (68.6 cm) (0 cm) Closet-fl'ont View 9 Please keep the following instructions will not detect accurate humidity information. If you review this entire manual before proceeding with a solid floor for a garage installation. If dryer is not level, laundry may necessitate additional clearances. • An additional inch...

Owners Manual
Page 10
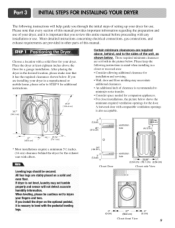
Note: Other sections of this entire manual before proceeding with any installation. Follow these instructions to the left or the right. Please review this manual also provide important information concerning the placement of and clearances for your door opens: Door and latch should be installed to open either ...
Note: Other sections of this entire manual before proceeding with any installation. Follow these instructions to the left or the right. Please review this manual also provide important information concerning the placement of and clearances for your door opens: Door and latch should be installed to open either ...

Owners Manual
Page 12
... complete instructions • Failure to green ground connector • Securely tighten all connections between the dryer and your laundry room is important that you thoroughly review that you remove the shipping cap. 3. I. if your houseis located at the elevationsup tO 1( Adjustingburner input settingis not needed , orific e conversion should be co nnected...
... complete instructions • Failure to green ground connector • Securely tighten all connections between the dryer and your laundry room is important that you thoroughly review that you remove the shipping cap. 3. I. if your houseis located at the elevationsup tO 1( Adjustingburner input settingis not needed , orific e conversion should be co nnected...
Owners Manual
Page 13
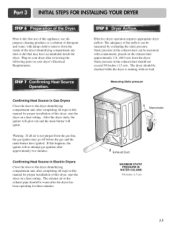
... WATER COLUMN 518 inches (1.5 cm) 13 Alter the dryer starts, the igniter will glow red and the main burner will re-attempt gas ignition after reviewing the fonowing parts on a heat setting. Plug-in the exhaust duct should be warm alter the dryer has been operating for proper installation of the...
... WATER COLUMN 518 inches (1.5 cm) 13 Alter the dryer starts, the igniter will glow red and the main burner will re-attempt gas ignition after reviewing the fonowing parts on a heat setting. Plug-in the exhaust duct should be warm alter the dryer has been operating for proper installation of the...
Owners Manual
Page 18
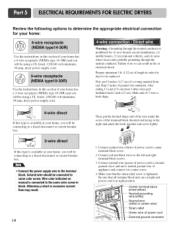
... available at your home. you will be connecting to a fused disconnect or circuit breaker box. • Connect the power supply wire to the terminal block. Review the following options to determine the appropriate electrical connection for your home: Use the instructions in this section if your home has a 4-wire receptacle (NEMA...
... available at your home. you will be connecting to a fused disconnect or circuit breaker box. • Connect the power supply wire to the terminal block. Review the following options to determine the appropriate electrical connection for your home: Use the instructions in this section if your home has a 4-wire receptacle (NEMA...
Owners Manual
Page 21
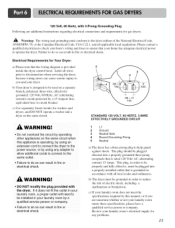
... Side 4 Round Grounding Prong 5 Neutral a) The dryer has a three-prong plug to operate the dryer. The plug should be grounded in fire or electrical shock. Review your dryer.
... Side 4 Round Grounding Prong 5 Neutral a) The dryer has a three-prong plug to operate the dryer. The plug should be grounded in fire or electrical shock. Review your dryer.

Owners Manual
Page 31
... should be replaced by a service center. 31 s the dryer plugged inl), • is the fuse blown, or is securely and completely pushed into the !aunchy .... . Review the charts on your home's or laundry rooln's fuse box/circuit breaker box and replace the fuse or reset the circuit breaker. (IMPORTANT: electric dryers...
... should be replaced by a service center. 31 s the dryer plugged inl), • is the fuse blown, or is securely and completely pushed into the !aunchy .... . Review the charts on your home's or laundry rooln's fuse box/circuit breaker box and replace the fuse or reset the circuit breaker. (IMPORTANT: electric dryers...

Owners Manual
Page 33
.... 12. that the OutSide wa!! T0 ay0id shrinkage_, please carethlly fol!ow_ the care and use two fuses or breakers.) Divide your dryer? C0nfinn through review of tl)e appr0p!_iate Sections of laundry can !ead t0 WtJnkled clothes. 9. C0nfirm that nothing has been set against the dampers. Problem: My clothesare shrinking...
.... 12. that the OutSide wa!! T0 ay0id shrinkage_, please carethlly fol!ow_ the care and use two fuses or breakers.) Divide your dryer? C0nfinn through review of tl)e appr0p!_iate Sections of laundry can !ead t0 WtJnkled clothes. 9. C0nfirm that nothing has been set against the dampers. Problem: My clothesare shrinking...
