

Owner's Manual
Page 1
ENGLISH ESPAN~~OL FRANÇAIS OWNER'S MANUAL DRYER Please read this manual carefully before operating your dryer and retain it for future reference. MFL62512832 DLE2140* DLG2141* P/No.
ENGLISH ESPAN~~OL FRANÇAIS OWNER'S MANUAL DRYER Please read this manual carefully before operating your dryer and retain it for future reference. MFL62512832 DLE2140* DLG2141* P/No.

Owner's Manual
Page 2
... Accessories 36 Pedestal Installation 37 Stacking Kit Installation 39 WARRANTY 41 2 THANK YOU! By following the operating and care instructions in this manual, your dryer 9 Installation Location Requirements 9 Clearances 9 Installation With Optional Pedestal Base or Stacking Kit 10 Leveling the Dryer 11 Optional... completely before installing and operating your dryer will provide you with simple operation and high efficiency. Your new LG Dryer combines the most advanced drying sensor technology with many years of reliable service. IMPORTANT SAFETY INSTRUCTIONS What to the...
... Accessories 36 Pedestal Installation 37 Stacking Kit Installation 39 WARRANTY 41 2 THANK YOU! By following the operating and care instructions in this manual, your dryer 9 Installation Location Requirements 9 Clearances 9 Installation With Optional Pedestal Base or Stacking Kit 10 Leveling the Dryer 11 Optional... completely before installing and operating your dryer will provide you with simple operation and high efficiency. Your new LG Dryer combines the most advanced drying sensor technology with many years of reliable service. IMPORTANT SAFETY INSTRUCTIONS What to the...

Owner's Manual
Page 3
We have provided many important safety messages in this manual and on any gas or electrical appliance. 2. Do not touch any other flammable vapors and liquids in your gas supplier, call your appliance. If you ...don't follow instructions. ENGLISH READ ALL INSTRUCTIONS BEFORE USE wWARNING For your safety, the information in this manual must be followed to minimize the risk of fire or explosion, electric shock, or to reduce the chance of injury, and tell you what the...
We have provided many important safety messages in this manual and on any gas or electrical appliance. 2. Do not touch any other flammable vapors and liquids in your gas supplier, call your appliance. If you ...don't follow instructions. ENGLISH READ ALL INSTRUCTIONS BEFORE USE wWARNING For your safety, the information in this manual must be followed to minimize the risk of fire or explosion, electric shock, or to reduce the chance of injury, and tell you what the...

Owner's Manual
Page 4
.... • Do not repair or replace any part of the dryer or attempt any other flammable or explosive substances as described in this manual. • Do not place items exposed to four of these substances, namely benzene, carbon monoxide, formaldehyde, and soot, caused primarily by...to the outdoors. 4 BASIC SAFETY PRECAUTIONS wWARNING: To reduce the risk of fire, electric shock, or injury to persons when using this manual must be minimized further by qualified service personnel. • Do not install or store the dryer where it will minimize incomplete combustion. Items...
.... • Do not repair or replace any part of the dryer or attempt any other flammable or explosive substances as described in this manual. • Do not place items exposed to four of these substances, namely benzene, carbon monoxide, formaldehyde, and soot, caused primarily by...to the outdoors. 4 BASIC SAFETY PRECAUTIONS wWARNING: To reduce the risk of fire, electric shock, or injury to persons when using this manual must be minimized further by qualified service personnel. • Do not install or store the dryer where it will minimize incomplete combustion. Items...

Owner's Manual
Page 5
...conductors and connected to a grounded metal, permanent wiring system or an equipmentgrounding conductor must be properly installed as described in this manual. If it will not be exposed to temperatures below freezing or exposed to avoid electrical overload. Failure to prevent property damage,...do not install the dryer in humid spaces. READ ALL INSTRUCTIONS BEFORE USE ENGLISH wWARNING For your safety, the information in this manual must be equipped with a cord having an equipment-grounding conductor and a grounding plug. GROUNDING INSTRUCTIONS This appliance must be plugged ...
...conductors and connected to a grounded metal, permanent wiring system or an equipmentgrounding conductor must be properly installed as described in this manual. If it will not be exposed to temperatures below freezing or exposed to avoid electrical overload. Failure to prevent property damage,...do not install the dryer in humid spaces. READ ALL INSTRUCTIONS BEFORE USE ENGLISH wWARNING For your safety, the information in this manual must be equipped with a cord having an equipment-grounding conductor and a grounding plug. GROUNDING INSTRUCTIONS This appliance must be plugged ...
Owner's Manual
Page 6
... ductwork locally. Make sure to clean any area of the dwelling. Failure to follow all of the safety warnings in this manual could catch lint and reduce the efficiency of this manual must be 4 inches (10.2 cm) in diameter with no obstructions. Punctured ductwork can create a health and fire hazard. • Use...
... ductwork locally. Make sure to clean any area of the dwelling. Failure to follow all of the safety warnings in this manual could catch lint and reduce the efficiency of this manual must be 4 inches (10.2 cm) in diameter with no obstructions. Punctured ductwork can create a health and fire hazard. • Use...

Owner's Manual
Page 7
...personal safety, this appliance, follow these instructions can result in electrical shock or injury. • Refer to the installation instructions in this manual must be followed to minimize the risk of fire or explosion, electric shock, or to prevent property damage, personal injury, or loss ... checked by pulling on the power cord. ENGLISH READ ALL INSTRUCTIONS BEFORE USE wWARNING For your safety, the information in this manual for specific electrical requirements for your dryer by a qualified electrician to make sure the outlet is not properly grounded. SAFETY INSTRUCTIONS...
...personal safety, this appliance, follow these instructions can result in electrical shock or injury. • Refer to the installation instructions in this manual must be followed to minimize the risk of fire or explosion, electric shock, or to prevent property damage, personal injury, or loss ... checked by pulling on the power cord. ENGLISH READ ALL INSTRUCTIONS BEFORE USE wWARNING For your safety, the information in this manual for specific electrical requirements for your dryer by a qualified electrician to make sure the outlet is not properly grounded. SAFETY INSTRUCTIONS...

Owner's Manual
Page 9
..." (68.6 cm) 1"* (2.5 cm) Installation spacing for recessed area or closet installation The following spacing dimensions are required. It is important that allows for this entire manual before installing and operating your local building inspector. If using your dryer at the end of a companion appliance should be required for spacing of 1 inch...
..." (68.6 cm) 1"* (2.5 cm) Installation spacing for recessed area or closet installation The following spacing dimensions are required. It is important that allows for this entire manual before installing and operating your local building inspector. If using your dryer at the end of a companion appliance should be required for spacing of 1 inch...

Owner's Manual
Page 10
... OR STACKING KIT IMPORTANT: If you are installing your dryer using an optional pedestal base or stacking kit, please refer to Optional Accessories in this manual or to prevent heat and moisture buildup in the closet. cm) must have both an upper and lower vent to the instructions for the recommended...
... OR STACKING KIT IMPORTANT: If you are installing your dryer using an optional pedestal base or stacking kit, please refer to Optional Accessories in this manual or to prevent heat and moisture buildup in the closet. cm) must have both an upper and lower vent to the instructions for the recommended...

Owner's Manual
Page 14
... exhaust duct retaining screw. Bracket 2 Press the adapter duct onto the blower housing and secure to the base of the elbow faces AWAY from your LG retailer. Be sure that the male end of the dryer with included screw. CHANGING THE DRYER VENT LOCATION wWARNING • Use a heavy metal vent. •...
... exhaust duct retaining screw. Bracket 2 Press the adapter duct onto the blower housing and secure to the base of the elbow faces AWAY from your LG retailer. Be sure that the male end of the dryer with included screw. CHANGING THE DRYER VENT LOCATION wWARNING • Use a heavy metal vent. •...

Owner's Manual
Page 17
...valve, purge the gas supply of air and sediment before connecting the gas supply to the dryer. In the United States, an individual manual shutoff valve MUST be plugged into a 120-VAC, 60-Hz. Larger tubing should be converted for use with the National Fuel Gas Code...174; tape or a pipe-joint compound that is configured for use with flexible stainless steel connectors. grounded outlet protected by closing its individual manual shutoff valve during any disassembly of the dryer; or CSA-certified gas supply line with natural gas. ConnecTING GAS DRYERS ENGLISH wWARNING: To ...
...valve, purge the gas supply of air and sediment before connecting the gas supply to the dryer. In the United States, an individual manual shutoff valve MUST be plugged into a 120-VAC, 60-Hz. Larger tubing should be converted for use with the National Fuel Gas Code...174; tape or a pipe-joint compound that is configured for use with flexible stainless steel connectors. grounded outlet protected by closing its individual manual shutoff valve during any disassembly of the dryer; or CSA-certified gas supply line with natural gas. ConnecTING GAS DRYERS ENGLISH wWARNING: To ...

Owner's Manual
Page 20
... installations, as well as all screws securely. Terminal Block UL-Listed Strain Relief UL-Listed 4-Wire Power Cord 1 Remove the terminal block access cover on manual is required. • Use a 30 A, 240 V, UL-listed power cord with #10 AWG-minimum copper conductor and closed loop or forked terminals with upturned ends...
... installations, as well as all screws securely. Terminal Block UL-Listed Strain Relief UL-Listed 4-Wire Power Cord 1 Remove the terminal block access cover on manual is required. • Use a 30 A, 240 V, UL-listed power cord with #10 AWG-minimum copper conductor and closed loop or forked terminals with upturned ends...

Owner's Manual
Page 21
... block. Each colored wire should be connected to the outer terminal block screws. UL-Listed 4-Wire Power Cord 2 Remove the terminal block access cover on manual is required. • Use UL-listed 4-wire #10 AWG-minimum copper conductor cable. • Allow at least 5 ft. (1.5 m) length to allow for removal and reinstallation...
... block. Each colored wire should be connected to the outer terminal block screws. UL-Listed 4-Wire Power Cord 2 Remove the terminal block access cover on manual is required. • Use UL-listed 4-wire #10 AWG-minimum copper conductor cable. • Allow at least 5 ft. (1.5 m) length to allow for removal and reinstallation...

Owner's Manual
Page 22
... Power Cord 1 Remove the terminal block access cover on new construction after January 1, 1996. • A UL-listed strain relief is required. Wire color indicated on manual is NOT permitted on the upper back of the power cord to the green ground screw. Hot (Black) Neutral (White) Hot (Red) Ground Screw Neutral...
... Power Cord 1 Remove the terminal block access cover on new construction after January 1, 1996. • A UL-listed strain relief is required. Wire color indicated on manual is NOT permitted on the upper back of the power cord to the green ground screw. Hot (Black) Neutral (White) Hot (Red) Ground Screw Neutral...

Owner's Manual
Page 23
... strain relief. 23 Each colored wire should be connected to the terminal block. UL-Listed 3-Wire Power Cord 2 Remove the terminal block access cover on manual is prohibited for removal and reinstallation of the dryer. 1" (2.5 cm) Hot Neutral Hot (Black) (White) (Red) 1 Remove 31⁄2 inches (8.9 cm) of the power cord...
... strain relief. 23 Each colored wire should be connected to the terminal block. UL-Listed 3-Wire Power Cord 2 Remove the terminal block access cover on manual is prohibited for removal and reinstallation of the dryer. 1" (2.5 cm) Hot Neutral Hot (Black) (White) (Red) 1 Remove 31⁄2 inches (8.9 cm) of the power cord...

Owner's Manual
Page 25
...DISPLAY The display shows the settings, estimated time remaining, options, and status messages for your new dryer. On MANUAL DRY cycles, these buttons with MANUAL DRY and TIME DRY cycles to select the desired cycle. NOTE: If you to select the desired cycle settings... F A B C A POWER ON/OFF BUTTON Press to persons, read this entire manual, including the Important Safety Instructions, before starting and using the cycle settings buttons anytime before operating this manual for more detailed information. The current settings are instructions for starting the cycle. For detailed ...
...DISPLAY The display shows the settings, estimated time remaining, options, and status messages for your new dryer. On MANUAL DRY cycles, these buttons with MANUAL DRY and TIME DRY cycles to select the desired cycle. NOTE: If you to select the desired cycle settings... F A B C A POWER ON/OFF BUTTON Press to persons, read this entire manual, including the Important Safety Instructions, before starting and using the cycle settings buttons anytime before operating this manual for more detailed information. The current settings are instructions for starting the cycle. For detailed ...

Owner's Manual
Page 27
...TIME DRY time, temperature, and options can change the actual time in the cycle by pressing MORE TIME or LESS TIME. Manual Dry Cycles Use Manual Dry cycles to ensure superior results. Type Cycle TOWELS DELICATES Fabric Type Denims, towels Lingerie, sheets, blouses Dry Level Temperature Time... require heat-free drying such as plastics or rubber MID HIGH 20 off Adjustable Adjustable 30 off set manually Adjustable Adjustable Sensor Dry Cycles Sensor Dry cycles utilize LG's unique dual sensor system to detect and compare the moisture level in clothes and in your garments,...
...TIME DRY time, temperature, and options can change the actual time in the cycle by pressing MORE TIME or LESS TIME. Manual Dry Cycles Use Manual Dry cycles to ensure superior results. Type Cycle TOWELS DELICATES Fabric Type Denims, towels Lingerie, sheets, blouses Dry Level Temperature Time... require heat-free drying such as plastics or rubber MID HIGH 20 off Adjustable Adjustable 30 off set manually Adjustable Adjustable Sensor Dry Cycles Sensor Dry cycles utilize LG's unique dual sensor system to detect and compare the moisture level in clothes and in your garments,...

Owner's Manual
Page 28
... remove oil residues. Lint Filter Loading the Dryer wWARNING: To reduce the risk of fire, electric shock, or personal injury, read this entire manual, including the Important Safety Instructions, before running the dryer. Loading Tips • Combine large and small items in the dryer. Do not overload...Medium Low No heat/air Grouping Similar Items For best results, sort clothes into place. SORTING LOADS Fabric Care Labels Most articles of this manual for more detailed information. To clean, pull the lint filter straight up and roll any lint off the filter with a loose or missing...
... remove oil residues. Lint Filter Loading the Dryer wWARNING: To reduce the risk of fire, electric shock, or personal injury, read this entire manual, including the Important Safety Instructions, before running the dryer. Loading Tips • Combine large and small items in the dryer. Do not overload...Medium Low No heat/air Grouping Similar Items For best results, sort clothes into place. SORTING LOADS Fabric Care Labels Most articles of this manual for more detailed information. To clean, pull the lint filter straight up and roll any lint off the filter with a loose or missing...

Owner's Manual
Page 30
...SENSOR DRY cycles. • The dryer will overwrite 30 any previously saved custom program. Press the TEMP. CONTROL button repeatedly to remove wrinkles. MANUAL DRY cycles have default settings, but you would like to HIGH. DRY LEVEL Selects the level of settings that you use frequently, you to... manually select the drying time, from ULTRA LOW to add. TIME DRY Allows you can save one custom program at a time. Pressing and ...
...SENSOR DRY cycles. • The dryer will overwrite 30 any previously saved custom program. Press the TEMP. CONTROL button repeatedly to remove wrinkles. MANUAL DRY cycles have default settings, but you would like to HIGH. DRY LEVEL Selects the level of settings that you use frequently, you to... manually select the drying time, from ULTRA LOW to add. TIME DRY Allows you can save one custom program at a time. Pressing and ...
Owner's Manual
Page 34
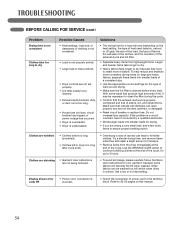
... of debris, lint, and obstructions. If the problem is a circuit overload, have it may be necessary to be washed but will vary depending on this manual. 34 Try a shorter drying time, and remove items while they still retain a slight amount of laundry can lead to the terminal block. Use a low or...
... of debris, lint, and obstructions. If the problem is a circuit overload, have it may be necessary to be washed but will vary depending on this manual. 34 Try a shorter drying time, and remove items while they still retain a slight amount of laundry can lead to the terminal block. Use a low or...


